

ULID规范解读与实现原理 - throwable
source link: https://www.cnblogs.com/throwable/p/16801110.html
Go to the source link to view the article. You can view the picture content, updated content and better typesetting reading experience. If the link is broken, please click the button below to view the snapshot at that time.
前提#
最近发现各个频道推荐了很多ULID相关文章,这里对ULID的规范文件进行解读,并且基于Java语言自行实现ULID,通过此实现过程展示ULID的底层原理。
ULID出现的背景#

ULID全称是Universally Unique Lexicographically Sortable Identifier,直译过来就是通用唯一按字典排序的标识符,它的原始仓库是https://github.com/ulid/javascript,该项目由前端开发者alizain发起,基于JavaScript语言编写。从项目中的commit历史来看已经超过了5年,理论上得到充分的实践验证。ULID出现的原因是一些开发者认为主流的UUID方案在许多场景下可能不是最优的,存在下面的原因:
UUID不是128 bit随机编码(由128 bit随机数通过编码生成字符串)的最高效实现方式UUID的v1/v2实现在许多环境中是不切实际的,因为这两个版本的的实现需要访问唯一的、稳定的MAC地址UUID的v3/v5实现需要唯一的种子,并且产生随机分布的ID,这可能会导致在许多数据结构中出现碎片UUID的v4除了随机性之外不需要提供其他信息,随机性可能会在许多数据结构中导致碎片
这里概括一下就是:UUID的v1/v2实现依赖唯一稳定MAC地址不现实,v3/v4/v5实现因为随机性产生的ID会"碎片化"。
基于此提出了ULID,它用起来像这样:
ulid() // 01ARZ3NDEKTSV4RRFFQ69G5FAV
ULID的特点如下:
- 设计为
128 bit大小,与UUID兼容 - 每毫秒生成
1.21e+24个唯一的ULID(高性能) - 按字典顺序(字母顺序)排序
- 标准编码为
26个字符的字符串,而不是像UUID那样需要36个字符 - 使用
Crockford的base32算法来提高效率和可读性(每个字符5 bit) - 不区分大小写
- 没有特殊字符串(
URL安全,不需要进行二次URL编码) - 单调排序(正确地检测并处理相同的毫秒,所谓单调性,就是毫秒数相同的情况下,能够确保新的
ULID随机部分的在最低有效位上加1位)
ULID规范#
下面的ULID规范在ULID/javascript类库中实现,此二进制格式目前没有在JavaScript中实现:
 01AN4Z07BY      79KA1307SR9X4MV3
|----------|    |----------------|
 Timestamp          Randomness
   48bits             80bits
组成#
时间戳(Timestamp)
- 占据
48 bit(high) - 本质是
UNIX-time,单位为毫秒 - 直到公元
10889年才会用完
随机数(Randomness)
- 占据
80 bit(low) - 如果可能的话,使用加密安全的随机源
排序#
"最左边"的字符必须排在最前面,"最右边"的字符排在最后(词法顺序,或者俗称的字典排序),并且所有字符必须使用默认的ASCII字符集。在相同的毫秒(时间戳)内,无法保证排序顺序。
规范的表示形式#
ULID规范的字符串表示形式如下:
ttttttttttrrrrrrrrrrrrrrrr

where
t is Timestamp (10 characters)
r is Randomness (16 characters)
- 时间戳占据高(左边)
10个(编码后的)字符 - 随机数占据低(右边)
16个(编码后的)字符
ULID规范的字符串表示形式的长度是确定的,共占据26个字符。
编码#
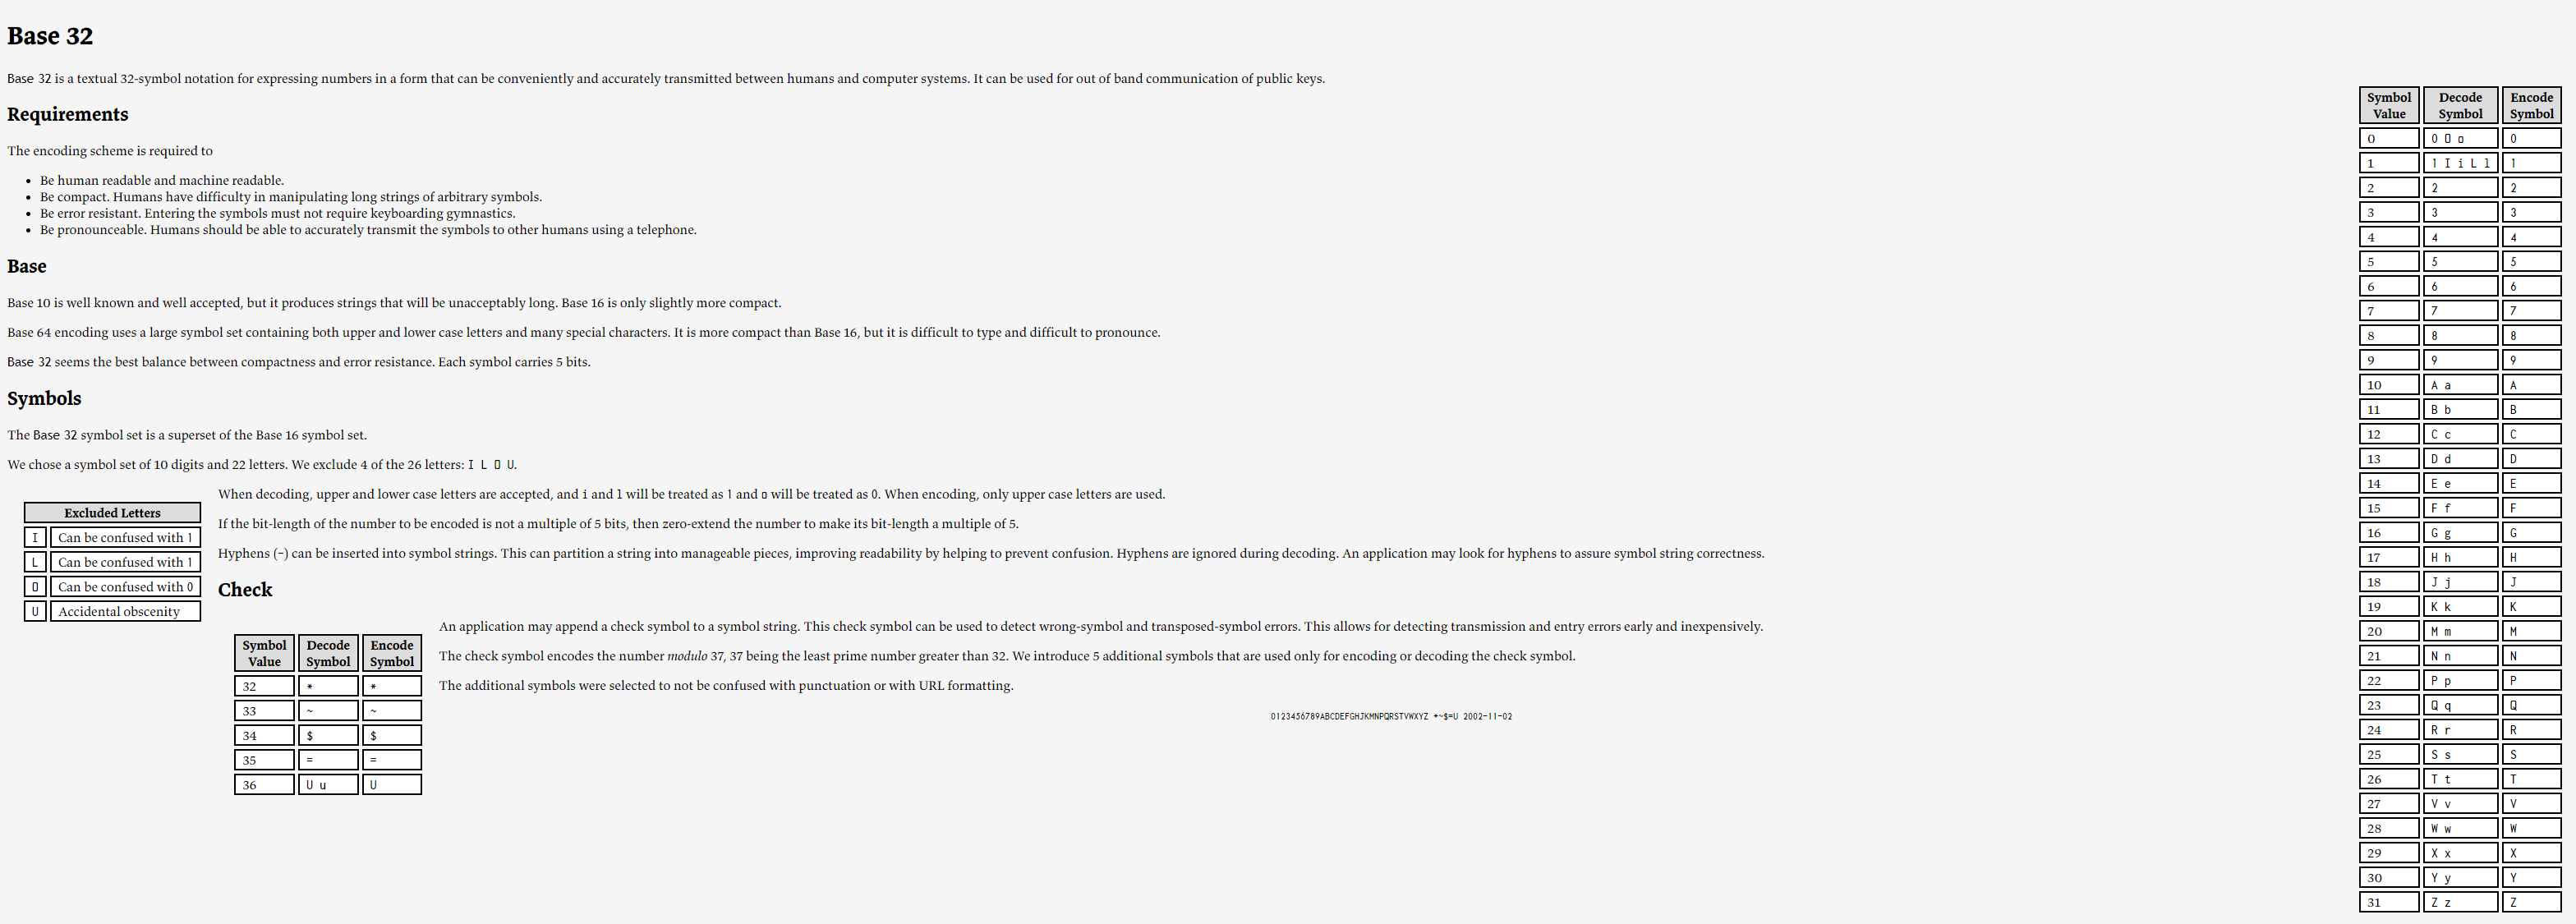
使用Crockford Base32编码算法,这个编码算法的字母表如下:
0123456789ABCDEFGHJKMNPQRSTVWXYZ
该字母表排除了I、 L、O、U字母,目的是避免混淆和滥用。此算法实现不难,它的官网有详细的算法说明(见https://www.crockford.com/base32.html):
单调性#
(如果启用了单调性这个特性为前提下)当在相同的毫秒内生成多个ULID时,可以保证排序的顺序。也就是说,如果检测到相同的毫秒,则随机分量在最低有效位上加1位(带进位)。例如:
monotonicUlid()  // 01BX5ZZKBKACTAV9WEVGEMMVRZ
monotonicUlid()  // 01BX5ZZKBKACTAV9WEVGEMMVS0
溢出错误处理#
从技术实现上来看,26个字符的Base32编码字符串可以包含130 bit信息,而ULID只包含128 bit信息,所以该编码算法是能完全满足ULID的需要。基于Base32编码能够生成的最大的合法ULID其实就是7ZZZZZZZZZZZZZZZZZZZZZZZZZ,并且使用的时间戳为epoch time的281474976710655或者说2 ^ 48 - 1。对于任何对大于此值的ULID进行解码或编码的尝试都应该被所有实现拒绝,以防止溢出错误。
二进制布局#
二进制布局的多个部分被编码为16 byte,每个部分都以最高字节优先(网络字节序,也就是big-endian)进行编码,布局如下:
0                   1                   2                   3
 0 1 2 3 4 5 6 7 8 9 0 1 2 3 4 5 6 7 8 9 0 1 2 3 4 5 6 7 8 9 0 1
+-+-+-+-+-+-+-+-+-+-+-+-+-+-+-+-+-+-+-+-+-+-+-+-+-+-+-+-+-+-+-+-+
|                      32_bit_uint_time_high                    |
+-+-+-+-+-+-+-+-+-+-+-+-+-+-+-+-+-+-+-+-+-+-+-+-+-+-+-+-+-+-+-+-+
|     16_bit_uint_time_low      |       16_bit_uint_random      |
+-+-+-+-+-+-+-+-+-+-+-+-+-+-+-+-+-+-+-+-+-+-+-+-+-+-+-+-+-+-+-+-+
|                       32_bit_uint_random                      |
+-+-+-+-+-+-+-+-+-+-+-+-+-+-+-+-+-+-+-+-+-+-+-+-+-+-+-+-+-+-+-+-+
|                       32_bit_uint_random                      |
+-+-+-+-+-+-+-+-+-+-+-+-+-+-+-+-+-+-+-+-+-+-+-+-+-+-+-+-+-+-+-+-+
ULID使用#
对于script标签引用:
<script src="https://unpkg.com/ulid@latest/dist/index.umd.js"></script>
<script>
    ULID.ulid()
</script>
NPM安装:
npm install --save ulid
TypeScript, ES6+, Babel, Webpack, Rollup等等下使用:
// import
import { ulid } from 'ulid'

ulid()

// CommonJS env
const ULID = require('ulid')

ULID.ulid()
后端Maven项目中使用需要引入依赖,这里选用ulid-creator实现:
<dependency>
  <groupId>com.github.f4b6a3</groupId>
  <artifactId>ulid-creator</artifactId>
  <version>5.0.2</version>
</dependency>
然后调用UlidCreator#getUlid()系列方法:
// 常规
Ulid ulid = UlidCreator.getUlid();

// 单调排序
Ulid ulid = UlidCreator.getMonotonicUlid();
实现ULID#
前面已经提到ULID的规范,其实具体实现ULID就是对着规范里面的每一个小节进行编码实现。先看二进制布局,由于使用128 bit去存储,可以借鉴UUID那样,使用两个long类似的成员变量存储ULID的信息,看起来像这样:
public final class ULID {

    /*
     * The most significant 64 bits of this ULID.
     *
     */
    private final long msb;

    /*
     * The least significant 64 bits of this ULID.
     *
     */
    private final long lsb;

    public ULID(long msb, long lsb) {
        this.msb = msb;
        this.lsb = lsb;
    }
}
按照ULID的组成来看,可以提供一个入参为时间戳和随机数字节数组的构造:
public ULID(long timestamp, byte[] randomness) {
    if ((timestamp & TIMESTAMP_MASK) != 0) {
        throw new IllegalArgumentException("Invalid timestamp");
    }
    if (Objects.isNull(randomness) || RANDOMNESS_BYTE_LEN != randomness.length) {
        throw new IllegalArgumentException("Invalid randomness");
    }
    long msb = 0;
    long lsb = 0;
    // 时间戳左移16位,低位补零准备填入部分随机数位,即16_bit_uint_random
    msb |= timestamp << 16;
    // randomness[0]左移0位填充到16_bit_uint_random的高8位,randomness[1]填充到16_bit_uint_random的低8位
    msb |= (long) (randomness[0x0] & 0xff) << 8;
    // randomness[1]填充到16_bit_uint_random的低8位
    msb |= randomness[0x1] & 0xff;
    // randomness[2] ~ randomness[9]填充到剩余的bit_uint_random中,要左移相应的位
    lsb |= (long) (randomness[0x2] & 0xff) << 56;
    lsb |= (long) (randomness[0x3] & 0xff) << 48;
    lsb |= (long) (randomness[0x4] & 0xff) << 40;
    lsb |= (long) (randomness[0x5] & 0xff) << 32;
    lsb |= (long) (randomness[0x6] & 0xff) << 24;
    lsb |= (long) (randomness[0x7] & 0xff) << 16;
    lsb |= (long) (randomness[0x8] & 0xff) << 8;
    lsb |= (randomness[0x9] & 0xff);
    this.msb = msb;
    this.lsb = lsb;
}
这是完全按照规范的二进制布局编写代码,可以像UUID的构造那样精简一下:
long msb = 0;
long lsb = 0;
byte[] data = new byte[16];
byte[] ts = ByteBuffer.allocate(8).putLong(0, timestamp << 16).array();
System.arraycopy(ts, 0, data, 0, 6);
System.arraycopy(randomness, 0, data, 6, 10);
for (int i = 0; i < 8; i++)
    msb = (msb << 8) | (data[i] & 0xff);
for (int i = 8; i < 16; i++)
    lsb = (lsb << 8) | (data[i] & 0xff);
接着可以简单添加下面几个方法:
public long getMostSignificantBits() {
    return this.msb;
}

public long getLeastSignificantBits() {
    return this.lsb;
}

// 静态工厂方法,由UUID实例生成ULID实例
public static ULID fromUUID(UUID uuid) {
    return new ULID(uuid.getMostSignificantBits(), uuid.getLeastSignificantBits());
}

// 实例方法,当前ULID实例转换为UUID实例
public UUID toUUID() {
    return new UUID(this.msb, this.lsb);
}
接着需要覆盖toString()方法,这是ULID的核心方法,需要通过Crockford Base32编码生成规范的字符串表示形式。由于128 bit要映射为26 char,这里可以考虑分三段进行映射,也就是48 bit时间戳映射为10 char,剩下的两部分随机数分别做40 bit到8 char的映射,加起来就是26 char:
 |----------|      |----------------|
  Timestamp     Randomness[split to 2 part]
48bit => 10char    80bit => 16char
编写方法:
/**
  * Default alphabet of ULID
  */
private static final char[] DEFAULT_ALPHABET = {'0', '1', '2', '3', '4', '5', '6', '7', '8', '9', 'A', 'B', 'C',
        'D', 'E', 'F', 'G', 'H', 'J', 'K', 'M', 'N', 'P', 'Q', 'R', 'S', 'T', 'V', 'W', 'X', 'Y', 'Z'};

/**
  * Default alphabet mask
  */
private static final int DEFAULT_ALPHABET_MASK = 0b11111;

/**
  * Character num of ULID
  */
private static final int ULID_CHAR_LEN = 0x1a;

@Override
public String toString() {
    return toCanonicalString(DEFAULT_ALPHABET);
}

public String toCanonicalString(char[] alphabet) {
    char[] chars = new char[ULID_CHAR_LEN];
    long timestamp = this.msb >> 16;
    // 第一部分随机数取msb的低16位+lsb的高24位,这里(msb & 0xffff) << 24作为第一部分随机数的高16位,所以要左移24位
    long randMost = ((this.msb & 0xffffL) << 24) | (this.lsb >>> 40);
    // 第二部分随机数取lsb的低40位,0xffffffffffL是2^40-1
    long randLeast = (this.lsb & 0xffffffffffL);
    // 接着每个部分的偏移量和DEFAULT_ALPHABET_MASK(31)做一次或运算就行,就是char[index] = alphabet[(part >> (step * index)) & 31]
    chars[0x00] = alphabet[(int) (timestamp >>> 45 & DEFAULT_ALPHABET_MASK)];
    chars[0x01] = alphabet[(int) (timestamp >>> 40 & DEFAULT_ALPHABET_MASK)];
    chars[0x02] = alphabet[(int) (timestamp >>> 35 & DEFAULT_ALPHABET_MASK)];
    chars[0x03] = alphabet[(int) (timestamp >>> 30 & DEFAULT_ALPHABET_MASK)];
    chars[0x04] = alphabet[(int) (timestamp >>> 25 & DEFAULT_ALPHABET_MASK)];
    chars[0x05] = alphabet[(int) (timestamp >>> 20 & DEFAULT_ALPHABET_MASK)];
    chars[0x06] = alphabet[(int) (timestamp >>> 15 & DEFAULT_ALPHABET_MASK)];
    chars[0x07] = alphabet[(int) (timestamp >>> 10 & DEFAULT_ALPHABET_MASK)];
    chars[0x08] = alphabet[(int) (timestamp >>> 5 & DEFAULT_ALPHABET_MASK)];
    chars[0x09] = alphabet[(int) (timestamp & DEFAULT_ALPHABET_MASK)];
    chars[0x0a] = alphabet[(int) (randMost >>> 35 & DEFAULT_ALPHABET_MASK)];
    chars[0x0b] = alphabet[(int) (randMost >>> 30 & DEFAULT_ALPHABET_MASK)];
    chars[0x0c] = alphabet[(int) (randMost >>> 25 & DEFAULT_ALPHABET_MASK)];
    chars[0x0d] = alphabet[(int) (randMost >>> 20 & DEFAULT_ALPHABET_MASK)];
    chars[0x0e] = alphabet[(int) (randMost >>> 15 & DEFAULT_ALPHABET_MASK)];
    chars[0x0f] = alphabet[(int) (randMost >>> 10 & DEFAULT_ALPHABET_MASK)];
    chars[0x10] = alphabet[(int) (randMost >>> 5 & DEFAULT_ALPHABET_MASK)];
    chars[0x11] = alphabet[(int) (randMost & DEFAULT_ALPHABET_MASK)];
    chars[0x12] = alphabet[(int) (randLeast >>> 35 & DEFAULT_ALPHABET_MASK)];
    chars[0x13] = alphabet[(int) (randLeast >>> 30 & DEFAULT_ALPHABET_MASK)];
    chars[0x14] = alphabet[(int) (randLeast >>> 25 & DEFAULT_ALPHABET_MASK)];
    chars[0x15] = alphabet[(int) (randLeast >>> 20 & DEFAULT_ALPHABET_MASK)];
    chars[0x16] = alphabet[(int) (randLeast >>> 15 & DEFAULT_ALPHABET_MASK)];
    chars[0x17] = alphabet[(int) (randLeast >>> 10 & DEFAULT_ALPHABET_MASK)];
    chars[0x18] = alphabet[(int) (randLeast >>> 5 & DEFAULT_ALPHABET_MASK)];
    chars[0x19] = alphabet[(int) (randLeast & DEFAULT_ALPHABET_MASK)];
    return new String(chars);
}
上面的方法toCanonicalString()看起来很"臃肿",但是能保证性能比较高,实现思路来自于Long#fastUUID(),也就是UUID的五段格式化方法。借鉴并且简化一下可以抽取一个toCanonicalString0()方法:
public String toCanonicalString0() {
    byte[] bytes = new byte[ULID_CHAR_LEN];
    formatUnsignedLong0(this.lsb & 0xffffffffffL, 5, bytes, 18, 8);
    formatUnsignedLong0(((this.msb & 0xffffL) << 24) | (this.lsb >>> 40), 5, bytes, 10, 8);
    formatUnsignedLong0(this.msb >> 16, 5, bytes, 0, 10);
    return new String(bytes, StandardCharsets.US_ASCII);
}

private static void formatUnsignedLong0(long val, int shift, byte[] buf, int offset, int len) {
    int charPos = offset + len;
    long radix = 1L << shift;
    long mask = radix - 1;
    do {
        buf[--charPos] = (byte) DEFAULT_ALPHABET[(int) (val & mask)];
        val >>>= shift;
    } while (charPos > offset);
}
toCanonicalString0()方法和toString()方法会得到相同的ULID格式化字符串。接着添加常用的工厂方法:
public static ULID ulid() {
    return ulid(System::currentTimeMillis, len -> {
        byte[] bytes = new byte[len];
        ThreadLocalRandom.current().nextBytes(bytes);
        return bytes;
    });
}

public static ULID ulid(Supplier<Long> timestampProvider,
                        IntFunction<byte[]> randomnessProvider) {
    return new ULID(timestampProvider.get(), randomnessProvider.apply(RANDOMNESS_BYTE_LEN));
}
默认使用ThreadLocalRandom生成随机数,如果是JDK17以上,还可以选用更高性能的新型PRNG实现,对应接口是RandomGenerator,默认实现是L32X64MixRandom。编写一个main方法运行一下:
public static void main(String[] args) {
    System.out.println(ULID.ulid());
}
// 某次执行结果
01GFGGMBFGB5WKXBN7S84ATRDG
最后实现"单调递增"的ULID构造,先提供一个"增长"方法:
/**
  * The least significant 64 bits increase overflow, 0xffffffffffffffffL + 1
  */
private static final long OVERFLOW = 0x0000000000000000L;

public ULID increment() {
    long msb = this.msb;
    long lsb = this.lsb + 1;
    if (lsb == OVERFLOW) {
        msb += 1;
    }
    return new ULID(msb, lsb);
}
其实就是低位加1,溢出后高位加1。接着添加一个静态内部子类和响应方法如下:
// 构造函数
public ULID(ULID other) {
    this.msb = other.msb;
    this.lsb = other.lsb;
}


public static byte[] defaultRandomBytes(int len) {
    byte[] bytes = new byte[len];
    ThreadLocalRandom.current().nextBytes(bytes);
    return bytes;
}

public static MonotonicULIDSpi monotonicUlid() {
    return monotonicUlid(System::currentTimeMillis, ULID::defaultRandomBytes);
}

public static MonotonicULIDSpi monotonicUlid(Supplier<Long> timestampProvider,
                                              IntFunction<byte[]> randomnessProvider) {
    return new MonotonicULID(timestampProvider, randomnessProvider, timestampProvider.get(),
            randomnessProvider.apply(RANDOMNESS_BYTE_LEN));
}

// @SPI MonotonicULID
public interface MonotonicULIDSpi {

  ULID next();
}

private static class MonotonicULID extends ULID implements MonotonicULIDSpi {

    @Serial
    private static final long serialVersionUID = -9158161806889605101L;

    private volatile ULID lastULID;

    private final Supplier<Long> timestampProvider;

    private final IntFunction<byte[]> randomnessProvider;

    public MonotonicULID(Supplier<Long> timestampProvider,
                          IntFunction<byte[]> randomnessProvider,
                          long timestamp,
                          byte[] randomness) {
        super(timestamp, randomness);
        this.timestampProvider = timestampProvider;
        this.randomnessProvider = randomnessProvider;
        this.lastULID = new ULID(timestamp, randomness);
    }

    // 这里没设计好,子类缓存了上一个节点,需要重写一下increment方法,父类可以移除此方法
    @Override
    public ULID increment() {
        long newMsb = lastULID.msb;
        long newLsb = lastULID.lsb + 1;
        if (newLsb == OVERFLOW) {
            newMsb += 1;
        }
        return new ULID(newMsb, newLsb);
    }

    @Override
    public synchronized ULID next() {
        long lastTimestamp = lastULID.getTimestamp();
        long timestamp = getTimestamp();
        // 这里做了一个恒为true的判断,后面再研读其他代码进行修改
        if (lastTimestamp >= timestamp || timestamp - lastTimestamp <= 1000) {
            this.lastULID = this.increment();
        } else {
            this.lastULID = new ULID(timestampProvider.get(), randomnessProvider.apply(RANDOMNESS_BYTE_LEN));
        }
        return new ULID(this.lastULID);
    }
}
关于上一个ULID和下一个ULID之间的时间戳判断,这里从规范文件没看出细节实现,先简单做一个永远为true的分支判断,后面再深入研究然后修改。使用方式如下:
public static void main(String[] args) {
    MonotonicULIDSpi spi = ULID.monotonicUlid();
    System.out.println(spi.next());
    System.out.println(spi.next());
    System.out.println(spi.next());
    System.out.println(spi.next());
}
// 某次运行输出
01GFGASXXQXD5ZJ26PKSCFGNPF
01GFGASXXQXD5ZJ26PKSCFGNPG
01GFGASXXQXD5ZJ26PKSCFGNPH
01GFGASXXQXD5ZJ26PKSCFGNPJ
这里为了更加灵活,没有采用全局静态属性缓存上一个ULID实例,而是简单使用继承方式实现。
ULID性能评估#
引入JMH做了一个简单的性能测试,代码如下:
@Fork(1)
@Threads(10)
@State(Scope.Benchmark)
@BenchmarkMode(Mode.Throughput)
@Warmup(iterations = 1, time = 1)
@Measurement(iterations = 5, time = 3)
@OutputTimeUnit(TimeUnit.MILLISECONDS)
public class BenchmarkRunner {

    private static ULID.MonotonicULIDSpi SPI;

    @Setup
    public void setup() {
        SPI = ULID.monotonicUlid();
    }


    @Benchmark
    public UUID createUUID() {
        return UUID.randomUUID();
    }

    @Benchmark
    public String createUUIDToString() {
        return UUID.randomUUID().toString();
    }

    @Benchmark
    public ULID createULID() {
        return ULID.ulid();
    }

    @Benchmark
    public String createULIDToString() {
        return ULID.ulid().toString();
    }

    @Benchmark
    public String createULIDToCanonicalString0() {
        return ULID.ulid().toCanonicalString0();
    }

    @Benchmark
    public ULID createMonotonicULID() {
        return SPI.next();
    }

    @Benchmark
    public String createMonotonicULIDToString() {
        return SPI.next().toString();
    }

    public static void main(String[] args) throws Exception {
        new Runner(new OptionsBuilder().build()).run();
    }
}
某次测试报告如下(开发环境Intel 6700K 4C8T 32G,使用OpenJDK-19):
Benchmark                                      Mode  Cnt       Score      Error   Units
BenchmarkRunner.createMonotonicULID           thrpt    5   18529.565 ± 3432.113  ops/ms
BenchmarkRunner.createMonotonicULIDToString   thrpt    5   12308.443 ± 1729.675  ops/ms
BenchmarkRunner.createULID                    thrpt    5  122347.702 ± 3183.734  ops/ms
BenchmarkRunner.createULIDToCanonicalString0  thrpt    5   50848.135 ± 3699.334  ops/ms
BenchmarkRunner.createULIDToString            thrpt    5   37346.891 ± 1029.809  ops/ms
BenchmarkRunner.createUUID                    thrpt    5     806.134 ±  218.622  ops/ms
BenchmarkRunner.createUUIDToString            thrpt    5     813.380 ±   46.333  ops/ms
小结#
本文就ULID的规范进行解读,通过规范和参考现有类库进行ULID的Java实现。ULID适用于一些"排序ID"生成或者需要"单调ID"生成的场景,可以考虑用于数据库键设计、顺序号设计等等场景。从实现上看它性能会优于UUID(特别是单调ULID,因为不需要重新获取随机数部分,吞吐量会提升一个数量级)。
Demo项目仓库:
framework-mesh/ulid4j:https://github.com/zjcscut/framework-mesh/tree/master/ulid4j
参考资料:
Recommend
About Joyk
Aggregate valuable and interesting links.
Joyk means Joy of geeK