

#打卡不停更#【木棉花】:运动记录Demo的自定义弹窗组件-开源基础软件社区-51CTO.COM
source link: https://ost.51cto.com/posts/18018
Go to the source link to view the article. You can view the picture content, updated content and better typesetting reading experience. If the link is broken, please click the button below to view the snapshot at that time.

#打卡不停更#【木棉花】:运动记录Demo的自定义弹窗组件 原创 精华
在参加了"HarmonyOS ArkUI入门训练营——健康生活实战"后,了解并学习了声明式UI开发框架及组件用法,本文是对笔者结营作品中的自定义弹窗组件作一个小分享。
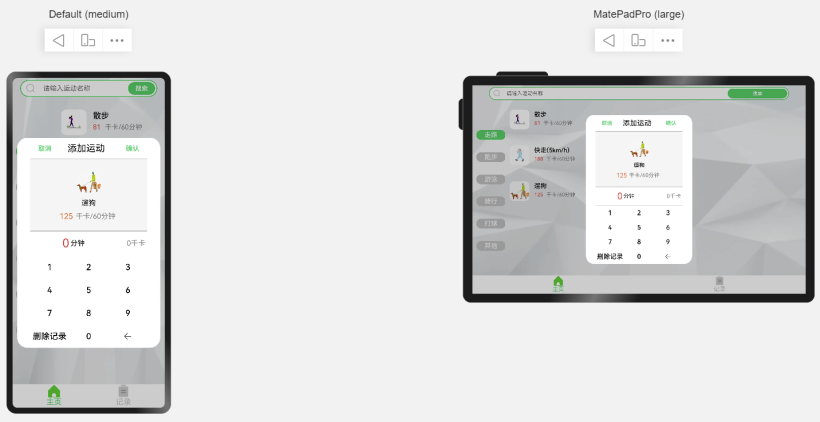
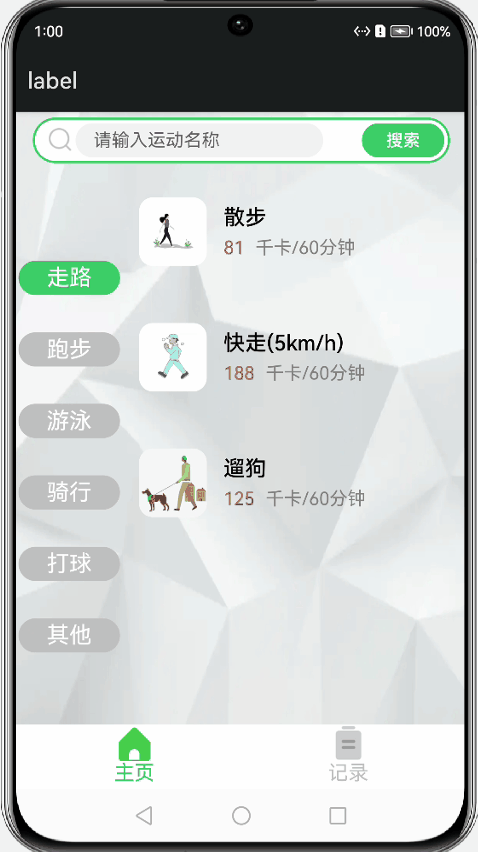
这是一个运动记录的应用,主要用于管理健康记录运动。可以添加运动信息,包括运动名称、运动时长,并自动计算消耗的卡路里,在记录页面可以查看所添加的运动记录。
自定义弹窗组件运行效果图如下:
一、总体布局设置
从效果图来对弹窗内容作布局,顶部是两个按钮“取消”“确定”和一个弹窗标题,中部是运动项的数据(包括图片、名称、单位消耗的热量、时间的输入框及自动计算得出的总值),底部是一个简易输入器(0-9的输入及删除)。三部分是纵向排布,顶部是横向布局,底部的输入器使用了栅格布局。
自定义弹窗组件要用**@CustomDialog** 修饰,我将弹窗组件命名为Record,其基本布局代码框架如下:
@CustomDialog
struct Record {
  private controller: CustomDialogController
  @State time: string = '0'
  @State sum: number = 0
  private title: string = '添加运动'
  private sportsItem: SportsData   //自定义的类

//其他定义的变量...

//运动数据项的布局
@Builder RecordItem(image: Resource, name: string, value: number) {

}

//输入器的布局
  @Builder valueInput() {

  }
//弹窗的总布局
  build() {
    Column() {
      Row() {
        Button('取消').fontSize(16).fontColor('#3ECF69').width(70).height(25).backgroundColor(Color.White)
          .onClick(() => {
                 this.controller.close()
          })
        Blank().flexGrow(1)
        Text(this.title).fontSize(22).fontWeight(400).width(100)
        Blank().flexGrow(1)
        Button('确认').fontSize(16).fontColor('#3ECF69').width(70).height(25).backgroundColor(Color.White)
          .onClick(() => {

          })
      }.width('100%').height(50)

      Divider().width('100%').vertical(false).strokeWidth(0.5)

     this.RecordItem(this.sportsItem.image, this.sportsItem.name, this.sportsItem.value)

      Divider().width('100%').vertical(false).strokeWidth(0.5)

      Row() {
        Blank().flexGrow(100)
        Row() {
          Text(this.time).fontColor('#E14843').fontSize(28).margin({ right: 3 })
          Text('分钟').fontSize(17)
        }.width(100)

        Blank().flexGrow(1)
        Text(this.sum + '千卡').fontColor(Color.Gray).fontSize(17).width(100).textAlign(TextAlign.End).padding(5)
      }.width('100%').margin({ top: 12, bottom: 12 })

      Divider().width('100%').vertical(false).strokeWidth(0.5)
      this.valueInput()   //输入器
    }.width('82%')
  }
}
二、子布局设置和点击事件的设置
由于运动数据项的数据在原demo中是根据点击的列表项,来传参显示相应的图片及名称,因此读者可以使用静态数据来调试此自定义弹窗组件。代码部分如下:
  @Builder RecordItem(image: Resource, name: string, value: number) {
    Flex({ direction: FlexDirection.Column, justifyContent: FlexAlign.Center, alignItems: ItemAlign.Center }) {
      Image(image).width(60).height(60).borderRadius(30).objectFit(ImageFit.Contain).backgroundColor('#ffffff').margin(5)
      Text(name).fontSize(17).margin(5)
      Row({ space: 6 }) {
        Text(value.toString()).fontColor('#EC7143').fontSize(19)
        Text('千卡/60分钟').fontColor(Color.Gray).fontSize(17)
      }.margin(5)
    }.height(170).backgroundColor('#F5F5F5').width('100%')
  }
对于输入器部分,由于在“添加记录”时,“删除记录”按键无响应,于是定义变量mode,区分增加记录和修改记录。
private mode: number = 0 //0:添加,1:修改
private Valueinput: any[] = ['1', '2', '3', '4', '5', '6', '7', '8', '9', '删除记录', '0', $r('app.media.Back')]
接着定义4行3列的栅格布局,用ForEach循环渲染布局,根据按键类型定义相应的点击事件。若是字符串类型且长度为1的,则为输入(即字符串拼接),定义输入范围为0-999,每次点击都调用calculate(),这是计算总值的函数,并实时显示计算结果。若按键类型是图片,则实现回删的点击事件,同样也会调用calculate()。点击“删除记录”时,会弹窗确认。代码如下:
  calculate() {
    if (this.time.length != 0) {
      this.sum = Math.round(parseInt(this.time) * this.sportsItem.value / 60)
    } else {
      this.sum = 0
    }
  }
  @Builder valueInput() {
    Column() {
      Grid() {
        ForEach(this.Valueinput, (item: any) => {
          GridItem() {
            if (typeof (item) == 'string') {
              Text(item)
                .fontSize(20)
                .fontWeight(500)
                .width('100%')
                .height('100%')
                .textAlign(TextAlign.Center)
                .onClick(() => {
                  if(item.length<2){
                    if (this.time == '0') {
                      this.time = item
                    }
                    else if (parseInt(this.time) < 999 && parseInt(this.time + item) < 999) {
                      this.time = this.time + item
                    }
                    else {
                      this.time = '999'
                    }
                    this.calculate()
                  }
                  else{
                    if(this.mode==1){
                      AlertDialog.show(
                        {
                          message: '确认删除这条运动记录吗?',
                          primaryButton: {
                            value: '取消',
                            action: () => {
                            }
                          },
                          secondaryButton: {
                            value: '确定',
                            action: () => {
			    	//删除逻辑...
                              this.controller.close()
                            }
                          },
                          cancel: () => {
                          }
                        }
                      )
                    }
                  }
                })

            } else if (typeof (item) == 'object') {
              Image(item).width(20).aspectRatio(1).objectFit(ImageFit.Contain)
                .onClick(() => {
                  if (this.time.length > 1) {
                    this.time = this.time.substring(0, this.time.length - 1)
                  }
                  else if (this.time.length == 1) {
                    this.time = '0'
                  }
                  this.calculate()
                })
            }
          }

        })
      }
      .backgroundColor(Color.White)
      .columnsTemplate('1fr 1fr 1fr')
      .rowsTemplate('1fr 1fr 1fr 1fr')
      .columnsGap(0)
      .rowsGap(0)
      .width('100%')
      .height('35%')
    }
  }
三、总体布局的点击事件及调用该自定义弹窗组件
1、确认按键的点击事件
因为涉及全局变量等其他组件的代码,因此笔者简单带过业务逻辑的实现。代码如下:
 Button('确认').fontSize(16).fontColor('#3ECF69').width(70).height(25).backgroundColor(Color.White)
          .onClick(() => {
            if (this.time == '0') {
              prompt.showToast({ message: '输入不能为零', duration: 1000 })
            }
            else {
              if (this.mode == 0) {
		//添加记录的实现代码,笔者是通过push数据进数组变量来实现的。
              }
              else if (this.mode == 1) {
                //修改(更新)记录的实现代码,笔者是对对应索引的数组值作更新来实现的。
              }
              this.controller.close()
            }
          })
      }.width('100%').height(50)
2、调用自定义弹窗组件
主要代码如下:
@Component
export struct SportsGridItem {
  private sportsItem: SportsData
  private controller: CustomDialogController

  aboutToAppear() {
    this.controller = new CustomDialogController({
      builder: Record({ sportsItem: this.sportsItem }),
      alignment: DialogAlignment.Center
    })
  }
以上就是本次的小分享啦!❀❀
更多资料请关注我们的项目 : Awesome-Harmony_木棉花
Recommend
About Joyk
Aggregate valuable and interesting links.
Joyk means Joy of geeK