

SpringBoot(二) - 核心配置文件 - 化羽羽
source link: https://www.cnblogs.com/xiaoqigui/p/16783776.html
Go to the source link to view the article. You can view the picture content, updated content and better typesetting reading experience. If the link is broken, please click the button below to view the snapshot at that time.

1、application.properties 和 application.yml 配置文件格式区别
1.1 文件格式
application.properties
# 端口号
server.port=8096
application.yml
# 服务端口
server:
  port: 8096
1.2 区别
- properties的优先级高于yml,同等配置,高优先级会覆盖低优先级,不同的配置时互补配置(增补,不管哪个配置文件中有,都可以生效);
- properties的核心语法是:通过 . 作为层级分隔符,配置值是用 = ,比如 server.port=9096
yml的核心语法是:通过层级+缩进的方式,同一给等级,缩进是相同的,配置使用key: value方式- server:
port: 8096 #注意值前面必须有空格
- server:
- 小结:yml格式配置,可以简化配置内容,层次清晰,更适合作为核心配置文件;
2、自定义配置
2.1 配置信息 yml 语法
注意:值前面必须有空格;
2.1.1 基本类型数据
user:
  userId: kh96
  user-Name: gala # 支持松散绑定
  user_age: 17
  adult: true # 是否成年
  salary: 9696.0
  userTel: 13501020304
  birthday: 2002/10/11 10:10:10
  email: [email protected]
2.1.2 数组,List,Set
user:
	hobbies:    # 爱好 list集合
        - springboot
        - linux
        - mysql
        - ssm
        - jvaweb
        - springvloud
    #行内写法
    #hobbies:[springboot,linux,mysql,ssm,jvaweb,springvloud]
2.1.3 Map
user:
	carMap:   # 爱车 map 集合
        bnm: 宝马325
        audi: 奥迪A41
        benz: 奔驰C200
    #行内写法
    #carMap:{bnm: 宝马325;audi: 奥迪A41;benz: 奔驰C200}
2.1.4 实体参数
user:
    userRole:
        role-id: R96 ${random.uuid} #${}可以去一些内置的自定义参数
        role_name: root
2.1.5 值的写法
2.1.5.1 单引号:
会转义特殊字符。
user:
	msg: '你好!\n小可爱!'
你好!\n小可爱!
2.1.5.2 双引号:
不会转义字符里的特殊字符,特殊字符仍然是本身的意思
user:
	msg: "你好!\n小可爱!"
你好!
小可爱!
2.2 获取 配置信息
2.2.1 批量自动读取
使用注解@ConfigurationProperties(prefix = "xxx") ,必须配合@Component 注解获取在核心启动类上使用 @EnableConfigurationProperties(配置属性读取类.class)使用;
特点:支持松散绑定(可以自动识别驼峰,-,_),支持复杂类型绑定(实体,集合-list,set,array,map等),支持数据格式校验;
@Component + @ConfigurationProperties(prefix = "user")

或

@Component
+
@EnableConfigurationProperties(UserProperties.class) //写在主启动类上
2.2.1.1 UserProperties
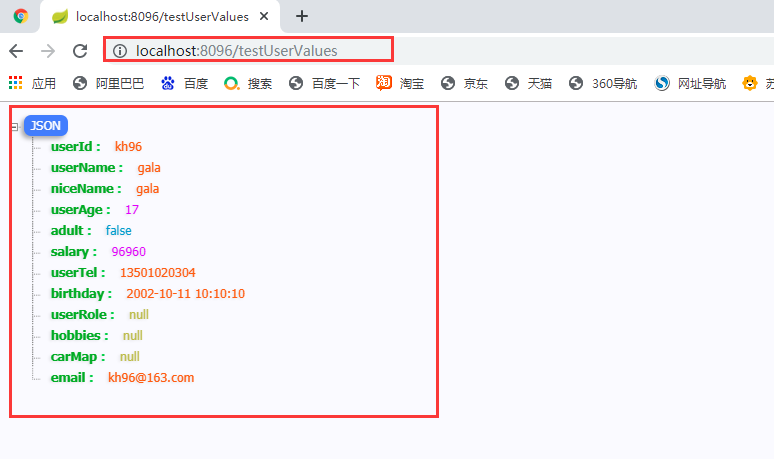
@Data
@Component //第一个写法,使用普通组件
@ConfigurationProperties(prefix = "user")  //不能单独使用,必须配合@EnableConfigurationProperties 或指定为spring容器中的普通组件
public class UserProperties {

    //用户编号
    private String userId;

    //用户名
    private String userName;

    //用户年龄
    private Integer userAge;

    //是否成年
    private boolean adult;

    //工资
    private  double salary;

    //联系方式
    private String userTel;

    //生日
    @JsonFormat(pattern = "yyyy-MM-dd HH:mm:ss",timezone = "GMT+8") //springMVC将将数据转成json格式,时间格式规则
    private Date birthday;

    //用户角色
    private UserRole userRole; //实体参数

    //爱好
    private List<String> hobbies;

    //爱车
    private Map<String,String> carMap;

    //邮箱
    @Email //邮箱格式校验
    private String email;

}
2.2.1.1.2 运行结果:

2.2.2 单个手动读取
用法:使用注解@Value("${xxx.xxx}");
特点:写法灵活,可以指定默认值等,但是不支持松散绑定,单个读取的配置要求指定的读取属性key必须和自定义配置一直,否者报错;
@Component + @ConfigurationProperties(prefix = "user")
2.2.2.1 UserProperties
@Data
@Component
@PropertySource(value = "classpath:user.properties")
//@EnableConfigurationProperties(UserProperties.class) //第二种方式,核心启动类上,增加指定开启自动配置读取,但是一般不怎么使用,且容易忘记
public class UserProperties {

    //用户编号
    @Value("${user.userId}")
    private String userId;

    //用户名
    @Value("${user.user-Name}")
    private String userName;

    //昵称
	@Value("#{userValues.userName}") //获取的是容器中已有的实体的值
	//@Value("#{'xiaoming'}") //可以赋默认值
    private String niceName;

    //用户年龄
        @Value("${user.user_age}")
//    @Value("16") //直接赋值
    private Integer userAge;

    //是否成年
    @Value("#{(${user.user_age}>17)?true:false}") //spel 表达式
    private boolean adult;

    //工资
    @Value("#{${user.salary}*10}")  //#{} 和 ${}套用
    private  double salary;

    //联系方式
    @Value("${user.userTel}")
    private String userTel;

    //生日
    @JsonFormat(pattern = "yyyy-MM-dd HH:mm:ss",timezone = "GMT+8") //springMVC将将数据转成json格式,时间格式规则
    @Value("${user.birthday}")
    private Date birthday;

    //用户角色
    //@Value("${user.userRole}")  //不可以单个手动获取石参数
    private UserRole userRole; //实体参数

    //爱好
    //@Value("${user.hobbies}") //不可以单个手动获取复杂参数
    private List<String> hobbies;

    //爱车
    //@Value("${user.carMap}")
    private Map<String,String> carMap;

    //邮箱
    @Email //邮箱格式校验
    @Value("${user.email:[email protected]}") //添加默认值,配置信息没有就使用默认值
    private String email;

}
2.2.2.2运行结果:
2.2.3 ${} 和 #{} 的区别
- ${}:用于读取核心配置文件中的自定义配置,也可以给属性指定默认值 (${xxx.xx:default值});
- #{}:不可以读取核心配置文件中的自定义配置,可以给属性发指定默认值#{default值} (可以使用表达式),还可以读取容器中已用实体的属性值;
- 两种读取自定义配置的方式,是可以混用的,但是实际开发中,尽量使用其中一种,,一般都是少量配置,单个读取,多个读取,使用批量读取;
3、自定义配置文件并获取配置信息
3.1xxx.properties
3.1.1 student.properties
student.studentId=19130010
student.studentName=huayu
student.studentClass=计算机科学与技术(2)
student.graduationSchool=金陵科技学院
student.graduationTime=2023/7/1 12:12:12
student.nativePlace=南京
student.hasGirFriends=true
3.1.2 StudentProperties.java
@Data
@Component
@ConfigurationProperties(prefix = "student")
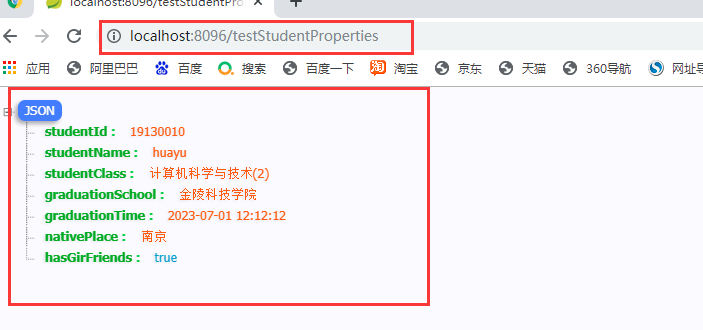
public class StudentProperties {
// 学号
private String studentId;
// 姓名
private String studentName;
// 班级
private String studentClass;
// 毕业院校
private String graduationSchool;
// 毕业时间
@JsonFormat(pattern = "yyyy-MM-dd HH:mm:ss",timezone = "GMT+8")
private Date graduationTime;
// 籍贯
private String nativePlace;
// 有没有女朋友
private boolean hasGirFriends;
}
3.1.3 StudentValues.java
@Data
@Component //第一个写法,使用普通组件
@PropertySource(value = "classpath:student.properties")//单个从student.properties 中获取参数
public class StudentValues {

    // 学号
    @Value("${student.studentId}")
    private String studentId;

    // 姓名
    @Value("${student.studentName}")
    private String studentName;

    // 班级
    @Value("${student.studentClass}")
    private String studentClass;

    // 毕业院校
    @Value("${student.graduationSchool}")
    private String graduationSchool;

    // 毕业时间
    @JsonFormat(pattern = "yyyy-MM-dd HH:mm:ss",timezone = "GMT+8")
    @Value("${student.graduationTime}")
    private Date graduationTime;

    // 籍贯
    @Value("${student.nativePlace}")
    private String nativePlace;

    // 有没有女朋友
    @Value("${student.hasGirFriends}")
    private boolean hasGirFriends;

}
3.2 xxx.yml
3.2.1 student.yml
student:
  studentId: 19130010
  studentName: huayu
  studentClass: 计算机科学与技术(2)
  graduationSchool: 金陵科技学院
  graduationTime: 2023/7/1 12:12:12
  nativePlace: 南京
  hasGirFriends: true
3.2.2 StudentProperties.java
@Data
@Component
@ConfigurationProperties(prefix = "student")
@PropertySource(value = "classpath:student.yml",encoding = "utf-8",factory = YamlPropertySourceFactory.class) //从自定义的 student.yml 中获取
public class StudentProperties {

......

}
3.2.3 StudentValues.java
@Data
@Component
@PropertySource(value = "classpath:my.yml", factory = YamlPropertySourceFactory.class) //从自定义的 student.yml 中获取
public class StudentValues {

......

}
3.2.4 YamlPropertySourceFactory.java yml配置映射类
@PropertySource读取不能直接自定义yaml配置文件,需要自定义一个继承 PropertySourceFactory 的 YamlPropertySourceFactory 编写配置映射类
public class YamlPropertySourceFactory implements PropertySourceFactory {
    @Override
    public PropertySource<?> createPropertySource(String name, EncodedResource encodedResource) {

        Resource resource = encodedResource.getResource();

        YamlPropertiesFactoryBean factory = new YamlPropertiesFactoryBean();
        factory.setResources(resource);

        Properties props = factory.getObject();

        return new PropertiesPropertySource(resource.getFilename(), props);
    }
}
3.3 测试
3.3.1 testStudentProperties
3.3.2 testStudentValues

4、*@Configuration配置类的用法,可以实现自定义组件加入容器
4.1 实体
@Data
@Builder
@AllArgsConstructor
@NoArgsConstructor
public class UserRole {
    //角色
    private String roleId;
    //角色名称
    private String roleName;
}
4.2 UserRoleConfig 配置类
@Configuration //凡是被此注解修饰的类,就是一个配置类,在项目启动是,自动加载,功能跟spring的核心配置文件xml文件是同等的
public class UserRoleConfig {

    //手动添加自定义对象,放入容器中以前spring框架,通过xml配置文件,添加<bean id="xx" class="xx">...</bran>
    @Bean //标注的方法,会自动将当前方法返回的实例对象放入容器中,默认的bean的id值就是方法名
    public UserRole userRole1(){
        return UserRole.builder()
                .roleId("R001")
                .roleName("admin")
                .build();
    }

    @Bean
    public UserRole userRole2(){
        return UserRole.builder()
                .roleId("R002")
                .roleName("admin")
                .build();
    }

}
4.3 测试类
@RestController
public class SpringBootConfigController {

    @Autowired
    @Qualifier("userRole2")
    UserRole userRole;

    //可以实现自定义实体加入容器
    @GetMapping("/testUserRole")
    public UserRole testUserRole(){
        return userRole;
    }

}
运行结果:

5、激活环境
5.1 多套环境配置文件
激活环境 (实际开发中,主要有三个环境:开发环境,测试环境,生产环境(线上环境),还有一个环境,灰度环境,也是线上环境,叫预上限环境);
好处:可以隔离不同环境的不同配置,需要使用哪个环境,就直接切换核心配置文件;
application-devp.properties
application-prod.properties
application-test.properties
5.2 激活环境
active: test # 指定当前的profiles值,环境是什么是通过核心配置文件名中,application-${profiles},profiles写的是什么就是什么环境;
spring:
  profiles:
    active: test  #激活测试环境
6、核心配置文件加载位置
优先级从高到底依次为:
    项目根路径下的config目录
    项目根路径下
    类路径(resource)下的
    类路径(resource)下
注意:模块项目的 项目根路径 是 父项目的根路径;

7、邮件发送 和 短信测试发送
7.1 邮件发送
7.1.1 依赖
<!--   spring-boot-starter-mail start  -->
<dependency>
    <groupId>org.springframework.boot</groupId>
    <artifactId>spring-boot-starter-mail</artifactId>
</dependency>
<!--   spring-boot-starter-mail end  -->
7.1.2 邮件配置信息
7.1.3 类里面写配置信息
配置信息直接写在 对象里面;
@GetMapping("/sendEmail")
public String sendEmail(@RequestParam(value = "setToEmail",required = false) String setToEmail){

    System.out.println("--------------[mail/mailSend] start------------------");
    try {

        MimeMessage message=javaMailSender.createMimeMessage();
        MimeMessageHelper helper=new MimeMessageHelper(message,true);
        helper.setFrom("[email protected]","2663092414");
        helper.setTo(setToEmail);
        helper.setSubject("KH-96-王松—核心配置文件读取");
        helper.setText("正在使用SpringBoot读取自定义核心配置,发送邮件成功!<br/>"+studentProperties.toString(),true);
        javaMailSender.send(message);
    } catch (Exception e) {
        System.out.println("邮件发送失败"+ e.getMessage());
        e.printStackTrace();
    }
    System.out.println("--------------[mail/mailSend] end------------------");

    return studentProperties.toString();
}

//实例化javaMailSender 并写入配置信息
private static JavaMailSenderImpl javaMailSender;
static {
    javaMailSender = new JavaMailSenderImpl();
    javaMailSender.setHost("smtp.qq.com");//链接服务器
    //javaMailSender.setPort(25);//默认使用25端口发送
    javaMailSender.setUsername("[email protected]");//账号
    javaMailSender.setPassword("dwxlbkrmdyagebhe");//授权码
    javaMailSender.setDefaultEncoding("UTF-8");

    Properties properties = new Properties();
    //properties.setProperty("mail.debug", "true");//启用调试
    //properties.setProperty("mail.smtp.timeout", "1000");//设置链接超时
    //设置通过ssl协议使用465端口发送、使用默认端口(25)时下面三行不需要
    properties.setProperty("mail.smtp.auth", "true");//开启认证
    properties.setProperty("mail.smtp.socketFactory.port", "465");//设置ssl端口
    properties.setProperty("mail.smtp.socketFactory.class", "javax.net.ssl.SSLSocketFactory");

    javaMailSender.setJavaMailProperties(properties);
}
7.1.4 application.yaml中写配置信息
7.1.4.1 application.yaml
spring:
  mail:
    default-encoding: UTF-8
    host: smtp.qq.com
    port: 587
    username: [email protected]
    password: 授权码
7.1.4.2 请求方法
@GetMapping("/sendEmail2")
public String sendEmail2(@RequestParam(value = "setToEmail",required = false) String setToEmail){

    SimpleMailMessage mailMessage = new SimpleMailMessage();
    mailMessage.setFrom("[email protected]"); //发送邮箱
    mailMessage.setTo("[email protected]"); //目标邮箱
    mailMessage.setText("你好 hello world");
    mailMessage.setSubject("测试 Springboot 邮箱服务");
    mailSender.send(mailMessage);

    return "====完成发送!====";
}
7.2 短信测试发送
7.2.1 依赖
<!-- SMS star -->
<dependency>
    <groupId>com.aliyun</groupId>
    <artifactId>dysmsapi20170525</artifactId>
    <version>2.0.9</version>
</dependency>

<dependency>
    <groupId>com.aliyun</groupId>
    <artifactId>tea</artifactId>
    <version>1.1.14</version>
</dependency>
<!-- SMS end -->
7.2.2 代码
其中:accessKeyId ,accessKeySecret 填写自己的用户 AccessKey,最好用子用户 AccessKey;
public class Sample {
    /**
     * 使用AK&SK初始化账号Client
     *
     * @param accessKeyId
     * @param accessKeySecret
     * @return Client
     * @throws Exception
     */
    public static com.aliyun.dysmsapi20170525.Client createClient(String accessKeyId, String accessKeySecret) throws Exception {
        com.aliyun.teaopenapi.models.Config config = new com.aliyun.teaopenapi.models.Config()
                // 您的 AccessKey ID
                .setAccessKeyId(accessKeyId)
                // 您的 AccessKey Secret
                .setAccessKeySecret(accessKeySecret);
        // 访问的域名
        config.endpoint = "dysmsapi.aliyuncs.com";
        return new com.aliyun.dysmsapi20170525.Client(config);
    }

    public static void main(String[] args_) throws Exception {
        java.util.List<String> args = java.util.Arrays.asList(args_);
        com.aliyun.dysmsapi20170525.Client client = Sample.createClient("accessKeyId", "accessKeySecret");  //accessKeyId ,accessKeySecret 填写自己的用户信息

        com.aliyun.dysmsapi20170525.models.SendSmsRequest sendSmsRequest = new com.aliyun.dysmsapi20170525.models.SendSmsRequest()
                .setSignName("阿里云短信测试")
                .setTemplateCode("SMS_154950909")
                .setPhoneNumbers("发送短信的手机号")
                .setTemplateParam("{\"code\":\"131313\"}");
        com.aliyun.teautil.models.RuntimeOptions runtime = new com.aliyun.teautil.models.RuntimeOptions();
        try {
            // 复制代码运行请自行打印 API 的返回值
            SendSmsResponse sendSmsResponse = client.sendSmsWithOptions(sendSmsRequest, runtime);
        } catch (TeaException error) {
            // 如有需要,请打印 error
            String errerMsg = Common.assertAsString(error.message);
        } catch (Exception _error) {
            TeaException error = new TeaException(_error.getMessage(), _error);
            // 如有需要,请打印 error
            String errorMsg = Common.assertAsString(error.message);
        }
    }
}
Recommend
About Joyk
Aggregate valuable and interesting links.
Joyk means Joy of geeK