
OpenHarmony - 基于ArkUI(JS)实现移动粒子效果背景
source link: https://www.51cto.com/article/719180.html
Go to the source link to view the article. You can view the picture content, updated content and better typesetting reading experience. If the link is broken, please click the button below to view the snapshot at that time.

OpenHarmony - 基于ArkUI(JS)实现移动粒子效果背景

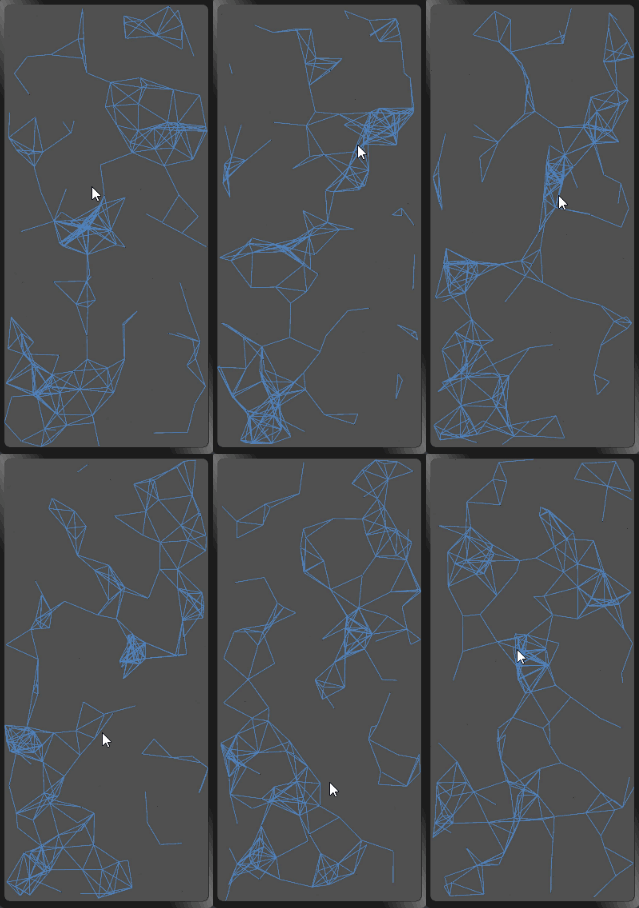
在web端博客逛多了,偶然间发现了一种网页背景,线条能自发的运动,并且可以让这些线条向鼠标聚集,就觉得挺有意思的,让我们来试着用鸿蒙JS来实现这个炫酷的背景吧!

1、创建canvas标签
设置画布的大小,背景颜色,以及触摸事件。
<div class="container">
    <canvas ref="canvas1" style="width: 100%; height: 100%; background-color: rgb(80, 80, 80);" @touchmove="handleMove"></canvas>
</div>
2、创建粒子
中学我们就知道,两点成线。页面中的这些线条其实都是点与点之间的连线,粒子运动,就造成了线条的运动,所以我们第一步先用数组来存储页面中的这些粒子。x和y代表粒子的坐标位置,xa和ya分别代表粒子水平方向和垂直方向运动的速度,max代表粒子成线的最小距离条件。
export default {
    data: {
        dots: [], // 存储粒子对象的数组
    },
    // 创建粒子,并存储到数组中
    drawBackground() {
        // 创建粒子,并存储到数组中
        for (let i=0; i<180; i++) {
            // 粒子的位置
            let x = Math.random() * 360
            let y = Math.random() * 780
            // 水平移动的速度,垂直移动的速度
            let xa = Math.random() * 0.5
            let ya = Math.random() * 0.5
            this.dots.push({ x, y, xa, ya, max: 3600 })
        }
    },
}
3、手指触摸事件
web端的效果是跟随鼠标的移动,移动端没有鼠标,那我们就让粒子向手指移动的地方靠近。用手指触摸事件来模拟鼠标移动事件。
x代表手指触摸屏幕的横坐标,y代表手指触摸屏幕的纵坐标,max代表粒子向手指触摸屏幕位置靠近的最小距离条件。
handleMove事件的作用,手指触摸屏幕时更新手指的坐标位置。
export default {
    data: {
        mouse: { // 手指位置
            x: null,
            y: null,
            max: 3200
        }
    },
    handleMove(e) {
        this.mouse.x = e.touches[0].localX
        this.mouse.y = e.touches[0].localY
    }
}
4、粒子的运动
前面我们已经准备好的粒子对象数组dots和模拟鼠标的手指对象,现在正戏要开始了。我们设定一个函数,接收canvas上下文对象,用来规定粒子的运动,并且画出粒子之间的线条。
我们创建一个新的数组nDots,用来存储手指对象和所有的粒子对象,接着遍历所有的粒子,规定粒子的运动。
当粒子运动到画布的边界时,我们要做边界处理,让粒子向反方向运动。
用上下文对象绘制粒子,为了让线条连线处不突兀,把粒子颜色也设置为背景颜色。
接着开始遍历nDots数组,若遍历到的是同一个粒子,则直接进入下一次循环。用勾股定理算出粒子之间的距离dDistance,当dDistance小于粒子间连线的最小距离时,绘制粒子间的线条;如果是手指对象,当dDistance小于向手指位置靠近的最小距离时,粒子向手指触摸位置靠近。
最后,我们删除比较过的粒子对象。
draw(ctx) {
    const self = this;
    // 清空整个画布
    ctx.clearRect(0, 0, 360, 780);
    // 粒子和鼠标的结合,把鼠标数组添加到粒子数组中
    const nDots = [this.mouse, ...this.dots];
    // 粒子运动
    this.dots.forEach(function (dot) {
        dot.x += dot.xa;
        dot.y += dot.ya;
        // 粒子运动的边界(画布),反弹
        dot.xa *= (dot.x > 360 || dot.x < 0) ? -1 : 1;
        dot.ya *= (dot.y > 780 || dot.y < 0) ? -1 : 1;
        // 绘制粒子
        ctx.fillRect(dot.x, dot.y, 1, 1);
        ctx.fillStyle = "#282828";
        // 连线
        for (let i=0; i<nDots.length; i++) {
            let d = nDots[i];
            if(d == dot) {
                continue;
            }
            // 计算粒子的距离
            let dx = dot.x - d.x;
            let dy = dot.y - d.y;
            let dDistance = Math.pow(dx, 2) + Math.pow(dy, 2);
            // 连线操作
            if (dDistance < d.max) {
                // 处理触摸事件
                if (d == self.mouse && dDistance > d.max / 2) {
                    dot.x -= dx * 0.03;
                    dot.y -= dy * 0.03;
                }
                // 绘制线条
                ctx.beginPath();
                ctx.lineWidth = 0.7;
                ctx.strokeStyle = 'rgba(80, 130, 189, 0.9)';
                // 起始位置
                ctx.moveTo(dot.x, dot.y);
                // 结束位置
                ctx.lineTo(d.x, d.y);
                ctx.stroke();
                ctx.closePath();
            }
        }
        // 删除比较过的粒子
        nDots.splice(nDots.indexOf(dot), 1);
    })
},
5、展示背景
最后,我们看看有没有生效,在onShow方法中调用drawBackground方法,点亮背景。
export default {
    onShow() {
        this.drawBackground();
    },
    drawBackground() {
        // 创建粒子,并存储到数组中
        for (let i=0; i<180; i++) {
            // 粒子的位置
            let x = Math.random() * 360;
            let y = Math.random() * 780;

            // 水平移动的速度,垂直移动的速度
            let xa = Math.random() * 0.5;
            let ya = Math.random() * 0.5;

            this.dots.push({ x, y, xa, ya, max: 3600 }); // 两个粒子相吸的最小距离
        }
        const can = this.$refs.canvas1;
        const ctx = can.getContext('2d');
        setInterval(() => {
            this.draw(ctx);
        }, 1000 / 60);
    }
}- 处理粒子向手指对象运动时,为了让速度不会太快,增加条件dDistance > d.max / 2。
- 当粒子运动边界时,需要给粒子一个反方向的速度。
- 在onInit生命周期中无法拿到canvas的dom,需要在onShow方法中获取。
- 粒子运动的速度看起来不太柔和,需要调试下参数。
Recommend
About Joyk
Aggregate valuable and interesting links.
Joyk means Joy of geeK