

Sophos UTM利用分析——导出配置文件
source link: https://3gstudent.github.io/Sophos-UTM%E5%88%A9%E7%94%A8%E5%88%86%E6%9E%90-%E5%AF%BC%E5%87%BA%E9%85%8D%E7%BD%AE%E6%96%87%E4%BB%B6
Go to the source link to view the article. You can view the picture content, updated content and better typesetting reading experience. If the link is broken, please click the button below to view the snapshot at that time.

Sophos UTM利用分析——导出配置文件
27 May 2022
0x00 前言
对于Sophos UTM设备,介绍利用方法的资料很少,本文将要介绍从零研究导出配置文件的过程,记录细节,开源利用脚本。
0x01 简介
本文将要介绍以下内容:
- Sophos UTM测试环境搭建
- 导出配置文件的研究过程
0x02 Sophos UTM测试环境搭建
1.下载镜像
下载页面:https://www.sophos.com/en-us/support/downloads/utm-downloads
这里选择版本9.711-5.1,分别有以下两个镜像文件:
- ssi-9.711-5.1.iso,需要在Sophos设备上安装,如果直接在VM中安装,会提示
"No appliance hardware has been detected" on appliance hardware - asg-9.711-5.1.iso,可在VM中安装
测试环境使用VMware搭建,所以下载asg-9.711-5.1.iso
2.安装镜像
配置好后等待系统重启,访问配置页面:https://<ip>:4444/
设置admin account password,作为登录配置页面的用户名和口令
需要填入License
4.开启ssh登录
进入配置页面后,依次选择Management->System Settings->Shell Access,分别设置root用户和loginuser用户的口令
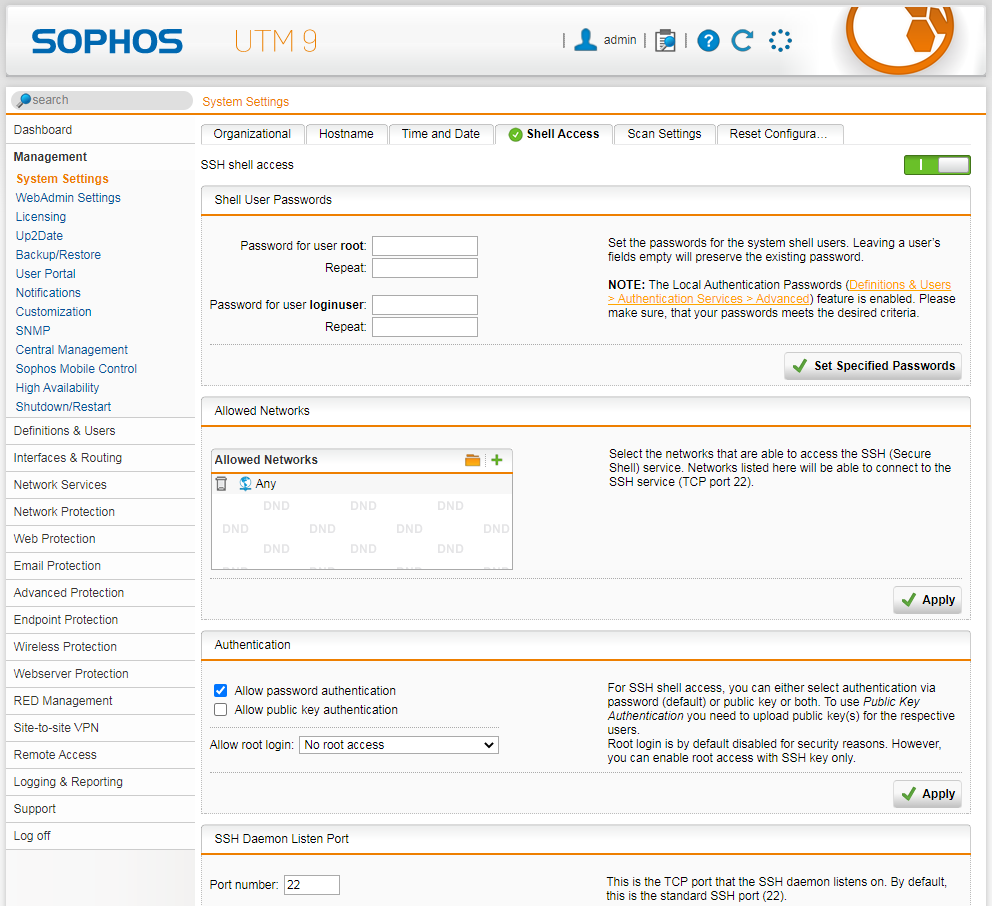
5.允许root用户口令登录ssh
sed -i "s/PermitRootLogin no/PermitRootLogin yes /g" /etc/ssh/sshd_config
/var/mdw/scripts/sshd restart
0x03 导出配置文件的研究过程
1.查询postgresql数据库
配置文件的位置:/var/storage/pgsql92/data/postgresql.conf
默认配置下,连接数据库不需要口令
连接命令:
psql -h localhost -U postgres
数据库内容如下图
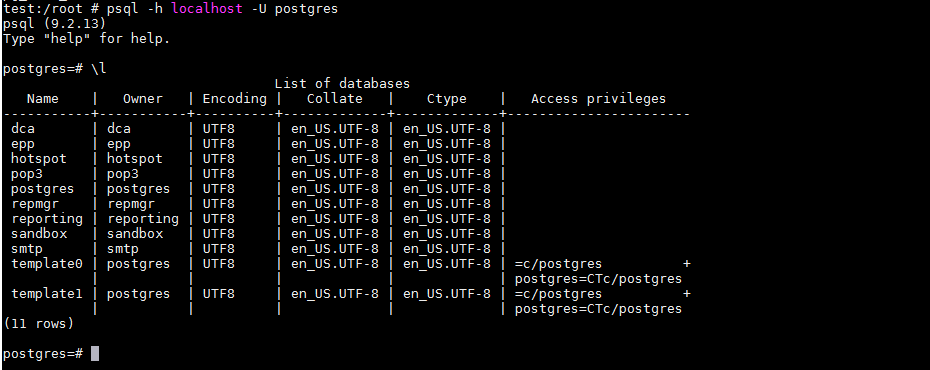
但我在数据库中没有找到配置信息
2.查询文档获得查看配置的思路
依次执行以下命令:
cc
webadmin
port$
获得了webadmin的port信息,如下图
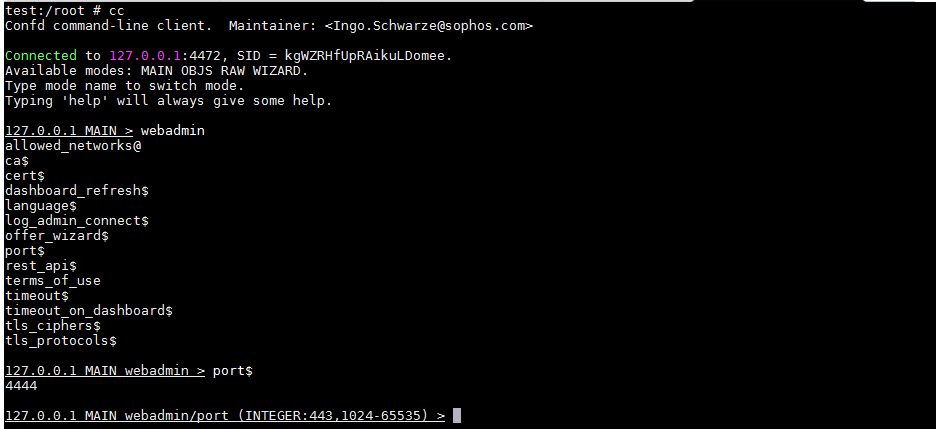
从输出内容上,发现cc命令连接了127.0.0.1的4472端口,接下来打算从端口入手
3.定位同4472端口相关的进程
获得4472端口对应的进程pid:
netstat -ltp | grep 4472
返回内容如下图

从返回内容可以看到对应的进程pid为4407
4.查看pid 4407的进程信息
依次执行以下命令:
cd /proc/4407/cwd
ls
返回内容如下图

从返回内容获得以下信息:
- 目录为
/var/confd - 配置文件为config.pm
- 主程序为confd.plx,无法直接查看源代码
5.反编译confd.plx
| 经过搜索,在[《网络设备分析实战 | Sophos UTM固件反编译Perl源码》](https://mp.weixin.qq.com/s?__biz=MzkyNTEwMTUzMA==&mid=2247489287&idx=1&sn=3f137422a266c5414b13d3f2361534e5&source=41#wechat_redirect)获得提示: .plx文件是由PerlAPP工具编译而来,可通过动态调试的方法使用IDA反编译出源码 |
经过搜索,在《Sophos UTM Preauth RCE: A Deep Dive into CVE-2020-25223》获得更为简单的反编译方法:通过Python实现静态反编译
参照《Sophos UTM Preauth RCE: A Deep Dive into CVE-2020-25223》中的方法在反编译confd.plx的过程中,会遇到bug,我们需要修改《Sophos UTM Preauth RCE: A Deep Dive into CVE-2020-25223》中提到的bfs_extract.py
整合yank.py和bfs.py,修复bfs_extract.py中的bug,完整的代码已上传至github,地址如下:
https://github.com/3gstudent/Homework-of-Python/blob/master/SophosUTM_plxDecrypter.py
使用SophosUTM_plxDecrypter.py能够获得confd.plx的反编译代码
6.代码分析
经过分析,得知Export-confd.plx\confd.pl为主要功能,在代码中发现配置文件的位置为$config::storage_dir/cfg
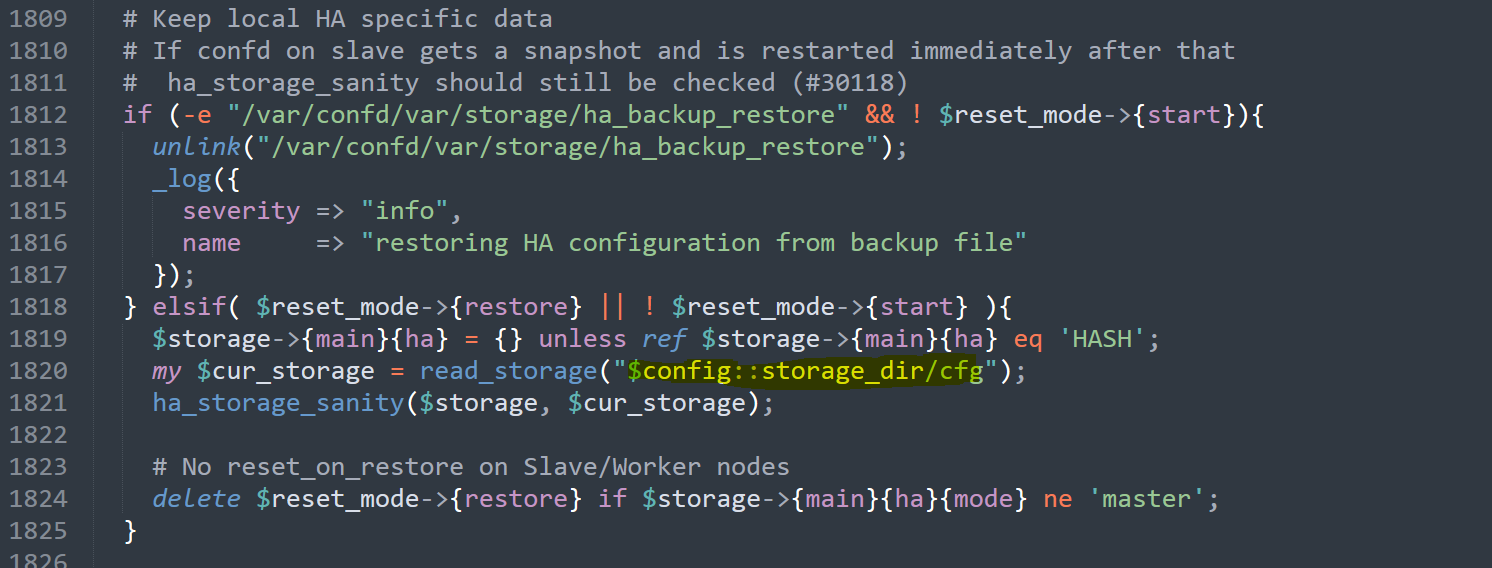
对应的绝对路径为/var/confd/var/storage/cfg
7.文件格式分析
查看cfg的文件格式:
file /var/confd/var/storage/cfg
返回结果:
/var/confd/var/storage/cfg: perl Storable (v0.7) data (major 2) (minor 7)
得知格式为perl Storable data,这是Perl经过序列化(Perl中称为冻结)生成的二进制数据
8.文件格式解析
(1)文件提取
这里可以使用Python的storable模块提取数据
安装storable模块:
pip install storable
简单使用:
from storable import retrieve
data = retrieve('cfg')
print(data)
输出结果为json数据
(2)文件分析
为了便于分析json数据,这里使用Sublime Text的pretty json插件,安装方法如下:
在Sublime text中依次选择Tools -> Command Palette...,打开面板,输入pci,选中PackageControl: Install Package,在弹出的输出框中填入pretty json
设置调用pretty json插件的快捷键为ctrl+alt+j:
在Sublime Text中依次选择Preferences -> Key Bindings,在弹出的右侧窗口添加如下内容:
[
    { "keys": ["ctrl+alt+j"], "command": "pretty_json" },
]
在使用pretty json解析json时会提示格式错误,按照提示逐个修复即可
最终显示的格式如下图

9.数据提取
为了提高效率,这里可以使用Python提取出关键数据,开发细节如下:
(1)提取用户信息
通过分析json文件,发现data['exclusive'][b'email_user']['u2v']中的key为每个用户信息的标志,例如user: REF_AaaUseVpn1
再通过对应标志位置的键值能够获取用户的完整信息,位置为data['objects'][<flag>]['data'],对应例子的位置为data['objects']['REF_AaaUseVpn1']['data']
实现代码:
def GetUserDataFull(file):
    data = retrieve(file)
    print("[*] Try to get the full data of user")
    for key, value in data['exclusive'][b'email_user']['u2v'].items():
        index = key.rfind(":")
        indexobject = data['objects'][key[index+1:]]['data']
        print("[+] " + data['objects'][key[index+1:]]['data']['name'])
        for key1, value1 in indexobject.items():
            print("    " + str(key1) + ": " + str(value1))
(2)提取网络配置信息
通过分析json文件,发现data['index']['network']中的value为每个网络配置的标志,例如REF_DefaultInternalNetwork
再通过对应标志位置的键值读取完整信息,位置为data['objects'][<flag>]['data'],对应例子的位置为data['objects']['REF_DefaultInternalNetwork']['data']
实现代码:
def GetNetworkConfig(file):
    data = retrieve(file)
    print("[*] Try to get the config of network")
    for key, value in data['index']['network'].items():
        print("[+] " + str(key))
        for objectvalue in value:
            print("  - " + objectvalue)
            for key1, value1 in data['objects'][objectvalue]['data'].items():
                print("    " + str(key1) + ": " + str(value1))
(3)提取LastChange信息
位置:data['lastchange']
需要注意时间格式,默认为数字形式,例如1652930086,需要进行转换
实现代码:
def GetLastChange(file):
    data = retrieve(file)
    print("[*] Try to get the data of LastChange")
    print("")
    for key, value in data['lastchange'].items():
        print("[+] " + str(key))
        for key1, value1 in value.items():
            if str(key1) == "time":
                print("    time: "+str(datetime.fromtimestamp(value['time'])))
            else:
                print("    " + str(key1) + ": " + str(value1))
完整的代码已上传至github,地址如下:
https://github.com/3gstudent/Homework-of-Python/blob/master/SophosUTM_ConfigParser.py
代码支持以下功能:
- GetAdminDataFull,提取出管理员用户的完整信息
- GetAdminHash,提取出管理员用户的md4 hash
- GetLastChange,提取出LastChange信息
- GetNetworkConfig,提取出网络配置信息
- GetRemoteAccess,提取出VPN配置信息
- GetSSHConfig,提取出SSH连接信息
- GetUserDataFull,提取出用户的完整信息
- GetUserHash,提取出用户的md4 hash
- Parsefile,提取出完整信息
0x04 小结
本文介绍了导出Sophos UTM配置文件的研究过程,开源利用脚本以提高分析效率。
Recommend
About Joyk
Aggregate valuable and interesting links.
Joyk means Joy of geeK