

Send as alias for a Shared mailbox in Exchange Online
source link: https://www.michev.info/Blog/Post/4081/send-as-alias-for-a-shared-mailbox-in-exchange-online
Go to the source link to view the article. You can view the picture content, updated content and better typesetting reading experience. If the link is broken, please click the button below to view the snapshot at that time.

Send as alias for a Shared mailbox in Exchange Online
Not sure if this has been available since the introduction of the Send As Alias feature in Microsoft 365 a while back, but it turns out you can actually use the feature with Shared mailboxes too. There are certain prerequisites though, so let’s go over them step by step.
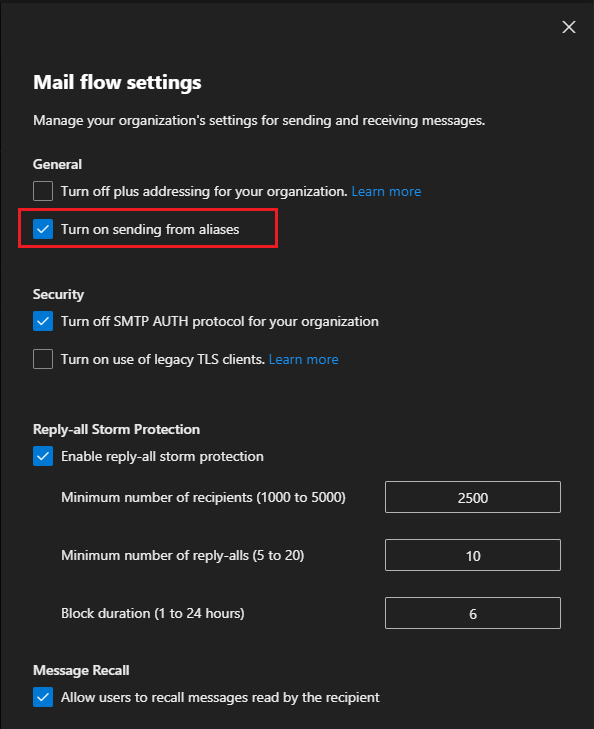
First, you need to make sure that the Send As Alias feature is enabled for your tenant. This is an admin-level operation, performed via PowerShell (Get-OrganizationConfig) or the EAC UI (go to Settings > Mail flow or directly here). If you need to toggle the feature on, you can do so again from PowerShell or the EAC UI:
Set-OrganizationConfig -SendFromAliasEnabled $true |
Once the feature has been enabled, you are free to use it, but not without some additional configuration first. At the time of writing, Outlook still does not support configuring which aliases you can use for sending (I’m using version 2208 on the Semi-annual channel), so you have to head over to OWA for this step. And since we want to configure this for a shared mailbox, OWA is actually the better choice here, as it’s easier to access a shared mailbox from within OWA.
Here, we need to mention the other prerequisite. In order to access OWA setting’s dialog for the shared mailbox, you need to be granted Full Access permissions, which is again an admin level operation. You can of course ask the admin to perform the configuration on your behalf. In any case, the steps you need to follow are detailed below.
First, open the shared mailbox by going to OWA, clicking your portrait icon in the top right corner and selecting Open another mailbox. Type in the address/name of the shared mailbox in question, then press the Open button. This is the step where you need the Full access permissions, as without them you will not be able to access the shared mailbox. If permissions have been granted, the shared mailbox will open in a new tab. Alternatively, you can open a new tab and enter the “direct” address to a shared mailbox in the form https://outlook.office.com/mail/[email protected]/.
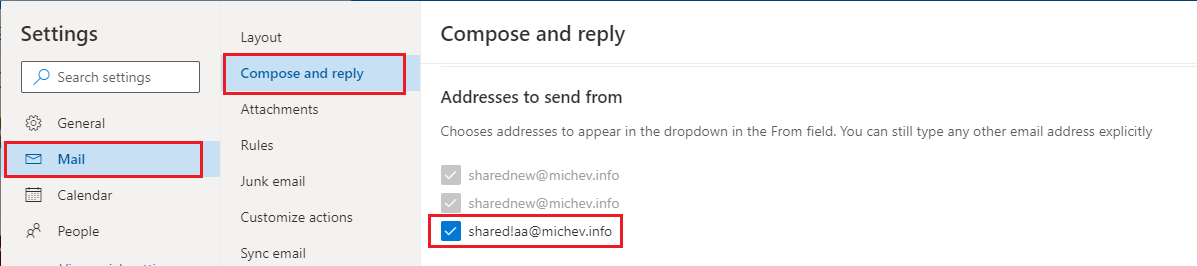
Once this happens, hit the Gear icon on top (Settings) and select View all Outlook settings. In the Settings dialog, go to the Mail tab > Compose and reply. Look for the Addresses to send from section down the page. Therein, you will be presented with a list of all proxy addresses configured for the shared mailbox, with the primary SMTP address being automatically selected. Select any additional aliases you would like to be able to send from. While you’re on the same page, you can also toggle the Always show From setting to make the next step easier.
With that, we’ve enabled sending as additional aliases for the shared mailbox in question. At this point Full access permissions are no longer needed, although if you do have Full access permissions, you will have another option to send messages, as we will see below.
Next, we can actually send the message. Since we are trying to do so for a shared mailbox, and not our own, we will also need to meet another prerequisite, namely having Send As permissions on the shared mailbox. This is yet another admin level operation that needs to be performed before attempting this.
If all the prerequisites have been met, with the alias enabled for sending and you granted Send As permissions on the shared mailbox, simply compose a new message. Make sure the From box is shown, by pressing the … menu on top and selecting it as needed. Next, hit the From button, then select the Other e-mail address… entry. This will place the cursor in the From field, where you can now enter the alias you want to send from. An important note is due here – do not select any autosuggested or resolved entry. Type in the full alias, and once it gets resolved to the shared mailbox, highlight it, then press the X on the right.
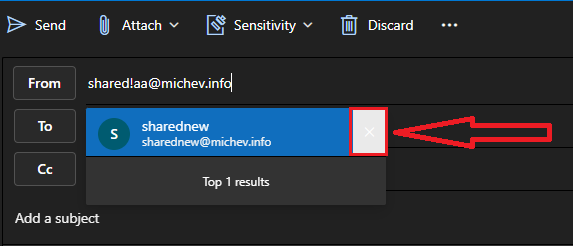
You will know whether you’ve completed this step correctly by looking at the value for the From address. If it gets resolved (replaced) with the name of the shared mailbox, you need to repeat the process anew, by pressing the From button ans selecting Other e-mail address. If the full email alias remains visible, you are good to go. Configure the rest of the fields as needed and when ready, press the Send button.

That’s all there is to it. The process isn’t complicated, but you do need to understand the steps involved and all the prerequisites. If you have Full access permissions to the shared mailbox, you can simplify the sending part by opening the shared mailbox in OWA and compose the message from this tab, instead of using your own mailbox. Much like with your personal mailbox, any “Send As” aliases you’ve configured on the shared mailbox will be visible under the From button menu, so you can readily select it therein, instead of having to type the address and play with the auto-resovle functionality.

Interestingly, I haven’t been able to get Outlook to send a message correctly as an alias of a shared mailbox. It seems to always generate an NDR message, with the error being I’m trying to Send on behalf of the shared mailbox. I’ll play with the permissions a bit more, and test with a version on the Current channel, to see whether the behavior changes. In any case, OWA works for this scenario, so there you have it.
Recommend
About Joyk
Aggregate valuable and interesting links.
Joyk means Joy of geeK