

玩转内核链表Llist_Head,教你管理不同类型节点的实现
source link: https://www.51cto.com/article/718820.html
Go to the source link to view the article. You can view the picture content, updated content and better typesetting reading experience. If the link is broken, please click the button below to view the snapshot at that time.

玩转内核链表Llist_Head,教你管理不同类型节点的实现

在Linux内核中,提供了一个用来创建双向循环链表的结构 list_head。虽然linux内核是用C语言写的,但是list_head的引入,使得内核数据结构也可以拥有面向对象的特性,通过使用操作list_head 的通用接口很容易实现代码的重用,有点类似于C++的继承机制(希望有机会写篇文章研究一下C语言的面向对象机制)。
首先找到list_head结构体定义,kernel/inclue/linux/types.h 如下:
struct list_head {
  struct list_head *next, *prev;
};
#define LIST_HEAD_INIT(name) { &(name), &(name) }
需要注意的一点是,头结点head是不使用的,这点需要注意。
使用list_head组织的链表的结构如下图所示:
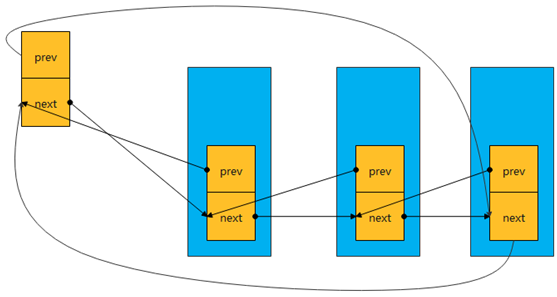
然后就开始围绕这个结构开始构建链表,然后插入、删除节点 ,遍历整个链表等等,其实内核已经提供好了现成的接口,接下来就让我们进入 kernel/include/linux/list.h中:
一、创建链表
内核提供了下面的这些接口来初始化链表:
#define LIST_HEAD_INIT(name) { &(name), &(name) }
#define LIST_HEAD(name) \
  struct list_head name = LIST_HEAD_INIT(name)
static inline void INIT_LIST_HEAD(struct list_head *list)
{
  WRITE_ONCE(list->next, list);
  list->prev = list;
}
如: 可以通过 LIST_HEAD(mylist) 进行初始化一个链表,mylist的prev 和 next 指针都是指向自己。
structlist_head mylist = {&mylist, &mylist} ;但是如果只是利用mylist这样的结构体实现链表就没有什么实际意义了,因为正常的链表都是为了遍历结构体中的其它有意义的字段而创建的,而我们mylist中只有 prev和next指针,却没有实际有意义的字段数据,所以毫无意义。
综上,我们可以创建一个宿主结构,然后在此结构中再嵌套mylist字段,宿主结构又有其它的字段(进程描述符 task_struct,页面管理的page结构,等就是采用这种方法创建链表的)。为简便理解,定义如下:
struct  mylist{
    int type;
    char name[MAX_NAME_LEN];
    struct list_head list;
}
创建链表,并初始化。
structlist_head myhead;
INIT_LIST_HEAD(&myhead);
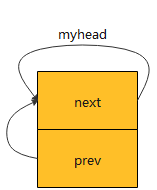
这样我们的链表就初始化完毕,链表头的myhead就prev 和 next指针分别指向myhead自己了,如下图:
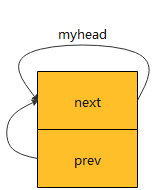
二、添加节点
内核已经提供了添加节点的接口了
1、list_add
如下所示。根据注释可知,是在链表头head后方插入一个新节点new。
/**
 * list_add - add a new entry
 * @new: new entry to be added
 * @head: list head to add it after
 *
 * Insert a new entry after the specified head.
 * This is good for implementing stacks.
 */
static inline void list_add(struct list_head *new, struct list_head *head)
{
  __list_add(new, head, head->next);
}
list_add再调用__list_add接口。
/*
 * Insert a new entry between two known consecutive entries.
 *
 * This is only for internal list manipulation where we know
 * the prev/next entries already!
 */
static inline void __list_add(struct list_head *new,
            struct list_head *prev,
            struct list_head *next)
{
  if (!__list_add_valid(new, prev, next))
    return;
  next->prev = new;
  new->next = next;
  new->prev = prev;
  WRITE_ONCE(prev->next, new);
}
其实就是在myhead链表头后和链表头后第一个节点之间插入一个新节点。然后这个新的节点就变成了链表头后的第一个节点了。
接着上面步骤创建1个节点然后插入到myhead之后
struct mylist node1;
node1.type = I2C_TYPE;
strcpy(node1.name,"yikoulinux");
list_add(&node1.list,&myhead);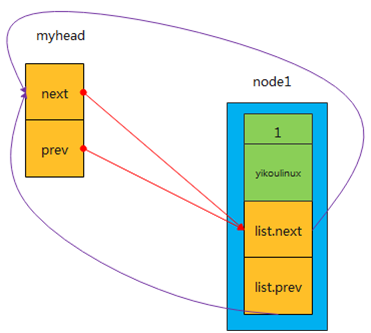
然后在创建第二个节点,同样把它插入到header_task之后。
struct mylist node2;
node2.type = I2C_TYPE;
strcpy(node2.name,"yikoupeng");
list_add(&node2.list,&myhead);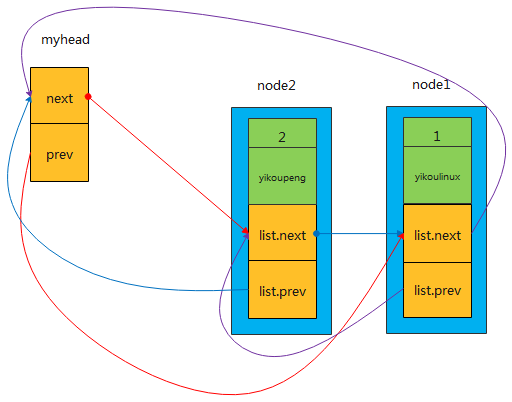
list_add
以此类推,每次插入一个新节点,都是紧靠着header节点,而之前插入的节点依次排序靠后,那最后一个节点则是第一次插入header后的那个节点。最终可得出:先来的节点靠后,而后来的节点靠前,“先进后出,后进先出”。所以此种结构类似于 stack“堆栈”, 而header_task就类似于内核stack中的栈顶指针esp,它都是紧靠着最后push到栈的元素。
2、list_add_tail 接口
上面所讲的list_add接口是从链表头header后添加的节点。同样,内核也提供了从链表尾处向前添加节点的接口list_add_tail.让我们来看一下它的具体实现。
/**
 * list_add_tail - add a new entry
 * @new: new entry to be added
 * @head: list head to add it before
 *
 * Insert a new entry before the specified head.
 * This is useful for implementing queues.
 */
static inline void list_add_tail(struct list_head *new, struct list_head *head)
{
  __list_add(new, head->prev, head);
}
从注释可得出:
(1)在一个特定的链表头前面插入一个节点。
(2)这个方法很适用于队列的实现(why?)。
进一步把__list_add()展开如下:
/*
 * Insert a new entry between two known consecutive entries.
 *
 * This is only for internal list manipulation where we know
 * the prev/next entries already!
 */
static inline void __list_add(struct list_head *new,
            struct list_head *prev,
            struct list_head *next)
{
  if (!__list_add_valid(new, prev, next))
    return;
  next->prev = new;
  new->next = next;
  new->prev = prev;
  WRITE_ONCE(prev->next, new);
}
所以,很清楚明了, list_add_tail就相当于在链表头前方依次插入新的节点(也可理解为在链表尾部开始插入节点,此时,header节点既是为节点,保持不变)
利用上面分析list_add接口的方法可画出数据结构图形如下。
(1)创建一个链表头(实际上应该是表尾)代码参考第一节。
(2)插入第一个节点 node1.list , 调用。
struct mylist node1;
 node1.type = I2C_TYPE;
 strcpy(node1.name,"yikoulinux");
 list_add_tail(&node1.list,&myhead);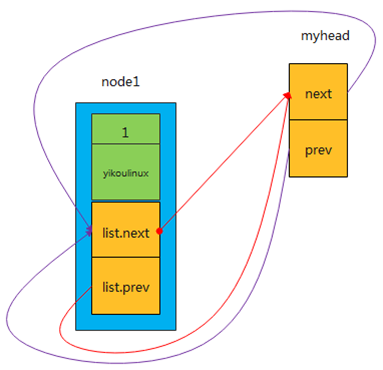
(3) 插入第二个节点node2.list,调用。
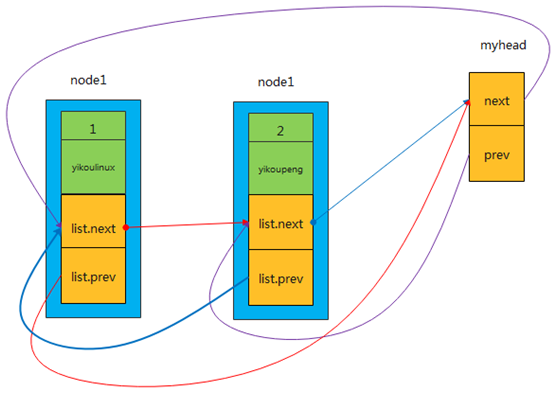
list_add_tail
依此类推,每次插入的新节点都是紧挨着 header_task表尾,而插入的第一个节点my_first_task排在了第一位,my_second_task排在了第二位,可得出:先插入的节点排在前面,后插入的节点排在后面,“先进先出,后进后出”,这不正是队列的特点吗(First in First out)!
三、删除节点
内核同样在list.h文件中提供了删除节点的接口 list_del(), 让我们看一下它的实现流程。
static inline void list_del(struct list_head *entry)
{
  __list_del_entry(entry);
  entry->next = LIST_POISON1;
  entry->prev = LIST_POISON2;
}
/*
 * Delete a list entry by making the prev/next entries
 * point to each other.
 *
 * This is only for internal list manipulation where we know
 * the prev/next entries already!
 */
static inline void __list_del(struct list_head * prev, struct list_head * next)
{
  next->prev = prev;
  WRITE_ONCE(prev->next, next);
}
/**
 * list_del - deletes entry from list.
 * @entry: the element to delete from the list.
 * Note: list_empty() on entry does not return true after this, the entry is
 * in an undefined state.
 */
static inline void __list_del_entry(struct list_head *entry)
{
  if (!__list_del_entry_valid(entry))
    return;
  __list_del(entry->prev, entry->next);
}
利用list_del(struct list_head *entry) 接口就可以删除链表中的任意节点了,但需注意,前提条件是这个节点是已知的,既在链表中真实存在,切prev,next指针都不为NULL。
四、链表遍历
内核是同过下面这个宏定义来完成对list_head链表进行遍历的,如下 :
/**
 * list_for_each  -  iterate over a list
 * @pos:  the &struct list_head to use as a loop cursor.
 * @head:  the head for your list.
 */
#define list_for_each(pos, head) \
  for (pos = (head)->next; pos != (head); pos = pos->next)
上面这种方式是从前向后遍历的,同样也可以使用下面的宏反向遍历:
/**
 * list_for_each_prev  -  iterate over a list backwards
 * @pos:  the &struct list_head to use as a loop cursor.
 * @head:  the head for your list.
 */
#define list_for_each_prev(pos, head) \
  for (pos = (head)->prev; pos != (head); pos = pos->prev)
而且,list.h 中也提供了list_replace(节点替换) list_move(节点移位) ,翻转,查找等接口,这里就不在一一分析了。
五、宿主结构
1、找出宿主结构 list_entry(ptr, type, member)
上面的所有操作都是基于list_head这个链表进行的,涉及的结构体也都是:
struct list_head {
  struct list_head *next, *prev;
};
其实,正如文章一开始所说,我们真正更关心的是包含list_head这个结构体字段的宿主结构体,因为只有定位到了宿主结构体的起始地址,我们才能对对宿主结构体中的其它有意义的字段进行操作。
struct mylist
{
    int type;
    char name[MAX_NAME_LEN];
  struct list_head list;
};
那我们如何根据list这个字段的地址而找到宿主结构node1的位置呢?list.h中定义如下:
/**
 * list_entry - get the struct for this entry
 * @ptr:  the &struct list_head pointer.
 * @type:  the type of the struct this is embedded in.
 * @member:  the name of the list_head within the struct.
 */
#define list_entry(ptr, type, member) \
  container_of(ptr, type, member)
list.h中提供了list_entry宏来实现对应地址的转换,但最终还是调用了container_of宏,所以container_of宏的伟大之处不言而喻。
2、container_of
做linux驱动开发的同学是不是想到了LDD3这本书中经常使用的一个非常经典的宏定义!
container_of(ptr, type, member)在LDD3这本书中的第三章字符设备驱动,以及第十四章驱动设备模型中多次提到,我觉得这个宏应该是内核最经典的宏之一。那接下来让我们揭开她的面纱:
此宏在内核代码 kernel/include/linux/kernel.h中定义(此处kernel版本为3.10;新版本4.13之后此宏定义改变,但实现思想保持一致)。
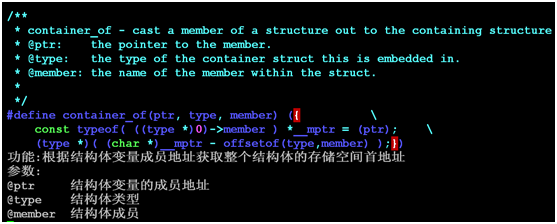
而offsetof定义在 kernel/include/linux/stddef.h ,如下:

举个例子,来简单分析一下container_of内部实现机制。
struct   test
{
    int       a;
    short   b;
    char    c;
};
struct  test  *p = (struct test *)malloc(sizeof(struct  test));
test_function(&(p->b));
int  test_function(short *addr_b)
{
      //获取struct test结构体空间的首地址
     struct  test *addr;
     addr =   container_of(addr_b,struct test,b);
}
展开container_of宏,探究内部的实现:
typeof (  ( (struct test   *)0 )->b ) ;                        (1)
typeof (  ( (struct test   *)0 )->b )   *__mptr =  addr_b ;    (2)
(struct test *)( (char *)__mptr  -  offsetof(struct test,b))   (3)
(1) 获取成员变量b的类型 ,这里获取的就是short 类型。这是GNU_C的扩展语法。
(2) 用获取的变量类型,定义了一个指针变量 __mptr ,并且将成员变量 b的首地址赋值给它。
(3) 这里的offsetof(struct test,b)是用来计算成员b在这个struct test 结构体的偏移。__mptr是成员b的首地址, 现在 减去成员b在结构体里面的偏移值,算出来的是不是这个结构体的首地址呀 。
3、宿主结构的遍历
我们可以根据结构体中成员变量的地址找到宿主结构的地址,并且我们可以对成员变量所建立的链表进行遍历,那我们是不是也可以通过某种方法对宿主结构进行遍历呢?
答案肯定是可以的,内核在list.h中提供了下面的宏:
/**
 * list_for_each_entry  -  iterate over list of given type
 * @pos:  the type * to use as a loop cursor.
 * @head:  the head for your list.
 * @member:  the name of the list_head within the struct.
 */
#define list_for_each_entry(pos, head, member)        \
  for (pos = list_first_entry(head, typeof(*pos), member);  \
       &pos->member != (head);          \
       pos = list_next_entry(pos, member))
其中,list_first_entry 和 list_next_entry宏都定义在list.h中,分别代表:获取第一个真正的宿主结构的地址;获取下一个宿主结构的地址。它们的实现都是利用list_entry宏。
/**
 * list_first_entry - get the first element from a list
 * @ptr:  the list head to take the element from.
 * @type:  the type of the struct this is embedded in.
 * @member:  the name of the list_head within the struct.
 *
 * Note, that list is expected to be not empty.
 */
#define list_first_entry(ptr, type, member) \
  list_entry((ptr)->next, type, member)
/**
 * list_next_entry - get the next element in list
 * @pos:  the type * to cursor
 * @member:  the name of the list_head within the struct.
 */
#define list_next_entry(pos, member) \
  list_entry((pos)->member.next, typeof(*(pos)), member)
最终实现了宿主结构的遍历。
#define list_for_each_entry(pos, head, member)      \
  for (pos = list_first_entry(head, typeof(*pos), member);  \
       &pos->member != (head);          \
       pos = list_next_entry(pos, member))
首先pos定位到第一个宿主结构地址,然后循环获取下一个宿主结构地址,如果查到宿主结构中的member成员变量(宿主结构中struct list_head定义的字段)地址为head,则退出,从而实现了宿主结构的遍历。如果要循环对宿主结构中的其它成员变量进行操作,这个遍历操作就显得特别有意义了。
我们用上面的 nod结构举个例子:
struct my_list *pos_ptr = NULL ;
list_for_each_entry (pos_ptr, &myhead, list )
{
         printk ("val =  %d\n" , pos_ptr->val);
}
实例1 一个简单的链表的实现
为方便起见,本例把内核的list.h文件单独拷贝出来,这样就可以独立于内核来编译测试。
功能描述:
本例比较简单,仅仅实现了单链表节点的创建、删除、遍历。
#include "list.h"
#include <stdio.h>
#include <string.h>
#define MAX_NAME_LEN 32
#define MAX_ID_LEN 10
struct list_head myhead;
#define I2C_TYPE 1
#define SPI_TYPE 2
char *dev_name[]={
  "none",
  "I2C",
  "SPI"
};
struct mylist
{
    int type;
    char name[MAX_NAME_LEN];
  struct list_head list;
};
void display_list(struct list_head *list_head)
{
  int i=0;
  struct list_head *p;
  struct mylist *entry;
  printf("-------list---------\n");
  list_for_each(p,list_head)
  {
    printf("node[%d]\n",i++);
    entry=list_entry(p,struct mylist,list);
    printf("\ttype: %s\n",dev_name[entry->type]);
    printf("\tname: %s\n",entry->name);
  }
  printf("-------end----------\n");
}
int main(void)
{
  struct mylist node1;
  struct mylist node2;
  INIT_LIST_HEAD(&myhead);
  node1.type = I2C_TYPE;
  strcpy(node1.name,"yikoulinux");
  node2.type = I2C_TYPE;
  strcpy(node2.name,"yikoupeng");
  list_add(&node1.list,&myhead);
  list_add(&node2.list,&myhead);
  display_list(&myhead);
  list_del(&node1.list);
  display_list(&myhead);
  return 0;
}
运行结果:
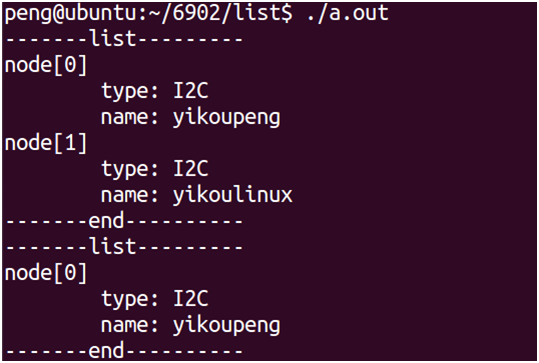
实例2 如何在一个链表上管理不同类型的节点
功能描述:
本实例主要实现在同一个链表上管理两个不同类型的节点,实现增删改查的操作。
结构体定义
一个链表要想区分节点的不同类型,那么节点中必须要有信息能够区分该节点类型,为了方便节点扩展,我们参考Linux内核,定义一个统一类型的结构体:
struct device
{
    int type;
    char name[MAX_NAME_LEN];
    struct list_head list;
};
其中成员type表示该节点的类型:
#defineI2C_TYPE 1
#define SPI_TYPE 2
有了该结构体,我们要定义其他类型的结构体只需要包含该结构体即可,这个思想有点像面向对象语言的基类,后续派生出新的属性叫子类,说到这,一口君又忍不住想挖个坑,写一篇如何用C语言实现面向对象思想的继承、多态、interface。
下面我们定义2种类型的结构体:
i2c这种类型设备的专用结构体:
struct i2c_node
{
  int data;
  unsigned int reg;
  struct device dev;
};
spi这种类型设备的专用结构体:
struct spi_node
{
  unsigned int reg;
  struct device dev;
};
我特意让两个结构体大小类型不一致。
链表头结点定义
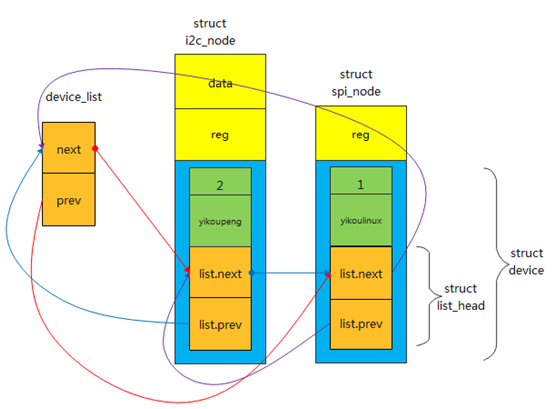
structlist_head device_list;根据之前我们讲解的思想,这个链表链接起来后,应该是以下这种结构:
节点的插入
我们定义的节点要插入链表仍然是要依赖list_add(),既然我们定义了struct device这个结构体,那么我们完全可以参考linux内核,针对不同的节点封装函数,要注册到这个链表只需要调用该函数即可。
实现如下:
设备i2c的注册函数如下:
void i2c_register_device(struct device*dev)
{
  dev.type = I2C_TYPE;
  strcpy(dev.name,"yikoulinux");
  list_add(&dev->list,&device_list);
}
设备spi的注册函数如下:
void spi_register_device(struct device*dev)
{
  dev.type = SPI_TYPE;
  strcpy(dev.name,"yikoupeng");
  list_add(&dev->list,&device_list);
}
我们可以看到注册函数功能是填充了struct device 的type和name成员,然后再调用list_add()注册到链表中。这个思想很重要,因为Linux内核中许许多多的设备节点也是这样添加到其他的链表中的。要想让自己的C语言编程能力得到质的提升,一定要多读内核代码,即使看不懂也要坚持看,古人有云:代码读百遍其义自见。
节点的删除
同理,节点的删除,我们也统一封装成函数,同样只传递参数device即可:
void i2c_unregister_device(struct device *device)
{
//  struct i2c_node *i2c_device=container_of(dev, struct i2c_node, dev);
  list_del(&device->list);
}
void spi_unregister_device(struct device *device)
{
//  struct spi_node *spi_device=container_of(dev, struct spi_node, dev);
  list_del(&device->list);
}
在函数中,可以用container_of提取出了设备节点的首地址,实际使用中可以根据设备的不同释放不同的资源。
宿主结构的遍历
节点的遍历,在这里我们通过设备链表device_list开始遍历,假设该节点名是node,通过list_for_each()可以得到node->dev->list的地址,然后利用container_of 可以得到node->dev、node的地址。
void display_list(struct list_head *list_head)
{
  int i=0;
  struct list_head *p;
  struct device *entry;
  printf("-------list---------\n");
  list_for_each(p,list_head)
  {
    printf("node[%d]\n",i++);
    entry=list_entry(p,struct device,list);
    switch(entry->type)
    {
      case I2C_TYPE:
                           display_i2c_device(entry);
        break;
      case SPI_TYPE:
        display_spi_device(entry);
        break;
      default:
        printf("unknown device type!\n");
        break;
    }
    display_device(entry);
  }
  printf("-------end----------\n");
}
由以上代码可知,利用内核链表的统一接口,找个每一个节点的list成员,然后再利用container_of 得到我们定义的标准结构体struct device,进而解析出节点的类型,调用对应节点显示函数,这个地方其实还可以优化,就是我们可以在struct device中添加一个函数指针,在xxx_unregister_device()函数中可以将该函数指针直接注册进来,那么此处代码会更精简高效一些。如果在做项目的过程中,写出这种面向对象思想的代码,那么你的地址是肯定不一样的。读者有兴趣可以自己尝试一下。
void display_i2c_device(struct device *device)
{
  struct i2c_node *i2c_device=container_of(device, struct i2c_node, dev);
  printf("\t  i2c_device->data: %d\n",i2c_device->data);
  printf("\t  i2c_device->reg: %#x\n",i2c_device->reg);
}
void display_spi_device(struct device *device)
{
struct spi_node *spi_device=container_of(device, struct spi_node, dev);
printf("\t spi_device->reg: %#x\n",spi_device->reg);
}上述代码提取出来宿主节点的信息。
#include "list.h"
#include <stdio.h>
#include <string.h>
#define MAX_NAME_LEN 32
#define MAX_ID_LEN 10
struct list_head device_list;
#define I2C_TYPE 1
#define SPI_TYPE 2
char *dev_name[]={
"none",
"I2C",
"SPI"
};
struct device
{
int type;
char name[MAX_NAME_LEN];
struct list_head list;
};
struct i2c_node
{
int data;
unsigned int reg;
struct device dev;
};
struct spi_node
{
unsigned int reg;
struct device dev;
};
void display_i2c_device(struct device *device)
{
struct i2c_node *i2c_device=container_of(device, struct i2c_node, dev);
printf("\t i2c_device->data: %d\n",i2c_device->data);
printf("\t i2c_device->reg: %#x\n",i2c_device->reg);
}
void display_spi_device(struct device *device)
{
  struct spi_node *spi_device=container_of(device, struct spi_node, dev);
  printf("\t  spi_device->reg: %#x\n",spi_device->reg);
}
void display_device(struct device *device)
{
printf("\t dev.type: %d\n",device->type);
printf("\t dev.type: %s\n",dev_name[device->type]);
printf("\t dev.name: %s\n",device->name);
}
void display_list(struct list_head *list_head)
{
int i=0;
struct list_head *p;
struct device *entry;
printf("-------list---------\n");
list_for_each(p,list_head)
{
printf("node[%d]\n",i++);
entry=list_entry(p,struct device,list);
switch(entry->type)
{
case I2C_TYPE:
display_i2c_device(entry);
break;
case SPI_TYPE:
display_spi_device(entry);
break;
default:
printf("unknown device type!\n");
break;
}
display_device(entry);
}
printf("-------end----------\n");
}
void i2c_register_device(struct device*dev)
{
struct i2c_node *i2c_device=container_of(dev, struct i2c_node, dev);
i2c_device->dev.type = I2C_TYPE;
strcpy(i2c_device->dev.name,"yikoulinux");
list_add(&dev->list,&device_list);
}
void spi_register_device(struct device*dev)
{
struct spi_node *spi_device=container_of(dev, struct spi_node, dev);
spi_device->dev.type = SPI_TYPE;
strcpy(spi_device->dev.name,"yikoupeng");
list_add(&dev->list,&device_list);
}
void i2c_unregister_device(struct device *device)
{
struct i2c_node *i2c_device=container_of(dev, struct i2c_node, dev);
list_del(&device->list);
}
void spi_unregister_device(struct device *device)
{
struct spi_node *spi_device=container_of(dev, struct spi_node, dev);
list_del(&device->list);
}
int main(void)
{
struct i2c_node dev1;
struct spi_node dev2;
INIT_LIST_HEAD(&device_list);
dev1.data = 1;
dev1.reg = 0x40009000;
i2c_register_device(&dev1.dev);
dev2.reg = 0x40008000;
spi_register_device(&dev2.dev);
display_list(&device_list);
unregister_device(&dev1.dev);
display_list(&device_list);
return 0;
}代码主要功能:
- 117-118 :定义两个不同类型的节点dev1,dev2。
- 120 :初始化设备链表。
- 121-122、124:初始化节点数据。
- 123/125 :向链表device_list注册这两个节点。
- 126 :显示该链表。
- 127 :删除节点dev1。
- 128 :显示该链表。
程序运行截图
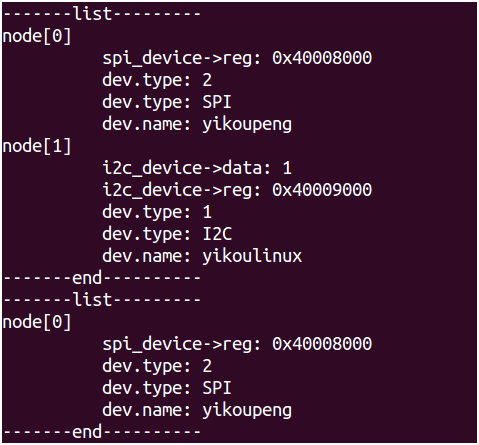
读者可以试试如何管理更多类型的节点。
实例3 实现节点在两个链表上自由移动
功能描述:
初始化两个链表,实现两个链表上节点的插入和移动。每个节点维护大量的临时内存数据。
节点结构体创建如下:
struct mylist{
  int number;
  char type;
    char *pmem;  //内存存放地址,需要malloc
  struct list_head list;
};
需要注意成员pmem,因为要维护大量的内存,我们最好不要直定义个很大的数组,因为定义的变量位于栈中,而一般的系统给栈的空间是有限的,如果定义的变量占用空间太大,会导致栈溢出,一口君曾经就遇到过这个bug。
链表定义和初始化
链表定义如下:
structlist_head active_head;
struct list_head free_head;
INIT_LIST_HEAD(&free_head);
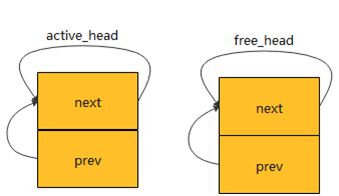
INIT_LIST_HEAD(&active_head);这两个链表如下:
关于节点,因为该实例是从实际项目中剥离出来,节点启示是起到一个缓冲去的作用,数量不是无限的,所以在此我们默认最多10个节点。
我们不再动态创建节点,而是先全局创建指针数组,存放这10个节点的地址,然后将这10个节点插入到对应的队列中。
数组定义:
structmylist*list_array[BUFFER_NUM];这个数组只用于存放指针,所以定义之后实际情况如下:
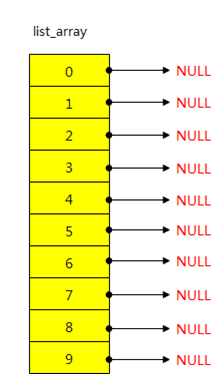
初始化这个数组对应的节点:
static ssize_t buffer_ring_init()
{
int i=0;
for(i=0;i<BUFFER_NUM;i++){
list_array[i]=malloc(sizeof(struct mylist));
INIT_LIST_HEAD(&list_array[i]->list);
list_array[i]->pmem=kzalloc(DATA_BUFFER_SIZE,GFP_KERNEL);
}
return 0;
}5:为下标为i的节点分配实际大小为sizeof(structmylist)的内存。
6:初始化该节点的链表。
7:为pmem成员从堆中分配一块内存。
初始化完毕,链表实际情况如下:
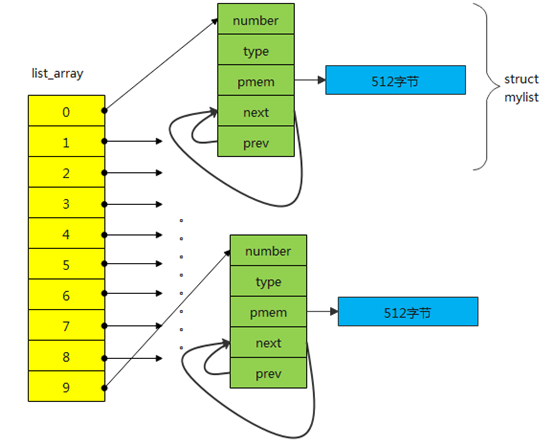
static ssize_t insert_free_list_all()
{
int i=0;
for(i=0;i<BUFFER_NUM;i++){
list_add(&list_array[i]->list,&free_head);
}
return 0;
}8:用头插法将所有节点插入到free_head链表中。
所有节点全部插入free链表后,结构图如下:
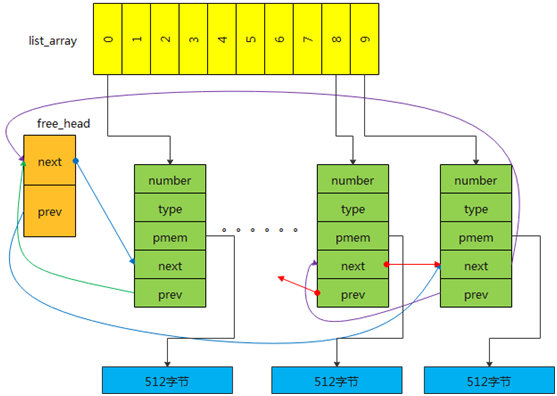
虽然可以通过数组遍历链表,但是实际在操作过程中,在链表中各个节点的位置是错乱的。所以最好从借助list节点来查找各个节点。
show_list(&free_head);show_list(&active_head)代码实现如下:
void show_list(struct list_head *list_head)
{
int i=0;
struct mylist*entry,*tmp;
//判断节点是否为空
if(list_empty(list_head)==true)
{
return;
}
list_for_each_entry_safe(entry,tmp,list_head,list)
{
printf("[%d]=%d\t",i++,entry->number);
if(i%4==0)
{
printf("\n");
}
}
}将节点从active_head链表移动到free_head链表,有点像生产者消费者模型中的消费者,吃掉资源后,就要把这个节点放置到空闲链表,让生产者能够继续生产数据,所以这两个函数我起名eat、spit,意为吃掉和吐,希望你们不要觉得很怪异。
int eat_node()
{
struct mylist*entry=NULL;
if(list_empty(&active_head)==true)
{
printf("list active_head is empty!-----------\n");
}
entry=list_first_entry(&active_head,struct mylist,list);
printf("\t eat node=%d\n",entry->number);
list_move_tail(&entry->list,&free_head);
}节点移动的思路是:
1. 利用list_empty判断该链表是否为空。
2. 利用list_first_entry从active_head链表中查找到一个节点,并用指针entry指向该节点。
3. 利用list_move_tail将该节点移入到free_head链表,注意此处不能用list_add,因为这个节点我要从原链表把他删除掉,然后插入到新链表。
将节点从free_head链表移动到active_head链表。
spit_node()
{
struct mylist*entry=NULL;
if(list_empty(&free_head)==true)
{
printf("list free_head is empty!-----------\n");
}
entry=list_first_entry(&free_head,struct mylist,list);
printf("\t spit node=%d\n",entry->number);
list_move_tail(&entry->list,&active_head);
}大部分功能讲解完了,下面我们贴下完整代码。
#include <stdint.h>
#include <stdio.h>
#include <stdlib.h>
#include <unistd.h>
#include <byteswap.h>
#include <string.h>
#include <errno.h>
#include <signal.h>
#include <fcntl.h>
#include <ctype.h>
#include <termios.h>
#include <sys/types.h>
#include <sys/mman.h>
#include <sys/ioctl.h>
#include "list.h" // linux-3.14/scripts/kconfig/list.h
#undef NULL
#define NULL ((void *)0)
enum {
false = 0,
true = 1
};
#define DATA_TYPE 0x14
#define SIG_TYPE 0x15
struct mylist{
int number;
char type;
char *pmem;
struct list_head list;
};
#define FATAL do { fprintf(stderr, "Error at line %d, file %s (%d) [%s]\n",__LINE_,__FILE__,errno,strerror(errno));exit(1);}while(0)
struct list_head active_head;
struct list_head free_head;
#define BUFFER_NUM 10
#define DATA_BUFFER_SIZE 512
struct mylist*list_array[BUFFER_NUM];
int born_number(int number)
{
struct mylist *entry=NULL;
if(list_empty(&free_head)==true)
{
printf("list free_head is empty!----------------\n");
}
entry = list_first_entry(&free_head,struct mylist,list);
entry->type = DATA_TYPE;
entry->number=number;
list_move_tail(&entry->list,&active_head);
}
int eat_node()
{
struct mylist*entry=NULL;
if(list_empty(&active_head)==true)
{
printf("list active_head is empty!-----------\n");
}
entry=list_first_entry(&active_head,struct mylist,list);
printf("\t eat node=%d\n",entry->number);
list_move_tail(&entry->list,&free_head);
}
spit_node()
{
struct mylist*entry=NULL;
if(list_empty(&free_head)==true)
{
printf("list free_head is empty!-----------\n");
}
entry=list_first_entry(&free_head,struct mylist,list);
printf("\t spit node=%d\n",entry->number);
list_move_tail(&entry->list,&active_head);
}
void show_list(struct list_head *list_head)
{
int i=0;
struct mylist*entry,*tmp;
if(list_empty(list_head)==true)
{
return;
}
list_for_each_entry_safe(entry,tmp,list_head,list)
{
printf("[%d]=%d\t",i++,entry->number);
if(i%4==0)
{
printf("\n");
}
}
}
int list_num(struct list_head *list_head)
{
int i=0;
struct mylist *entry,*tmp;
// printf("----------show free list-------------\n");
list_for_each_entry_safe(entry,tmp,list_head,list)
{
i++;
}
return i;
}
static ssize_t buffer_ring_init()
{
int i=0;
for(i=0;i<BUFFER_NUM;i++){
list_array[i]=malloc(sizeof(struct mylist));
INIT_LIST_HEAD(&list_array[i]->list);
list_array[i]->pmem=kzalloc(DATA_BUFFER_SIZE,GFP_KERNEL);
list_add_tail(&list_array[i]->list,&free_head);
}
return 0;
}
static ssize_t insert_free_list_all()
{
int i=0;
for(i=0;i<BUFFER_NUM;i++){
list_add_tail(&list_array[i]->list,&free_head);
}
return 0;
}
static ssize_t buffer_ring_free()
{
int buffer_count=0;
struct mylist*entry=NULL;
for(;buffer_count<BUFFER_NUM;buffer_count++)
{
free(list_array[buffer_count]->pmem);
free(list_array[buffer_count]);
}
return 0;
}
int main(int argc,char**argv)
{
INIT_LIST_HEAD(&free_head);
INIT_LIST_HEAD(&active_head);
buffer_ring_init();
insert_free_list_all();
born_number(1);
born_number(2);
born_number(3);
born_number(4);
born_number(5);
born_number(6);
born_number(7);
born_number(8);
born_number(9);
born_number(10);
printf("\n----------active list[%d]------------\n",list_num(&active_head));
show_list(&active_head);
printf("\n--------------end-----------------\n");
printf("\n----------free list[%d]------------\n",list_num(&free_head));
show_list(&free_head);
printf("\n--------------end-----------------\n");
printf("\n\n active list----------> free list \n");
eat_node();
eat_node();
eat_node();
printf("\n----------active list[%d]------------\n",list_num(&active_head));
show_list(&active_head);
printf("\n--------------end-----------------\n");
printf("\n----------free list[%d]------------\n",list_num(&free_head));
show_list(&free_head);
printf("\n--------------end-----------------\n");
printf("\n\n free list----------> active list \n");
spit_node();
spit_node();
printf("\n----------active list[%d]------------\n",list_num(&active_head));
show_list(&active_head);
printf("\n--------------end-----------------\n");
printf("\n----------free list[%d]------------\n",list_num(&free_head));
show_list(&free_head);
printf("\n--------------end-----------------\n");
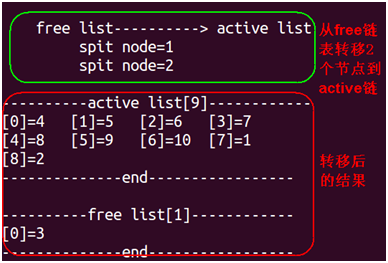
}运行结果如下:
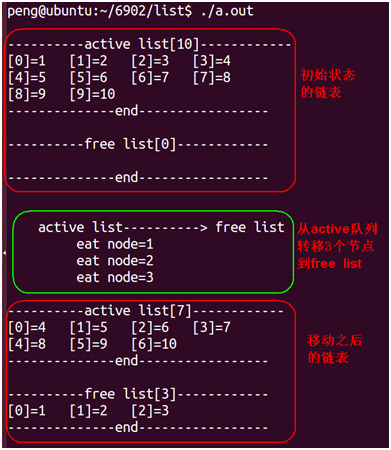
list_head短小精悍,读者可以借鉴此文实现其他功能。
Recommend
About Joyk
Aggregate valuable and interesting links.
Joyk means Joy of geeK