
1

转置卷积 - SXQ-BLOG
source link: https://www.cnblogs.com/sxq-blog/p/16689306.html
Go to the source link to view the article. You can view the picture content, updated content and better typesetting reading experience. If the link is broken, please click the button below to view the snapshot at that time.

一. 基本操作
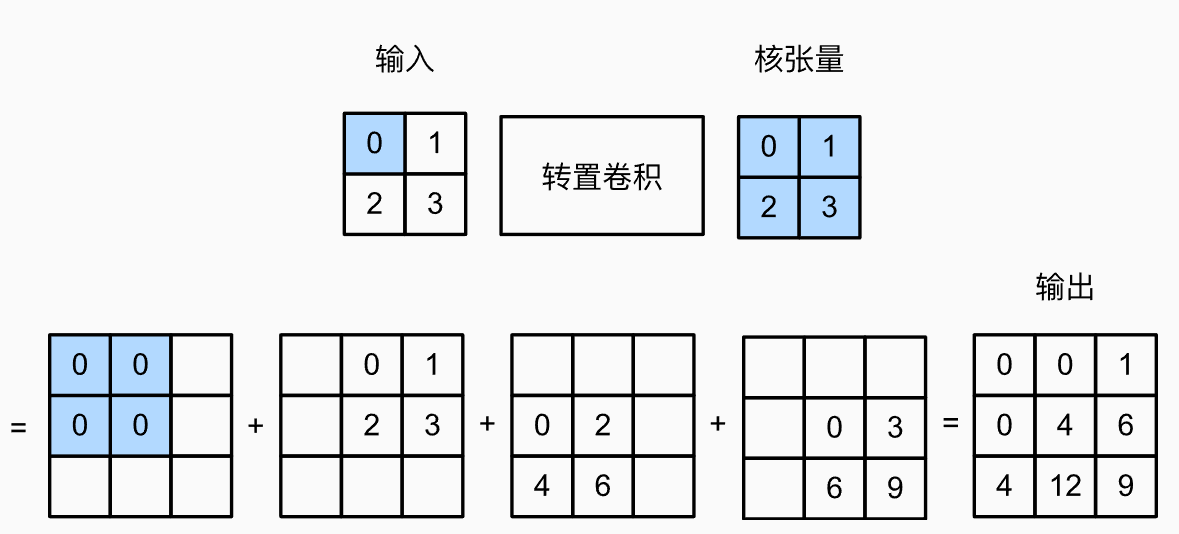
不同于一般的卷积做的是多个元素->1个元素,转置卷积是从1个元素到多个元素
二. 填充、步幅和多通道
- 常规卷积中padding是在输入的外圈添加元素,转置卷积中的padding则是在输出中删除外圈的元素
x = torch.tensor([[0.0, 1.0], [2.0, 3.0]])x = x.reshape(1, 1, 2, 2)k = torch.tensor([[4.0, 7.0], [2.0, 2.0]])k = k.reshape(1, 1, 2, 2)tconv1 = nn.ConvTranspose2d(1, 1, kernel_size=2, padding=0, bias=False)tconv1.weight.data = kprint(tconv1(x))tconv2 = nn.ConvTranspose2d(1, 1, kernel_size=2, padding=1, bias=False)tconv2.weight.data = kprint(tconv2(x))
Output:
tensor([[[[ 0., 4., 7.], [ 8., 28., 23.], [ 4., 10., 6.]]]], grad_fn=<ConvolutionBackward0>)tensor([[[[28.]]]], grad_fn=<ConvolutionBackward0>)
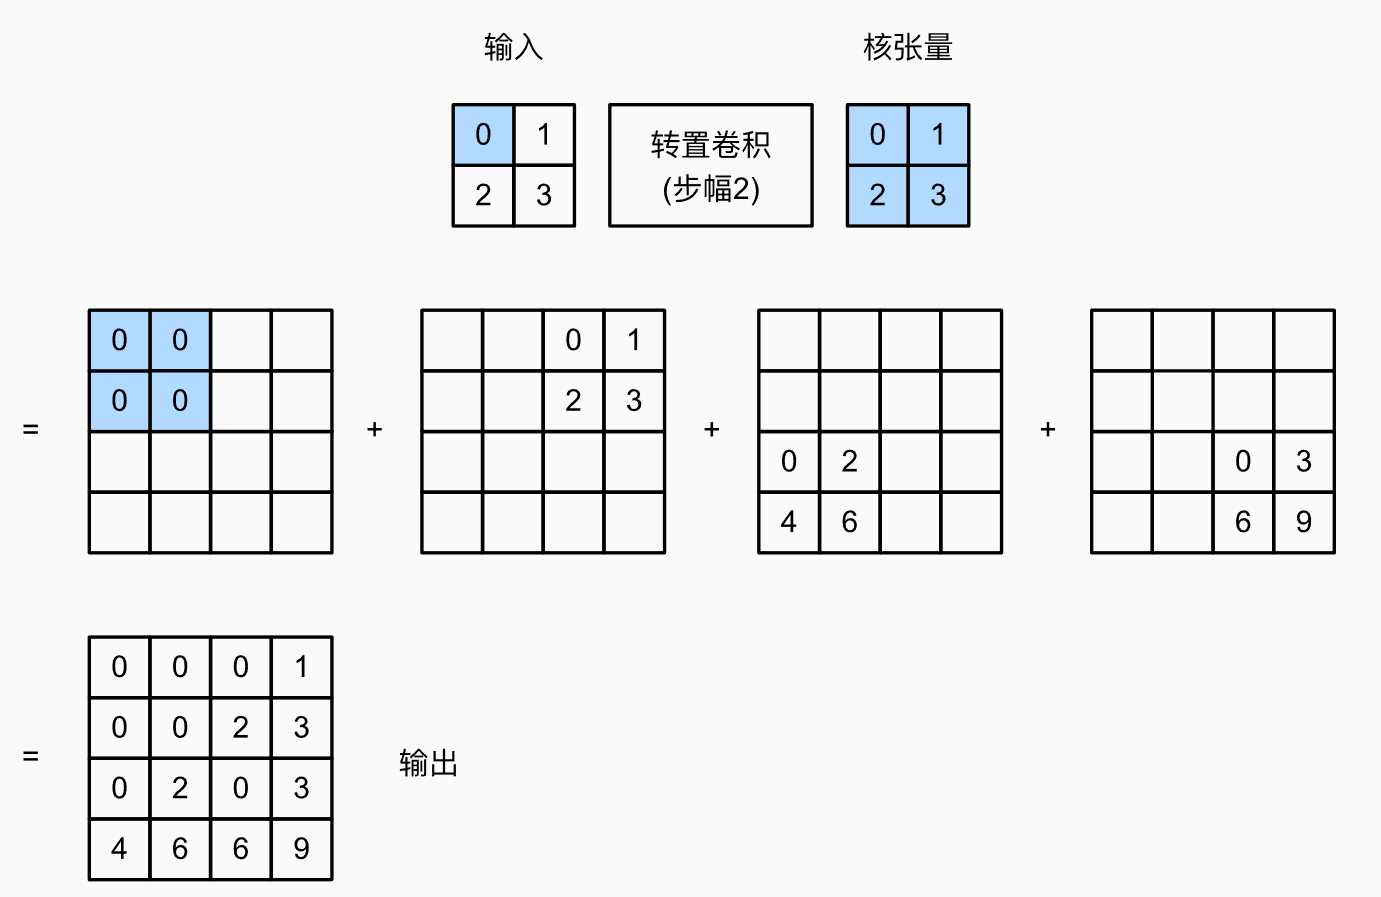
- 步幅这里指的是每一个像素扩展出的的输出的摆放方式。
x = torch.tensor([[0.0, 1.0], [2.0, 3.0]])x = x.reshape(1, 1, 2, 2)k = torch.tensor([[4.0, 7.0], [2.0, 2.0]])k = k.reshape(1, 1, 2, 2)tconv1 = nn.ConvTranspose2d(1, 1, kernel_size=2, stride=4, bias=False)tconv1.weight.data = kprint(tconv1(X))
Output:
tensor([[[[ 0., 0., 0., 0., 4., 7.], [ 0., 0., 0., 0., 2., 2.], [ 0., 0., 0., 0., 0., 0.], [ 0., 0., 0., 0., 0., 0.], [ 8., 14., 0., 0., 12., 21.], [ 4., 4., 0., 0., 6., 6.]]]], grad_fn=<ConvolutionBackward0>)
3. 多通道
nn.ConvTranspose2d(2, 1, kernel_size=2, bias=False)指的是用1个2∗2∗22∗2∗2的卷积核做转置卷积。
x = torch.tensor([[[0, 1.0], [2.0, 3.0]], [[4, 5], [7, 8]]])x = x.reshape(1, 2, 2, 2)k = torch.tensor([[[0.0, 1.0], [2.0, 3.0]], [[4, 5], [2, 3]]])k = k.reshape(2, 1, 2, 2) tconv3 = nn.ConvTranspose2d(2, 1, kernel_size=2, bias=False)tconv3.weight.data = k print(x)print(k)print(tconv3(x))print(tconv3(x).shape)
Output:
tensor([[[[0., 1.], [2., 3.]], [[4., 5.], [7., 8.]]]]) tensor([[[[0., 1.], [2., 3.]]], [[[4., 5.], [2., 3.]]]]) tensor([[[[16., 40., 26.], [36., 93., 61.], [18., 49., 33.]]]], grad_fn=<ConvolutionBackward0>) torch.Size([1, 1, 3, 3])
- 下面分析下为啥是这个结果
原图中第一个像素的扩展方式为:
0∗0213+4∗4253=16820120∗0123+4∗4523=1620812
其他像素点的展开方式也是同样的。
转置卷积同样遵循用几个卷积核输出几个通道的原则。
三. 转置卷积与普通卷积的形状互逆操作
只需要把Conv和ConvTranspose的kernel,padding,stride参数指定成一样的即可。
X = torch.rand(size=(1, 10, 16, 16))conv = nn.Conv2d(10, 20, kernel_size=5, padding=2, stride=3)tconv = nn.ConvTranspose2d(20, 10, kernel_size=5, padding=2, stride=3)tconv(conv(X)).shape == X.shape
Output:
True
__EOF__
本文作者: SXQ-BLOG 本文链接: https://www.cnblogs.com/sxq-blog/p/16689306.html 关于博主: 评论和私信会在第一时间回复。或者直接私信我。 版权声明: 本博客所有文章除特别声明外,均采用 BY-NC-SA 许可协议。转载请注明出处! 声援博主: 如果您觉得文章对您有帮助,可以点击文章右下角【推荐】一下。
Recommend
About Joyk
Aggregate valuable and interesting links.
Joyk means Joy of geeK