

VMware to AWS Migration | NAKIVO Case Study
source link: https://www.nakivo.com/blog/migrating-from-vmware-to-aws/
Go to the source link to view the article. You can view the picture content, updated content and better typesetting reading experience. If the link is broken, please click the button below to view the snapshot at that time.

NAKIVO Blog > Datacenter Migration > How to Migrate VMware VMs to AWS: A Case Study
How to Migrate VMware VMs to AWS: A Case Study

In 2016, our management set a goal to move all the organization’s mission-critical servers to the Amazon Web Services cloud. This was done to enable our geographically distributed teams to work seamlessly and securely. At that time, all our servers were based on VMware vSphere. So we started the VMware to AWS migration project.
This blog post covers all the steps that we undertook to successfully migrate our workloads to Amazon EC2 from our data center, including planning and post-migration data protection.
Estimating Resources for VMware to AWS Migration
At the first stage of VMware to AWS migration, it is necessary to assess the resources needed in AWS for each server. These resources include disk capacity, CPU, and RAM. When considering EC2 instances, which are VMs in Amazon terms, it is important to know that you cannot buy the exact amount of CPU GHz and GB of RAM that you need. AWS provides a few dozen types of instances with a fixed amount of resources. The objective is to choose the right type of instances based on the usage statistics of each server.
Tip: Use IT Monitoring software for your VMware environment to understand historical and current usage needs and be able to provision resources correctly.
Estimating Payments for Amazon Web Services (AWS)
Here we want to describe the structure of the payments for Amazon Web Services. We need to estimate payments before starting VMware to AWS migration.
- Payment depends on the type of instances. AWS only offers fixed sets of physical resources of CPU and RAM, meaning that you cannot buy an exact amount of CPU or RAM. You can choose from a dozen sets of EC2 instances and select the type of instance that is suitable for you. For example, it might be the t2.micro instance with 1 vCPU and 1 GB of RAM or the m4.2xlarge instance with 8 vCPU and 32 GB of RAM.
- You need to pay for an operating system (OS). There are various operating systems offered by AWS, including Linux (SLES, RHEL, Ubuntu, and others) and Windows (with or without SQL Server installed). In addition, Amazon has its own Marketplace, which offers different types of operating systems with preinstalled applications that are available for free or for a charge.
- You need to pay for the amount of used storage. The price is calculated per GB. There are several storage types, such as general-purpose SSD-based volumes, SSD-based volumes with guaranteed IOPs, and specific types of SSD disk layout, which are more suitable for databases and other specific applications.
As a result, the final payment for your instance will be based on the type of instance (CPU and RAM resources), size and type of storage, and the OS you run.
Establishing Secure Access to Services Running in AWS
Another issue is secure access to services running in AWS. Placing a server on the internet and providing access to the server directly through a real IP address is quite risky from a security standpoint. Therefore, at NAKIVO, we decided to set up two networks in AWS:
- an internal network without internet access, where all the servers would be placed
- an external network with internet access
A software router, which is also a VPN server, runs between these two networks. Thus, in order to obtain access to the servers, it is necessary to connect to the VPN.
Note: AWS has its own solution for VPN access, but it comes at an extra cost.
For NAKIVO, all the servers were successfully migrated to the AWS, and local VMs were powered off. Users started working with IT services through a permanent VPN connection to AWS. This way, we implemented the task of hosting servers in Amazon EC2 and arranged secure encrypted access to the resources. Let’s focus on VMware to AWS migration and explain how to configure this migration process.
Selecting the Tool for VMware to AWS Migration
There are two ways to approach VMware to AWS migration:
- Create new instances with the required operating system, install the required software, and transfer databases, configuration settings, etc. from source servers
- Migrate an existing VM(s) via AWS services
Amazon provides a set of well-documented tools for migrating VMs from a VMware vSphere environment to AWS. A common way to perform VMware to AWS migration is using AWS Server Migration Service (AWS SMS) with Server Migration Connector. This method allows you to migrate multiple VMs at once without the need to configure migration manually for each particular VM. You can use AWS SMS for mass VM migration.
AWS Server Migration Connector is a virtual appliance deployed in vCenter that provides integrated support for VMware to AWS migration. You don’t need to install any migration agents on VMware VMs. There is a possibility to schedule VMware migration to AWS, use incremental replication to move data changed on a source VM, and other useful options.
Configuring the Migration Process Using AWS Server Migration Connector
The workflow consists of the following main stages:
- Stage 1: Creating an IAM user
- Stage 2: Installing AWS Server Migration Service Connector
- Stage 3: Configuring AWS Server Migration Service
Stage 1. Creating an IAM user
First, you need to add a new user for VM migration (for security purposes) and assign the ServerMigrationConnector role to the user.
- Open AWS Management Console.
- Go to Services > Security, Identity & Compliance > IAM.
As an alternative, you can type IAM in the search bar of the Services menu.
- On the Identity and Access Management (IAM) page that opens, click Users > Add user.
- Set user details. Enter a user name, for example, SMS or migration.
Select AWS access type. Make sure you select the Programmatic Access checkbox. There is no need to enable the AWS Management Console access.
Click Next: Permissions to continue.
- Attach a policy to the user. You can attach a policy to the user directly or via a group. As we use only one migration user in our walkthrough, we attach a policy directly.
Click Attach existing policies directly in the Set permissions screen.
Type ServerMigrationConnector in the search bar (Filter policies) and select the ServerMigrationConnector policy.
Click Next: Tags to continue.
You can add tags (optional) at this step and go forward to the Review step.
- Review your configuration for the user. Click Create user if everything is correct.
- You should see the Success message notifying you that you have successfully created a user. Write down (copy) and save the access key ID and secret access key to a safe place. You can click the Download .scv button to save credentials as a CSV file.
Click Close when done.
Stage 2. Installing the AWS Server Migration Service Connector
Once you have configured an IAM user with the appropriate permissions, you should install the AWS Server Migration Service Connector (AWS SMS Connector). The SMS Connector is distributed as an OVA template to deploy a VM in VMware vSphere. You can consider this VM a virtual appliance.
- Downloading the OVA
Download the OVA virtual machine template file by using the link:
https://s3.amazonaws.com/sms-connector/AWS-SMS-Connector.ova
As an alternative, you can find the link in AWS Management Console by doing the following steps:
-
- Go to Services > Migration > Server Migration.
- Click Get started on the AWS Migration Service page.
- Click the Download OVA button and save the OVA file on your disk.
- Deploying the VM from OVA
-
- Deploy the VM from the OVA template in vSphere.
- Log in to VMware vSphere Client to manage vSphere with vCenter Server.
- Use the Host and clusters view in the navigation pane, right-click an ESXi host, cluster or resource pool, and click Deploy OVF Template in the menu that opens.
The Deploy OVF Template wizard opens:
- Select an OVF template. You can paste a direct link (URL) to the AWS-SMS-Connector OVA file (https://s3.amazonaws.com/sms-connector/AWS-SMS-Connector.ova ) if you use the latest vSphere 7 version. Otherwise, you may get an error.
The most reliable method is to select and upload a local file from your disk. Select Local file and click Upload files (browse the file when prompted).
Click Next at each step to continue.
- Select a name and folder. Enter a virtual machine name (you can leave the default name), for example, AWS-SMS-Connector. Select a location for the VM, such as a data center, VM folder, etc.
- Select a compute resource. Select an ESXi host, cluster, or resource pool to run the VM.
- Review details. Verify the template details and continue.
- Select storage. Select Thin or Thick Provision as a virtual disk format. Select a datastore to place VM files. We select a thin-provisioned format and a VMFS 6 datastore in our example.
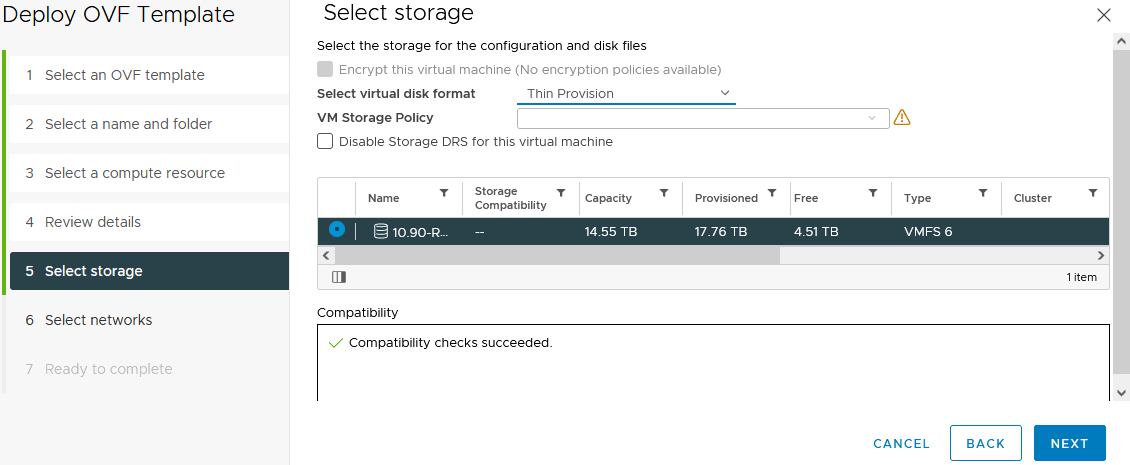
- Select networks. Select VM networks to which you want to connect a virtual machine.
- Ready to complete. Review your selections and click Finish if everything is correct.
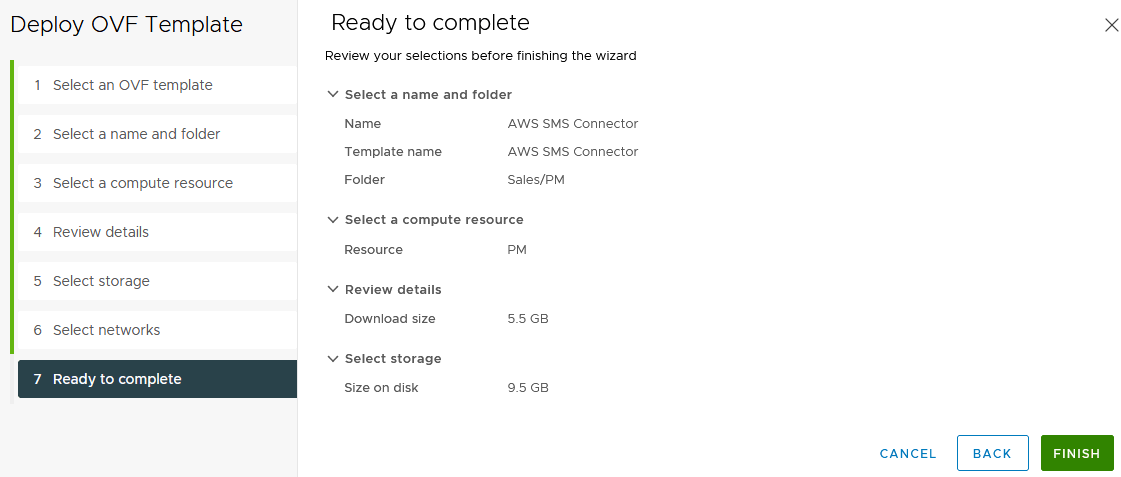
Wait until the SMS Connector VM is deployed from the OVA template. You can check the progress in the Recent Tasks bar at the bottom of the vSphere Client web interface.
Once the VM is deployed, start the VM.
AWS Connector configuration
Launch a web console or VMware Remote Console to open the user interface of the operating system running AWS Connector. AWS Connector is running on FreeBSD with the command line interface. Check the IP address of the AWS Connector VM (10.10.10.27 in our case).
Enter this IP address in a web browser to access the web interface of AWS Connector in the https://IP_ADDRESS format. We enter https://10.10.10.27 in this case.
Click the Get started now button located in the center of the window.
A setup wizard opens in the web interface.
- License Agreement. Accept the license agreement. Hit Next at each step of the wizard to continue.
- Create a password. Create a password for the management console of the AWS Connector appliance.
- Network info. The current IP address assigned to a virtual network adapter of the VM is displayed on this screen. You can log in to the command line interface of the SMS Connector (by using VMware Remote Console or Web Console) and change the network configuration of the VM.
Use these default credentials to log in:
• Username: ec2-user
• Password: ec2pass
The available options for network configuration are displayed on the screenshot below and are identical to the options in the command line interface. You can use an IP address assigned via DHCP (by default).
The log-in screen contains the basic information, including system time, IP address, and login prompt. Enter the user name and password mentioned above to log in.
Change the password after your first login.
Run the command to open the configuration menu after you log in to the system:
sudo setup.rb
Then you should see a menu with options identical to the options on the previous screen (step 3 of the wizard in the web interface).
- Log uploads and upgrades. You can leave the AWS Server Migration Service auto-upgrade checkbox selected to keep the AWS SMS up-to-date.
- Server Migration Service. Select an AWS region, for example, EU (Ireland).
Enter the AWS credentials you saved after creating the IAM user, that is the Access Key and Secret Key.
- vCenter Service Account. Enter the vCenter IP address or hostname and credentials.
For security reasons, it is better to create a vCenter service account with the appropriate permissions. This operation includes three actions whose details are displayed on the screen:
• Create a vCenter role
• Create a vCenter user
• Assign the vCenter role to the vCenter user
You can use the default administrator account for vCenter (for example, [email protected]), but it is less secure.
Validate (accept) the untrusted vCenter certificate when the appropriate message is displayed. Hit Trust.
You have configured the SMS Connector. Click Go to connector dashboard.
We are redirected to the dashboard page of the AWS Server Migration Service running as a VM in VMware vSphere (10.10.10.27 in our case).
You can see the status and basic configuration information on this page.
Note: Before you start moving VMs to the Amazon cloud with the VMware to AWS migration tool, you can use a VMware VM data protection solution to create backups.
Stage 3. Configuring AWS Server Migration Service
Now you need to configure AWS Server Migration Service on the AWS side.
- Open the web interface of AWS Management Console once again.
- Click Services > Server Migration Service. You can type server migration service in the search bar.
- Open the Connectors page, where you can see the basic information and the connector status.
- Click Import server catalog to proceed. Wait for a while until a system creates a list of VMs of your vCenter.
Once the import has been completed, you can see the list of your VMware VMs managed by vCenter.
- Select the VMs you need to migrate from VMware vSphere to AWS.
Click Create replication jobs.
- Configure server-specific settings. Select the license type for each VM to migrate. The available licensing options are:
• Auto – an operating system on a source VM is detected and the appropriate license is applied automatically in AWS.
• AWS – an AWS license is assigned to the EC2 instance after migration if needed.
• BYOL (Bring Your Own License) – the license from the source system is preserved after migration.
- Configure replication job settings. Select the replication type, start time, IAM service role, AMI deletion options, and other options. In our case, we select One-time migration and start replication immediately to migrate VMware VM to AWS now.
- Review settings and click Create to start VM replication for VMware migration to AWS.
After that, you can see the creation status, replication job ID, VM ID, Server ID, etc.
Click View replication jobs.
Now you should be on a Servers page. Click a Replication job ID for a VM that is replicating.
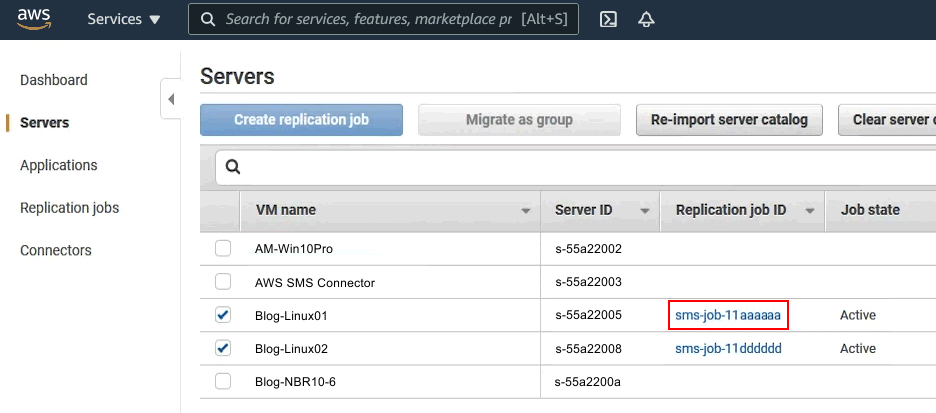
You are redirected to a Replication jobs page.
Select the checkbox at the needed Replication Job ID.
The details for the selected Replication Job ID are displayed below.
Click the Run History tab.
Select the needed Replication job ID which job has already finished. Click Launch instance to create an EC2 instance from the AMI (Amazon Machine Image) created as a result of VM migration from VMware vSphere to AWS. As an alternative, you can click Actions > Launch instance from the latest AMI.
Create an EC2 instance by using the image created as a result of VM replication for VM migration. Follow the wizard and select the AWS EC2 instance type that meets your requirements to run the VM migrated from VMware vSphere.
Note: The process of creating an EC2 instance is explained in the blog post about creating EC2 instances by using EBS snapshots.
VMware to AWS migration is finished after that.
Backup and Recovery of AWS EC2 Instances
Logically, the next step was backup and recovery of Amazon EC2 instances. In terms of backup, AWS provides a mechanism for creating snapshots.
Snapshots are created not for a whole instance, as it is done in VMware vSphere, but just for disks connected to the instance. Snapshots must be created for each individual disk. This means that if you have 5 instances and 20 disks are connected to each instance, you have to make 100 snapshots. Snapshots can be created manually or by using scripts launched by tools offered by AWS.
While analyzing the existing solutions for automated backups, we saw that all of the proposed solutions simply create scheduled snapshots. No solution offered a backup outside of the AWS infrastructure.
Being a backup company, we could not be satisfied only with the creation of snapshots. NAKIVO started developing a solution that would allow storing backups of AWS instances locally on the client’s site. The solution would allow restoring an instance from a locally stored backup in any AWS region.
AWS EC2 Instance Protection in NAKIVO Backup & Replication
NAKIVO has developed a solution for EC2 instance protection. NAKIVO Backup & Replication allows you to create AWS instance backups and store them anywhere: in Amazon S3 (same or different region), in EC2 EBS storage, on a local host, in Wasabi, in Azure Blob, on tape, on deduplication appliances, and more.
Adding EC2 instances to the Inventory is as easy as adding a VMware vCenter server. To discover existing EC2 instances, You just need to enter an access key ID and a secret access key from your AWS account. To back up instances, you should deploy the NAKIVO Transporter in AWS. The region where the Transporter is deployed must be the same as the region with the EC2 instances you need to back up.
After the Transporter is deployed, you are ready to create an AWS EC2 backup job. The process is the same as for VMware environments.
You can try the functionality in your environment by downloading NAKIVO Backup & Replication Free Edition.
Recommend
About Joyk
Aggregate valuable and interesting links.
Joyk means Joy of geeK