

总在用户态调试 C# 程序,终还是搭了一个内核态环境 - 一线码农
source link: https://www.cnblogs.com/huangxincheng/p/16652322.html
Go to the source link to view the article. You can view the picture content, updated content and better typesetting reading experience. If the link is broken, please click the button below to view the snapshot at that time.

一直在用 WinDbg 调试用户态程序,并没有用它调试过 内核态,毕竟不是做驱动开发,也没有在分析 dump 中需要接触用内核态的需求,但未知的事情总觉得很酷,加上最近在看 《深入解析 Windows 操作系统》 一书,书中有不少案例需要深入到 内核态 ,所以这篇准备整理一下如何用 WinDbg 调试 C# 内核态吧。
操作环境:
- Windbg Preview
- 宿主机:Windows 10
- 虚拟机:Windows 10
二:搭建内核态调试
1. 基本原理
操作系统的引导程序 BootMgr 和 WinLoad 内置了调试模式,支持以 COM 接口互通,所以我们需要先添加一种可供调试的启动项,供引导程序 BootMgr 启动时弹框让我们选择。
2. 配置调试启动项
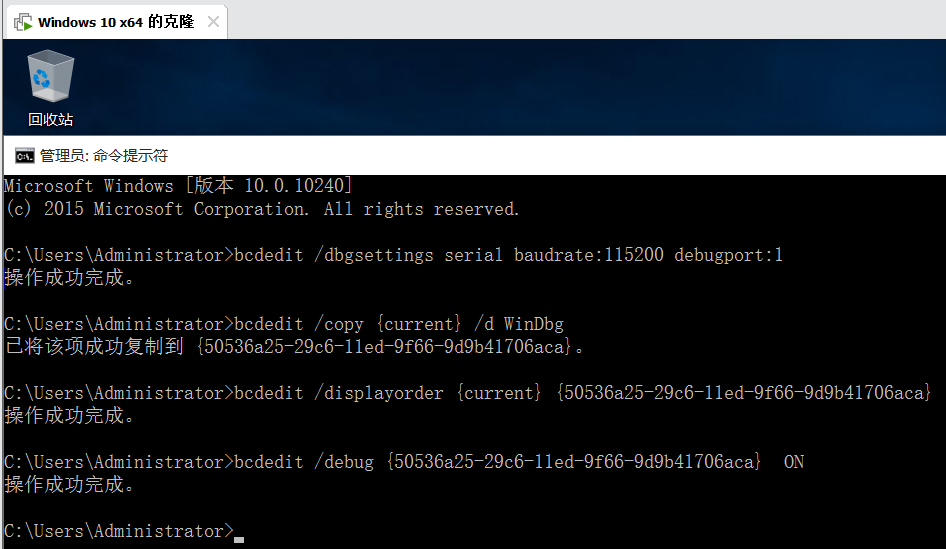
大家可以在 https://msdn.itellyou.cn/ 下载一个完整版的 Window10 ISO 包,这里就不细说了,启动虚拟机进入 Windows10 ,以管理员模式打开 CMD 窗口,执行如下 四条命令 来编辑 bcd (Boot Configuration Data)。
bcdedit /dbgsettings serial baudrate:115200 debugport:1
bcdedit /copy {current} /d WinDbg
bcdedit /displayorder {current} {ID}
bcdedit /debug {ID} ON
注意一下,这里的 {ID} 是 CMD 上生成的 GUID,这是你的启动项唯一键,别名是 WinDbg, 在我的界面上大概是这个样子:
3. 配置 COM 接口
这里有几个步骤要注意了,大致如下:
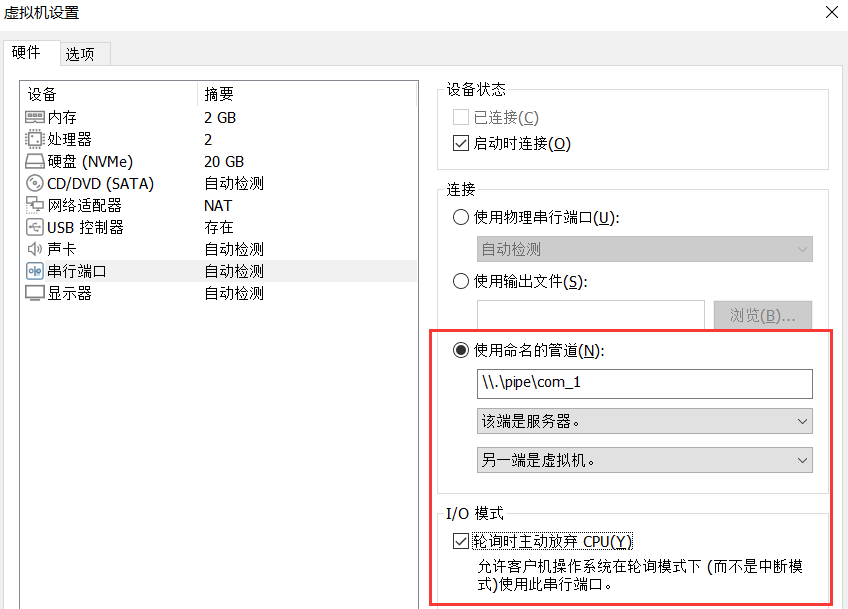
1) 把打印机选项移除了,因为它占用了 COM1 接口。
2) 新增一个 串行端口。
3)在 使用命名管道 中填入 \\.\pipe\com_1, 同时勾选 轮询时主动放弃CPU。
设置完之后点击确定,完整截图如下:
4. 配置 Windbg Preview
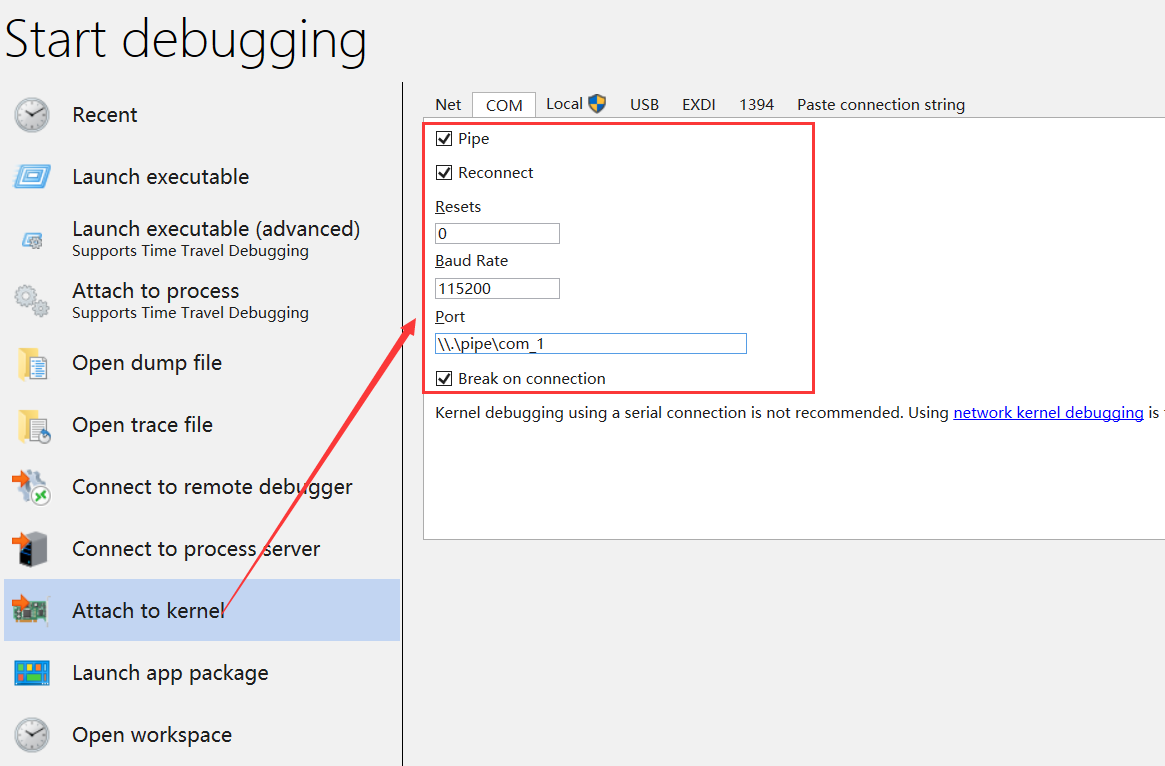
我们把 WinDbg 打开,选择 Attach to kernel 选项,然后选择 COM 模式,设置 Baud Rate = 115200 ,然后是 Port=\\.\pipe\com_1 ,配置完之后点击 OK, 完整截图如下:
如果一切正常的话,Windbg 应该是如下输出,等待COM连接状态。
Microsoft (R) Windows Debugger Version 10.0.25136.1001 AMD64
Copyright (c) Microsoft Corporation. All rights reserved.

Waiting for pipe \\.\pipe\com_1
Waiting to reconnect...
5. 启动虚拟机
这些都配置完之后,我们重新启动虚拟机,在 BootMgr 阶段会出现两个引导项,其中一个就是在 小项2 时配置的,我们选择它就好了,完整截图如下:
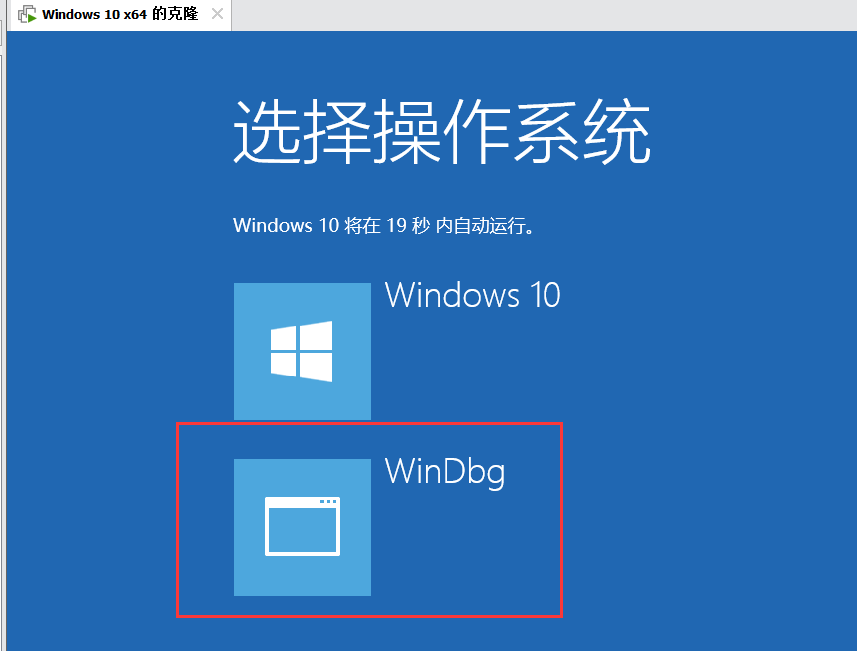
稍等片刻后 WinDbg 会显示连接成功,在进入初始化时会 int 3 中断, 如果你真的到了这一步,那恭喜你!!!
Microsoft (R) Windows Debugger Version 10.0.25136.1001 AMD64
Copyright (c) Microsoft Corporation. All rights reserved.

Waiting for pipe \\.\pipe\com_1
Waiting to reconnect...
Connected to Windows 10 10240 x64 target at (Thu Sep  1 23:23:35.235 2022 (UTC + 8:00)), ptr64 TRUE
Kernel Debugger connection established.  (Initial Breakpoint requested)

************* Path validation summary **************
Response                         Time (ms)     Location
Deferred                                       srv*c:\mysymbols_fix*https://msdl.microsoft.com/download/symbols
Error                                          D:\net5\ConsoleApp1\Debug
Deferred                                       srv*c:\mysymbols*https://msdl.microsoft.com/download/symbols
Symbol search path is: srv*c:\mysymbols_fix*https://msdl.microsoft.com/download/symbols;D:\net5\ConsoleApp1\Debug;srv*c:\mysymbols*https://msdl.microsoft.com/download/symbols
Executable search path is:
Windows 10 Kernel Version 10240 MP (1 procs) Free x64
Edition build lab: 10240.17394.amd64fre.th1_st1.170427-1347
Machine Name:
Kernel base = 0xfffff802`a3c7b000 PsLoadedModuleList = 0xfffff802`a3fa0070
System Uptime: 0 days 0:00:00.092
nt!DebugService2+0x5:
fffff802`a3dcfca5 cc              int     3
因为是初始化中断,接下来在 WinDbg 命令面板中先用 g 执行,让操作系统继续跑下去,稍等片刻就会进入到 Windows 10 的操作界面。
6. netcore 测试
前段时间写了一篇文章,聊到了 ReadFile 从用户态切到内核态的过程,还画了一张图。
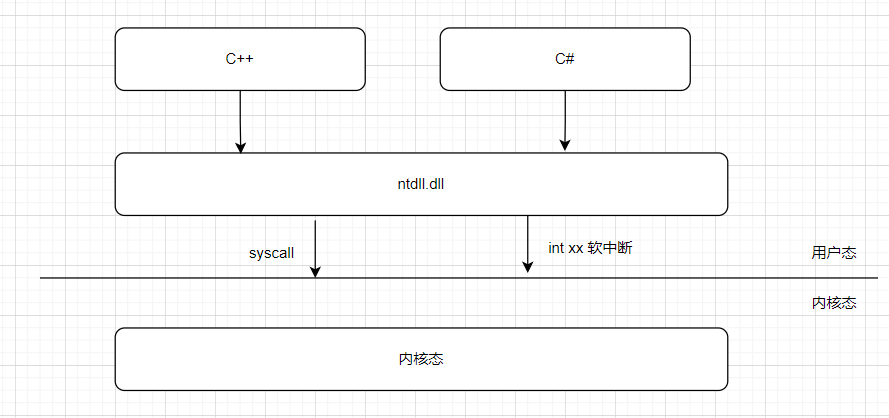
现在可以调试 内核态 那何不试试看呢??? 哈哈,说干就干,先上一段测试代码。
        static void Main(string[] args)
        {
            var i = 0;

            File.WriteAllText(@"C:\1.txt", "hello world!");
            while (true)
            {
                var str = File.ReadAllText(@"C:\1.txt");
                Console.WriteLine($"{i++}, content={str.Length}");
                Thread.Sleep(1000);
            }

            Console.ReadLine();
        }
为了方便观察用户态栈,我在虚拟机中的 Windows10 系统上安装一个 WinDbg10,目的就是拦截 ntdll!NtReadFile 函数时输出 用户态栈。
bp ntdll!NtReadFile "k 10;gc"
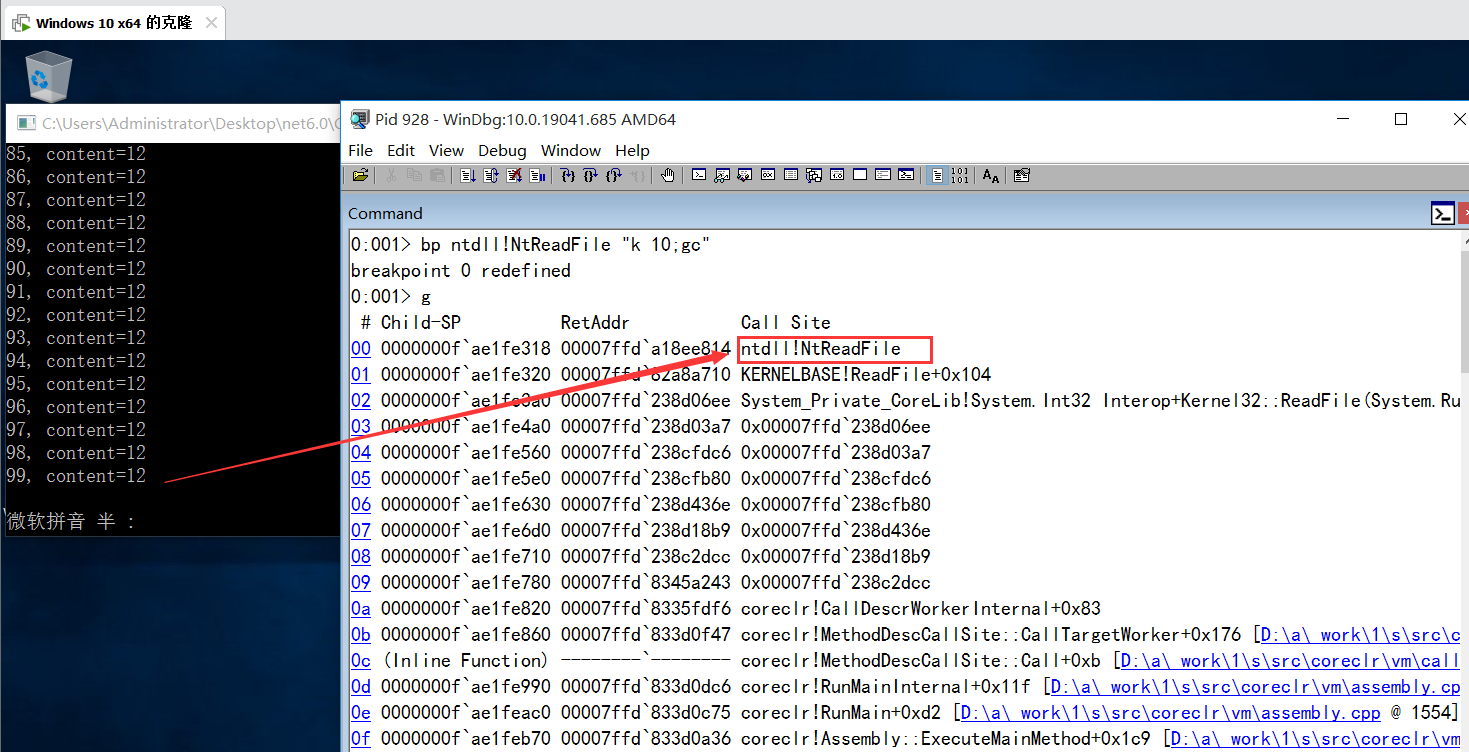
可以看到每次只要程序输出一次,windbg10 都能成功拦截,接下来在宿主机的 WinDbg Preview 中先输入 .reload 重新加载下符号,目的就是方便看到用户态上的 ntdll.dll 函数名,但不一定好使,碰碰运气吧,接下来输入 nt!NtReadFile 观察内核态栈。
bp nt!NtReadFile
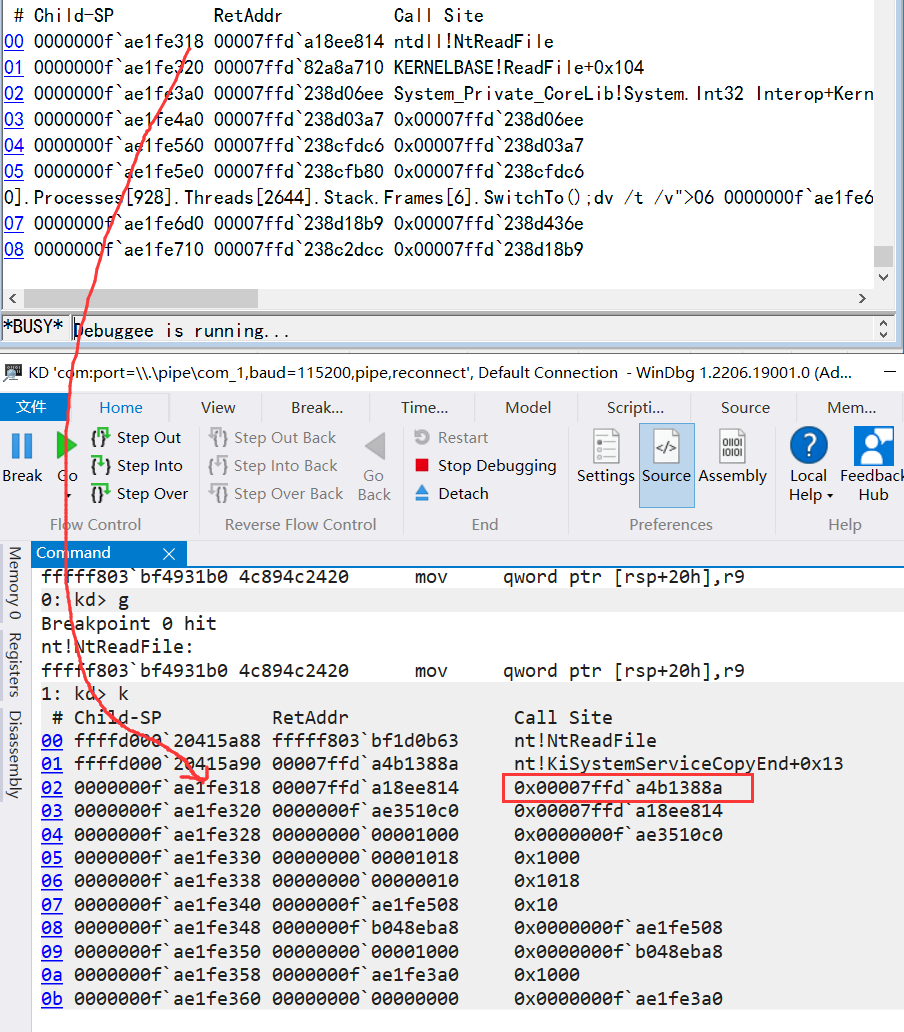
从新老Windbg截图中,可以清晰的看到,这个的 Child-SP 线程栈终于对接上了,也就验证了图上所说:ntdll!NtReadFile (用户态网关) -> nt!KiSystemServiceCopyEnd(内核态调度中心) -> nt!NtReadFile (内核态处理函数)。
好了,本篇就先说这么多,希望对大家有帮助,也是对自己的一个总结。
Recommend
About Joyk
Aggregate valuable and interesting links.
Joyk means Joy of geeK