

Let’s Dockerize a Node.js Express App
source link: https://blog.bitsrc.io/lets-dockerize-a-node-express-app-fdba1cf516b2
Go to the source link to view the article. You can view the picture content, updated content and better typesetting reading experience. If the link is broken, please click the button below to view the snapshot at that time.

Let’s Dockerize a Node.js Express App
Create a docker image and deploy your Node application in 3 steps
Why Docker?
“Docker takes away repetitive, mundane configuration tasks and is used throughout the development lifecycle for fast, easy and portable application development — desktop and cloud. Docker’s comprehensive end to end platform includes UIs, CLIs, APIs and security that are engineered to work together across the entire application delivery lifecycle.” — Official Website
I couldn’t have said it better myself. That’s exactly why Docker. If that’s a bit complicated to make sense of, in simple words, it means that Docker let’s you focus more on making your code/product/app better, by taking away all the deployment and distribution related worries that come along with it.
Getting Started
Before we actually get on with the code, I assume 3 things:
- You have Docker installed on your machine If not, you can download it from here.
- You have a Node-Express app.
- You have some understanding and knowledge of TypeScript.
In case you don’t have an application yet, you can simply clone one from my GitHub (link below).
GitHub - the-devdesigner/node-express-boilerplate: A boilerplate Node-Express application to get…
You can't perform that action at this time. You signed in with another tab or window. You signed out in another tab or…
In case you don’t know TypeScript, or simply prefer to use JS, you can go ahead and create a JS version of the app. Once you have a running Node app, everything Docker related are yaml files, or has its own syntax.
For the complete implementation, check out the code on my GitHub. This project has more than just Docker implementation, but other things as well like Logging — using Winston.
Docker Configurations
With the initial steps out of the way, it is finally time to configure our app to work with Docker. We are gonna use both Dockerfile and docker-compose methods to dockerize our application.
Using Dockerfile
In the root of your project, add a new file called Dockerfile. Remember, it has to have the exact name or else you will have to explicitly tell docker which file to use as config. Also, this file has no extensions. You can read more about Dockerfile here.
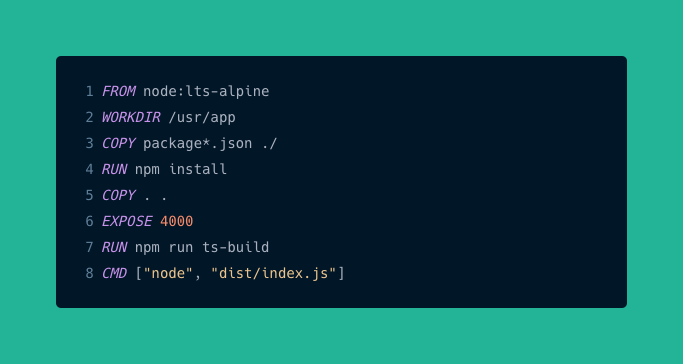
FROM node:lts-alpine— instructs Docker to use a lean version of NodeJS image from Docker registry, as the base for the image that we are creating.- Using
WORKDIR /usr/app, we create ausr/appa working directory where all our code will be present, and thenCOPYpackage.json and package-lock.json to that directory. - By copying the package.json and package-lock.json first, we make use of caching that comes with Docker, since it only copies the files that change between image creations.
- Once that is done, we copy everything from our project root
.(on our machine), on to theWORKDIRon the container. - By using
EXPOSE 4000, we let docker know that once we start our container using this image, we want port 4000 to be available for traffic. - The
RUN npm run ts-buildis just what we do on our local machines too. It is just compiling our TypeScript code. - Finally, the
CMD ["node", "/dist/index.js"]is how we specify a default command that should be executed when a new container is created using our image. After all, we do want our app to start up once the container does.
At this point, we can actually go ahead and build our image, and start a new container, by running a few commands in the CLI, or we can create a docker-compose file. I surely will show you both ways, but do keep in mind, using docker-compose really makes a lot of things easier. You will see that once we reach the next step.
Using docker-compose
Just as before, add 2 new filedocker-compose.yml and Dockerfile.dev, both in the root of your project. Reason for this is simple, this one is going to be for development env. Yes! That’s right! Similar to what we do with webpack, or by using nodemon, we can have a dev and a prod version in Docker as well.
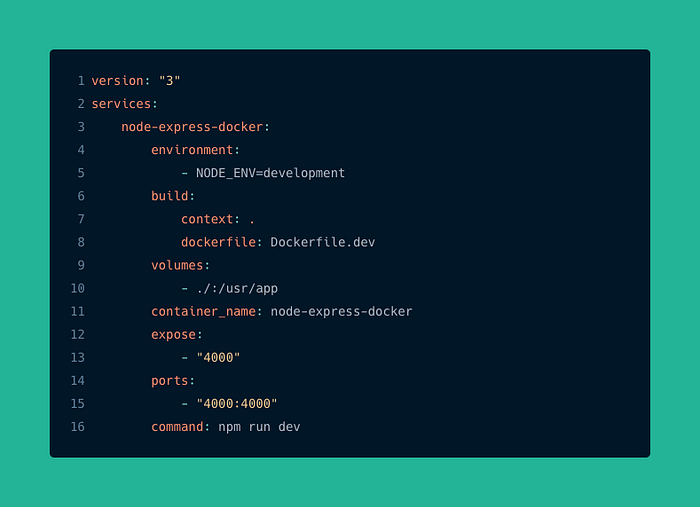
If you take bothDockerfile.dev and docker-compose.yml and compare it together with the Dockerfile created in the beginning, you will find similarities. We’re still exposing PORT 4000 and adding a default container command of npm run dev. If you want to take a deeper dive into docker-compose, you can find a lot more details here.
If you have made it till here, we’re done with major configurations that we’ll be needing to create an image for our app and for starting a new container using that very image.
Build the Image and Start the Container
There are different ways that we can build an image.
Using Dockerfile
By running the following command, we are telling docker to build a new image using the current context . , name the image in this <your_dockerhub_name>/<container_name>:tag, using the -t flag, and do all of this using the Dockerfile that we created first.
docker image build . -t <your_dockerhub_name>/<container_name>:tag
Now to use that image to create a new container, we need to run:
docker run -p 4000:4000 <image_name/image_id>
You will see the -p 4000:4000 flag and value passed into the command, which tells docker to map port 4000 from my local machine with port 4000 of the container. This will let me to have access of my node app over on localhost:4000. This is known as Container Port Mapping.
Using docker-compose
Remember all the configurations that we added to our docker-compose file? And also how I told you your life will be easier with docker-compose? It’s time for that magic now… By running the following command in the cli, we build an image and start a new container, both in one go.
docker-compose up --build
And that’s it. The --build flag instructs docker to first build an image using the configurations in Dockerfile.dev and then start a new container having all those network settings (container port mapping) and default command.
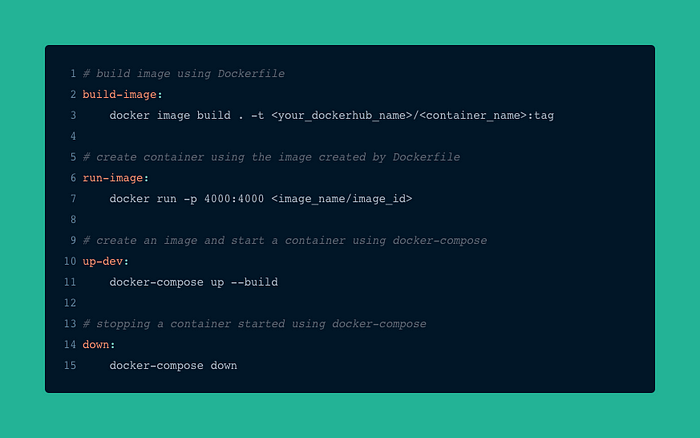
Adding a Makefile
Honestly, it can be hard to keep writing the same, long commands, or remember all the flags that must be passed into the cli. I suggest you add a Makefile into your project root and create scripts (similar to what we do in package.json). Running any command is as simple as make <command_name>.
Wrapping Up
Once you run either make up-dev command or, make build-image, followed by make run-image commands, you’ll have your app running inside a Docker container. If you do not get any errors in your terminal/console, visit localhost:4000 and you’ll see a message printed — Hello World!. From that point onwards, sky is the limit for you.
That’s all folks!
We are done!
Thanks for reading. If you found this helpful, make sure to drop me a 👏 so that I can know. Check out my other articles where I talk about React, NodeJS and MongoDB.
Bit: Build Better UI Component Libraries
Say hey to Bit. It’s the #1 tool for component-driven app development.
With Bit, you can create any part of your app as a “component” that’s composable and reusable. You and your team can share a toolbox of components to build more apps faster and consistently together.
- Create and compose “app building blocks”: UI elements, full features, pages, applications, serverless, or micro-services. With any JS stack.
- Easily share, and reuse components as a team.
- Quickly update components across projects.
- Make hard things simple: Monorepos, design systems & micro-frontends.
Recommend
About Joyk
Aggregate valuable and interesting links.
Joyk means Joy of geeK