

Getting started with Fresh: The New Deno Framework
source link: https://blog.bitsrc.io/getting-started-with-fresh-the-new-deno-framework-47ac30545891
Go to the source link to view the article. You can view the picture content, updated content and better typesetting reading experience. If the link is broken, please click the button below to view the snapshot at that time.

Getting started with Fresh: The New Deno Framework
Building your first project using islands of interactivity

Since the moment I interviewed Fresh’s creator, Luca Casonato for the 20MinJS podcast (you can listen to the full episode here), I’ve been intrigued by the philosophy behind this framework.
Unlike others, its mantra is:
Static first, then dynamic
He never actually said those words, but if you listen to the episode you’ll get the idea that if you’re building a site or a web app with Fresh, you go static first. Meaning that chances are, your website is between 80% to 95% static and you only need a few interactive items here and there. This is where the islands of interactivity happen to be super helpful (I actually wrote an article on this pattern if you’d like to know more about it).
But I thought it could be interesting to show you what that means from the developer’s perspective. So let’s build a web application using Fresh to understand how the islands pattern affects your development process.
What are we building?
To keep it interesting, I’m going to build a blog engine. I know, shocking!
But hear me out, blogs by themselves are quite static, so I’m going to also build a “search engine” tied to it that indexes every static page and provides an island component that you can use to search the blog.
Notice the quotes around “search engine” though, the focus of this tutorial is going to be the islands pattern, not the implementation of the search algorithm, keep that in mind before you start killing me in the comments!
The end result is going to look like this:
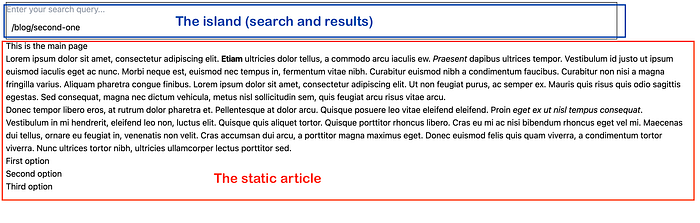
Granted, there are no styles in there, that is because right now Fresh only supports Tailwind and I’m not that great with it. So I focused on the JavaScript part, hopefully you’ll be able to figure out the styles part on your own.
Building the blog engine — getting started with Fresh
Getting started with Fresh is quite simple, assuming of course, you already install Deno 1.2.0 in your system. If you’ve done that part, then all you have to do is:
You can then go into the new folder, and run deno task start to get the dev server going. If you look at the folder content, you’ll see in the root there are 2 files: dev.ts and main.ts , the first one is going to be run during development (like now), and the second one is run in production.
With that said, the blog engine will take our Markdown files (inside a preset folder) and it’ll translate them into something Fresh knows how to serve. That means we’ll save them as .tsx files inside the routes/blog folder (which we’ll have to create for this example).
To achieve this, our entry point will be inside the dev.ts file, we’ll call a function that does the following:
- It reads all Markdown files inside our content folder.
- It translates the markdown into HTML using a predefined template, we can generate the
.tsxfile we need. - It checks if the file already exists in the destination folder.
- (a) If it exists, it checks if their content match, if they don’t, it’ll replace it, otherwise it won’t do anything with it.
- (b) If it doesn’t exist, it’ll save the file.
Since Fresh uses file-path-based routing, all .tsx files inside the routes folder will become valid routes. So a file called my-article.md will be turned into my-article.tsx inside the routes/blog folder. This, in turn, means you can visit http://localhost:3000/blog/my-article and read its content.
We need to perform the back of 4.a, because the file watcher of Deno (it comes out-of-the-box) will restart the server every time we re-create the .tsx files, so if we don’t check to make sure we don’t overwrite the exact same file, we’ll generate a restarting loop (not that it happened to me, but I know a friend who went through the same thing, alright!?).
Let’s start building the first stage of our function:
This is a simple function, and the one we’ll be calling from the dev.ts file. It “walks” through all the files inside our predefined content folder (with the walk function) and if they are files (they can also be folders), it’ll read their content, parse them into HTML and then call the. saveMarkDownFile function, which will do steps 3–5 from above.
Saving our file
The saveMarkDownFile function needs to do several things, so let’s take a look at it:
Now, this function is not that complex, but it does do a few things:
- Using the original file name (ending in
.md) will change it to end in.tsx - It will call the
pageTemplatefunction, which will take the HTML of the parsed markdown and insert it into a predefined page component template. - It also calculates the SHA-1 hash for both, the template we got from the previous step, and the template of the file on disk with the same name (unless it doesn’t exist already, of course).
- Finally, it checks both hashes and if they’re not the same, it’ll save the file, otherwise it will do nothing.
The component template
The pageTemplate function will return a new string, it’s nothing fancy really, and you can define here what your new .tsx component pages will look like:
At this point, the blog “engine” is ready. You can create markdown files inside a predefined folder, and call the readAllMD function from the dev.ts file. It will work, but we need to get the search engine going.
Implementing the search engine
Our search engine is going to be quite simple, it will keep the content of every file it reads in memory, and it will use a simple method to search through them.
So let’s take a quick look at it:
That’s it, also, it’s a singleton, because it simplifies accessing it from multiple places and having the same data in memory. If you don’t know what the singleton pattern is, check out this article I wrote a while ago about it.
Let’s now look at how we can use the search engine inside our blog engine to index all the files we translate. Inside the saveMarkDownFile function, add the following lines:
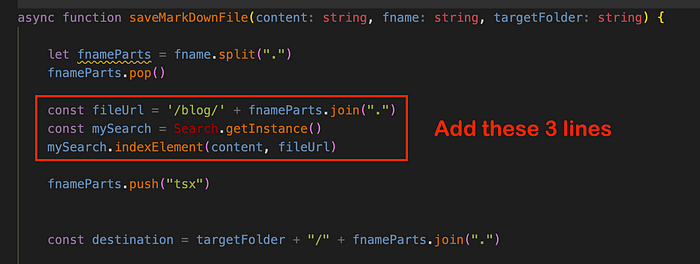
The first line generates the URL for the file, because we’ll index that information as well, and then we simply get the current instance of the engine and call the indexElement method. That’s all, during the startup process the engine will index all files.
Let’s now take a look at how we can implement an island component to interact with our search engine.
Implementing our first island
Inside the islands folder, which should already be there, create a SearchBar.tsx file, and put the following content inside it:
While this is a Preact component, if you’re a React developer, you should be very familiar with it. It renders a search box, and on its “change” event, it calls the doSearch function. This function will perform an API call (since we can’t really import our search engine into the front-end and expect to have the indexed data loaded) where the actual search will be performed.
With the results, it will set a state variable through the useState hook, nothing out of the ordinary.
Now, as you can see, the “island” itself is not different. In fact, it’s just a normal component, the only consideration we had to have was to save it inside a special folder. That’s it!
Let’s now end this example with the actual code of the API endpoint to understand how to perform the actual search.
Setting up our first API endpoint in Fresh
Again, since Fresh is using file path routing, we’ll have to save our endpoint files inside a special folder: routes/api
For this example, I’m creating the search.ts file inside that folder:
The file is exporting a special object called handlers which defines one method per supported HTTP verb. In our case, we only need the GET method to be available, so that’s what I’m defining.
Then I capture the q URL parameter, where the search term is sent (look a the component’s code to double check it), and then I get the instance of the search engine (thanks to the fact that this is a singleton, the indexed files are still loaded in memory), and I perform the search by calling the searchFile method. This method, as you’ve probably seen already, will filter the list of indexed elements and only return the files that contain a match.
With that information, I create a new Response and end the method.
And that’s it, you now have a working blog engine that turns your MD files into TSX-compatible files. In the process you’ve learned:
- How to create your first island component.
- How to create your first API route.
- How to tap into Fresh’s start-up process and insert custom behavior.
If you’d like to read the full source code of the project, I’ve uploaded it to this GitHub repository.
Have you tried Fresh already? What are your thoughts on it? Leave a comment and share your experience!
Bit: Build Better UI Component Libraries
Say hey to Bit. It’s the #1 tool for component-driven app development.
With Bit, you can create any part of your app as a “component” that’s composable and reusable. You and your team can share a toolbox of components to build more apps faster and consistently together.
- Create and compose “app building blocks”: UI elements, full features, pages, applications, serverless, or micro-services. With any JS stack.
- Easily share, and reuse components as a team.
- Quickly update components across projects.
- Make hard things simple: Monorepos, design systems & micro-frontends.

Recommend
About Joyk
Aggregate valuable and interesting links.
Joyk means Joy of geeK