

Windows下ESP32 环境搭建(基于esp-idf FreeRTOS) - 姜小豆
source link: https://www.cnblogs.com/warcraft/p/16593820.html
Go to the source link to view the article. You can view the picture content, updated content and better typesetting reading experience. If the link is broken, please click the button below to view the snapshot at that time.

1. 之前的尝试(失败的尝试)#
咸鱼买了3块ESP32开发板。背面写了NODEMCU v1.1,好像这玩意可以直接写lua,也可以刷Micropython写python,还可以用Arduino IDE写c。我想直接用官方库写C。
和乐鑫的这块开发板(ESP32-DevKitC)外观还挺像的(外观和引脚),可以参考这个文档
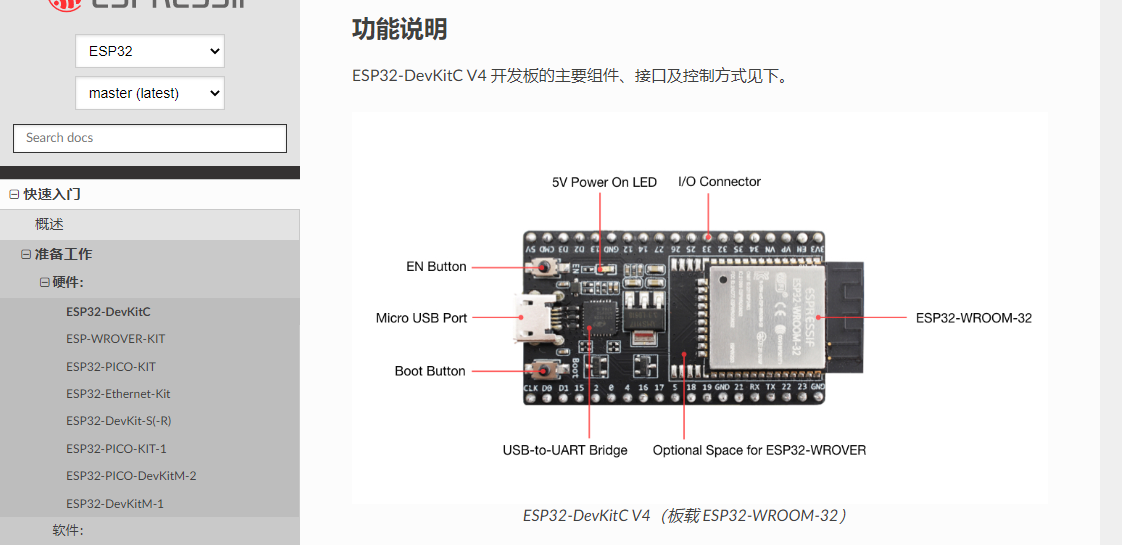
图1 ESP32-DevKitC
...... 经历了一段失败的尝试。
这期间玩了下ESP8266,稍微有了点环境方面的经验。可参考 ESP8266 系统环境搭建。
先直接用之前的程序什么也不改(只改个串口号)来烧录。
Running stub...

A fatal error occurred: Invalid head of packet (0x46)
make: *** [/e/labs/esp8266/ESP8266_RTOS_SDK/components/esptool_py/Makefile.projbuild:76: flash] Error 2
ESP8266的RTOS是 https://github.com/espressif/ESP8266_RTOS_SDK
ESP32 的RTOS是 https://github.com/espressif/esp-idf
ESP8266设置时除了设置RTOS路径,还要设置专用的工具链,而ESP32不需要另外下载工具链。
下载RTOS
git clone --recursive https://github.com/espressif/esp-idf.git
在环境中设置rtos目录
编辑 vim ~/.bash_profile,上面注释的两行是之前配置的ESP8266路径,最后一行是新增的配置
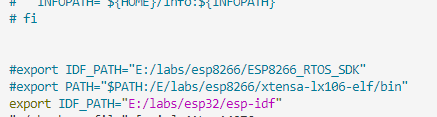
图2 配置文件
编译
复制个 hello world 项目过来。make 报错
make menuconfig
make: *** No rule to make target 'menuconfig'.  Stop.
新建了 Makefile
PROJECT_NAME := myProject

include $(IDF_PATH)/make/project.mk
发现 idf 目录下没有make目录,切换个版本:
git checkout release/v4.4
V4.4对应文档在 构建系统 (传统 GNU Make)
而且有4.4到5的升级指南,看来5这次升级改动比较大,那就一直用V4版本吧。
又经历了一段失败的尝试...
2. 新的尝试(vscode + espressif)#
上面的不用看了,全都PASS掉。直接用官网教程 github - vscode-esp-idf-extension install 一步步进行即可。
直接使用 vscode 下的 扩展。
在python自动安装库的时候,出现错误
Could not fetch URL https://pypi.org/simple/pip/: There was a
修改当前使用的pip源即可,参考Python基础-03-设置pip源
在家里装好了后,将.espressif 和 esp-idf 目录都拷下来。到公司直接放到指定目录后,选择 EXPRESS (再选择本地的ESP-IDF 以及 tools 目录)运行安装,发现总是报错,包含:
        module = __import__(self.module_name, fromlist=['__name__'], level=0)
    ModuleNotFoundError: No module named 'setuptools.command.build'
    ----------------------------------------
ERROR: Command errored out with exit status 1: python setup.py egg_info Check the logs for full command output.
Traceback (most recent call last):
  File "d:\Software\esp-idf\tools\idf_tools.py", line 1860, in <module>
    main(sys.argv[1:])
  File "d:\Software\esp-idf\tools\idf_tools.py", line 1856, in main
    action_func(args)
  File "d:\Software\esp-idf\tools\idf_tools.py", line 1577, in action_install_python_env
    subprocess.check_call(run_args, stdout=sys.stdout, stderr=sys.stderr, env=env_copy)
  File "subprocess.py", line 364, in check_call
subprocess.CalledProcessError: Command '['C:\\Users\\Administrator\\.espressif\\python_env\\idf4.4_py3.8_env\\Scripts\\python.exe', '-m', 'pip', 'install', '--no-warn-script-location', '-r', 'd:\\Software\\esp-idf\\requirements.txt', '--extra-index-url', 'https://dl.espressif.com/pypi']' returned non-zero exit status 1.
的一大长串错误。想着这么安装到底行不行,看到配置中有两个大大的路径名
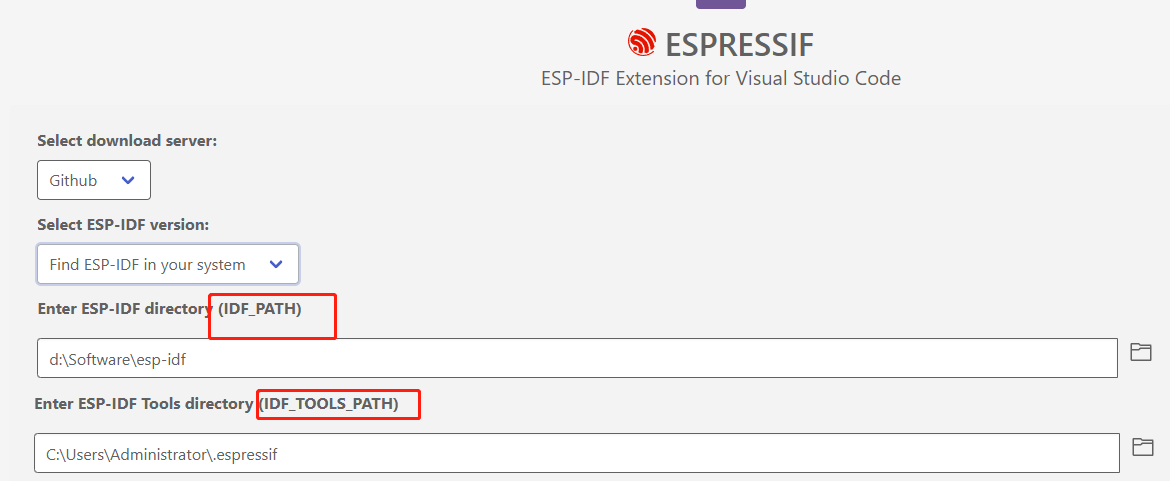
便把这两个路径加到环境变量中,重启vscode 后,现在有三种选项了,直接选最后一个(使用用户配置),就成功了。

还得再备注一下,这之前我还修改了 .espressif/esp-idf.json 文件。修改为了当前目录,不知道有没有影响,也一块贴到这里了
{
  "$schema": "http://json-schema.org/schema#",
  "$id": "http://dl.espressif.com/dl/schemas/esp_idf",
  "_comment": "Configuration file for ESP-IDF IDEs.",
  "_warning": "Use / or \\ when specifying path. Single backslash is not allowed by JSON format.",
  "gitPath": "C:\\Users\\Administrator\\.espressif\\tools\\idf-git\\2.30.1\\cmd\\git.exe",
  "idfToolsPath": "C:\\Users\\Administrator\\.espressif",
  "idfSelectedId": "esp-idf-ba516b215dd292dbb871744b96db338d",
  "idfInstalled": {
    "esp-idf-ba516b21593292dbb8dd744b96db338d": {
      "version": "4.4.2",
      "python": "C:\\Users\\Administrator\\.espressif\\python_env\\idf4.4_py3.8_env\\Scripts\\python.exe",
      "path": "d:\\Software\\esp-idf"
    }
  }
}
基本使用Tutorials。
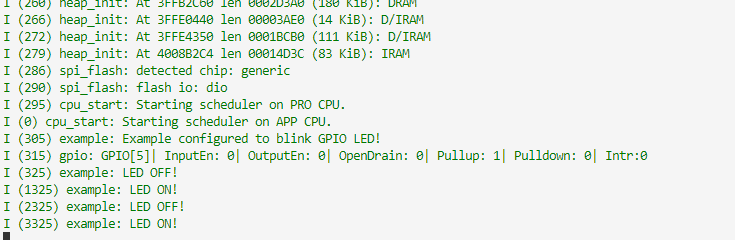
3. 点个灯#
从 esp-idf\examples\get-started\ 下复制blink项目,用vscode 打开,点击左侧ESP-IDF 扩展。
下边栏就出现了菜单
-
首先 target,
-
然后Crtl+E G进行配置,
-
在命令面板下通过IDF命令来生成 C/C++ 配置文件:

- Ctrl+E B, build 项目,过程比较久,可以在终端下查看

更详细流程可参考tutorial 中 basic_use教程。
- Ctrl+E P 选择串口
- Ctrl+E F 进行烧录
- Ctrl+E M 进行监视
注:上面的快捷方式都有对应的菜单可以点击的。快捷键是按一个组合之后,再按另一个键,比如Ctrl+E M, 先按 Ctrl+E, 松开再快速按M。
环境搭建好了,终于可以愉快地玩耍了:)
参考#
Recommend
About Joyk
Aggregate valuable and interesting links.
Joyk means Joy of geeK