

YOLOV7 + StrongSORT 实现目标检测与跟踪,基于 OSNet
source link: https://xugaoxiang.com/2022/08/16/yolov7-strongsort-osnet/
Go to the source link to view the article. You can view the picture content, updated content and better typesetting reading experience. If the link is broken, please click the button below to view the snapshot at that time.

- windows 10 64bit
- python 3.8
- pytorch1.7.1 + cu101
视频看这里
Youtube
Bilibili
前面,我们介绍过 基于YOLOv5和DeepSort的目标跟踪,最近大神又在刚出的 YOLOv7 的基础上加上了目标跟踪,跟踪部分使用的是基于 OSNet 的 StrongSORT,项目地址: https://github.com/mikel-brostrom/Yolov7_StrongSORT_OSNet。
首先去下载源码,目前作者已经发布了 v1.0 正式版,我们就用它
# 使用参数-b下载特定tag的源码,--recurse-submodules参数是为了递归下载根目录下的子项目,这里有yolov7,它是从官方的仓库fork而来,还有deep-person-reid,这种方式也是开源项目中非常常见的依赖管理模式
git clone --recurse-submodules https://github.com/mikel-brostrom/Yolov7_StrongSORT_OSNet.git -b v1.0
这里不建议直接去下载 zip 包,很多新手会碰到这个问题,然后就跑来问,运行程序的时候,为什么缺模块?这是因为,项目中包含了子项目,而子项目往往是一个链接,它并没有直接放到本项目中去管理维护,所以,下载的 zip 中并不包含子项目的源码。
如果因为网络原因,实在是 clone 不下来,可以参考下面的操作
找到对应的 tag 标签,比如现在的 v1.0 版本,然后点击进入对应版本的源码
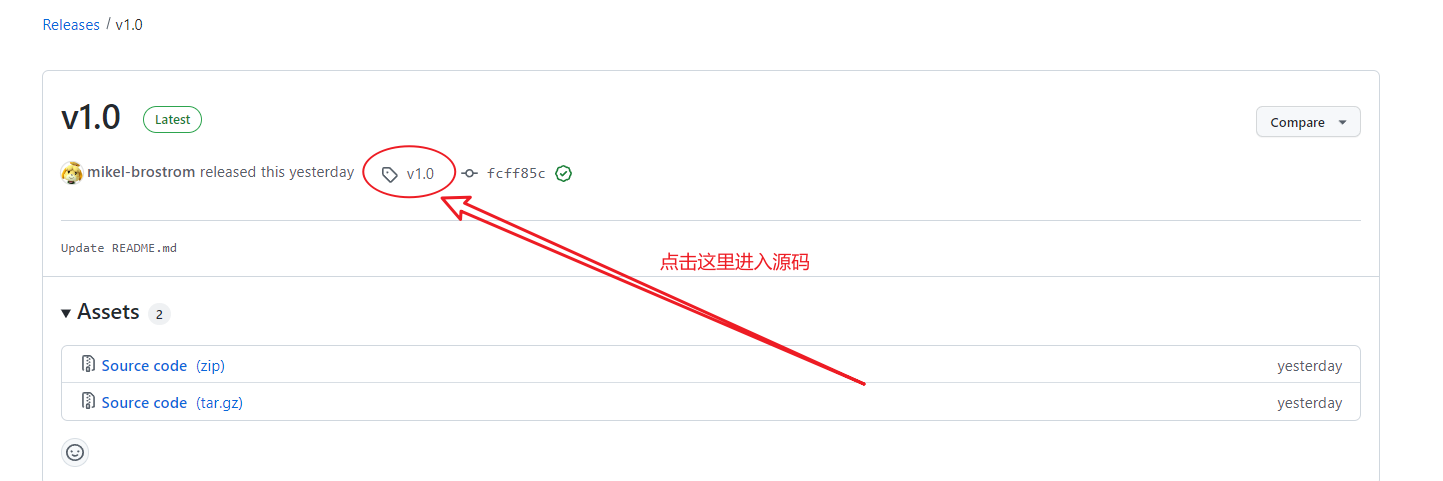
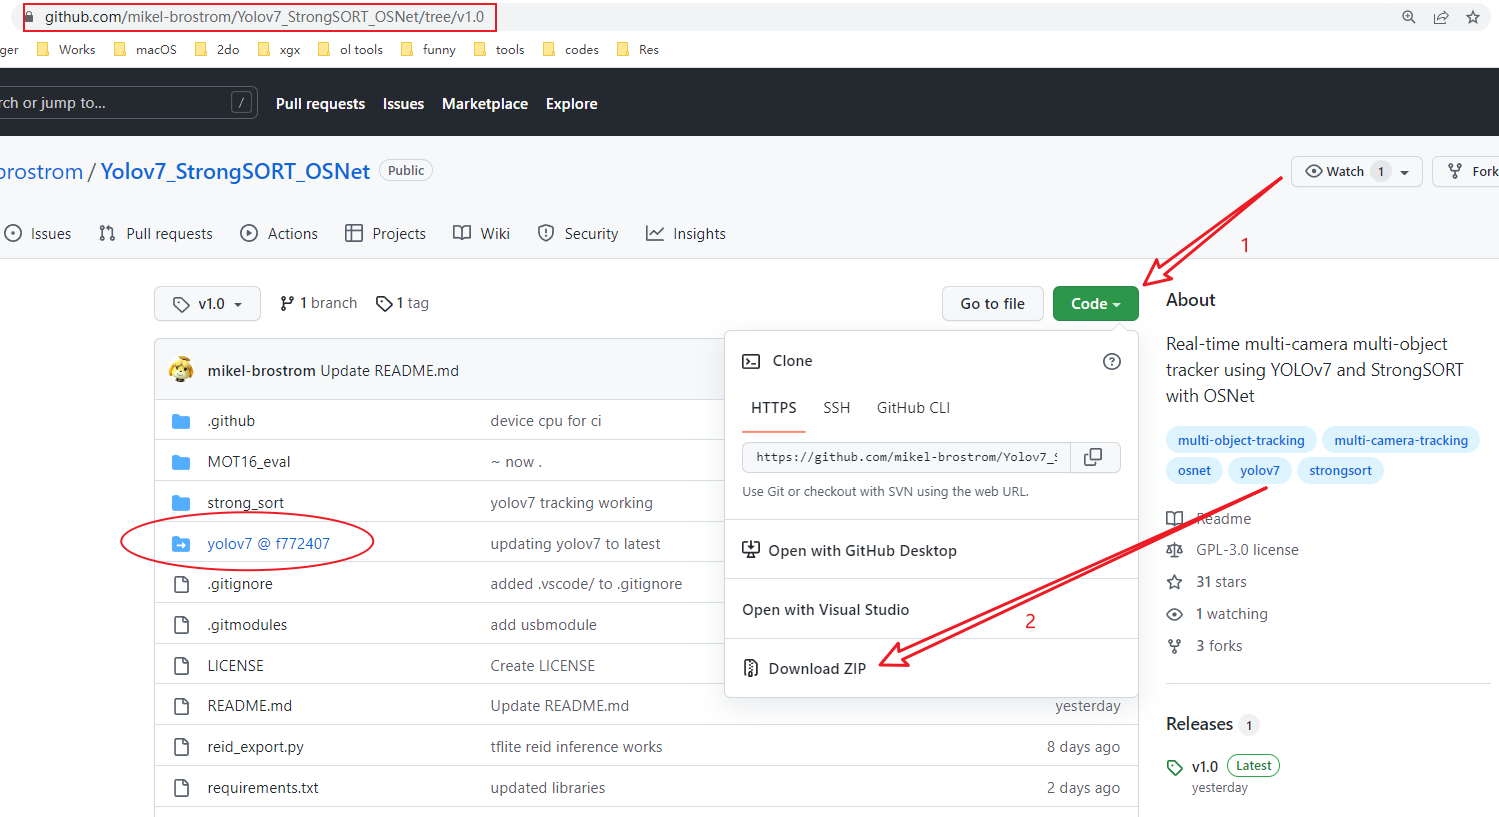
然后下载 zip 压缩包
至于源码中的子项目,注意到,它的项目名后面带了一个 commit id,我们可以直接点击进去,下载 zip 压缩包进行解压。如果有多个子项目,就依次操作多次
安装项目依赖
下面来安装依赖
# 安装gpu版本的pytorch1.7.1,cuda10.1
pip install torch==1.7.1+cu101 torchvision==0.8.2+cu101 torchaudio==0.7.2 -f https://download.pytorch.org/whl/torch_stable.html
除此之外,将 requirements.txt 文件中的 torch 和 torchvision 注释掉,然后执行安装其它依赖
pip install -r requirements.txt环境准备好了,那就找个视频来跑跑看效果,执行
python track.py --source test.mp4 --strong-sort-weights osnet_x0_25_market1501.pt这里是 source 可以是视频文件、摄像头 ID 或者网络视频(rtsp、http、https 都支持),参数 --strong-sort-weights 是指使用的 reid 重识别模型,模型可以到 https://kaiyangzhou.github.io/deep-person-reid/MODEL_ZOO 下载,这里的模型后缀是 pth,可以直接重命名为 pt
程序执行过程中,会去自动下载2个模型文件,一个是 yolov7的,另一个是你指定的 reid 模型,一个是存放的 github 上,下载后放在源码目录下的 weights 文件夹内;另一个是存放的 google 网盘里,下载后放在源码根目录下。

完整的 track.py 参数列表如下,除了 --strong-sort-weights 和 --config-strongsort,其余都是 yolov7 支持的命令行参数
(pytorch1.7) PS D:\Github\Yolov7_StrongSORT_OSNet> python .\track.py -h
strong_sort/deep/reid\torchreid\metrics\rank.py:11: UserWarning: Cython evaluation (very fast so highly recommended) is unavailable, now use python evaluation.
  warnings.warn(
usage: track.py [-h] [--yolo-weights YOLO_WEIGHTS [YOLO_WEIGHTS ...]] [--strong-sort-weights STRONG_SORT_WEIGHTS] [--config-strongsort CONFIG_STRONGSORT] [--source SOURCE] [--imgsz IMGSZ [IMGSZ ...]]
                [--conf-thres CONF_THRES] [--iou-thres IOU_THRES] [--max-det MAX_DET] [--device DEVICE] [--show-vid] [--save-txt] [--save-conf] [--save-crop] [--save-vid] [--nosave]
                [--classes CLASSES [CLASSES ...]] [--agnostic-nms] [--augment] [--visualize] [--update] [--project PROJECT] [--name NAME] [--exist-ok] [--line-thickness LINE_THICKNESS] [--hide-labels]
                [--hide-conf] [--hide-class] [--half] [--dnn]

optional arguments:
  -h, --help            show this help message and exit
  --yolo-weights YOLO_WEIGHTS [YOLO_WEIGHTS ...]
                        model.pt path(s)
  --strong-sort-weights STRONG_SORT_WEIGHTS
  --config-strongsort CONFIG_STRONGSORT
  --source SOURCE       file/dir/URL/glob, 0 for webcam
  --imgsz IMGSZ [IMGSZ ...], --img IMGSZ [IMGSZ ...], --img-size IMGSZ [IMGSZ ...]
                        inference size h,w
  --conf-thres CONF_THRES
  --classes CLASSES [CLASSES ...]
                        filter by class: --classes 0, or --classes 0 2 3
  --agnostic-nms        class-agnostic NMS
  --augment             augmented inference
  --visualize           visualize features
  --update              update all models
  --project PROJECT     save results to project/name
  --name NAME           save results to project/name
  --exist-ok            existing project/name ok, do not increment
  --line-thickness LINE_THICKNESS
                        bounding box thickness (pixels)
  --hide-labels         hide labels
  --hide-conf           hide confidences
  --hide-class          hide IDs
  --half                use FP16 half-precision inference
  --dnn                 use OpenCV DNN for ONNX inference
这里提几个比较常用的参数,检测时显示结果跟参数 --show-vid;保存结果跟参数 --save-vid;如果模型中包含多个目标,但实际只想检测某一个目标时,跟参数 --classes,它的值是目标的 id
下面是常见的一些错误及解决方法
AttributeError: partially initialized module 'cv2' has no attribute 'gapi_wip_gst_GStreamerPipeline' (most likely due to a circular import)升级 opencv-python,执行 pip install -U opencv-python
(pytorch1.7) PS D:\Github\Yolov7_StrongSORT_OSNet> python track.py --source test.mp4 --strong-sort-weights osnet_x0_25_market1501.pt
strong_sort/deep/reid\torchreid\metrics\rank.py:11: UserWarning: Cython evaluation (very fast so highly recommended) is unavailable, now use python evaluation.
  warnings.warn(
Fusing layers...
RepConv.fuse_repvgg_block
RepConv.fuse_repvgg_block
RepConv.fuse_repvgg_block
Model: osnet_x0_25
** The following layers are discarded due to unmatched keys or layer size: ['classifier.weight', 'classifier.bias']
(1, 256, 128, 3)
video 1/1 (1/7501) D:\Github\Yolov7_StrongSORT_OSNet\test.mp4: Traceback (most recent call last):
  File "track.py", line 332, in <module>
    main(opt)
  File "track.py", line 327, in main
    run(**vars(opt))
  File "D:\Tools\anaconda3\envs\pytorch1.7\lib\site-packages\torch\autograd\grad_mode.py", line 26, in decorate_context
    return func(*args, **kwargs)
  File "track.py", line 149, in run
    for frame_idx, (path, im, im0s, vid_cap) in enumerate(dataset):
  File "D:\Github\Yolov7_StrongSORT_OSNet\yolov7\utils\datasets.py", line 191, in __next__
    img = letterbox(img0, self.img_size, stride=self.stride)[0]
  File "D:\Github\Yolov7_StrongSORT_OSNet\yolov7\utils\datasets.py", line 1000, in letterbox
    dw, dh = np.mod(dw, stride), np.mod(dh, stride)  # wh padding
  File "D:\Tools\anaconda3\envs\pytorch1.7\lib\site-packages\torch\tensor.py", line 630, in __array__
    return self.numpy()
TypeError: can't convert cuda:0 device type tensor to numpy. Use Tensor.cpu() to copy the tensor to host memory first.
修改 track.py 中的 loadImages 部分,将原来的
dataset = LoadImages(source, img_size=imgsz, stride=stride)dataset = LoadImages(source, img_size=imgsz, stride=stride.cpu().numpy())可以参考官方 issue
本文中使用的 v1.0 版本的完整工程,放在网盘里,方便大伙下载
链接:https://pan.baidu.com/s/1di_ju3JeoZDpnX3IuSBLlw
提取码:y3ib
Recommend
About Joyk
Aggregate valuable and interesting links.
Joyk means Joy of geeK