

优维低代码:Custom Templates 自定义模板
source link: https://studygolang.com/articles/35822?fr=sidebar
Go to the source link to view the article. You can view the picture content, updated content and better typesetting reading experience. If the link is broken, please click the button below to view the snapshot at that time.

优维低代码:Custom Templates 自定义模板
EASYOPS_youwei · 18分钟之前 · 62 次点击 · 预计阅读时间 7 分钟 · 大约8小时之前 开始浏览

优维低代码技术专栏,是一个全新的、技术为主的专栏,由优维技术委员会成员执笔,基于优维7年低代码技术研发及运维成果,主要介绍低代码相关的技术原理及架构逻辑,目的是给广大运维人提供一个技术交流与学习的平台。
连载第十六期
《高级指引:Custom Templates 自定义模板》
▽
# 背景
在较早的 Legacy Templates 构件模板中(以下称 Legacy Templates),我们定义了一种使用 JavaScript Functions 定义的构件模板,这一层抽象在一定程度上封装了复杂的构件配置。
Legacy Templates 使用函数定义,因此拥有了高度灵活的动态展开能力。但函数定义使得框架无法将它们像普通构件一样地利用起来,因此受到了诸多限制,例如模板无法享受 Provider 刷新带动更新、无法对模板绑定事件处理、无法让用户编排一个自定义模板等等。
因此有必要设计一种自定义模板(以下称 Custom Templates),它使用静态结构声明(JSON or YAML),并且拥有普通构件的所有能力,以便在 Brick Next 中编排者可以像普通构件一样去使用它们。
# 原理
Custom Templates 的定义和 Storyboard 中的构件配置基本保持一致,可以在它内部配置多个构件,并且可以为这些构件配置插槽。在系统渲染该模板时,将按模板定义展开,并维护一份模板外部与模板内部的属性和事件等的的映射关系。
模板的展开过程如下图所示:
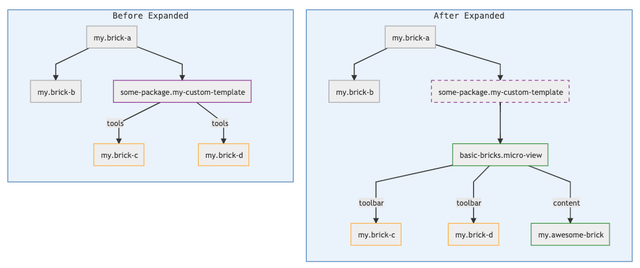
上图中 紫色边框 表示的是 Custom Template,模板在运行时按模板的定义被展开,绿色边框 的构件是模板内部定义好的构件,展开前的模板的 tools 插槽下的 橙色边框 的构件按模板定义被移植到了 basic-bricks.micro-view 的 toolbar 插槽中。并且模板构件的属性和事件等也会按模板定义映射到相关内部构件中。
# 示例
例如一个简单的模板定义:
# A custom template definition.
name: "some-package.my-custom-template"
bricks:
  - brick: "basic-bricks.micro-view"
    properties:
      pageTitle: "My Awesome Page"
    slots:
      content:
        type: "bricks"
        bricks:
          - brick: "my.awesome-brick"
          - brick: "my.another-brick"
            events:
              something.happen:
                action: "console.log"
在定义好 Custom Templates 后,它们可以像普通构件一样使用:
# A storyboard partial.
brick: "some-package.my-custom-template"
# All lifeCycles and other configs.
lifeCycle: ...
Custom Templates 可以代理内部构件的属性、事件、插槽和方法,以此实现将 Storyboard 上为该模板配置的属性和事件等映射到模板内部的指定构件上。
例如以下包含 proxy 设置的模板定义:
# A custom template definition with proxy.
name: "some-package.my-custom-template"
proxy:
  properties:
    pageName:
      ref: "micro-vew"
      refProperty: "pageTitle"
      # Set `refTransform` instead of `refProperty`, to transform a property.
      # E.g.:
      #   refTransform: {
      #     pageTitle: '<% `${DATA.pageName} - Awesome Page` %>'
      #   }
      # Tips: the transformed source data is `{ [tplPropName] : tplPropValue }`.
  events:
    awesome.happen:
      ref: "awesome-brick"
      refEvent: "something.happen"
  slots:
    tools:
      ref: "micro-view"
      refSlot: "toolbar"
      # Optional `refPosition` (number):
      # Insert the slotted bricks to the specified position of inner brick slot.
      # If `refPosition >= 0`, counts from the start.
      # If `refPosition < 0`, counts from the end.
      # The `refPosition` is relative to the slotted bricks specified in template definition.
  methods:
    tellAwesomeStories:
      ref: "awesome-brick"
      refMethod: "tellStories"
bricks:
  - brick: "basic-bricks.micro-view"
    ref: "micro-view" # Notice here! The ref id should be unique inside a custom template.
    slots:
      content:
        type: "bricks"
        bricks:
          - brick: "my.awesome-brick"
            ref: "awesome-brick" # And another ref.
            events:
              inner.happen:
                # Use `targetRef` to point to another brick inside a custom template.
                targetRef: "micro-view"
                method: "updateView"
在 Storyboard 中使用:
# A storyboard partial.
brick: "some-package.my-custom-template"
properties:
  pageName: "My Awesome Page"
events:
  awesome.happen:
    action: "console.log"
slots:
  tools:
    type: "bricks"
    bricks: [...]
在该 Storyboard 中:
- 模板的pageName属性将被映射到模板内部的 micro-view 的 pageTitle 属性上;
- 模板内部的awesome-brick触发的something.happen将触发模板的 awesome.happen 事件;
- 模板的 tools 插槽将被装载到模板内部的 micro-view 的 toolbar 插槽中;
- 调用模板的 tellAwesomeStories 将实际调用模板内部的 awesome-brick 的 tellStories 方法。
# 将模板的一个属性映射到多个不同的内部构件属性
有时候我们期望将模板的一个属性映射到多个不同的内部构件属性上,这时我们可以配置 extraOneWayRefs:
proxy:
  properties:
    pageName:
      ref: "micro-vew"
      refProperty: "pageTitle"
      extraOneWayRefs:
        - ref: "button"
          refProperty: "buttonName"
        - ref: "link"
          refProperty: "linkName"
对于以上配置,模板对外的属性 pageName 除了映射到micro-view的pageTitle上,还会同时映射到 button 和 link 的对应属性上。
注意:正如该配置的名称所说,extraOneWayRefs 是单向的,如果直接变更其内部构件的属性不会向上反馈到模板上。
# 属性合并
有时候我们希望自定义模板代理的内部构件的属性可以进行数据合并,而不是整体的属性映射。例如我们定义一个自定义模板,它内部有一个表格构件,它的 columns 初始定义了一些通用列,同时希望编排者可以按需为表格增加其它的列定义。
现已支持通过 mergeProperty 等配置即可实现属性合并,例如定义一个自定义模板:
name: "tpl-extensible-table"
proxy:
  properties:
    appendColumns:
      ref: "table"
      mergeProperty: "columns"
      mergeType: "array" # "array" or "object"
      mergeMethod: "append" # "append" or "prepend" or "insertAt"
      # mergeArgs: # optional args for methods like "insertAt"
bricks:
  - brick: "presentational-bricks.brick-table"
    properties:
      # Predefined default columns
      columns:
        - dataIndex: "id"
          title: "ID"
        - dataIndex: "name"
          title: "Name"
bricks:
- brick: "tpl-extensible-table"
properties:
# User-defined extra columns
appendColumns:
- dataIndex: "email"
title: "Email详细说明:
- mergeProperty: 要合并到的内部构件的属性名。
- mergeType:
- 支持两种类型:"array" 和 "object"。
- mergeMethod:
- 当mergeType === "array"时支持三种方法: "append", "prepend", "insertAt";
- 当mergeType === "object" 时只支持一种方法:"extend"。
- mergeArgs:
- 当mergeType === "array" && mergeMethod === "insertAt" 时传入一个索引位置,位置为负数时,从结尾开始计数,默认为 [ -1 ]。
注意:当使用 mergeProperty 时,属性是从模板到内部构件单向流动的,即如果直接更改内部构件的相关属性,无法影响直接从模板读取的属性。
# 属性作为内部变量
有时候我们希望可以定义一些模板实例级别的变量,模板内部的构件可以在属性、事件等地方消费这些变量。注意它和 Context 上下文 的区别,后者相当于全局变量,无法将其作用域限制在某个具体的模板的实例内部。
现已支持将指定的模板属性标记为可供内部构件引用的变量,例如定义一个自定义模板:
name: "tpl-flexible-table"
proxy:
  properties:
    # 1. 将属性标记为 `asVariable: true`。
    dataIndexOfName:
      asVariable: true
bricks:
  - brick: "presentational-bricks.brick-table"
    properties:
      columns:
        # 2. 在求值占位符中使用 `TPL.*` 引用标记好的属性。
        - dataIndex: "<% TPL.dataIndexOfName ?? 'name' %>"
          title: "Name"
bricks:
- brick: "tpl-flexible-table"
properties:
dataIndexOfName: "hostname"
- brick: "tpl-flexible-table"
properties:
dataIndexOfName: "username"⊙ NOTE
在内部构件的属性中引用 TPL.* 时,只能在构件初始时拿到其初始值,此时该属性变量相当于一个常量,当模板实例的对应属性在运行时重新赋值时,该内部构件的属性不会发生变化。另一方面,在事件回调里则始终能拿到当事件发生时、最新的 TPL.*。更多信息请参考 Context 上下中的注意事项。
# 开发
- 运行 yarn yo;
- 选择 a new custom template (如果没有该选项,请先执行 yarn renew 然后再从第一步开始);
- 输入你的 Custom Template 名称;
一个新的 Custom Template 就初始化好了:
// `./bricks/YOUR-PKG/src/custom-templates/YOUR-TEMPLATE.ts`
import { getRuntime } from "@next-core/brick-kit";


getRuntime().registerCustomTemplate("YOUR-PKG.YOUR-TEMPLATE", {
  bricks: [],
  proxy: {},
});
有疑问加站长微信联系(非本文作者)

入群交流(和以上内容无关):加入Go大咖交流群,或添加微信:liuxiaoyan-s 备注:入群;或加QQ群:692541889
Recommend
About Joyk
Aggregate valuable and interesting links.
Joyk means Joy of geeK