

羽夏看Linux内核——环境搭建 - 寂静的羽夏
source link: https://www.cnblogs.com/wingsummer/p/16556206.html
Go to the source link to view the article. You can view the picture content, updated content and better typesetting reading experience. If the link is broken, please click the button below to view the snapshot at that time.

羽夏看Linux内核——环境搭建
此系列是本人一个字一个字码出来的,包括示例和实验截图。如有好的建议,欢迎反馈。码字不易,如果本篇文章有帮助你的,如有闲钱,可以打赏支持我的创作。如想转载,请把我的转载信息附在文章后面,并声明我的个人信息和本人博客地址即可,但必须事先通知我。
在学习与计算机相关的知识时,工欲善其事,必先利其器,搭建一个优秀的学习实验环境是完成学习任务和提高学习热情的推动剂。本来虚拟机想选VirtualBox,不过太难搞了,网上也没有好到成熟的教程,最关键是没有配套的调试功能,这样很不直观。到最后我还是选择了Bochs。
严格的说,Bochs是一个模拟器。它是一个以LGPL许可证发放的开放源代码的x86、x86-64IBM PC兼容机模拟器和调试工具。它支持处理器(包括保护模式)、内存、硬盘、显示器、以太网、BIOS、IBM PC兼容机的常见硬件外设的仿真,主要用于操作系统开发。
说了这么有关Bochs一大堆,它有一个十分优秀的地方,它具有配套的调试工具,只要在编译期间开启了对应的开关,就可以实现调试的图形界面化,这在 Linux 上是可遇不可求的,如下图所示:

这个和我系统主题相关,看起来比较丑一点,但这已经很不错了,在开发与 Linux 相关应用的同志会深有体会。
下面我们来开始编译Bochs,为 Linux 内核的学习开始新的旅程。
编译 Bochs
在编译之前,我们需要安装编译所需的依赖,请输入以下指令:
sudo apt install build-essential
sudo apt install libgtk2.0-dev
我们解压我们下载的Bochs源码,然后在该文件打开终端,输入如下命令:
./configure --with-x11 --with-wx --enable-disasm --enable-all-optimizations --enable-readline --enable-debugger-gui --enable-x86-debugger --enable-a20-pin --enable-fast-function-calls --enable-debugger --enable-iodebug
--后面跟着字母的参数就是我所谓的开关,开启这些开关之后,就支持反汇编、内置调试、io 接口调试以及图形界面。
该指令执行完之后,就会在该目录下生成MakeFile文件,我们需要编辑一下继续。找到文件的第92行,在最后加一个参数-lpthread,如下所示:
LIBS = -lm -lgtk-x11-2.0 -lgdk-x11-2.0 -lpangocairo-1.0 -latk-1.0 -lcairo -lgdk_pixbuf-2.0 -lgio-2.0 -lpangoft2-1.0 -lpango-1.0 -lgobject-2.0 -lglib-2.0 -lfontconfig -lfreetype -lpthread
如果不这么修改,在编译的过程中就会报错。因为pthread库不是Linux系统默认的库,连接时需要使用静态库 libpthread.a,所以在使用pthread_create创建线程,以及调用pthread_atfork函数建立fork处理程序时,需要链接该库。
然后我们输入make回车,不到一分钟就能编译完。如果编译无报错,我们再输入sudo make install将其安装在系统当中。
如果以后要卸载,请保留编译过后留下的内容,只需要MakeFile文件夹下,进入终端,输入sudo make uninstall即可卸载。
配置 Bochs
下面我们需要简单配置一下它以能够使用,我们需要一个配置文件。由于个人习惯起名字为bochsrc.disk,它的内容如下:
#=======================================================================
# MEGS
# Set the number of Megabytes of physical memory you want to emulate.
# The default is 32MB, most OS's won't need more than that.
# The maximum amount of memory supported is 2048Mb.
# The 'MEGS' option is deprecated. Use 'MEMORY' option instead.
#=======================================================================
megs: 32

#=======================================================================
# DISPLAY_LIBRARY
#
# The display library is the code that displays the Bochs VGA screen.  Bochs
# has a selection of about 10 different display library implementations for
# different platforms.  If you run configure with multiple --with-* options,
# the display_library command lets you choose which one you want to run with.
# If you do not write a display_library line, Bochs will choose a default for
# you.
#=======================================================================
display_library: x, options="gui_debug" # use GTK debugger gui

#=======================================================================
# ROMIMAGE:
# The ROM BIOS controls what the PC does when it first powers on.
# Normally, you can use a precompiled BIOS in the source or binary
# distribution called BIOS-bochs-latest. The ROM BIOS is usually loaded
# starting at address 0xf0000, and it is exactly 64k long. Another option
# is 128k BIOS which is loaded at address 0xe0000.
# You can also use the environment variable $BXSHARE to specify the
# location of the BIOS.
# The usage of external large BIOS images (up to 512k) at memory top is
# now supported, but we still recommend to use the BIOS distributed with
# Bochs. The start address optional, since it can be calculated from image size.
#=======================================================================
romimage: file=/usr/local/share/bochs/BIOS-bochs-latest

#=======================================================================
# VGAROMIMAGE
# You now need to load a VGA ROM BIOS into C0000.
#=======================================================================
vgaromimage: file=/usr/local/share/bochs/VGABIOS-lgpl-latest

#=======================================================================
# BOOT:
# This defines the boot sequence. Now you can specify up to 3 boot drives,
# which can be 'floppy', 'disk', 'cdrom' or 'network' (boot ROM).
# Legacy 'a' and 'c' are also supported.
#=======================================================================
#boot: floppy
boot: disk

#=======================================================================
# LOG:
# Give the path of the log file you'd like Bochs debug and misc. verbiage
# to be written to. If you don't use this option or set the filename to
# '-' the output is written to the console. If you really don't want it,
# make it "/dev/null" (Unix) or "nul" (win32). :^(
#=======================================================================
#log: /dev/null
log: bochsout.txt

#=======================================================================
# MOUSE:
# The Bochs gui creates mouse "events" unless the 'enabled' option is
# set to 0. The hardware emulation itself is not disabled by this.
# Unless you have a particular reason for enabling the mouse by default,
# it is recommended that you leave it off. You can also toggle the mouse
# usage at runtime (control key + middle mouse button on X11, SDL,
# wxWidgets and Win32).
# With the mouse type option you can select the type of mouse to emulate.
# The default value is 'ps2'. The other choices are 'imps2' (wheel mouse
# on PS/2), 'serial', 'serial_wheel' and 'serial_msys' (one com port requires
# setting 'mode=mouse'). To connect a mouse to an USB port, see the 'usb_uhci'
# or 'usb_ohci' option (requires PCI and USB support).
#=======================================================================
mouse: enabled=0

#=======================================================================
# KEYBOARD_MAPPING:
# This enables a remap of a physical localized keyboard to a
# virtualized us keyboard, as the PC architecture expects.
# If enabled, the keymap file must be specified.
#=======================================================================
keyboard_mapping: enabled=1, map=/usr/local/share/bochs/keymaps/x11-pc-us.map

#=======================================================================
# ATA0, ATA1, ATA2, ATA3
# ATA controller for hard disks and cdroms
#
# ata[0-3]: enabled=[0|1], ioaddr1=addr, ioaddr2=addr, irq=number
#
# These options enables up to 4 ata channels. For each channel
# the two base io addresses and the irq must be specified.
#
# ata0 and ata1 are enabled by default with the values shown below
#=======================================================================
ata0: enabled=1, ioaddr1=0x1f0, ioaddr2=0x3f0, irq=14
如果啥也不想了解,直接新建文件拷进去就能用。不过我建议你还是得了解一下。
这个配置文件,它有点类似BIOS。我们在开机时按下的del、esc ,或者F2键,各个机型进入BIOS式有所不同,但差不多就那几种方式。BIOS中会显示各种硬件的信息,还有启动顺序等。Bochs既然是模拟硬件的,它就得知道,您需要它模拟的计算机是什么样的,换句话说,在这个虚拟机中有哪些硬件,启动顺序是什么,是从软盘开始,还是从硬盘开始。给Bochs配置硬件的方法,就是写一个配置文件给它,Bochs启动时会找到此文件,根据文件内容创建自己,这样咱们的虚拟机就健全了。
在安装目录下有样本文件:/usr/local/share/doc/bochs,里面非常全,只不过是英文的,我上面的只是必须使用的部分。下面我们来介绍一下我使用的相关配置含义:
设置Bochs在运行过程中能够使用的内存,本例为 32MB。
display_library
设置图形界面,这条配置就可以启用我们的图形界面化调试,而不是黑框。
romimage
设置对应的BIOS。
vgaromimage
设置对应的VGA BIOS。它是显卡BIOS,储存了显示卡的硬件控制程序和相关信息,可以说是显示卡的“神经中枢”。
选择启动盘符,floppy是软盘的意思,disk是磁盘的意思,指的是从什么地方启动,这里是从磁盘启动。
输出的日志路径。
mouse
鼠标相关设置,这里被禁用。
keyboard_mapping
打开键盘,并设置键盘映射。
设置硬件相关。
# 开头的行
表示是注释。
当然上述部分并不能保证一个内核正常启动,后续还需要进行添加,剩余所需到后面用到再说。
使用 Bochs
配置完毕后,我们在配置文件位置打开终端,输入以下指令:
bochs -f ./bochsrc.disk
这行命令就是调用我们的虚拟机使用bochsrc.disk加载。当然,你可以直接输入bochs,然后回车,你会看到如下界面:
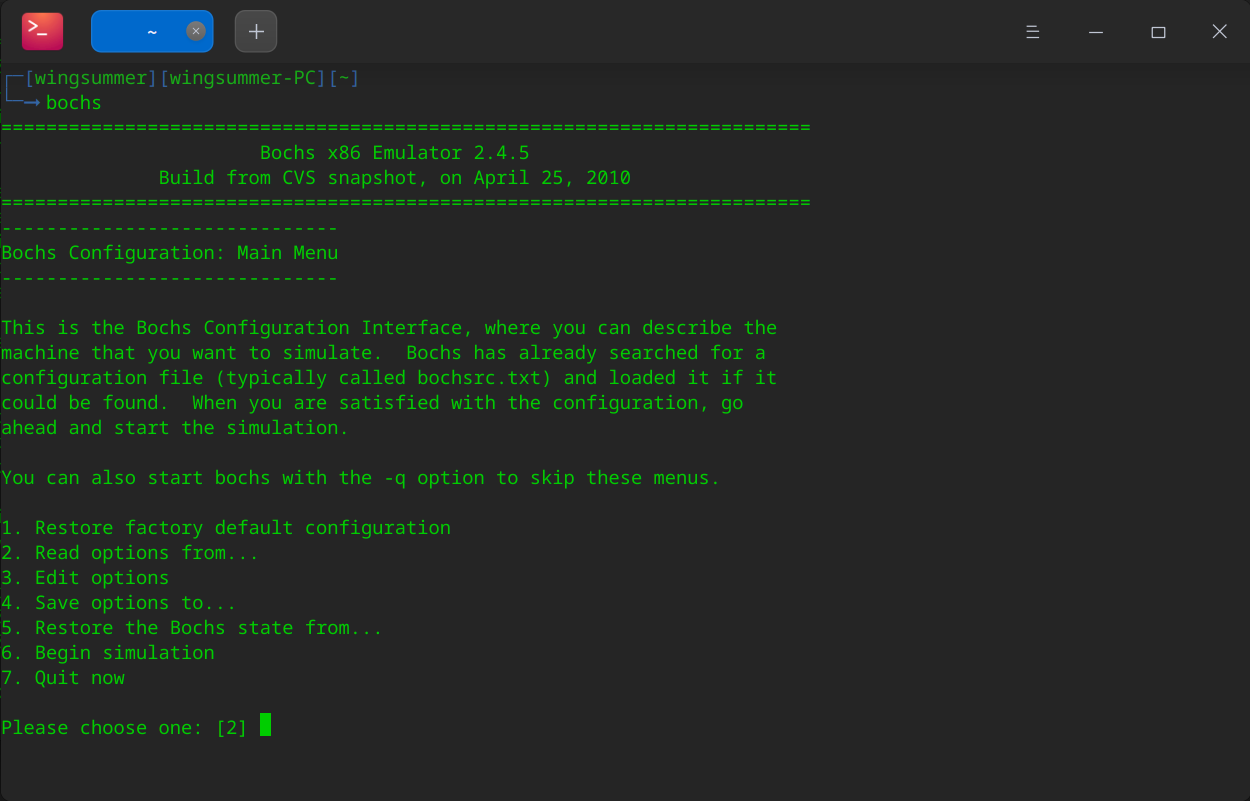
可以看到如下几个选项,默认选项是2,也就是从配置文件进行加载,我们需要输入文件路径,作用和bochs -f ./bochsrc.disk一样。
但每次学习的时候我们总不能现输入这条指令吧,我们可以利用bash脚本来减轻键盘的负担。我们在配置文件目录下新建一个文件startLearning.sh,输入如下指令:
#!/usr/bin/env bash

bochs -f ./bochsrc.disk
然后保存,赋予可执行权限。以后我们要使用该环境进行学习的话,只需双击该脚本就可以了。下面我们来双击测试一下:

可以看到默认选项是开始仿真,直接回车即可:
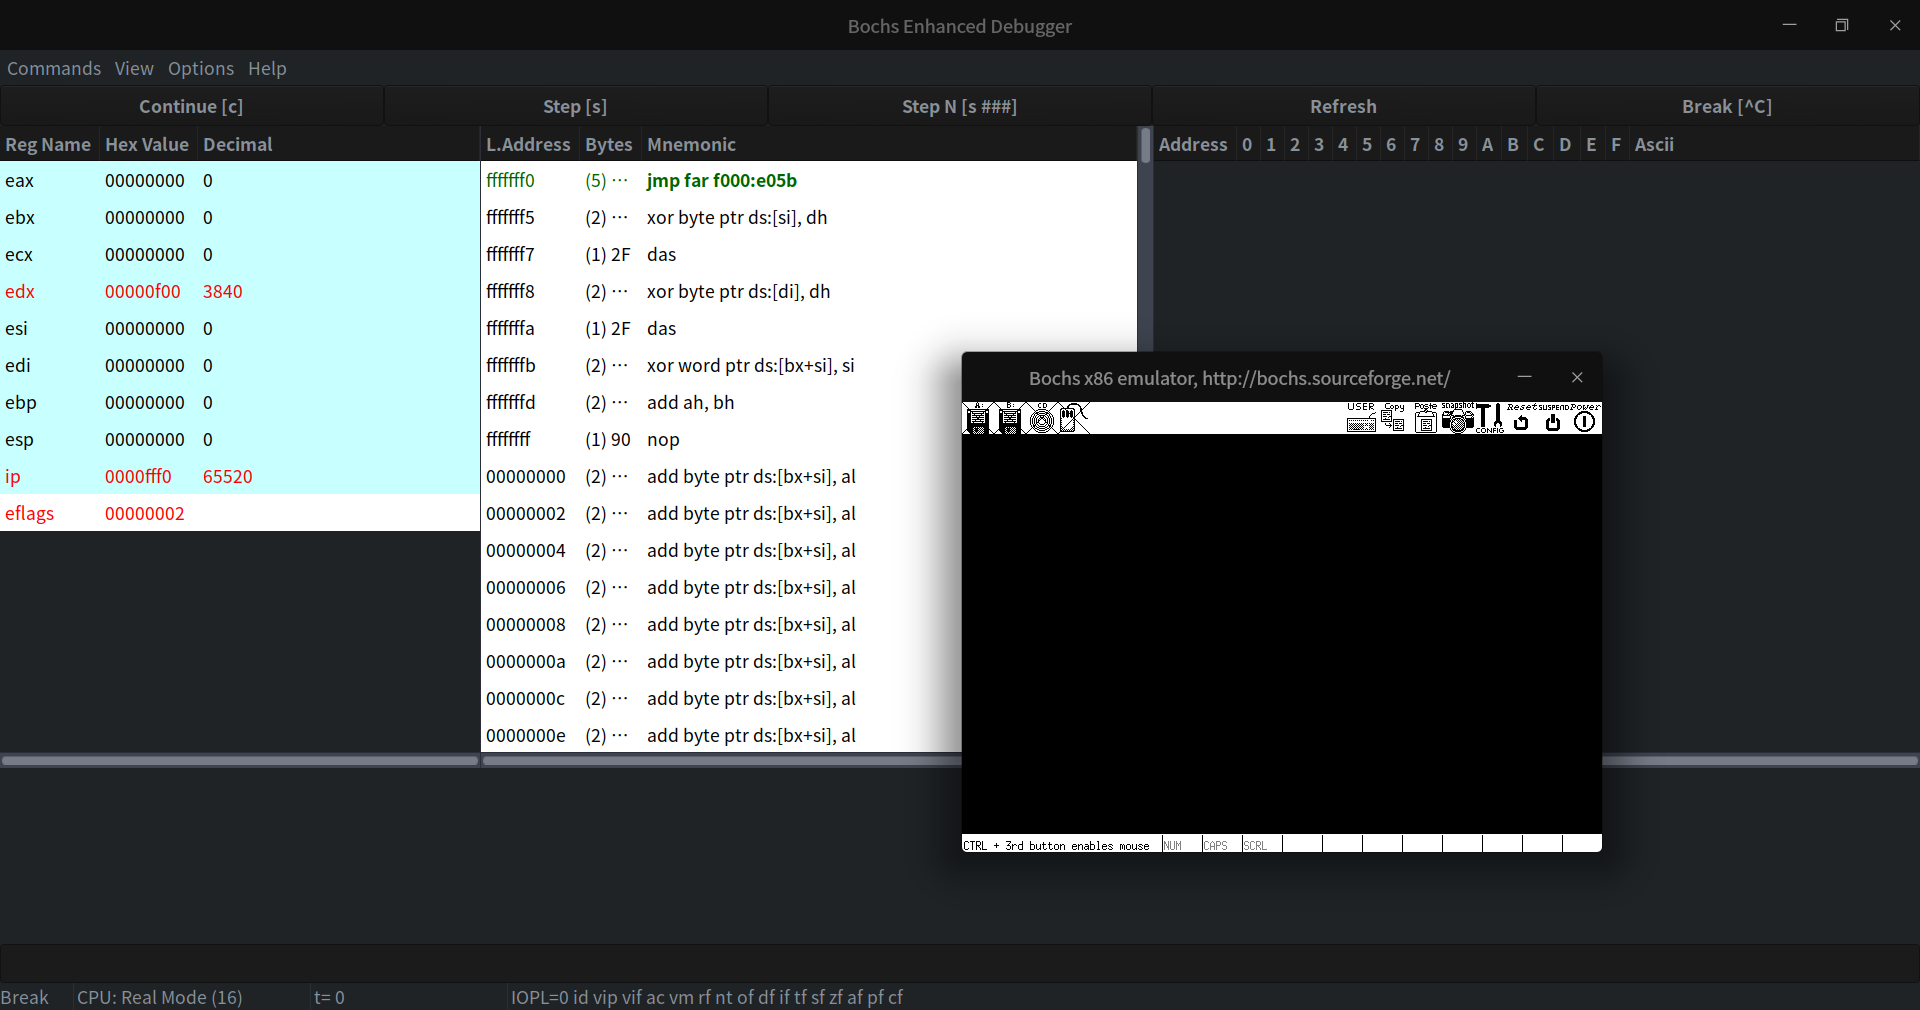
你会看到两个窗体,小的是虚拟机的显示窗口,类似屏幕;大的是调试窗体,我们可以在这里进行调试操作。
如果我们点击调试窗体的Continue按钮,你会看到如下弹窗:
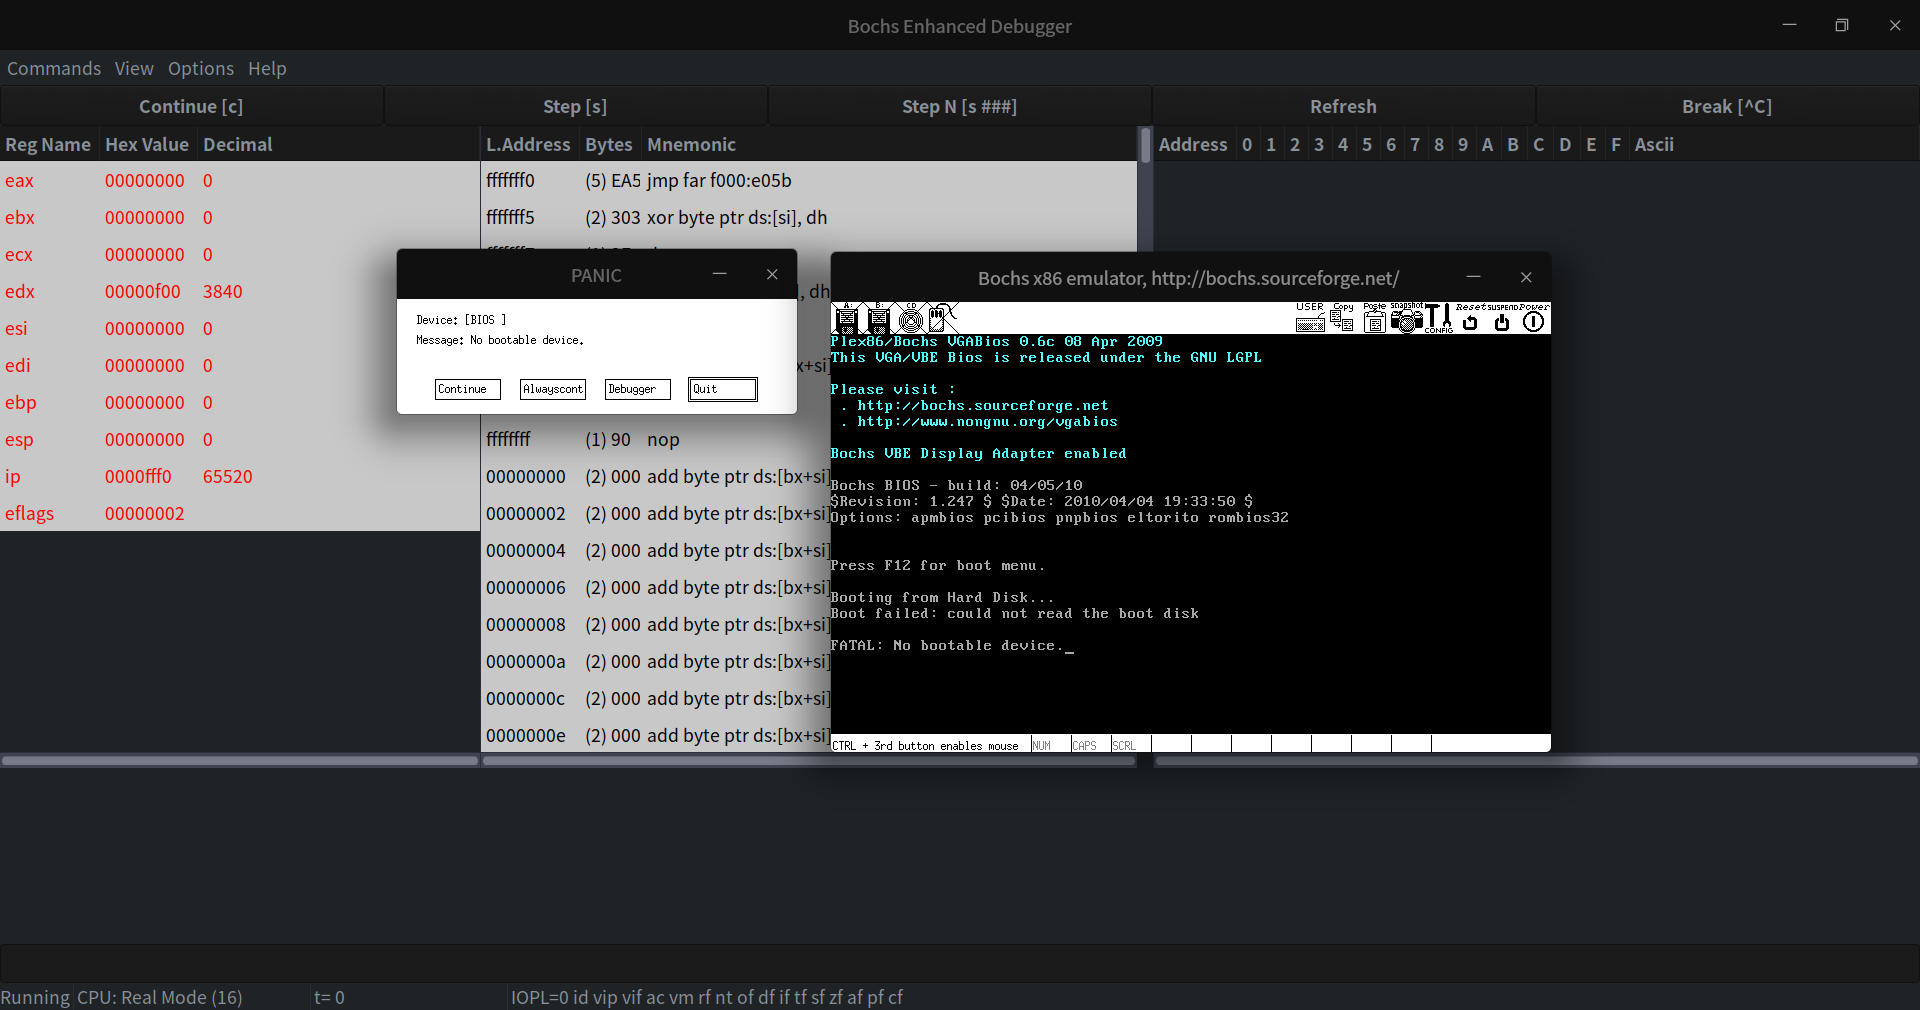
这个是正常现象,因为还没有对应的镜像,那么我们创建一个。作为一个负责任的模拟器,Bochs给咱们提供了创建虚拟硬盘的工具bximage,这里简单介绍几个参数:
-fd:创建软盘-hd:创建硬盘-mode:创建硬盘的类型,有flat、sparse和growing三种-size:指创建多大的硬盘,以MB为单位。-q:以静默模式创建,创建过程中不会和用户交互。
下面我们来开始操作了,在配置文件所在目录输入以下指令:
bximage -hd -mode="flat" -size=60 -q test.img
然后我们就成功创建了一个启动镜像,下面我们把它添加到配置文件中。在ata0的下一行,添加一行内容,效果如下:
ata0: enabled=1, ioaddr1=0x1f0, ioaddr2=0x3f0, irq=14
ata0-master: type=disk, path="test.img", mode=flat, cylinders=121 ,heads=16 ,spt=63
保存,执行脚本查看。不出意外的话,还是报错:
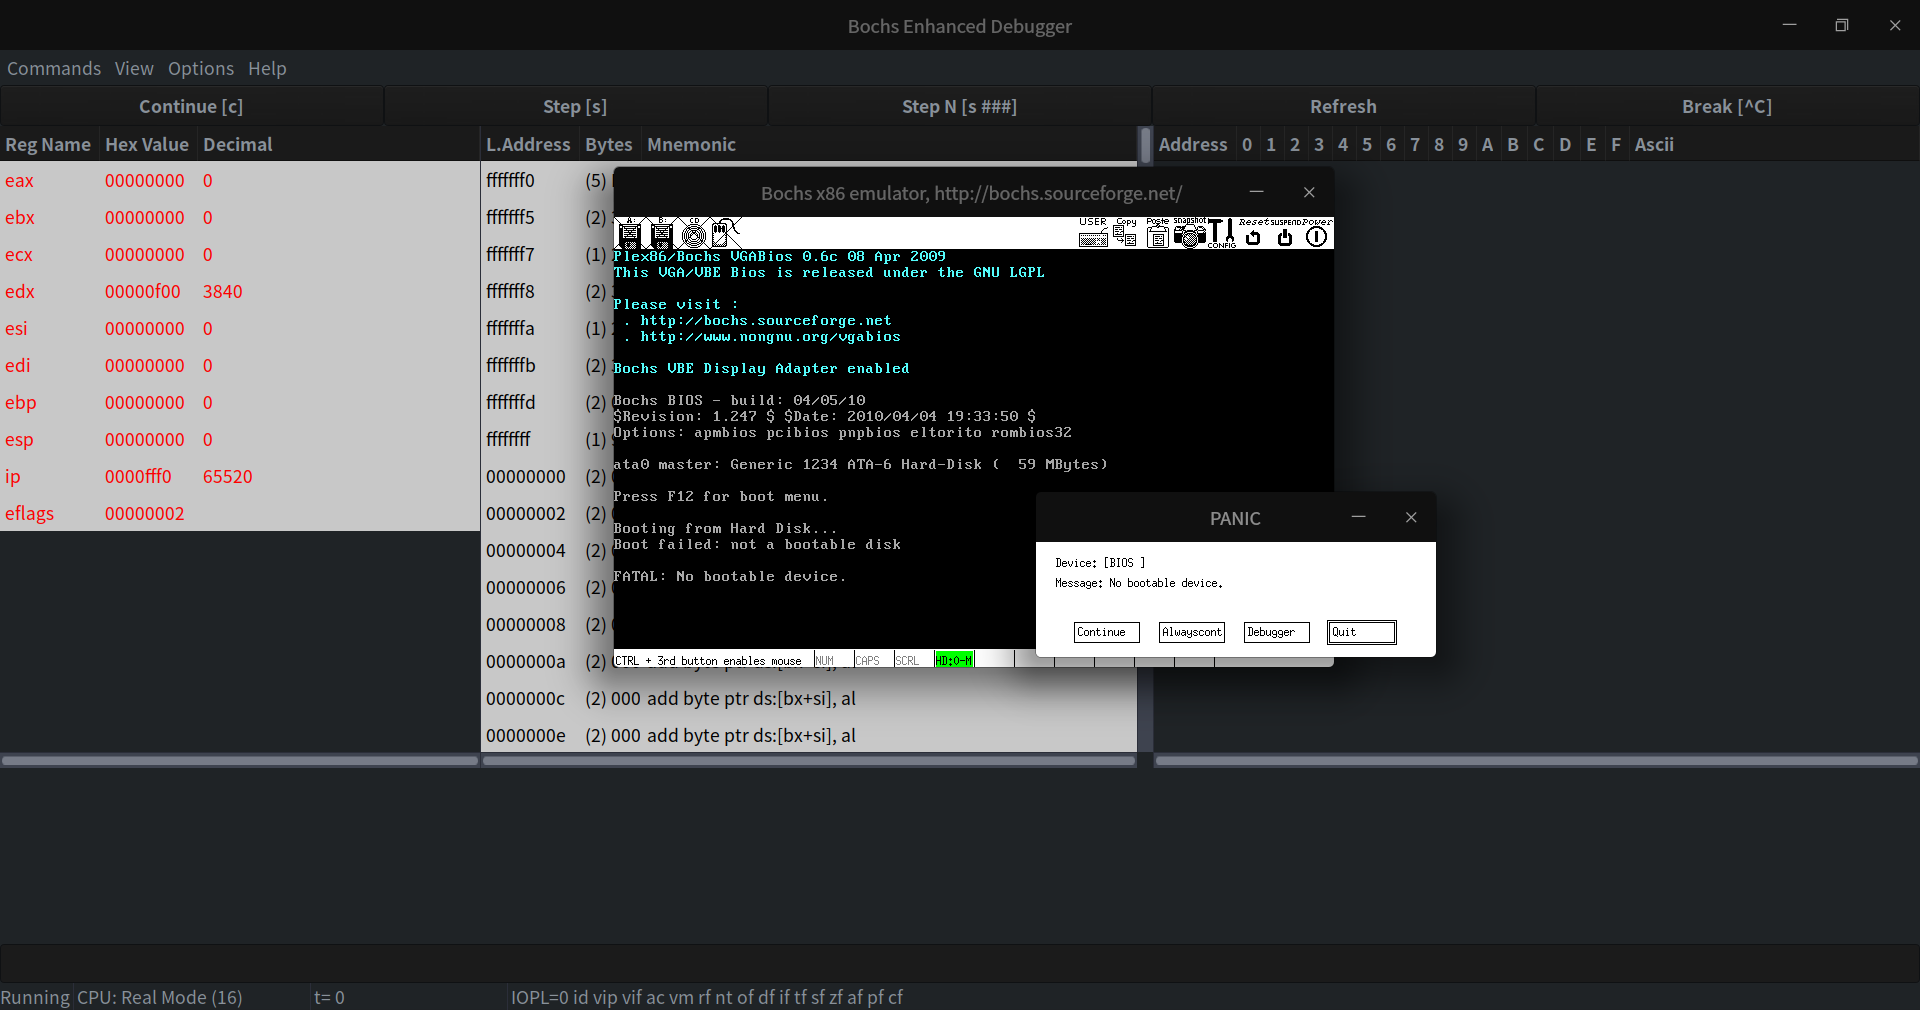
这此报错说是不是一个启动盘,和之前无启动设备不一样了。不要灰心,这个时候说明学习环境已成功搭建完毕,至于什么是启动盘,启动流程是啥将会在下一篇进行介绍。
练习与思考
俗话说得好,光说不练假把式,如下是本节相关的练习。如果练习没做成功,就不要看下一节教程了。
- 搭建
Bochs环境并取得成功。
羽夏看Linux内核——启动那些事
Recommend
About Joyk
Aggregate valuable and interesting links.
Joyk means Joy of geeK