

Firebase Crashlytics and the Flutter Casual Games Toolkit
source link: https://medium.com/flutter/firebase-crashlytics-and-the-flutter-casual-games-toolkit-5d4f952cbe35
Go to the source link to view the article. You can view the picture content, updated content and better typesetting reading experience. If the link is broken, please click the button below to view the snapshot at that time.

Firebase Crashlytics and the Flutter Casual Games Toolkit
Learn how to enable Crashlytics in the Flutter Games example to make detecting and fixing issues in your game easier
The Flutter Casual Games Toolkit (FCGT) is a starter template for developers who want to create a mobile game app. It has already been customized with a main menu, game levels, a settings screen, sound effects, music, and more. In addition to the template app, you can also download a TicTacToe app that is based on this template.
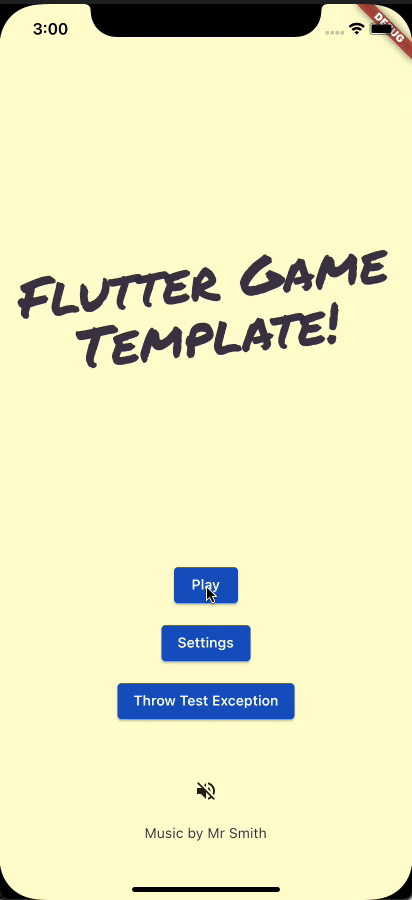
The following screenshots show the out-of-the-box main menu, game level page, and a settings page, in that order:
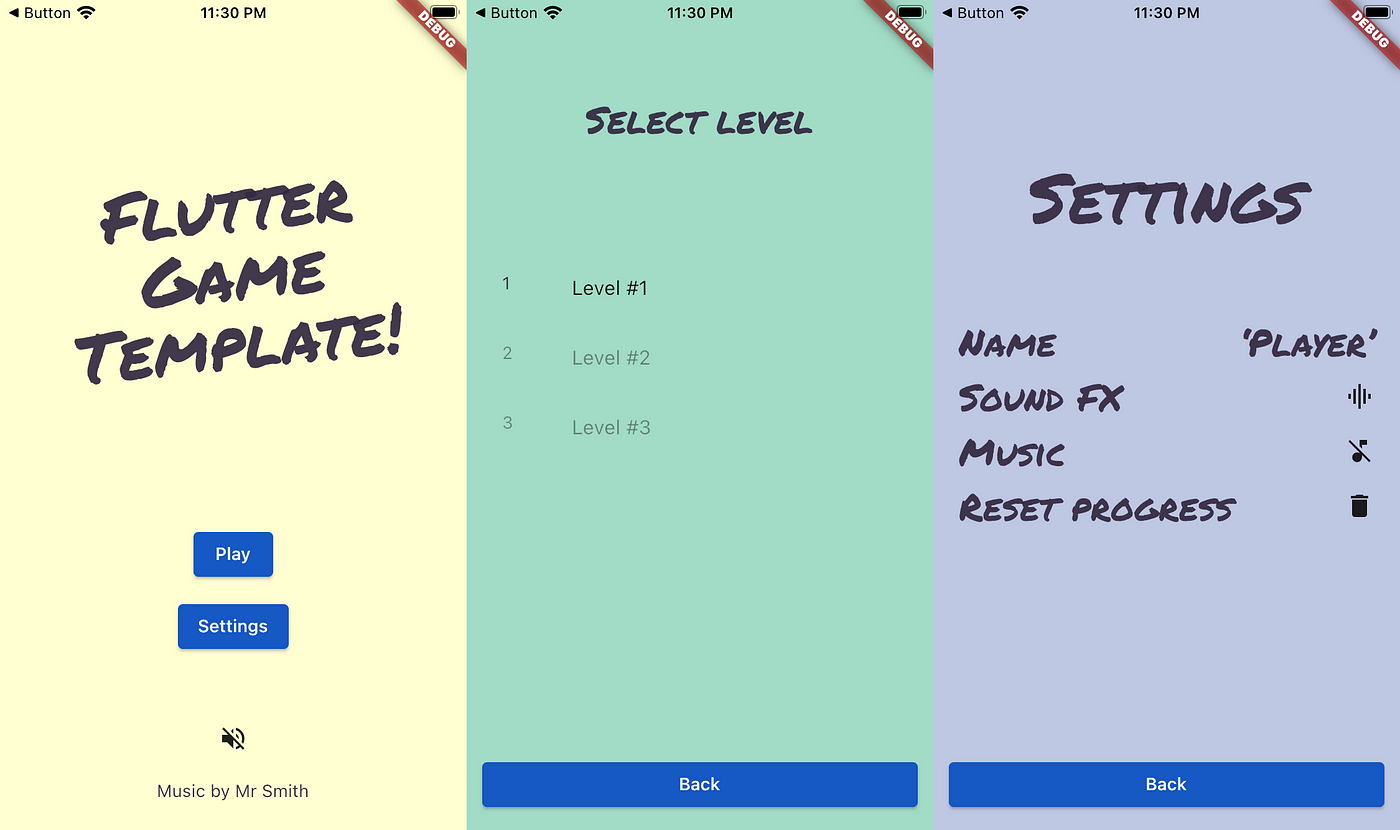
Screenshots of the main FCGT screens
Included in the FCGT are integrations with some useful services when developing your own game: the Apple Game Center, Google Play Games Services, the Google Mobile Ads SDK, and the In-App purchase package. These more advanced integrations are initially disabled because they require some setup by you, the developer, before you can use them. If you take a look at the game template’s main.dart file on GitHub and scroll down to the first “TODO”, you’ll see the code for the Ads, Games Services, and In-App Purchases plugins, lying dormant, waiting to be enabled.
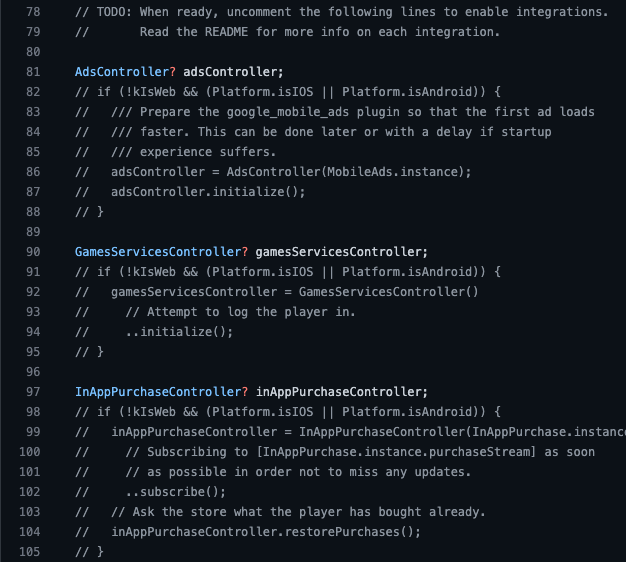
Disabled Ads, Games Services, and In-App Purchases code
Also included in the FCGT is Firebase Crashlytics, which is a powerful crash reporting solution that helps you detect, track, prioritize, and fix issues in real time. The Crashlytics dashboard allows you to visualize issues in your code, see how many users are affected, and figure out which lines of code are causing them.
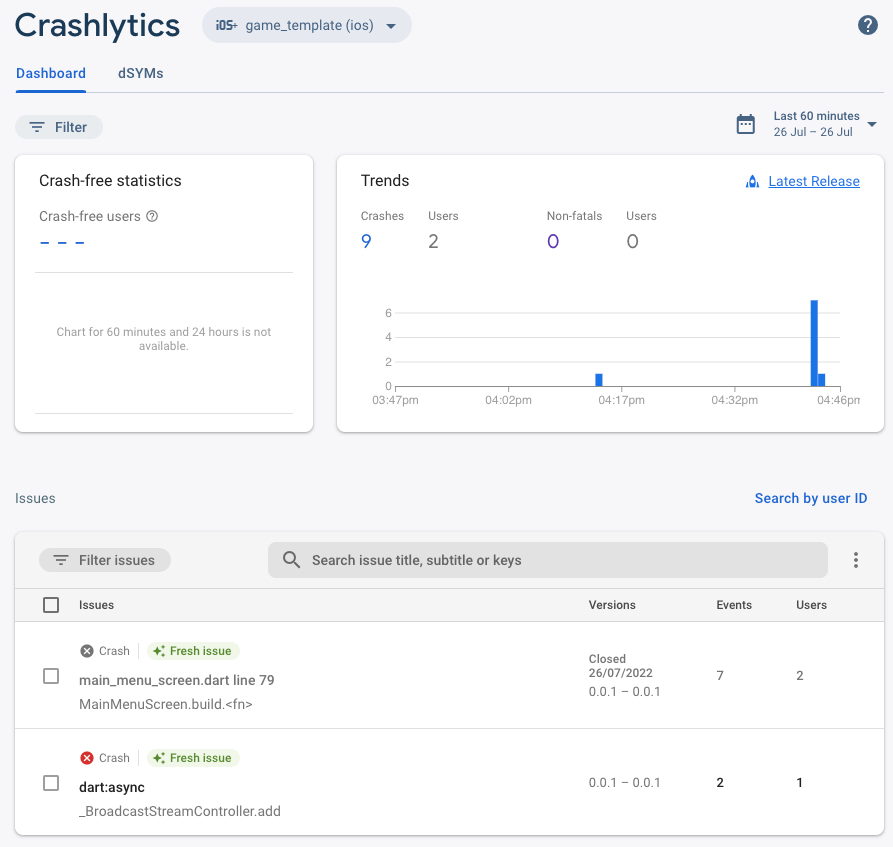
Firebase Crashlytics Dashboard
In its initial state, without Crashlytics enabled, the code in the crashlytics/crashlytics.dart file gathers error messages, logs, and stack traces and writes them to the console. This information is only available when testing on local development devices. With Crashlytics enabled, you can receive data from users running your production code on their own devices and view it on the Crashlytics dashboard.
This article shows you how to enable Firebase Crashlytics in the FCGT, throw some test exceptions, and demonstrate how the exceptions are represented on the Crashlytics dashboard. If you’re interested in using Crashlytics for your Flutter App but don’t want to use the FCGT to develop a game, the information about throwing exceptions and the Crashlytics dashboard applies to any app hosted on Firebase.
At the top of the main.dart file, you can see the code for the Crashlytics integration:
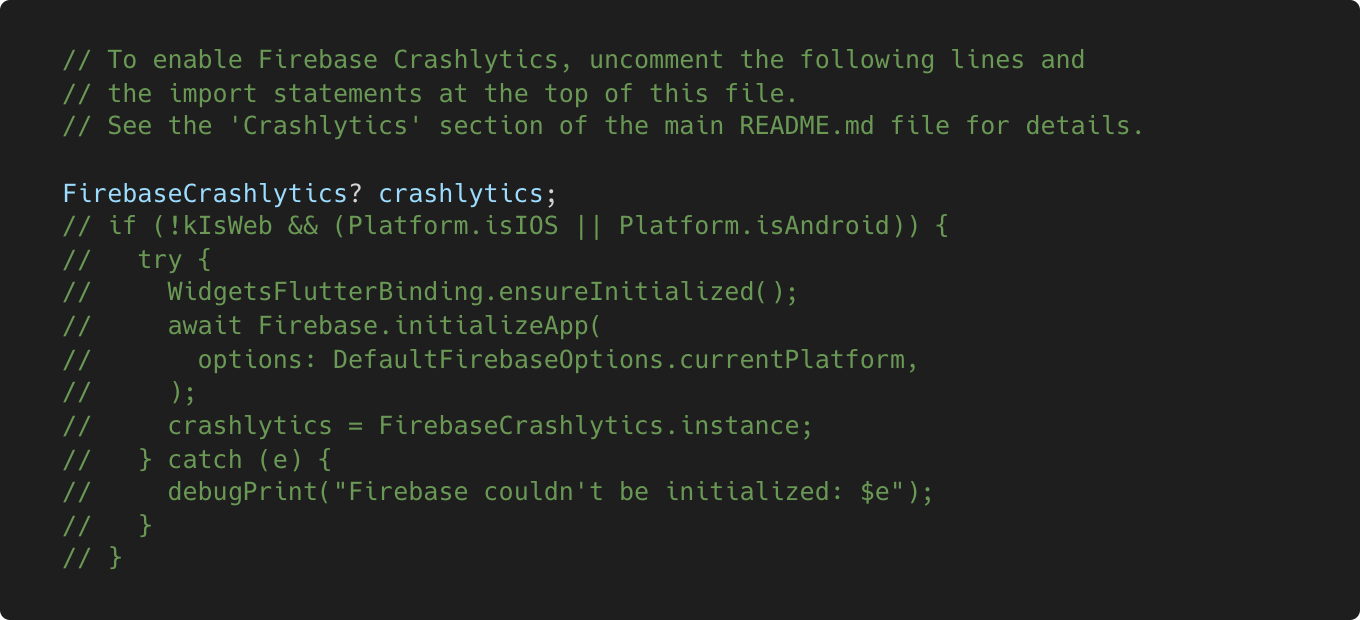
main.dart: disabled Firebase Crashlytics code
This Crashlytics Firebase code wasn’t included in the original FCGT YouTube tutorial, Quick start to building a game in Flutter — this code will be explained soon.
The steps to enable Crashlytics in the FCGT are listed in the Crashlytics section of the FCGT README.md file, but keep reading for a walk through of each step and a demonstration of how things appear in the Crashlytics dashboard.
To get started, use the following instructions:
1. Download a copy of the latest version of the game template from the Flutter project GitHub page.
2. Ensure that you have Flutter installed on your computer and that you’re able to run apps on the iOS Simulator or Android Emulator. If you have any questions about how to do this, refer to the Flutter Get started guide for your target platform.
3. Open the game template folder in your IDE or terminal and upgrade to the latest version of Flutter:
$> flutter upgrade
4. Select the device or simulator where you’d like to run the app.
5. Run the app:
$> flutter run
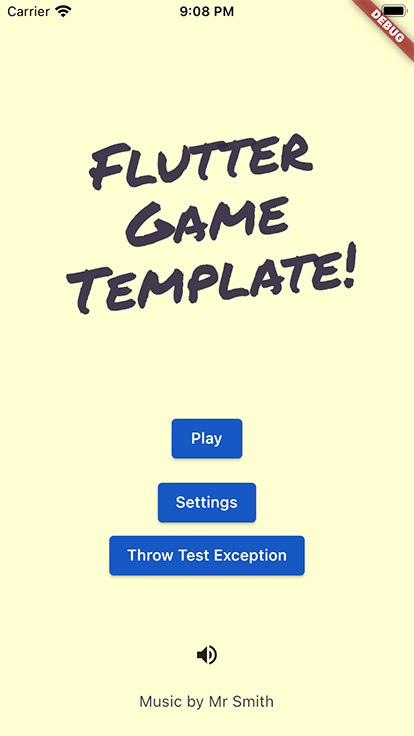
If everything goes well, the app launches and you see the home screen:

Game template home screen
The FCGT was designed to give developers a quick and comfortable foundation on which to build games. While you have the app running, navigate around and see what it can do. You’ll quickly notice that “game play” in the FCGT isn’t the most exciting (unless you’re a fan of sliders). The shallow structure of the game code is a deliberate design choice to keep things simple for when you start writing your own game.
FCGT “game play”
Now that you have the code, go to the Firebase website and set up a free account (if you don’t have one). Then, open the Firebase console and click Add project. From there, creating a new project is a 3-step process, just follow the on-screen instructions. You will be asked if you would like to enable Google Analytics (GA). It’s recommend that you do enable Google Analytics because, aside from being free, it unlocks some powerful analytics functionality, such as crash-free user data, session breadcrumbs, Velocity alerts, and BigQuery integration.
If you enabled Google Analytics, install the Google Analytics Flutter plugin by using the following command:
$> flutter pub add firebase_analytics
To learn more, refer to steps 1 and 2 in the Use Google Analytics to get metrics for crash reports guide, but there is no need to follow the additional steps outlined in the guide, as they are covered below.
Next, install the Firebase CLI. Go to the Firebase CLI docs, select your operating system, and follow the instructions. Once you’ve logged in, run the following command in your terminal and it should display a list of Firebase project names:
$> flutterfire configure
Select the name of the Firebase project you created earlier. Then, select which target platforms your app supports. Currently, the Crashlytics console only supports iOS and Android, so select those two, at most.
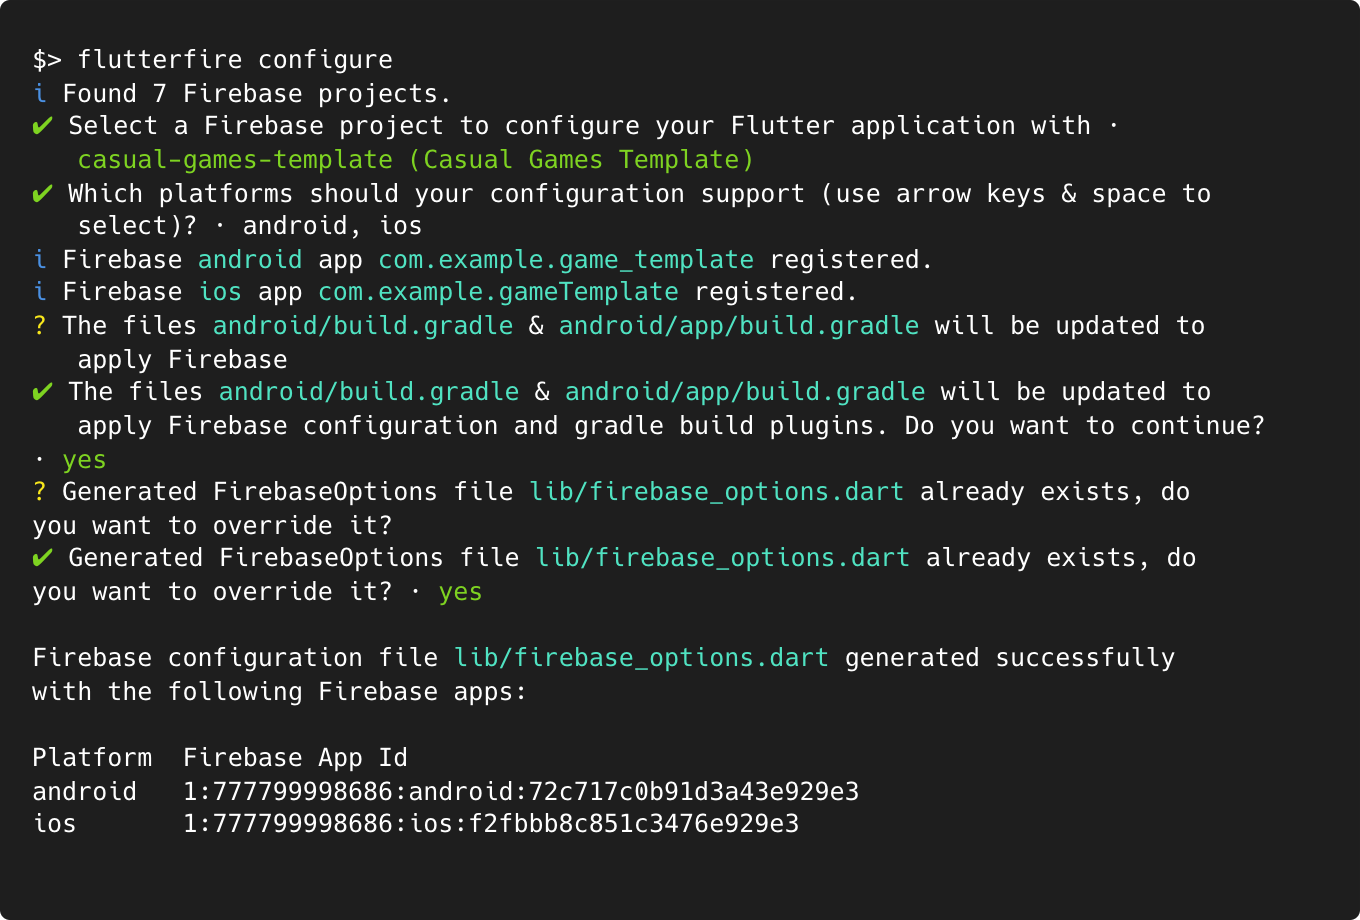
Output from FlutterFire config command
The FlutterFire CLI generates all the keys and client IDs needed to connect to Firebase and overwrites them in the src/firebase_options.dart file. If you add more plugins or would like to enable more platforms in the future, simply re-run the flutterfire configure command.
To enable Crashlytics, go back to the lib/main.dart file and uncomment the Crashlytics code. At the top of the file, there are 3 import statements that also must be uncommented:

Uncommented Crashlytics import statements
Then, lower down in the same file, uncomment the Crashlytics integration code you looked at before. This code initializes an instance of Crashlytics if one doesn’t already exist, then it checks to ensure the app is running on either Android and iOS. The Crashlytics code won’t execute if the app is running on desktop or the web because the Crashlytics dashboard doesn’t yet support these platforms.
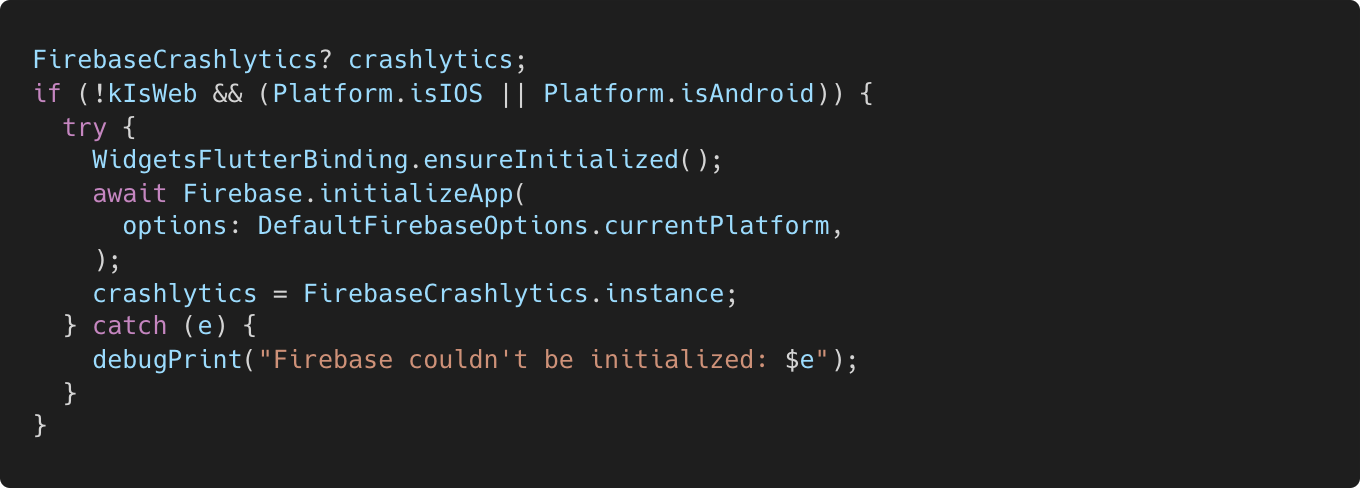
Crashlytics integration code
After you’ve uncommented the Crashlytics integration code, use the flutter run command to run the app again to make sure that everything still works.
It’s time to crash your app!
Actually, you’ll only be raising a few test exceptions but you’ll also learn how to locate them in the Crashlytics dashboard. This is useful because an uncaught exception might not cause your app to crash, but can still cause a poor user experience and, without Crashlytics enabled, they could go unreported. The Crashlytics Fatal Error APIs used in the crashlytics/crashlytics.dartfile report uncaught exceptions as fatal events so they will appear in the Crashlytics dashboard and can be properly prioritized.

Crashlytics fatal error API
To learn more about how this logging is implemented, check out the guide on how to Customize your Firebase Crashlytics Crash Reports and read the comments in the crashlytics.dart file.
In your text editor or IDE of choice, navigate to the main_menu folder and open the main_menu_screen.dart file. Scroll down until you find the code for the Settings button.
Before (original code)
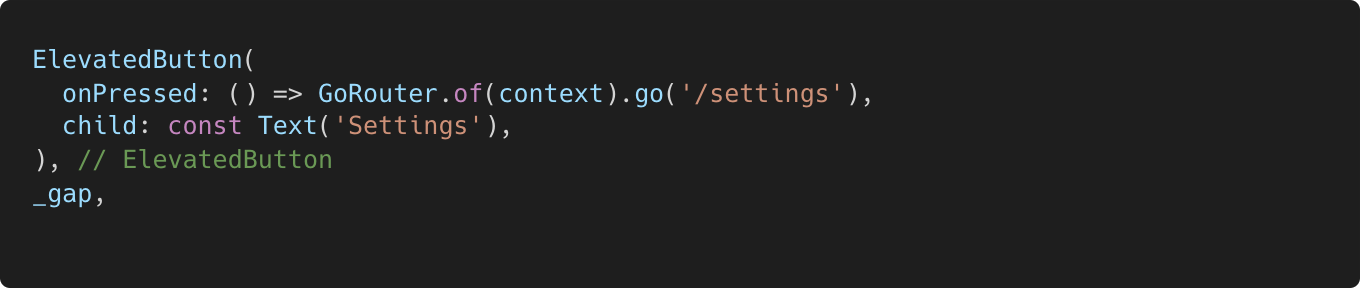
Make a copy of the ElevatedButton and then, inside the onPressed call-back, instead of calling GoRouter to navigate to the Settings page, throw an exception. While you’re there, change the name of the button to something like Throw Test Exception as shown below:
ElevatedButton(
  onPressed: () => GoRouter.of(context).go('/settings'),
  child: const Text('Settings'),
),
_gap,
ElevatedButton(
  onPressed: () => throw Exception(),
  child: const Text("Throw Test Exception"),
),
Next, navigate to the audio folder and open the audio_controller.dart file. Scroll down until you find the _musicOnHandler function. The framework calls this function when the user toggles the music play on the Settings screen.
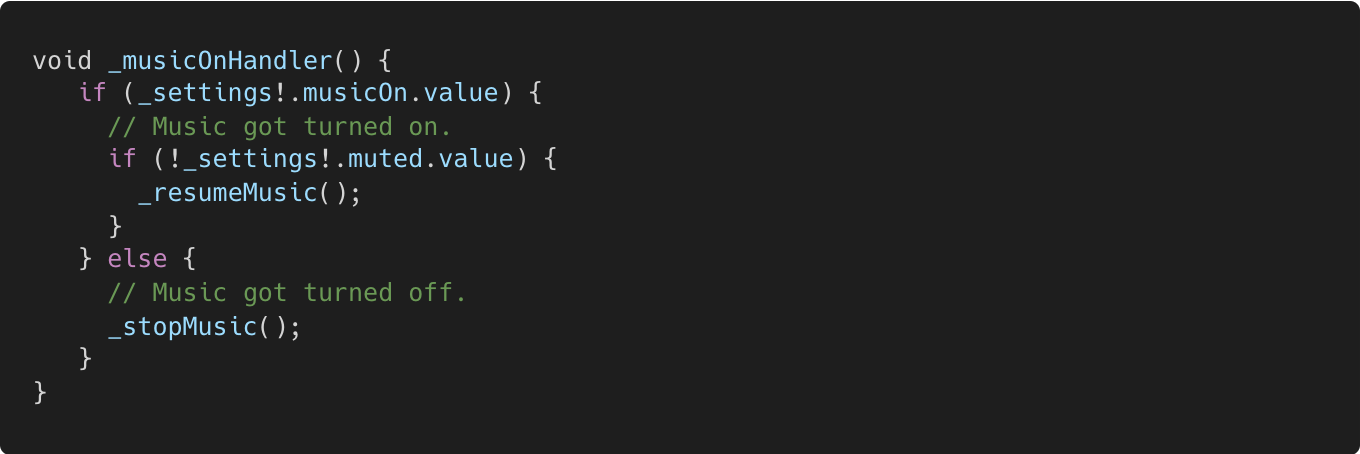
Before (original code)
Inside the else statement, below where the _stopMusic() function is called, use the _log.severe() method to write a message to the console. Any log message with Level.severe or above is sent to Crashlytics, so this message will appear in the Crashlytics console, too. For demonstration purposes, throw another exception here as well:
void _musicOnHandler() {
  if (_settings!.musicOn.value) {
    // Music got turned on.
    if (!_settings!.muted.value) {
      _resumeMusic();
    }
  } else {
    // Music got turned off.
    _stopMusic();
    _log.severe("Someone is messing with the music!");
    throw Exception();
  }
}
Now there are two places in the app where you can click a button and throw an exception. Run your app again and verify that there’s a Throw Test Exception button in the Main Menu.
Main menu with throw exception button
Clicking the Throw Test Exception button generates a full stack trace as of when the exception was thrown and writes it to the console:

Console output after an exception was thrown
If you click Settings to open the settings view and then tap the musical note button a couple of times, more exceptions and stack traces will appear in your console. Now that you have Crashlytics enabled, this data is available in the Crashlytics dashboard.
Open the Firebase console, select your project, and then select Crashlytics from the menu on the left. Choose the version of the project you are running (Android or iOS) and you should be able to see the Crashlytics dashboard.
Firebase Crashlytics Dashboard
If, after a couple of minutes, all you see when you try to access the Crashlytics dashboard, is this guy swishing around at bugs, it’s probably because Crashlytics hasn’t detected any events yet.
In this case, stop your app from running and then go back to your device or simulator, close the app, and start it again by tapping on the app icon. Now, try throwing some exceptions in the app and check the Crashlytics dashboard again. If you’ve refreshed the Firebase console, restarted your app manually, and you’re still not seeing the test crash after five minutes, enable debug logging to see if your app is sending crash reports.

No events detected by Crashlytics yet
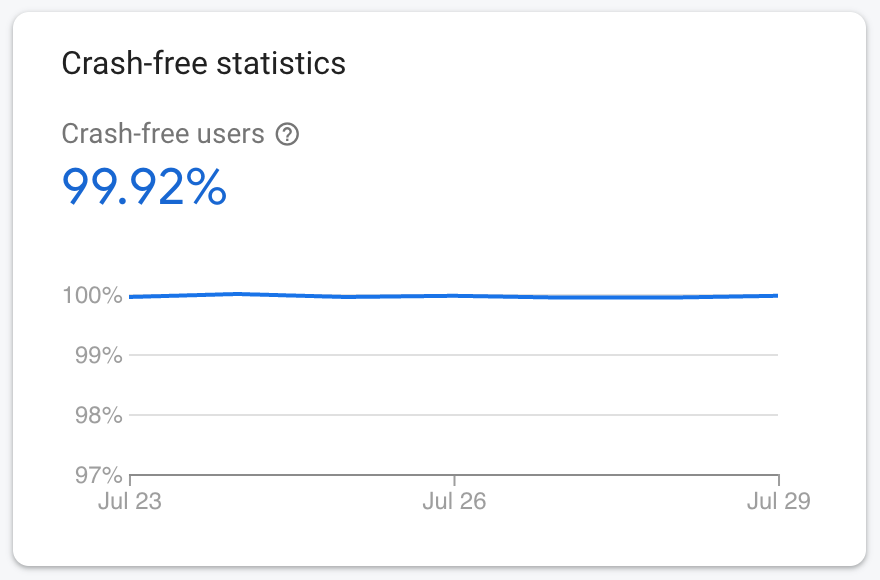
If you’ve enabled Google Analytics, the crash-free statistics pane will show you the percentage of users who have not experienced a crash during a selected time range.
Crashlytics dashboard crash-free statistics pane
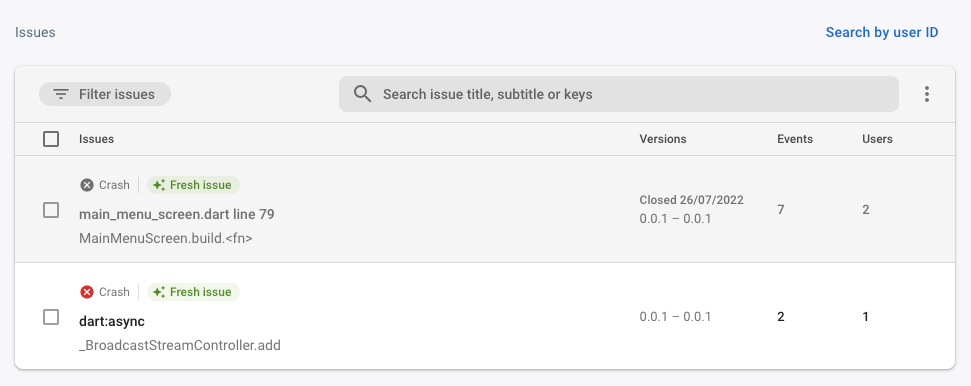
The Issues table of the bottom of the Crashlytics dashboard displays the thrown exceptions.
Crashlytics dashboard issues table
Clicking on a particular issue in the table shows a card for every time the issue has occurred, along with more detailed information about the issue. By default, the stack trace is shown, which allows you to identify where in your code the crash happened. As you can see in the screenshot below, the exception was thrown from the _musicOnHandler()function on line 197 of the audio_controller.dart file. This is no surprise because that’s exactly where you placed that exception in the code, but imagine how useful this is for tracking down issues in complex production apps.
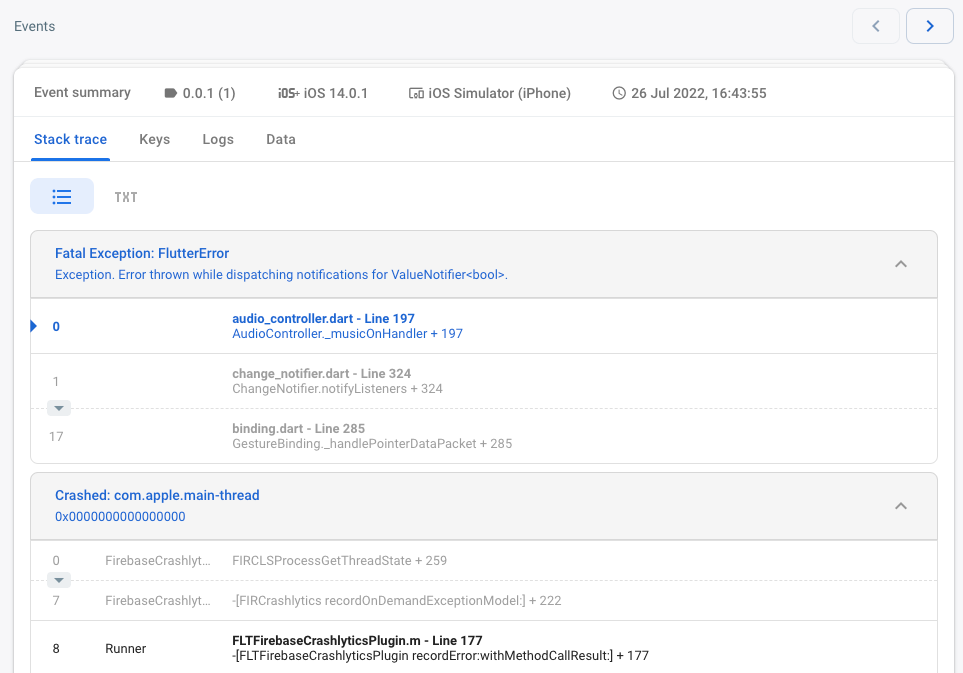
Crashlytics dashboard stack trace
If you click on the Logs tab, you can see any messages written to the console by the _log.severe() method:
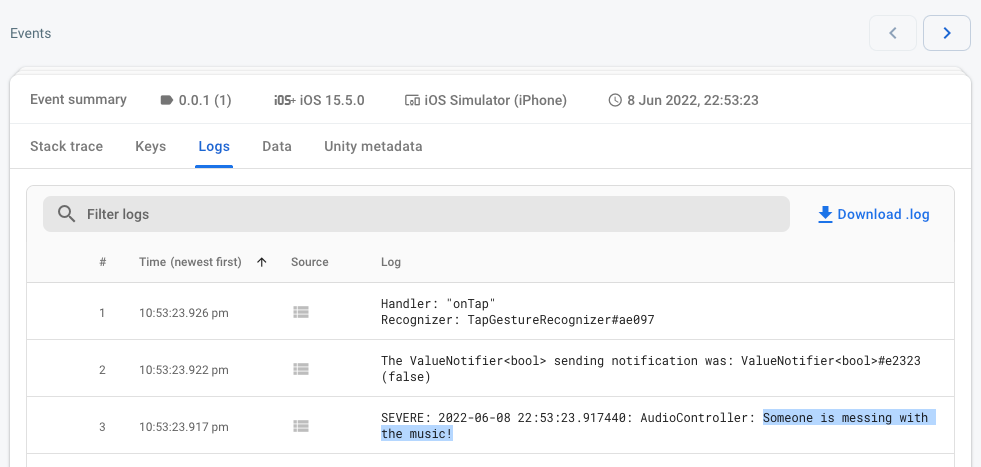
Crashlytics dashboard logs
Congratulations!! Now, when you go on to write an award-winning game (maybe with lots of sliders in it), you’ll have Crashlytics enabled to help you find and fix any issues.
Recommend
About Joyk
Aggregate valuable and interesting links.
Joyk means Joy of geeK