

MMDetection 使用示例:从入门到出门 - 丿风色幻想
source link: https://www.cnblogs.com/ifantasy/p/16551526.html
Go to the source link to view the article. You can view the picture content, updated content and better typesetting reading experience. If the link is broken, please click the button below to view the snapshot at that time.
MMDetection 使用示例:从入门到出门
最近对目标识别感兴趣,想做一些有趣目标识别项目自己玩耍,本来选择的是 YOLOV5 的,但无奈自己使用 YOLOV5 环境训练模型时,不管训练多少次 mAP 指标总是为 0,而其它 pytorch 项目却能正常运行,尝试解决无果后发现另一个更好用的目标识别库——MMDetection ,最终实现了自己的需求。本文首先介绍了 MMDetection 库在 Windows 11 下的安装方式,及可能遇到的问题和解决方法;然后说明了其自带的单图片检测、视频检测、摄像头检测工具的使用方法,并在此之上扩展了一个同时包含上述功能并且能够批量检测图片的 Python 代码;最后以数据集 CelebA 数据集为例,详细记录了使用 MMDetection 训练私有数据集的方法。
| 软件 | 版本 |
|---|---|
| Windows | 11 |
| CUDA | 11.6 |
| conda | 4.12.0 |
| python | 3.9.12 |
| torch | 1.11.0+cu113 |
| torchaudio | 0.11.0+cu113 |
| torchvision | 0.12.0+cu113 |
| mmcv-full | 1.5.1 |
| mmdet | 2.24.1 |
安装 MMCV
MMDetection 的运行依赖 MMCV ,它是一个面向计算机视觉的基础库,其中支持了很多开源工具,如图像分类工具、目标检测工具、语义分割工具、姿态估计工具等常用工具。 MMDetection 的版本跟 MMCV 的版本依赖关系如下表:
| MMDetection 版本 | MMCV 版本 |
|---|---|
| master | mmcv-full>=1.3.17, <1.6.0 |
| 2.25.0 | mmcv-full>=1.3.17, <1.6.0 |
| 2.24.1 | mmcv-full>=1.3.17, <1.6.0 |
| 2.24.0 | mmcv-full>=1.3.17, <1.6.0 |
| 2.23.0 | mmcv-full>=1.3.17, <1.5.0 |
| 2.22.0 | mmcv-full>=1.3.17, <1.5.0 |
| 2.21.0 | mmcv-full>=1.3.17, <1.5.0 |
一般,MMCV 可以通过 pip 直接安装:
pip install mmcv-full -f https://download.openmmlab.com/mmcv/dist/{cu_version}/{torch_version}/index.html
具体的只需要将链接中的 {cu_version} 和 {torch_version} 根据自身需求替换成实际的版本号即可,例如:
pip install mmcv-full -f https://download.openmmlab.com/mmcv/dist/cu111/torch1.9.0/index.html
偶有例外情况,比如本文中使用的 CUDA 11.6 和 torch 1.11.0+cu113 就不能直接带入其中,此时可尝试逐渐降低所装 MMCV 的 CUDA 或 torch 版本号,然后直接在浏览器中打开链接观察是否存在数据以确定版本匹配,对于本文环境则使用以下安装链接:
pip install mmcv-full -f https://download.openmmlab.com/mmcv/dist/cu115/torch1.11.0/index.html
安装 MMDetection
可直接在使用 pip 命令安装 MMDetection :
pip install mmdet
也可以下载 git 仓库源码本地编译安装:
git clone https://github.com/open-mmlab/mmdetection.git
cd mmdetection
pip install -r requirements/build.txt
pip install -v -e .
我在两台电脑上分别安装 MMDetection 环境,第一台通过 pip 可以完全正常安装,第二台安装过程中出现了几个错误:
- 缺少
Microsoft Visual C++库highlighter- subuniterror: Microsoft Visual C++ 14.0 or greater is required. Get it with "Microsoft C++ Build Tools": https://visualstudio.microsoft.com/visual-cpp-build-tools/
此时只需要根据错误提示链接下载官方构建工具即可,运行工具后选择使用 C++ 的桌面开发它会推荐4个构建工具,建议不要试图为了节省硬盘容量而更改,最终安装的内容如下:
如果因为网速不好无法下载而导致安装失败,可自行搜索离线安装包进行安装。 - 缺少
pycocotools库highlighter- fortranNo module named ‘pycocotools’
这个错误卡了很久,试过本地编译、降低版本、pip 安装pycocotools、 conda 安装pycocotools等各种方式想解决这个问题都失败,最后根据 win10python3.9安装pycocotools 成功安装 。
使用前,先将 MMDetection 源码拷贝到本地,并在其根目录打开命令行激活 mmdet 环境,如无特殊说明,本文所有命令皆在此目录此环境下运行:
git clone [email protected]:open-mmlab/mmdetection.git
其中主要目录介绍如下:
configs:模型网络结构配置目录,基本所有主流模型都在里面被定义,其中每个模型目录下的README.md包含本模型的预训练模型demo:官方识别示例,包含图片识别、视频识别、摄像头识别等docker: docker 环境文件docs:相关说明文档mmdet:MMDetection 的主要源码文件,包含数据处理、模型加载、API 接口等tests:包含各种场景下的使用示例tools:包含各种有用的工具——训练代码、测试代码、数据集分析、日志分析等
识别单张图片
识别单张图片的代码是 demo 目录下的 image_demo.py ,打开源码可发现其执行需要指定四个参数:
img:待识别图片地址config:所用模型配置文件地址,即项目根目录下的configs目录对应地址checkpoint:与config参数对应的训练好的模型文件--out-file:输出文件地址
在此我们选择使用的模型配置文件是 configs/faster_rcnn/faster_rcnn_r50_fpn_1x_coco.py (MMDetection 的名称规范为 [model]_(model setting)_[backbone]_[neck]_(norm setting)_(misc)_(gpu x batch)_[schedule]_[dataset].py),在具体使用前,还需要下载该模型对应训练好的模型文件,在模型配置文件对应目录 faster_rcnn 下的 README.md 文件中可找到预训练模型的下载地址:

将预训练模型训练好后放入项目根目录的 checkpoints 目录下,然后就可以开始识别具体图片了,以官方图片为例:
在根目录下运行以下命令:
python demo/image_demo.py --out-file demo-result.jpg demo/demo.jpg configs/faster_rcnn/faster_rcnn_r50_fpn_1x_coco.py checkpoints/faster_rcnn_r50_fpn_1x_coco_20200130-047c8118.pth
随后可在根目录下找到识别输出图片 demo-result.jpg :

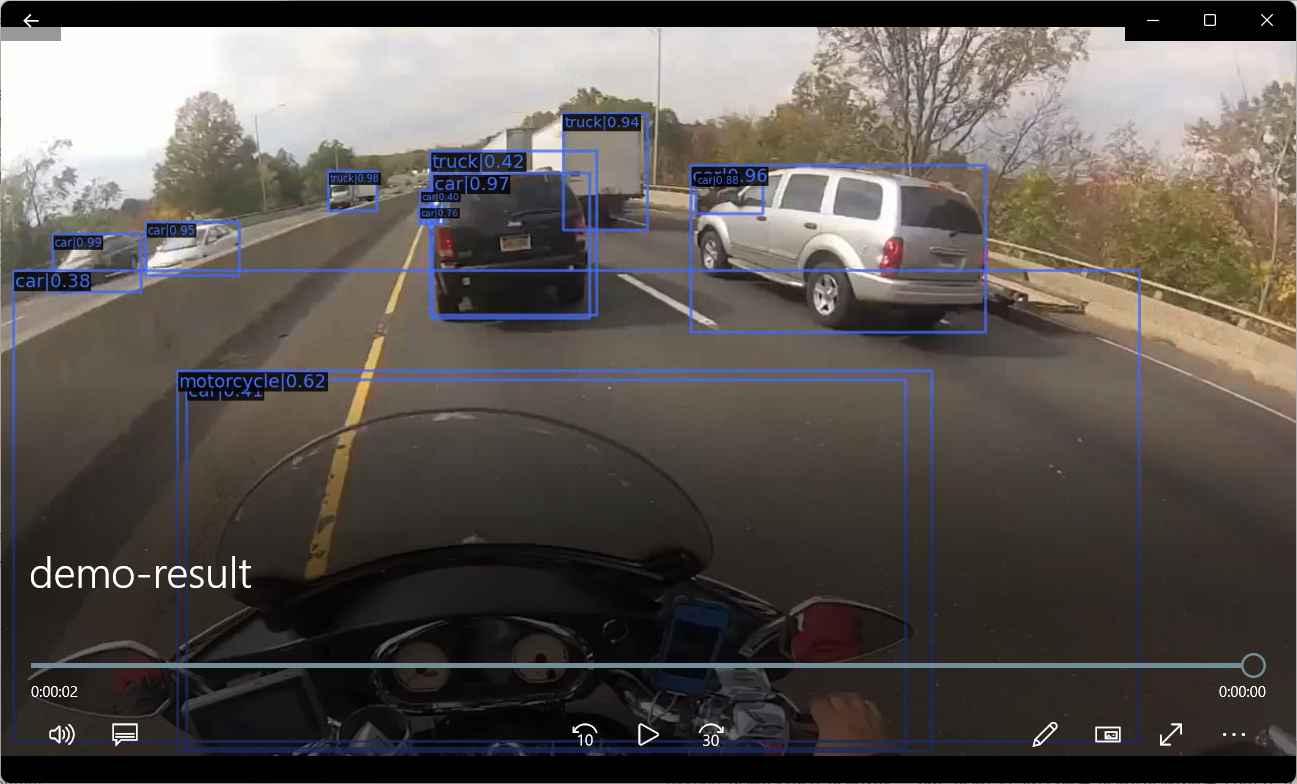
识别视频文件
识别视频文件的代码是 demo 目录下的 video_demo.py ,打开源码可发现其执行需要指定四个参数:
video:待识别视频文件地址config:所用模型配置文件地址,即项目根目录下的configs目录对应地址checkpoint:与config参数对应的训练好的模型文件--out:输出文件地址
我们仍然使用上节指定的模型配置文件和模型文件,输入视频为demo/demo.mp4,原视频如下: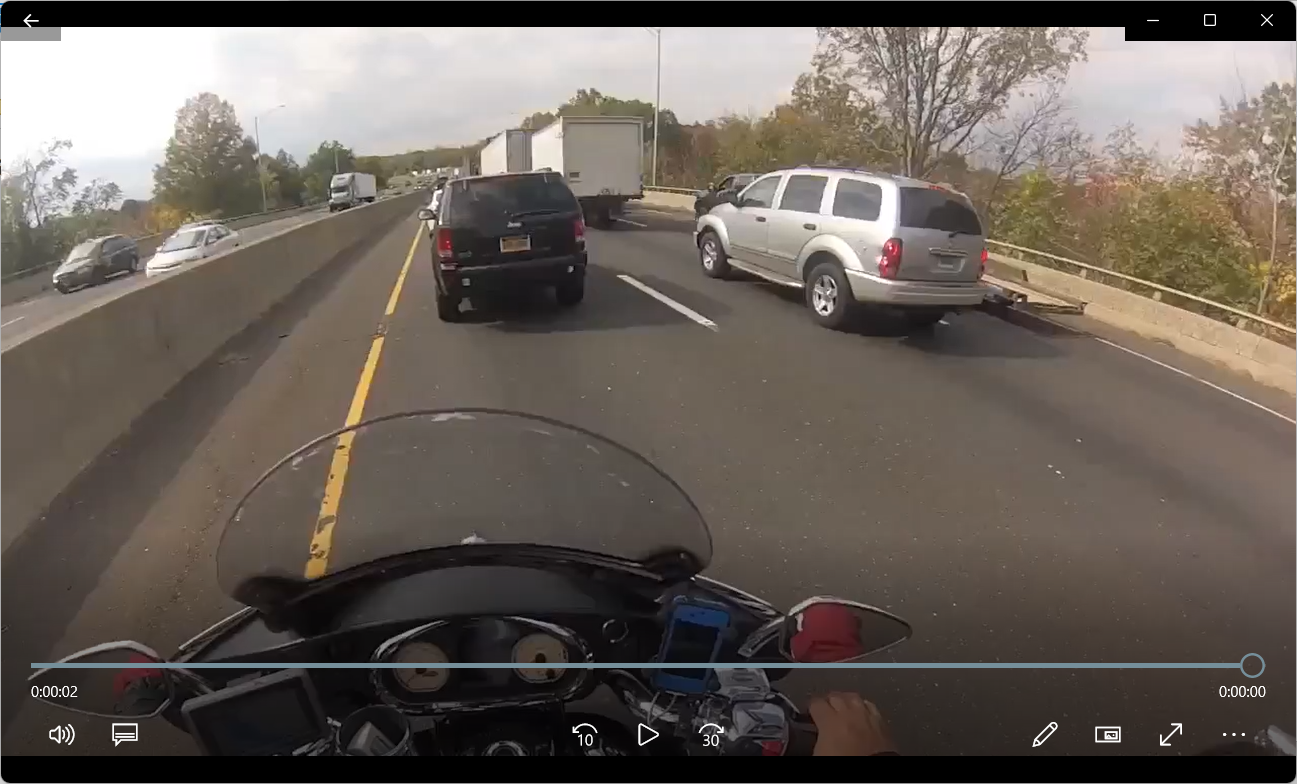
在根目录下运行以下命令:
python demo/video_demo.py --out demo-result.mp4 demo/demo.mp4 configs/faster_rcnn/faster_rcnn_r50_fpn_1x_coco.py checkpoints/faster_rcnn_r50_fpn_1x_coco_20200130-047c8118.pth
随后可在根目录下找到识别输出视频 demo-result.mp4 :
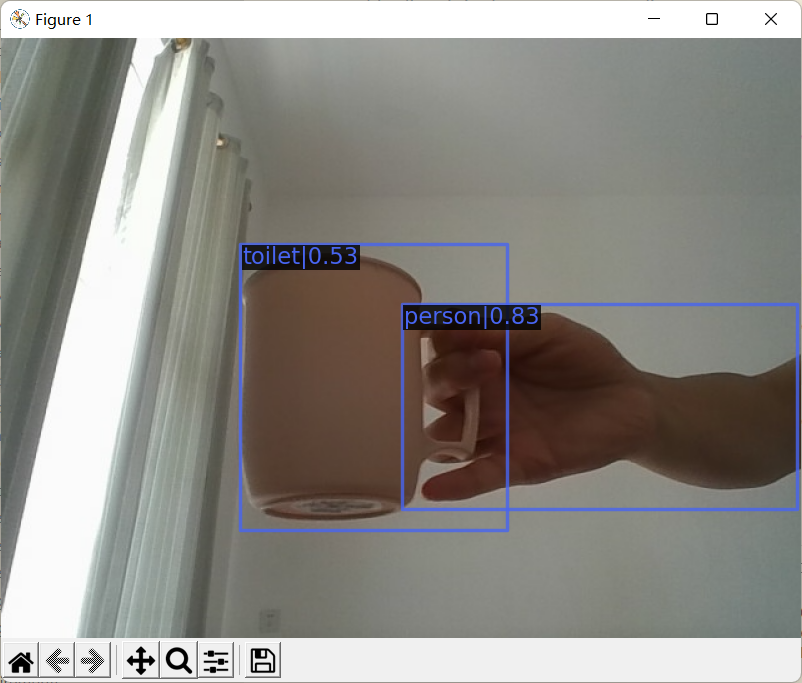
识别摄像头
识别视频文件的代码是 demo 目录下的 webcam_demo.py ,打开源码可发现其执行需要指定四个参数:
config:所用模型配置文件地址,即项目根目录下的configs目录对应地址checkpoint:与config参数对应的训练好的模型文件
在根目录下运行以下命令:
python demo/webcam_demo.py configs/faster_rcnn/faster_rcnn_r50_fpn_1x_coco.py checkpoints/faster_rcnn_r50_fpn_1x_coco_20200130-047c8118.pth
随后程序会一直调用电脑可用摄像头进行拍照识别,一个中间过程截图为:
识别整合/批量图片
MMDetection 自带的 Demo 是不支持文件夹批量图片识别的,而且常用的视频识别和图片识别分开且参数不一致使用起来也比较麻烦,因此本小节尝试将视频识别和图片识别进行合并,并使其支持批量图片识别:
- 格式化参数:
def parse_args():
    parser = ArgumentParser()
    parser.add_argument('source', help='source')
    parser.add_argument('config', help='Config file')
    parser.add_argument('checkpoint', help='Checkpoint file')
    parser.add_argument('--out_path', default=None, help='Path to output')
    parser.add_argument('--device', default='cuda:0', help='Device used for inference')
    parser.add_argument('--palette', default='coco', choices=['coco', 'voc', 'citys', 'random'], help='Color palette used for visualization')
    parser.add_argument('--score-thr', type=float, default=0.3, help='bbox score threshold')
    args = parser.parse_args()
    return args
- 单图片识别:
def single_image(args):
    model = init_detector(args.config, args.checkpoint, device=args.device)
    basename = os.path.basename(args.source)
    result = inference_detector(model, args.source)
    model.show_result(args.source, result, args.score_thr, show=False, win_name=basename, bbox_color=args.palette, text_color=args.palette, mask_color=None, out_file=os.path.join(args.out_path, "detect_" + basename))
- 多图片识别:
def multi_image(args):
    model = init_detector(args.config, args.checkpoint, device=args.device)
    imgs = glob.glob(os.path.join(args.source, "*.jpg"))
    with alive_bar(len(imgs), ctrl_c=False, title=f'Detecting') as bar:
        for img in imgs:
            basename = os.path.basename(img)
            result = inference_detector(model, img)
            model.show_result(img, result, args.score_thr, show=False, win_name=basename, bbox_color=args.palette, text_color=args.palette, mask_color=None, out_file=os.path.join(args.out_path, "detect_" + basename))
            bar()
- 单视频识别:
def single_video(args):
    import matplotlib
    matplotlib.use('agg')
    model = init_detector(args.config, args.checkpoint, device=args.device)
    video_reader = mmcv.VideoReader(args.source)
    video_writer = None

    basename = os.path.basename(args.source)
    fourcc = cv2.VideoWriter_fourcc(*'mp4v')
    video_writer = cv2.VideoWriter(os.path.join(args.out_path, "detect_" + basename), fourcc, video_reader.fps, (video_reader.width, video_reader.height))

    for frame in mmcv.track_iter_progress(video_reader):
        result = inference_detector(model, frame)
        frame = model.show_result(frame, result, score_thr=args.score_thr, bbox_color=args.palette, text_color=args.palette, mask_color=None)
        video_writer.write(frame)

    if video_writer:
        video_writer.release()
    cv2.destroyAllWindows()
- 入口函数:
def main(args):
    if os.path.isdir(args.source):
        multi_image(args)
    elif args.source.endswith(('.bmp', '.dib', '.png', '.jpg', '.jpeg', '.pbm', '.pgm', '.ppm', '.tif', '.tiff')):
        single_image(args)
    elif args.source.endswith(".mp4", ".avi", ".wmv"):
        single_video(args)
完整代码为:
# Copyright (c) OpenMMLab. All rights reserved.
import os
import cv2
import mmcv
import glob
from alive_progress import alive_bar
from argparse import ArgumentParser

from mmdet.apis import (inference_detector, init_detector, show_result_pyplot)


def parse_args():
    parser = ArgumentParser()
    parser.add_argument('source', help='source')
    parser.add_argument('config', help='Config file')
    parser.add_argument('checkpoint', help='Checkpoint file')
    parser.add_argument('--out_path', default=None, help='Path to output')
    parser.add_argument('--device', default='cuda:0', help='Device used for inference')
    parser.add_argument('--palette', default='coco', choices=['coco', 'voc', 'citys', 'random'], help='Color palette used for visualization')
    parser.add_argument('--score-thr', type=float, default=0.3, help='bbox score threshold')
    args = parser.parse_args()
    return args


def single_image(args):
    model = init_detector(args.config, args.checkpoint, device=args.device)
    basename = os.path.basename(args.source)
    result = inference_detector(model, args.source)
    model.show_result(args.source, result, args.score_thr, show=False, win_name=basename, bbox_color=args.palette, text_color=args.palette, mask_color=None, out_file=os.path.join(args.out_path, "detect_" + basename))


def multi_image(args):
    model = init_detector(args.config, args.checkpoint, device=args.device)
    imgs = glob.glob(os.path.join(args.source, "*.jpg"))
    with alive_bar(len(imgs), ctrl_c=False, title=f'Detecting') as bar:
        for img in imgs:
            basename = os.path.basename(img)
            result = inference_detector(model, img)
            model.show_result(img, result, args.score_thr, show=False, win_name=basename, bbox_color=args.palette, text_color=args.palette, mask_color=None, out_file=os.path.join(args.out_path, "detect_" + basename))
            bar()


def single_video(args):
    import matplotlib
    matplotlib.use('agg')
    model = init_detector(args.config, args.checkpoint, device=args.device)
    video_reader = mmcv.VideoReader(args.source)
    video_writer = None

    basename = os.path.basename(args.source)
    fourcc = cv2.VideoWriter_fourcc(*'mp4v')
    video_writer = cv2.VideoWriter(os.path.join(args.out_path, "detect_" + basename), fourcc, video_reader.fps, (video_reader.width, video_reader.height))

    for frame in mmcv.track_iter_progress(video_reader):
        result = inference_detector(model, frame)
        frame = model.show_result(frame, result, score_thr=args.score_thr, bbox_color=args.palette, text_color=args.palette, mask_color=None)
        video_writer.write(frame)

    if video_writer:
        video_writer.release()
    cv2.destroyAllWindows()


def main(args):
    if os.path.isdir(args.source):
        multi_image(args)
    elif args.source.endswith(('.bmp', '.dib', '.png', '.jpg', '.jpeg', '.pbm', '.pgm', '.ppm', '.tif', '.tiff')):
        single_image(args)
    elif args.source.endswith(".mp4", ".avi", ".wmv"):
        single_video(args)


if __name__ == '__main__':
    args = parse_args()
    main(args)
将完整代码保存至项目根目录下的 detect.py 文件中,一个批量识别 demo 下的所有图片,并将结果保存至 demo-result 下的示例为:
python detect.py --out_path demo-result demo/ configs/faster_rcnn/faster_rcnn_r50_fpn_1x_coco.py checkpoints/faster_rcnn_r50_fpn_1x_coco_20200130-047c8118.pth

训练私有数据
数据集介绍
CelebA 是 CelebFaces Attribute 的缩写,意即名人人脸属性数据集,其包含 10177 个名人身份的 202599 张人脸图片,每张图片都做好了特征标记,包含人脸 bbox 标注框、 5 个人脸特征点坐标以及 40 个属性标记, CelebA 由香港中文大学开放提供,广泛用于人脸相关的计算机视觉训练任务,可用于人脸属性标识训练、人脸检测训练以及 landmark 标记等,官方网址:Large-scale CelebFaces Attributes (CelebA) Dataset 。通过官网下载的 CelebA 数据集目录结构如下:
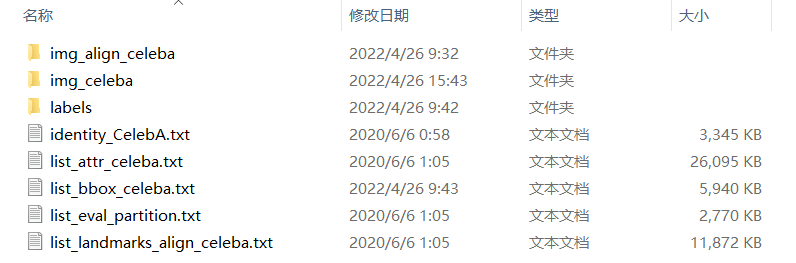
其中各文件目录介绍如下:
img_align_celeba:经过人脸对齐和裁剪了的图像img_celeba:原始“野生”人脸图像,从网络爬取未有做任何裁剪缩放操作的人脸图像labels: 标签文件identity_CelebA.txt:每张图片对应的身份编号信息list_attr_celeba.txt:40 个属性标签文件,第一行为图像张数,第二行为属性名,有该属性则标记为1,否则标记为-1list_bbox_celeba.txt:人脸标注框坐标注释文件,包含每一张图片对应的 bbox 起点坐标及其宽高list_eval_partition.txt:用于划分为training,validation及testing等数据集的标签文件,标签0对应training,标签1对应validation,标签2对应testinglist_landmarks_align_celeba.txt:人脸对齐后的5个特征点landmark坐标注释文件
数据集预处理
CelebA 包含大量数据,本节我们只想讨论 MMDetection 自定义数据集的训练方法而非真的要训练出一个效果极好的图像分类识别模型,因此需要对数据集进行简化,大致流程如下:
- 创建训练数据文件夹
celeba100 - 将
CelebA/img_celeba中前100张图片复制到celeba100/images目录下 - 将
CelebA/labels/list_bbox_celeba.txt复制到celeba100/list_bbox_celeba.txt - 创建
celeba100/classes.txt文件并写入一行数据face,此时训练集目录如下: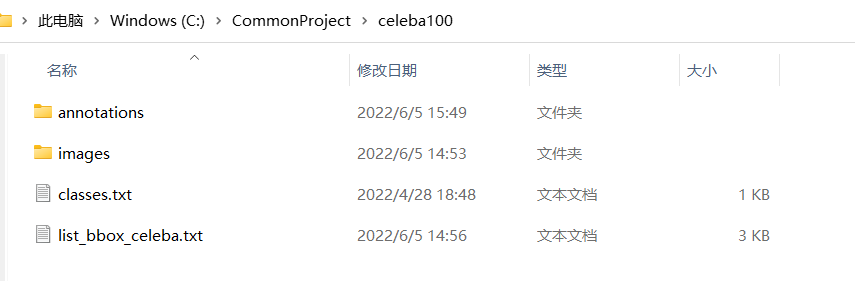
- 用代码将
celeba100/list_bbox_celeba.txt中前100行标签格式转为 COCO 格式存放于celeba100/annotations/label.json
list_bbox_celeba.txt 转为 COCO 代码如下:
import os
from PIL import Image
import json
basepath = r"C:\CommonProject\celeba100"
imagepath = os.path.join(basepath, "images")
annpath = os.path.join(basepath, "annotations")
annfile = os.path.join(annpath, "label.json")
labeltxt = os.path.join(basepath, "list_bbox_celeba.txt")
calssestxt = os.path.join(basepath, "classes.txt")
def get_image_size(infile):
    im = Image.open(infile)
    return im.size

label = {}
with open(calssestxt, 'r+') as f:
    classes = []
    lines = f.readlines()
    for i, line in enumerate(lines):
        c = {}
        c['id'] = i
        c['name'] = line
        c['supercategory'] = "mark"
        classes.append(c)
label['categories'] = classes

images = []
annotations = []
with open(labeltxt, 'r+') as f:
    lines = f.readlines()[:101]
    for i, line in enumerate(lines):
        d = line.split()
        imgpath = os.path.join(imagepath, d[0])
        img = {}
        img_size = get_image_size(imgpath)
        img['id'] = i
        img['file_name'] = d[0]
        img['width'] = img_size[0]
        img['height'] = img_size[1]
        images.append(img)
        ann = {}
        ann['id'] = i
        ann['image_id'] = i
        ann['category_id'] = 0
        ann['iscrowd'] = 0
        ann['bbox'] = [int(t) for t in d[1:]]
        ann['area'] = (ann['bbox'][2] - ann['bbox'][0]) * (ann['bbox'][3] - ann['bbox'][1])
        annotations.append(ann)

label['images'] = images
label['annotations'] = annotations

with open(annfile, "w+") as f:
    json.dump(label, f)
配置 MMDetection
上节我们已经整理出 MMDetection 能直接使用的小数据集,现在需要编写我们训练所使用的模型配置文件。在 mmdetection 根目录下创建一个 celeba 文件夹,并在其下创建模型配置文件 celeba.py ,写入内容如下:
_base_ = '../configs/fcos/fcos_r101_caffe_fpn_gn-head_mstrain_640-800_2x_coco.py'

import os
model = dict(bbox_head=dict(num_classes=1))

dataset_type = 'COCODataset'
classes = ('face', )
data_root = "C:/CommonProject/celeba100"
data = dict(
    samples_per_gpu=2,
    workers_per_gpu=0,
    train=dict(img_prefix=data_root + '/images', classes=classes, ann_file=data_root + '/annotations/label.json'),
    val=dict(img_prefix=data_root + '/images', classes=classes, ann_file=data_root + '/annotations/label.json'),
    test=dict(img_prefix=data_root + '/images', classes=classes, ann_file=data_root + '/annotations/label.json'),
)
work_dir = os.path.join(data_root, 'work_dir')
runner = dict(type='EpochBasedRunner', max_epochs=100)
checkpoint_config = dict(interval=5)
load_from = r'C:\CommonProject\mmdetection\checkpoints\fcos_r101_caffe_fpn_gn-head_mstrain_640-800_2x_coco-511424d6.pth'
其中主要配置解释如下(所有字段详细解释参考 学习配置文件):
_base_:继承的基准模型,跟类的继承差不多model:模型的配置,用于覆盖所继承基准模型的部分内容dataset_type:数据集类型,主要有CocoDataset、CityscapesDataset、LVISV05Dataset、VOCDataset等classes:分类识别的类名data:定义数据集位置,这里我们的训练集、验证集、测试集都为一个runner:设置训练时所需的参数,这里设置了epoch为 100checkpoint_config:设置每 5 轮训练保存一个checkpointload_from:要加载的预训练模型
除了直接训练, MMDetection 还提供很多有用的脚本用以校准模型和数据:
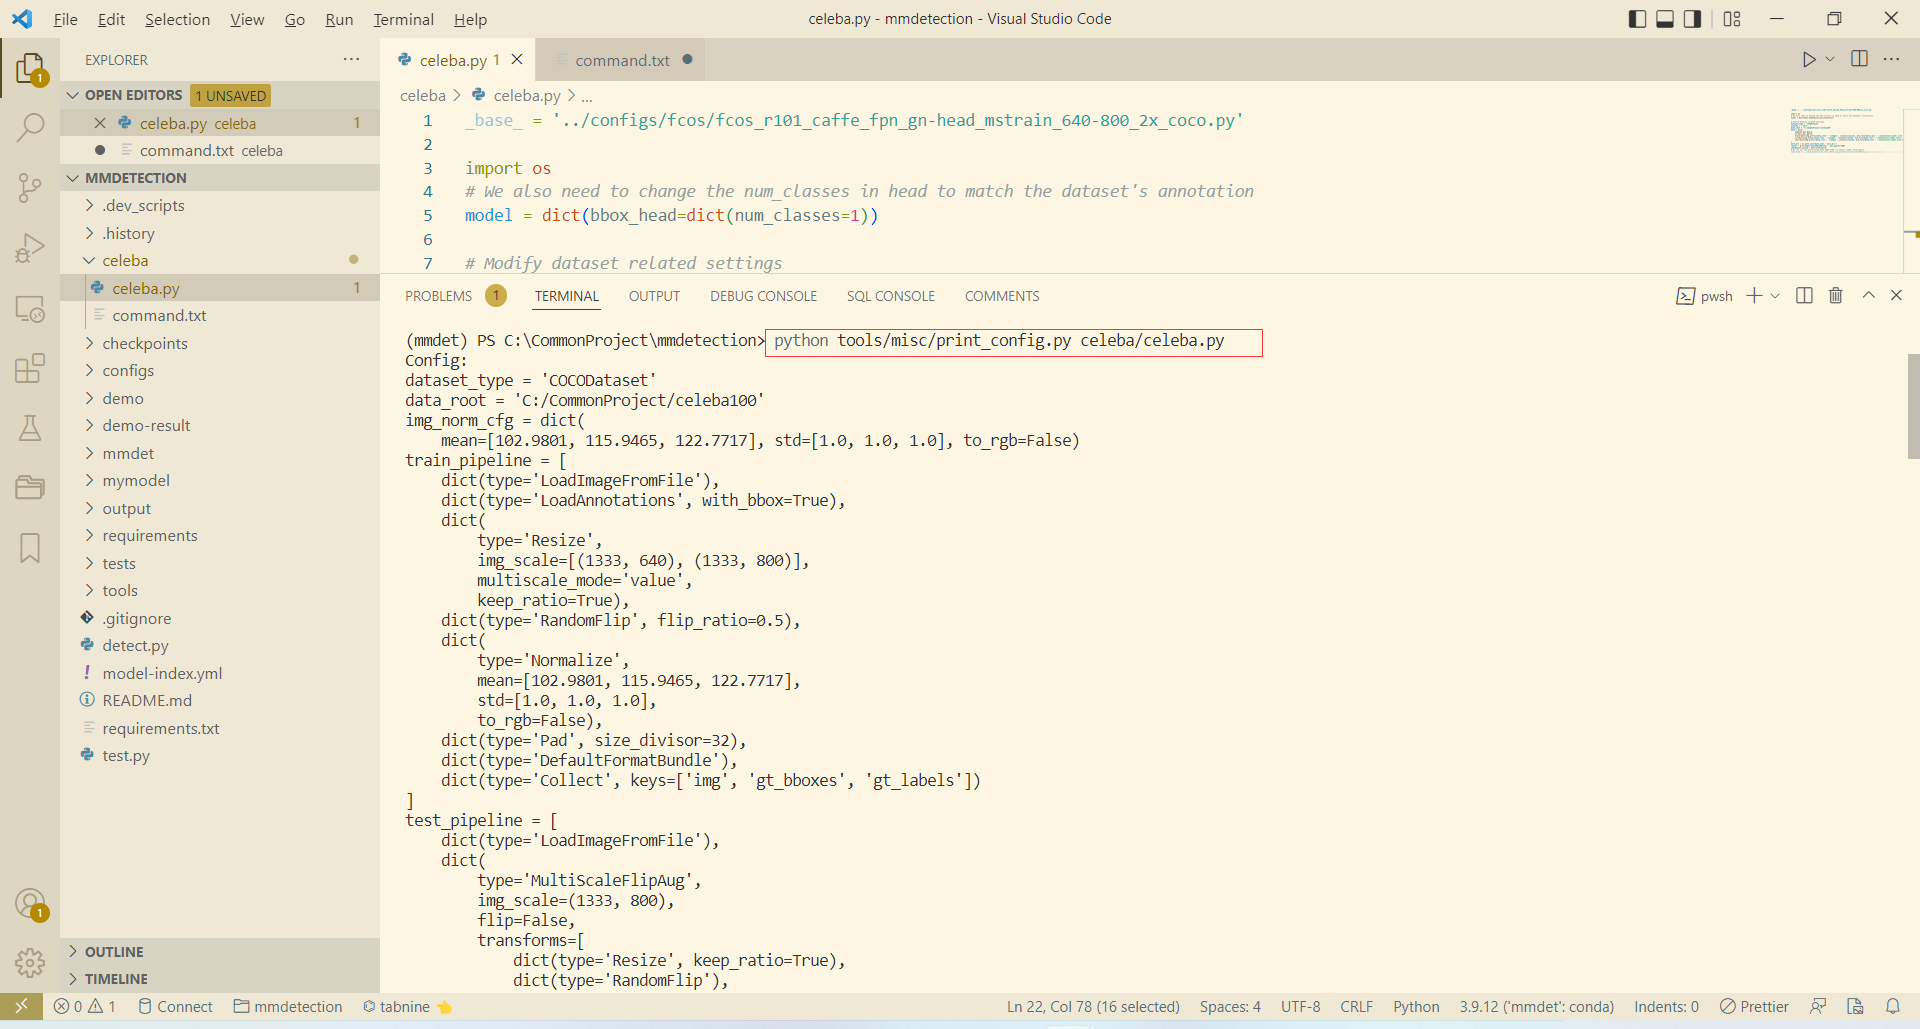
- 输出全配置文件highlighter- vim
python tools/misc/print_config.py celeba/celeba.py
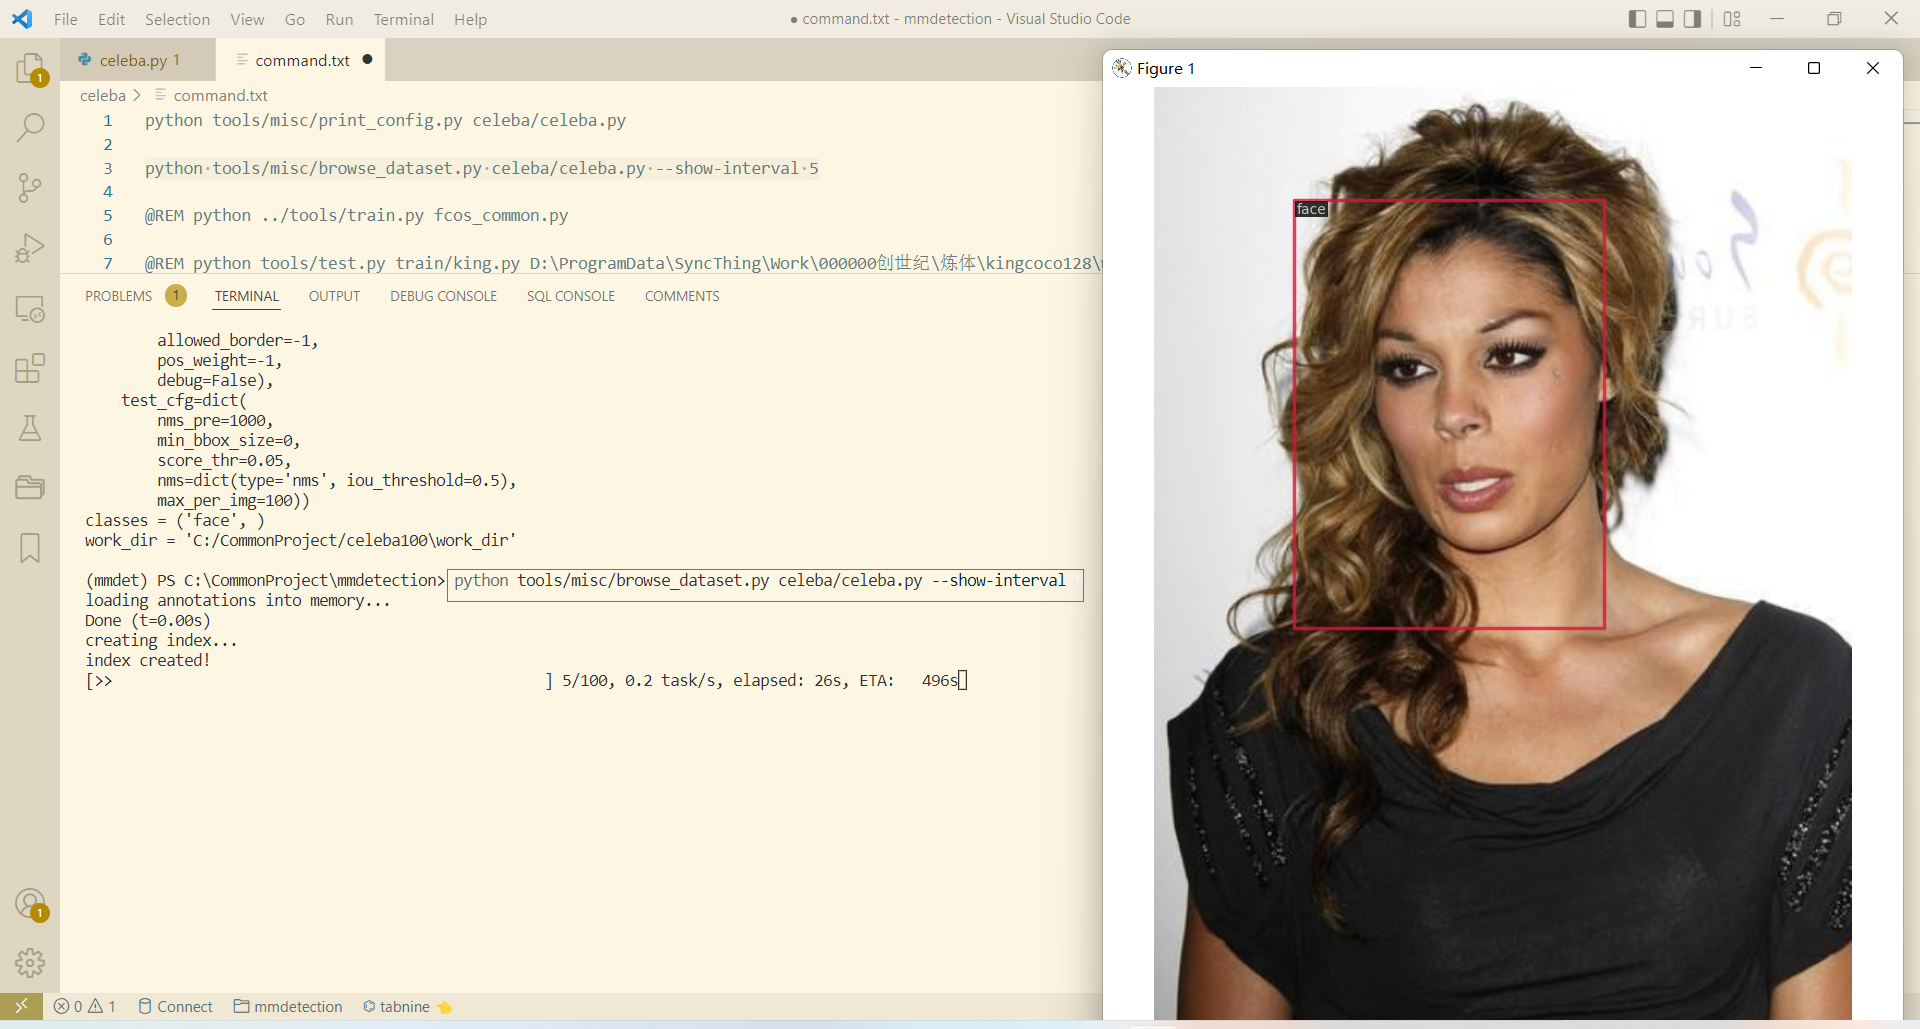
- 以5秒间隔查看数据集highlighter- vim
python tools/misc/browse_dataset.py celeba/celeba.py --show-interval 5
- 开始训练highlighter- vim
python tools/train.py celeba/celeba.py
如果缺少checkpoints文件它会自动下载,然后只需等待其训练完成即可: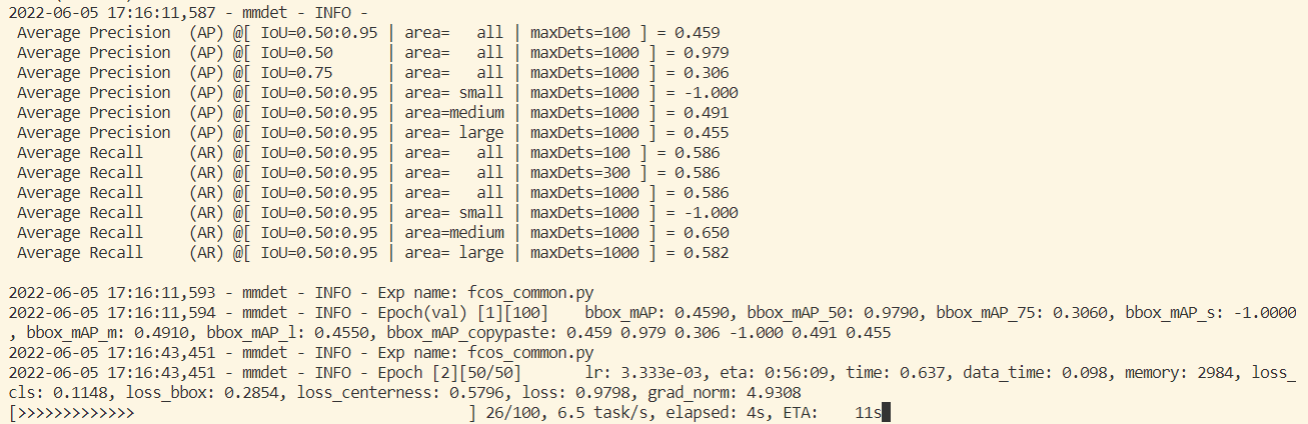
-
去掉检测结果方框的填充
修改 mmdet\core\visualization\image.py#line 324 -
长视频检测时出现: Fail to create pixmap with Tk_GetPixmap in TkImgPhotoInstanceSetSize ( Fail to allocate bitmap) #7035
在检测视频前插入以下代码:
import matplotlib
matplotlib.use('agg')
[1]: open-mmlab. 依赖 MMDetection 2.24.1 文档. TesterHome. [-]
[2]: open-mmlab. 安装 MMCV — mmcv 1.5.1 文档. readthedocs.io. [-]
[3]: open-mmlab. mmdetection. github.com. [-]
[4]: 隔壁恒哥. win10python3.9安装pycocotools. CSDN. [2022-04-06]
[5]: Clear butterfly. coco数据集格式介绍. CSDN. [2021-01-17]
__EOF__
Recommend
About Joyk
Aggregate valuable and interesting links.
Joyk means Joy of geeK