

Implementing WebAuthn authentication in Reactjs and Nodejs with OnzAuth
source link: https://medium.com/@onzauth/implementing-passwordless-webauthn-authentication-in-reactjs-and-nodejs-with-onzauth-a08750a8076b
Go to the source link to view the article. You can view the picture content, updated content and better typesetting reading experience. If the link is broken, please click the button below to view the snapshot at that time.

Implementing WebAuthn authentication in Reactjs and Nodejs with OnzAuth

OnzAuth Passwordless Solution
Logging in with Face ID and Touch ID on the web
Enable TouchID , FaceID and Windows Hello authentication to your website in under 5 minutes.
How does OnzAuth WebAuthn solution work?
OnzAuth’s WebAuthn authentication generates both a public and a private key pair when the user registers. The public key, stored in OnzAuth’s server, identifies the user similarly to a username, whereas the private key, stored in the user’s device, secures storage along with the biometric data and completes the verification process.
Read about the official WebAuthn standard here
Tutorial for Implementing Passwordless login with React and Nodejs
Have you ever considered implementing easy and safe authentication on your web application at no cost? Have you considered integrating authentication with minimal or no initial environment setup? Then hang on for the next 10 minutes or so. In this tutorial, you’ll learn to Implement user authentication in React with OnzAuth. This tutorial is a hands-on demonstration to get you started. Ensure you’ve met the following requirements:
- You have Node (>= 10) installed
- You have a foundational knowledge of Reactjs or Javascript
For reference, clone the demo repository for this tutorial.
What is OnzAuth?
OnzAuth is a passwordless first IDAAS (Identity As A Service) platform, alternative to Firebase, Auth0, Magic.Link etc... OnzAuth allows you to add secure passwordless authentication to your web application in minutes with a prebuilt UI that you can easily customize.
- Combined Register/Login Flow: with OnzAuth, you only need an email address to register and signin in seconds, increasing your user experience and conversion rate for your websites.
- Passwordless-First: OnzAuth will never store any sensitive passwords or biometric information, thereby increasing security from day one. Biometric data stays on your device.
- Custom UI: OnzAuth has prebuilt Login forms(via our vanilla Javascript SDK) and email. (Coming soon at the time of this writing)
- Advanced Custom Flow: Custom flows and claims for advanced permissions control. (Coming soon at the time of this writing)
- Free tier: OnzAuth has a generous limit and pricing for our free tier, only pay when you grow at a low rate monthly.
- Works in any frameworks/languages/platforms: Using industry standard W3C OAuth 2.0, OpenID Connect and WebAuthn, handle your code in a multitudes of frameworks available natively in your platform/language of choice.
Scaffold React Frontend Project
npx create-react-app react-passwordless-frontend
The command will scaffold a new project using the default create-react-app cli in a folder called react-passwordless-frontend. Please read more about create-react-app here.
Create a free OnzAuth account with WebAuthn Enabled
Before you proceed any further, please create a free account at https://tryonzauth.com.
- After signing up, and confirming your email, proceed to create a new Project.
- After creating the New Project, note the ClientID for later.
- Select the Project and go to Settings
- Toggle Enable WebAuthN (Web Authentication)
- Select None for attestation
- Select Platform TPM for authenticator
- Click Save to enable WebAuthn in the project
Install the OnzAuth SDK
Change directory into the newly created folder and npm install the OnzAuth SDK and react-router-dom dependencies
cd react-passwordless-frontendnpm -i -s onz-authnpm -i -s react-router-dom
Next, add the following initialisation code to the top of the App.js file
App.js
Please refer to the guide here for more detailed explanation of the options available.
Create Components
Create the component folders
mkdir src/components/ProtectedPagemkdir src/components/PublicPagemkdir src/components/PublicRoute
Create the ProtectedPage.js file in src/components/ProtectedPage/ProtectedPage.js
ProtectedPage.js
As you can see, there are a few things going on here. First we have a local function called loadServerToken which will be used to call the secured api later and verify the accesstoken we have. The protected page will extract the user email and display it on the component, as well as the returned logged in user called adminInfo.
Note the addition of: ‘Authorization’: `Bearer ${accessToken}` to your own secured api which we will create later.
Create the PublicPage.js file in src/components/PublicPage/PublicPage.js
PublicPage.js
Create the ProtectedRoute.js file in src/components/ProtectedRoute/ProtectedRoute.js
ProtectedRoute.js
The ProtectedRoute component is used to redirect to root should the user object not exist, just a general component to prevent repeated code. Real world code would have more complex but similar implementation.
Because we want to use the navigate logic in the App.js file for our simplified example, we will need to wrap the App component in a BrowserRouter component.
Please make the following changes to the src/index.js file
Index.js
Now we want to finish off the Authentication/Login logic within the App.js file.
- Import the components
App.js (imports)
2. Define the constants and events. Note the auth.isAuthenticated(), auth.showLogin(), auth.logout() and auth.close() functions, they are built in SDK events you can use to initiate the login/logout flows. Please have a look at the available events here
App.js (initialisation)
3. Define the React Use Effect Hooks to navigate to the protected page if the user is logged in
App.js (userEffect)
4. Create the UpdateUserToken function to pass to the protected page, again using the api from here.
App.js (updateUserToken)
5. Intercept the events you want to listen to from the SDK auth object, like logged in, logged out events etc… Please see the available events here.
App.js (events)
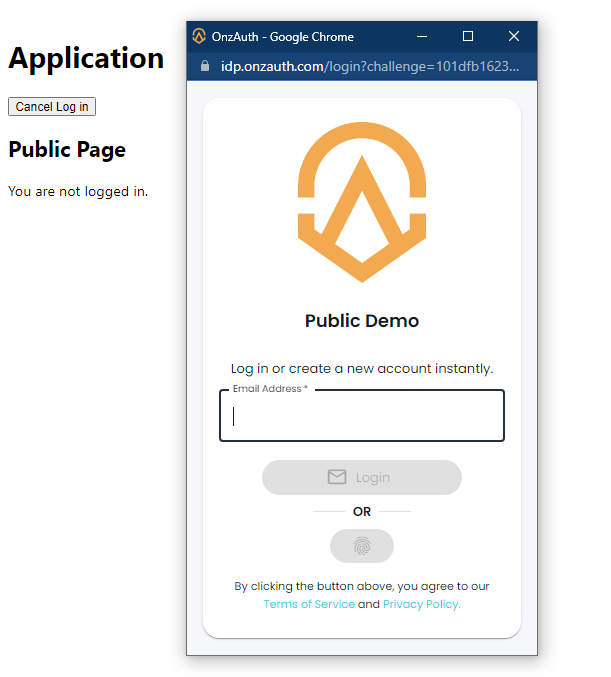
6. Finally, change the return UI component to be as so, please note the empty div myLoginDiv used in the registration, the div will be used to show the iframe should iframe mode be enabled (When WebAuthn is enabled, please do not use iframe mode, as that is a security restriction with iframe when WebAuthn is turned on).
App.js (UI)
The page should currently look like this without logging in.

Log out state
Now that our frontend is done, let’s create our simple Express JS Server.
Setup the NodeJs Express Server
We will need to first install the dependencies first
npm -i --save-dev express cors jsonwebtoken jwks-rsa
Note: We are using standard framework libraries not specific to OnzAuth for reading OAuth 2.0 JWT tokens and verifying them on Nodejs. Other languages should have similar libraries available as well.
We will be using the expressand corsmiddleware, plus jsonwebtokenand jwks-rsa library to verify the jwt token and secure the api. Of course you can choose other libraries instead.
Create a file in the folder calledserver.js
- Create the constants at the top of the file to import the libraries we will be using. Please also replace the VALID_CLIENT_ID with your CLIENT ID you created above earlier.
server.js (imports)
2. Define a path called adminInfo and run the server via express js with cors middleware enabled.
server.js (express and cors middleware)
3. Replace the // Code Here comment with the follow code to verify the token and return the user, if invalid, we will return 401 or 403.
server.js (method body verify token)
Please Note: We first verify if there is a token in the header, then checks if the clientId matches our clientId, then generate the PEM key with the public onzauth jwks.json endpoint to verify the token Signature, before lastly calling the jwt.verify to verify the token with the signing key. Once verified, we will send the verified user info back response.
Please have a look at https://github.com/zailky/onz-auth-js#standard-oauth2-public-endpoints for a list of OnzAuth OAuth2.0 and OpenID connect standard endpoints.
Putting it all together
Lastly, we want to run both the client and server together on npm start therefore, we have to modify the package.jsonfile as follows under the script
"scripts": {
"start": "react-scripts start & node server.js",
    "build": "react-scripts build",
    "test": "react-scripts test",
    "eject": "react-scripts eject"
},
Now we are ready to run the application. Give it a try by running npm start

Conclusion
Congrats! You made it at this point. You’ve learned how to easy and fast it is to implement user authentication in React and Nodejs with OnzAuth. Now which auth service will you prefer to use in your next project? Feel free to learn more about OnzAuth from the official documentation.
Recommend
About Joyk
Aggregate valuable and interesting links.
Joyk means Joy of geeK