

React18 源码解析之 fiber 等数据结构
source link: https://www.xiabingbao.com/post/react/jsx-element-fiber-rfztfs.html
Go to the source link to view the article. You can view the picture content, updated content and better typesetting reading experience. If the link is broken, please click the button below to view the snapshot at that time.

我们解析的源码是 React18.1.0 版本,请注意版本号。React 源码学习的 GitHub 仓库地址:https://github.com/wenzi0github/react。
我们稍微了解下 React 中的几个结构。 我们这里仅了解其中的转换过程,后续我们再了解两棵 fiber 树是如何进行对比的。
1. jsx 结构
我们在 React 中写的类似于 html 的结构就被称为 JSX,但他并不是 html,而是一个 JavaScript 的语法扩展。即他是 js,而不是 html。
官方文档:
const App = () => {
  const handleClick = () => {
    console.log('click');
  };

  return (
    <div onClick={handleClick}>
      <p>hello world</p>
    </div>
  );
};
不过这里我们不深入 jsx 的使用方式,主要说下 JSX 的作用。jsx 是 js 的语法糖,方便我们开发者的维护。最后实际上会被 React(React16.x 及之前)或 babel 编译(React17.0 及更新)成用 createElement 编译的结构。
一开始我写 jsx 时也不太习惯,觉得把逻辑和模板混合到一起太乱了,还是 Vue 中的模板+逻辑+样式的组合更好。后来写多了以后,发现 jsx 其实也挺香的,比如它没有额外语法糖的记忆,各种语法跟 js 本身就很像;同时,因为 typescript 给开的后门,jsx 对 ts 的支持程度很高。而且 React 中并不是用文件来分割组件的,我们可以在一个文件里,编写多个组件。
同样的,我们在 React 中像下面这样写的效果是一样的:
createElement('div', { onClick: handleClick }, createElement('p', null, 'hello world'));但这种方式使用起来确实不方便。

2. element 结构
上面提到会将 jsx 编译成由 createElement()函数组成的一个嵌套结果。那么 createElement 里具体都干了什么呢?
在 React16 及之前,createElement()方法是 React 中的一个方法,因此有些同学就会有疑问,在写.jsx的组件时,本来没用到 React 中的方法,但还是要引入 React。就如上面的代码,在 React16 及之前,要在头部显式地将 React 引入进来的。
import React from 'react';最终转换出的代码是:
React.createElement('div', { onClick: handleClick }, React.createElement('p', null, 'hello world'));但从 React17 开始,React 和 babel 合作,将 jsx 的转换工作放到了编译工具 babel 中。新的 JSX 转换不会将 JSX 转换为 React.createElement,而是自动从 React 的 package 中引入新的入口函数并调用。
假设你的源代码如下:
function App() {
  return <h1>Hello World</h1>;
}
下方是新 JSX 被转换编译后的结果:
// 由编译器引入(禁止自己引入!)
import { jsx as _jsx } from 'react/jsx-runtime';

function App() {
  return _jsx('h1', { children: 'Hello world' });
}
注意,此时源代码无需引入 React 即可使用 JSX 了!若仍然要使用 React 提供的 Hook 等功能,还是需要引入 React 的。
可以看到新 jsx()和之前的 React.createElement()方法转换出来的结构稍微有点区别。之前的 React.createElement()方法里,子结构会通过第三个参数进行传入;而在 jsx()方法中,这里将子结构放到了第二个参数的 children 字段里,第 3 个字段则用于传入设置的 key 属性。若子结构中只有一个子元素,那么 children 就是一个 jsx(),若有多个元素时,则会转为数组:
const App = () => {
  return jsx('div', {
    children: jsx('p', {
      children: [
        jsx('span', {
          className: 'dd',
          children: 'hello world',
        }),
        _jsx('span', {
          children: '123',
        }),
      ],
    }),
  });
};
这里有个 babel 的在线网站,我们可以编写一段 React 代码,能实时看到通过 babel 编译后的效果:React 通过 babel 实现新的 jsx 转换。若 jsx 的转换方式还是旧版的,请在左侧的配置中,将 React Runtime 设置为 automatic 。
那么 jsx()方法里具体是怎么执行的呢?最后返回了样子的数据呢?源码位置:jsx()。
jsx()方法会先进行一系列的判断,相关链接: 介绍全新的 JSX 转换。jsx()方法中,会经过一些判断,将 key 和 ref 两个比较特殊的属性单独提取出来。
/**
 * 将jsx编译为普通的js树形结构
 * @param {string|function} type 若节点为普通html标签时,type为标签的tagName,若为组件时,即为该函数
 * @param {object} config 该节点所有的属性,包括children
 * @param {string?} maybeKey 显式地设置的key属性
 * @returns {*}
 */
export function jsx(type, config, maybeKey) {
  let propName;

  // Reserved names are extracted
  const props = {};

  let key = null;
  let ref = null;

  // 若设置了key,则使用该key
  if (maybeKey !== undefined) {
    if (__DEV__) {
      checkKeyStringCoercion(maybeKey);
    }
    key = '' + maybeKey;
  }

  // 若config中设置了key,则使用config中的key
  if (hasValidKey(config)) {
    if (__DEV__) {
      checkKeyStringCoercion(config.key);
    }
    key = '' + config.key;
  }

  // 提取设置的ref属性
  if (hasValidRef(config)) {
    ref = config.ref;
  }

  // Remaining properties are added to a new props object
  // 剩余属性将添加到新的props对象中
  for (propName in config) {
    if (hasOwnProperty.call(config, propName) && !RESERVED_PROPS.hasOwnProperty(propName)) {
      props[propName] = config[propName];
    }
  }

  /**
   * 我们的节点有有三种类型:
   * 1. 普通的html标签,type为该标签的tagName,如div, span等;
   * 2. 当前是Function Component节点时,则type该组件的函数体,即可以执行type();
   * 3. 当前是Class Component节点,则type为该class,可以new出一个实例;
   * 而type对应的是Function Component时,可以给该组件添加defaultProps属性,
   * 当设置了defaultProps,则将未明确传入的属性给到props里
   */
  // Resolve default props
  if (type && type.defaultProps) {
    const defaultProps = type.defaultProps;
    for (propName in defaultProps) {
      if (props[propName] === undefined) {
        props[propName] = defaultProps[propName];
      }
    }
  }

  /**
   * 参数处理完成后,就调用ReactElement()方法返回一个object结构
   */
  return ReactElement(type, key, ref, undefined, undefined, ReactCurrentOwner.current, props);
}
ReactElement()方法的作用就是返回一个 object 结构,我们这里把所有的提示代码都去掉:
/**
 * Factory method to create a new React element. This no longer adheres to
 * the class pattern, so do not use new to call it. Also, instanceof check
 * will not work. Instead test $$typeof field against Symbol.for('react.element') to check
 * if something is a React Element.
 */
const ReactElement = function(type, key, ref, self, source, owner, props) {
  const element = {
    // This tag allows us to uniquely identify this as a React Element
    $$typeof: REACT_ELEMENT_TYPE, // 用来标识当前是否是React元素

    /**
     * 我们的节点有有三种类型:
     * 1. 普通的html标签,type为该标签的tagName,如div, span等;
     * 2. 当前是Function Component节点时,则type该组件的函数体,即可以执行type();
     * 3. 当前是Class Component节点,则type为该class,可以通过该type,new出一个实例;
     * 而type对应的是Function Component时,可以给该组件添加defaultProps属性,
     * 当设置了defaultProps,则将未明确传入的属性给到props里
     */
    // Built-in properties that belong on the element
    type: type,
    key: key,
    ref: ref,
    props: props,

    // Record the component responsible for creating this element.
    _owner: owner,
  };

  return element;
};
上面方法注释的大概意思是:现在不再使用类的方式 new 出一个实例来,因此不再使用 instanceOf 来判断是否是 React 元素;而是判断 $$typeof 字段是否等于Symbol.for('react.element')来判断。
我们已经知道 $$typeof 字段的作用是为了标识 React 元素的,但他的值为什么用 Symbol 类型呢?可以参考这篇文章:为什么 React 元素有一个$$typeof 属性?
到目前位置,我们已经知道了 jsx 在传入 render()方法之前,会编译成什么样子。
我们在*.jsx文件中,先直接输出下 jsx 的结构:
console.log(
  <div>
    <span>hello world</span>
  </div>,
);
在控制台里就能看到这样的结构:
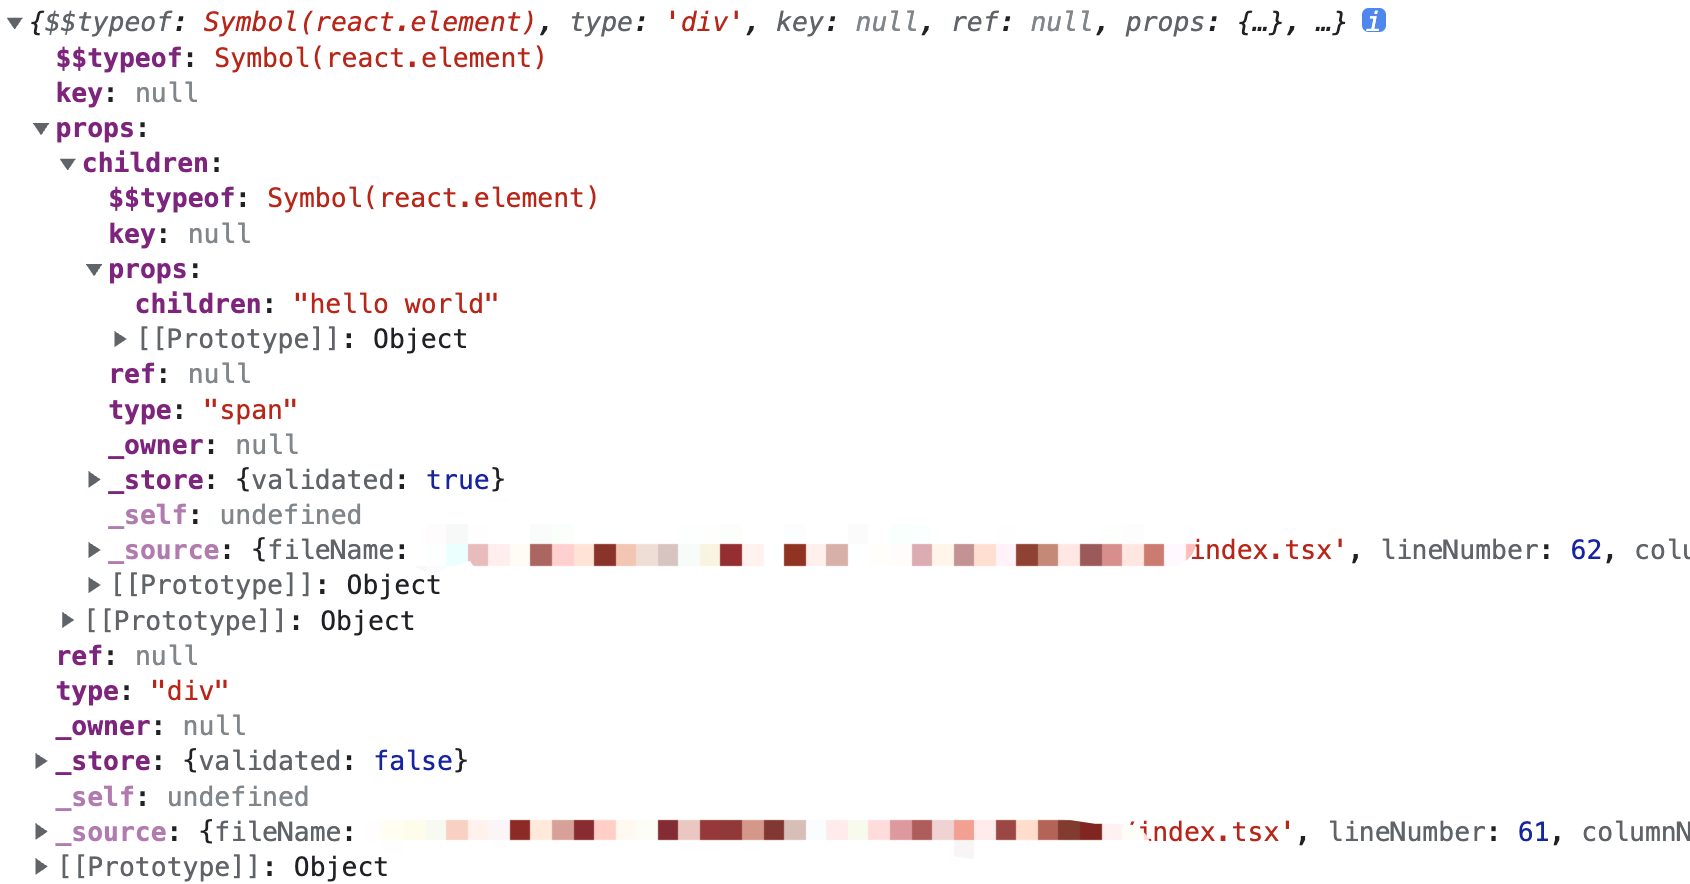
const element = {
  $$typeof: Symbol(react.element),
  key: null,
  props: {
    children: {
      // 当children有多个时,会转为数组类型
      $$typeof: Symbol(react.element),
      key: null,
      props: {
        children: 'hello world', // 文本节点没有类型
      },
      ref: null,
      type: 'span',
    },
  },
  ref: null,
  type: 'div',
};
我们再输出一个完整的组件,如一个 App 组件如下:
const App = ({ username }) => {
  return (
    <div>
      <span>hello {username}</span>
    </div>
  );
};
分别输出下 App 和:
console.log(<App />, App);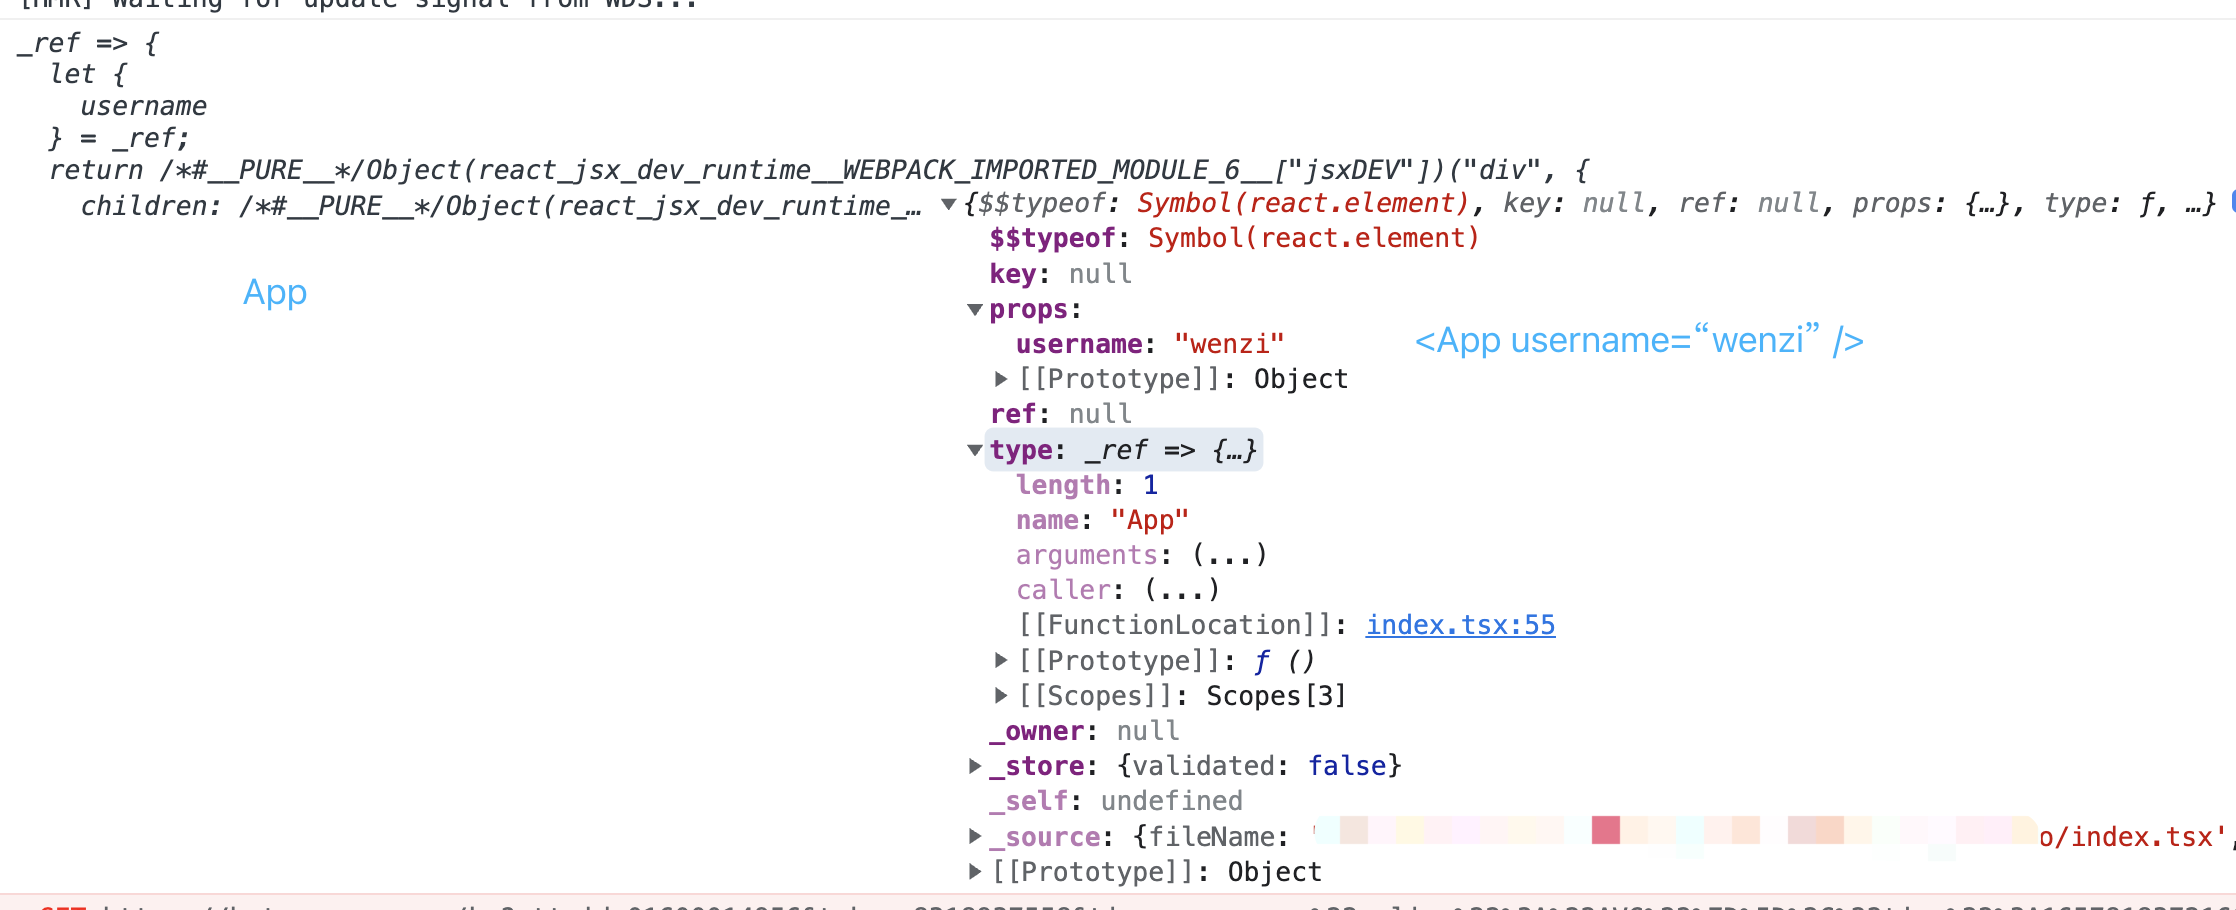
单纯的App是一个函数,function 类型,但这里不能直接执行App(),会报错的;而<App />则是一个 json 结构,object 类型的,其本来的方法则存放到了 type 字段中。
我们在上面的代码中已经说了 type 字段的含义,这里再说下跟 type 相关的 children 字段。当 type 为 html 标签时,children 就其下面所有的子节点。当只有一个子节点时,children 为 object 类型,当有多个子节点时,children 是 array 类型。
有些同学可能一时反应不过来,觉得组件的 children 是其内部返回的 jsx 结构。这是不对的。这里我们要把组件也当做一个跟普通 html 标签一样的标签来对待,组件的 children 就是该组件标签包裹的内容。组件里的内容,可以通过执行type字段对应的 function 或 class 来获得。如:
const Start = (
  <div>
    <App>
      <p>this is app children</p>
    </App>
  </div>
);这里<App>标签里的 p 标签才是他的 children。
因此,在传入到 render()方法时,就是这样子的一个 object 类型的 element 结构的元素。

3. fiber 结构
在上面通过 babel 转换后的 element 结构的数据,会在 render()方法中的某个阶段将其转为 fiber 结构。render()方法里具体怎样转换的,我们稍后再讲,这里我们只是看下 fiber 节点的结构。
/**
 * 创建fiber节点
 * @param {WorkTag} tag
 * @param {mixed} pendingProps
 * @param {null | string} key
 * @param {TypeOfMode} mode
 * @constructor
 */
function FiberNode(tag: WorkTag, pendingProps: mixed, key: null | string, mode: TypeOfMode) {
  // Instance
  this.tag = tag; // 当前节点的类型,如 FunctionComponent, ClassComponent 等

  /**
   * 这个字段和 react element 的 key 的含义和内容有一样(因为这个 key 是
   * 从 react element 的key 那里直接拷贝赋值过来的),作为 children 列表
   * 中每一个 item 的唯一标识。它被用于帮助 React 去计算出哪个 item 被修改了,
   * 哪个 item 是新增的,哪个 item 被删除了。
   * @type {string}
   */
  this.key = key;
  this.elementType = null;

  /**
   * 当前fiber节点的元素类型,与React Element里的type类型一样,若是原生的html标签,
   * 则 type 为该标签的类型('div', 'span' 等);若是自定义的Class Component或
   * Function Component等,则该type的值就是该class或function,后续会按照上面的tag字段,
   * 来决定是用new初始化一个实例(当前是 Class Component),然后执行该class内
   * 的render()方法;还是执行该type(当前是 Function Component),得到其返回值;
   */
  this.type = null;

  /**
   * 1. 若当前fiber节点是dom元素,则对应的是真实DOM元素;
   * 2. 若当前是function component,则值为null;
   * 3. 若当前是class component,则值为class初始化出来的实例
   */
  this.stateNode = null;

  /**
   * 下面的return, child和sibling都是指针,用来指向到其他的fiber节点,
   * React会将jsx编译成的element结构,转为以fiber为节点的链表结构,
   * return: 指向到父级fiber节点;
   * child: 指向到该节点的第1个子节点;
   * sibling: 指向到该节点的下一个兄弟节点;
   * 如图所示:https://pic4.zhimg.com/80/v2-a825372d761879bd1639016e6db93947_1440w.jpg
   */
  this.return = null;
  this.child = null;
  this.sibling = null;
  this.index = 0;

  this.ref = null;

  this.pendingProps = pendingProps;
  this.memoizedProps = null;
  this.updateQueue = null;
  this.memoizedState = null;
  this.dependencies = null;

  this.mode = mode;

  // Effects
  this.flags = NoFlags; // 该节点更新的优先级,若为NoFlags时,则表示不更新
  this.subtreeFlags = NoFlags; // 子节点的更新情况,若为NoFlags,则表示其子节点不更新,在diff时可以直接跳过
  this.deletions = null; // 子节点中需要删除的节点

  this.lanes = NoLanes;
  this.childLanes = NoLanes;

  /**
   * 双缓冲:防止数据丢失,提高效率(之后Dom-diff的时候可以直接比较或者使用
   * React在进行diff更新时,会维护两颗fiber树,一个是当前正在展示的,一个是
   * 通过diff对比后要更新的树,这两棵树中的每个fiber节点通过 alternate 属性
   * 进行互相指向。
   */
  this.alternate = null;
}
React 中大到组件,小到 html 标签,都会转为 fiber 节点构建的 fiber 链表。

4. 为什么要使用 fiber 结构
为什么要使用 fiber 链表?这里我们稍微了解下,后面会详细介绍 fiber 链表如何进行 diff 每个 fiber 节点的。
4.1 Stack Reconciler
在 React 15.x 版本以及之前的版本,Reconciliation 算法采用了栈调和器( Stack Reconciler )来实现,但是这个时期的栈调和器存在一些缺陷:不能暂停渲染任务,不能切分任务,无法有效平衡组件更新渲染与动画相关任务的执行顺序,即不能划分任务的优先级(这样有可能导致重要任务卡顿、动画掉帧等问题)。Stack Reconciler 的实现。
4.2 Fiber Reconciler
为了解决 Stack Reconciler 中固有的问题,以及一些历史遗留问题,在 React 16 版本推出了新的 Reconciliation 算法的调和器—— Fiber 调和器(Fiber Reconciler)来替代栈调和器。Fiber Reconciler 将会利用调度器(Scheduler)来帮忙处理组件渲染/更新的工作。此外,引入 fiber 这个概念后,原来的 react element tree 有了一棵对应的 fiber node tree。在 diff 两棵 react element tree 的差异时,Fiber Reconciler 会基于 fiber node tree 来使用 diff 算法,通过 fiber node 的 return、child、sibling 属性能更方便的遍历 fiber node tree,从而更高效地完成 diff 算法。
fiber 调度的优点:
能够把可中断的任务切片处理;
能够调整任务优先级,重置并复用任务;
可以在父子组件任务间前进后退切换任务;
render 方法可以返回多个元素(即可以返回数组);
支持异常边界处理异常;

fiber 结构是 React 整体的一个基础,两棵状态树的 遍历、diff 对比,任务优先级的判断等,都是基于 fiber 结构来实现的。
其实我们在上面的讲解中,已经解决了几个常见的问题,如:
5.1 为什么 React17 需要显式地引入 React,而之后不用了?
这是因为在 React17 之前,createElement() 方法是在放在 React 中的,只要涉及到 jsx 的,都需要引入 React,才能使用该方法。而从 React17 开始,修改了 jsx 的编译方式。
5.2 Virtual Dom 是什么?
这里我们介绍了 3 种数据结构,那么 React 中说的虚拟 DOM(Virtual DOM)指的是哪一个呢?
实际上指的是 element 这个数据结构,用 js 对象描述真实 dom 的 js 对象。
优点:处理了浏览器的兼容性,防范 xss 攻击,跨平台,差异化更新,减少更新的 dom 操作;
缺点:额外的内存,初次渲染不一定快;因为要进行后续一系列的构建、hooks 的搭建等,才会渲染 DOM;会比直接操作 DOM 要慢一些;
Recommend
About Joyk
Aggregate valuable and interesting links.
Joyk means Joy of geeK