

LyScript 内存交换与差异对比 - lyshark
source link: https://www.cnblogs.com/LyShark/p/16547840.html
Go to the source link to view the article. You can view the picture content, updated content and better typesetting reading experience. If the link is broken, please click the button below to view the snapshot at that time.

LyScript 内存交换与差异对比
LyScript 针对内存读写函数的封装功能并不多,只提供了内存读取和内存写入函数的封装,本篇文章将继续对API进行封装,实现一些在软件逆向分析中非常实用的功能,例如内存交换,内存区域对比,磁盘与内存镜像比较,特征码检索等功能。
LyScript项目地址:https://github.com/lyshark/LyScript
内存区域交换: 实现被加载程序内特定一块内存区域的交换,该方法实现原理就是两个变量之间的交换,只是在交换时需要逐个字节进行,调用read_memory_byte()函数实现起了很容易。
from LyScript32 import MyDebug
# 交换两个内存区域
def memory_xchage(dbg,memory_ptr_x,memory_ptr_y,bytes):
ref = False
for index in range(0,bytes):
# 读取两个内存区域
read_byte_x = dbg.read_memory_byte(memory_ptr_x + index)
read_byte_y = dbg.read_memory_byte(memory_ptr_y + index)
# 交换内存
ref = dbg.write_memory_byte(memory_ptr_x + index,read_byte_y)
ref = dbg.write_memory_byte(memory_ptr_y + index, read_byte_x)
return ref
if __name__ == "__main__":
dbg = MyDebug()
dbg.connect()
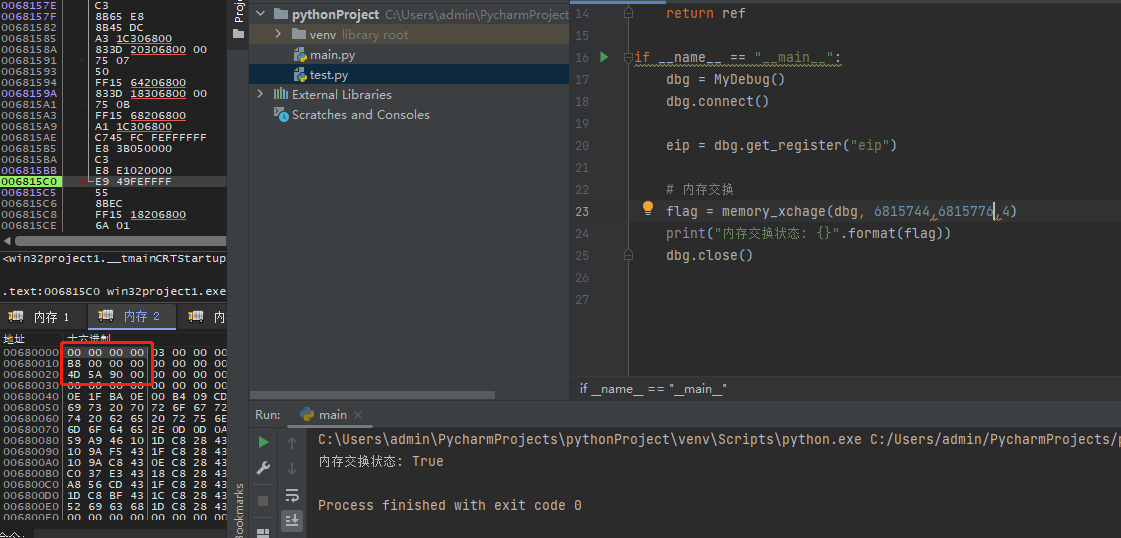
eip = dbg.get_register("eip")
# 内存交换
flag = memory_xchage(dbg, 6815744,6815776,4)
print("内存交换状态: {}".format(flag))
dbg.close()
PE文件头节点交换后如下:
内存区域对比: 可用于对比该进程内存中的特定一块区域的差异,返回是列表中的字典形式,分别传入对比内存x,y以及需要对比的内存长度,此处建议不要超过1024字节。
from LyScript32 import MyDebug

# 对比两个内存区域
def memory_cmp(dbg,memory_ptr_x,memory_ptr_y,bytes):
    cmp_memory = []
    for index in range(0,bytes):

        item = {"addr":0, "x": 0, "y": 0}

        # 读取两个内存区域
        read_byte_x = dbg.read_memory_byte(memory_ptr_x + index)
        read_byte_y = dbg.read_memory_byte(memory_ptr_y + index)

        if read_byte_x != read_byte_y:
            item["addr"] = memory_ptr_x + index
            item["x"] = read_byte_x
            item["y"] = read_byte_y
            cmp_memory.append(item)
    return cmp_memory

if __name__ == "__main__":
    dbg = MyDebug()
    dbg.connect()

    eip = dbg.get_register("eip")

    # 内存对比
    cmp_ref = memory_cmp(dbg, 6815744,6815776,4)
    for index in range(0,len(cmp_ref)):
        print("地址: 0x{:08X} -> X: 0x{:02x} -> y: 0x{:02x}".format(cmp_ref[index].get("addr"),cmp_ref[index].get("x"),cmp_ref[index].get("y")))

    dbg.close()
对比特定内存区域,返回差异字节地址:

内存与磁盘机器码比较: 通过调用read_memory_byte()函数,或者open()打开文件,等就可以得到程序磁盘与内存中特定位置的机器码参数,然后通过对每一个列表中的字节进行比较,就可得到特定位置下磁盘与内存中的数据是否一致的判断。
#coding: utf-8
import binascii,os,sys
from LyScript32 import MyDebug
# 得到程序的内存镜像中的机器码
def get_memory_hex_ascii(address,offset,len):
count = 0
ref_memory_list = []
for index in range(offset,len):
# 读出数据
char = dbg.read_memory_byte(address + index)
count = count + 1
if count % 16 == 0:
if (char) < 16:
print("0" + hex((char))[2:])
ref_memory_list.append("0" + hex((char))[2:])
else:
print(hex((char))[2:])
ref_memory_list.append(hex((char))[2:])
else:
if (char) < 16:
print("0" + hex((char))[2:] + " ",end="")
ref_memory_list.append("0" + hex((char))[2:])
else:
print(hex((char))[2:] + " ",end="")
ref_memory_list.append(hex((char))[2:])
return ref_memory_list
# 读取程序中的磁盘镜像中的机器码
def get_file_hex_ascii(path,offset,len):
count = 0
ref_file_list = []
with open(path, "rb") as fp:
# file_size = os.path.getsize(path)
fp.seek(offset)
for item in range(offset,offset + len):
char = fp.read(1)
count = count + 1
if count % 16 == 0:
if ord(char) < 16:
print("0" + hex(ord(char))[2:])
ref_file_list.append("0" + hex(ord(char))[2:])
else:
print(hex(ord(char))[2:])
ref_file_list.append(hex(ord(char))[2:])
else:
if ord(char) < 16:
print("0" + hex(ord(char))[2:] + " ", end="")
ref_file_list.append("0" + hex(ord(char))[2:])
else:
print(hex(ord(char))[2:] + " ", end="")
ref_file_list.append(hex(ord(char))[2:])
return ref_file_list
if __name__ == "__main__":
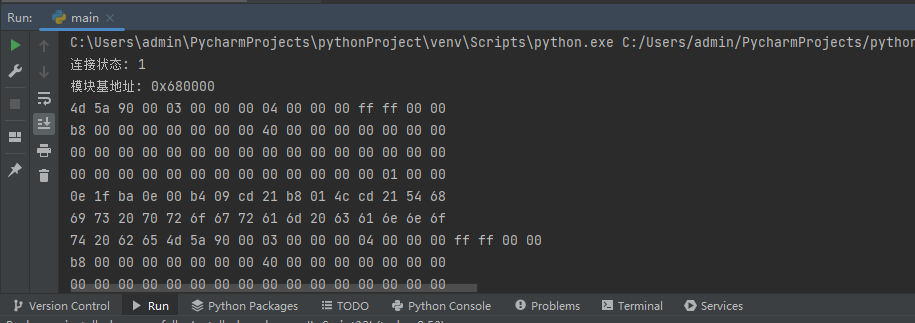
dbg = MyDebug()
connect_flag = dbg.connect()
print("连接状态: {}".format(connect_flag))
module_base = dbg.get_base_from_address(dbg.get_local_base())
print("模块基地址: {}".format(hex(module_base)))
# 得到内存机器码
memory_hex_byte = get_memory_hex_ascii(module_base,0,100)
# 得到磁盘机器码
file_hex_byte = get_file_hex_ascii("d://Win32Project1.exe",0,100)
# 输出机器码
print("\n内存机器码: ",memory_hex_byte)
print("\n磁盘机器码: ",file_hex_byte)
dbg.close()
读取后输出时会默认十六个字符一次换行,输出效果如下。
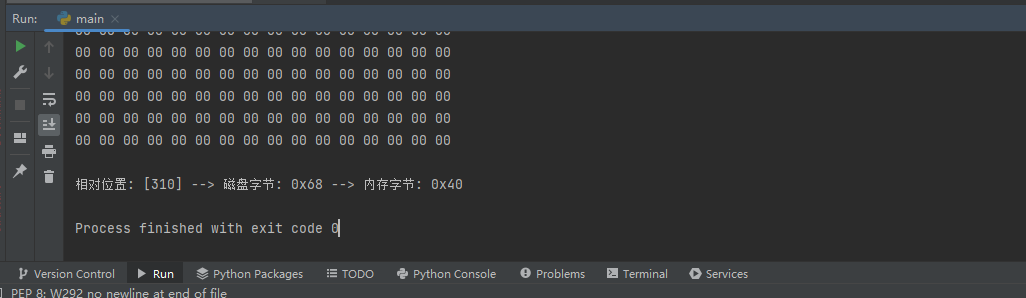
我们继续增加磁盘与内存对比过程,然后就能实现对特定内存区域与磁盘区域字节码一致性的判断。
#coding: utf-8
import binascii,os,sys
from LyScript32 import MyDebug

# 得到程序的内存镜像中的机器码
def get_memory_hex_ascii(address,offset,len):
    count = 0
    ref_memory_list = []
    for index in range(offset,len):
        # 读出数据
        char = dbg.read_memory_byte(address + index)
        count = count + 1

        if count % 16 == 0:
            if (char) < 16:
                print("0" + hex((char))[2:])
                ref_memory_list.append("0" + hex((char))[2:])
            else:
                print(hex((char))[2:])
                ref_memory_list.append(hex((char))[2:])
        else:
            if (char) < 16:
                print("0" + hex((char))[2:] + " ",end="")
                ref_memory_list.append("0" + hex((char))[2:])
            else:
                print(hex((char))[2:] + " ",end="")
                ref_memory_list.append(hex((char))[2:])
    return ref_memory_list

# 读取程序中的磁盘镜像中的机器码
def get_file_hex_ascii(path,offset,len):
    count = 0
    ref_file_list = []

    with open(path, "rb") as fp:
        # file_size = os.path.getsize(path)
        fp.seek(offset)

        for item in range(offset,offset + len):
            char = fp.read(1)
            count = count + 1
            if count % 16 == 0:
                if ord(char) < 16:
                    print("0" + hex(ord(char))[2:])
                    ref_file_list.append("0" + hex(ord(char))[2:])
                else:
                    print(hex(ord(char))[2:])
                    ref_file_list.append(hex(ord(char))[2:])
            else:
                if ord(char) < 16:
                    print("0" + hex(ord(char))[2:] + " ", end="")
                    ref_file_list.append("0" + hex(ord(char))[2:])
                else:
                    print(hex(ord(char))[2:] + " ", end="")
                    ref_file_list.append(hex(ord(char))[2:])
    return ref_file_list

if __name__ == "__main__":
    dbg = MyDebug()

    connect_flag = dbg.connect()
    print("连接状态: {}".format(connect_flag))

    module_base = dbg.get_base_from_address(dbg.get_local_base())
    print("模块基地址: {}".format(hex(module_base)))

    # 得到内存机器码
    memory_hex_byte = get_memory_hex_ascii(module_base,0,1024)

    # 得到磁盘机器码
    file_hex_byte = get_file_hex_ascii("d://Win32Project1.exe",0,1024)

    # 输出机器码
    for index in range(0,len(memory_hex_byte)):
        # 比较磁盘与内存是否存在差异
        if memory_hex_byte[index] != file_hex_byte[index]:
            # 存在差异则输出
            print("\n相对位置: [{}] --> 磁盘字节: 0x{} --> 内存字节: 0x{}".
                  format(index,memory_hex_byte[index],file_hex_byte[index]))
    dbg.close()
代码运行后即可输出,存在差异的相对位置:
内存ASCII码解析: 通过封装的get_memory_hex_ascii得到内存机器码,然后再使用如下过程实现输出该内存中的机器码所对应的ASCII码。
from LyScript32 import MyDebug
import os,sys

# 转为ascii
def to_ascii(h):
    list_s = []
    for i in range(0, len(h), 2):
        list_s.append(chr(int(h[i:i+2], 16)))
    return ''.join(list_s)

# 转为16进制
def to_hex(s):
    list_h = []
    for c in s:
        list_h.append(hex(ord(c))[2:])
    return ''.join(list_h)

# 得到程序的内存镜像中的机器码
def get_memory_hex_ascii(address,offset,len):
    count = 0
    ref_memory_list = []
    for index in range(offset,len):
        # 读出数据
        char = dbg.read_memory_byte(address + index)
        count = count + 1

        if count % 16 == 0:
            if (char) < 16:
                ref_memory_list.append("0" + hex((char))[2:])
            else:
                ref_memory_list.append(hex((char))[2:])
        else:
            if (char) < 16:
                ref_memory_list.append("0" + hex((char))[2:])
            else:
                ref_memory_list.append(hex((char))[2:])
    return ref_memory_list


if __name__ == "__main__":
    dbg = MyDebug()
    dbg.connect()

    eip = dbg.get_register("eip")

    # 得到模块基地址
    module_base = dbg.get_base_from_address(dbg.get_local_base())

    # 得到指定区域内存机器码
    ref_memory_list = get_memory_hex_ascii(module_base,0,1024)

    # 解析ascii码
    break_count = 1
    for index in ref_memory_list:
        if break_count %32 == 0:
            print(to_ascii(hex(int(index, 16))[2:]))
        else:
            print(to_ascii(hex(int(index, 16))[2:]),end="")
        break_count = break_count + 1

    dbg.close()
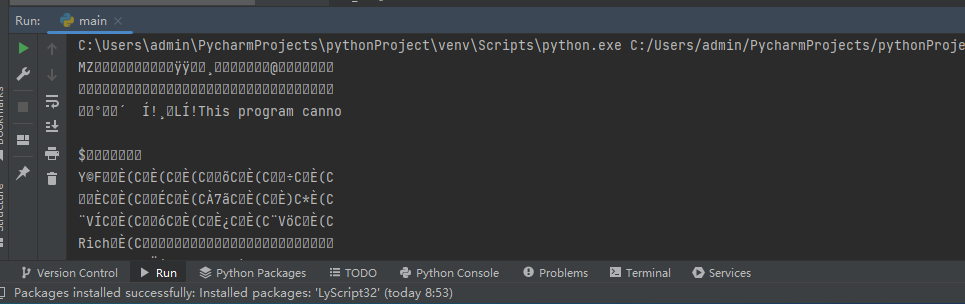
输出效果如下,如果换成中文,那就是一个中文搜索引擎了。
内存特征码匹配: 通过二次封装get_memory_hex_ascii()实现扫描内存特征码功能,如果存在则返回True否则返回False。
from LyScript32 import MyDebug
import os,sys

# 得到程序的内存镜像中的机器码
def get_memory_hex_ascii(address,offset,len):
    count = 0
    ref_memory_list = []
    for index in range(offset,len):
        # 读出数据
        char = dbg.read_memory_byte(address + index)
        count = count + 1

        if count % 16 == 0:
            if (char) < 16:
                ref_memory_list.append("0" + hex((char))[2:])
            else:
                ref_memory_list.append(hex((char))[2:])
        else:
            if (char) < 16:
                ref_memory_list.append("0" + hex((char))[2:])
            else:
                ref_memory_list.append(hex((char))[2:])
    return ref_memory_list


# 在指定区域内搜索特定的机器码,如果完全匹配则返回
def search_hex_ascii(address,offset,len,hex_array):
    # 得到指定区域内存机器码
    ref_memory_list = get_memory_hex_ascii(address,offset,len)

    array = []

    # 循环输出字节
    for index in range(0,len + len(hex_array)):

        # 如果有则继续装
        if len(hex_array) != len(array):
            array.append(ref_memory_list[offset + index])

        else:
            for y in range(0,len(array)):
                if array[y] != ref_memory_list[offset + index + y]:
                    return False

        array.clear()
    return False

if __name__ == "__main__":
    dbg = MyDebug()
    dbg.connect()

    eip = dbg.get_register("eip")

    # 得到模块基地址
    module_base = dbg.get_base_from_address(dbg.get_local_base())

    re = search_hex_ascii(module_base,0,100,hex_array=["0x4d","0x5a"])

    dbg.close()
特征码扫描一般不需要自己写,自己写的麻烦,而且不支持通配符,可以直接调用我们API中封装好的scan_memory_one()它可以支持??通配符模糊匹配,且效率要高许多。
Recommend
About Joyk
Aggregate valuable and interesting links.
Joyk means Joy of geeK