

如何基于WPF写一款数据库文档管理工具(二) - 月亮邮递员
source link: https://www.cnblogs.com/izhaofu/p/smartsql2.html
Go to the source link to view the article. You can view the picture content, updated content and better typesetting reading experience. If the link is broken, please click the button below to view the snapshot at that time.

上次发表了基于WPF重复造轮子,写一款数据库文档管理工具(一) 得到不少人支持,文章一度上到了博客园推荐表首页,看来大家对这个工具还是很喜欢。今天就继续来分享一下我在开发这款工具的过程中积累的一些技术点。
本篇主要讲的是基于HandyControl控件的DataGrid进行数据绑定以及如何实现自定义一个自定义控件。在写这些之前我们先来看下我们工具的整个界面:
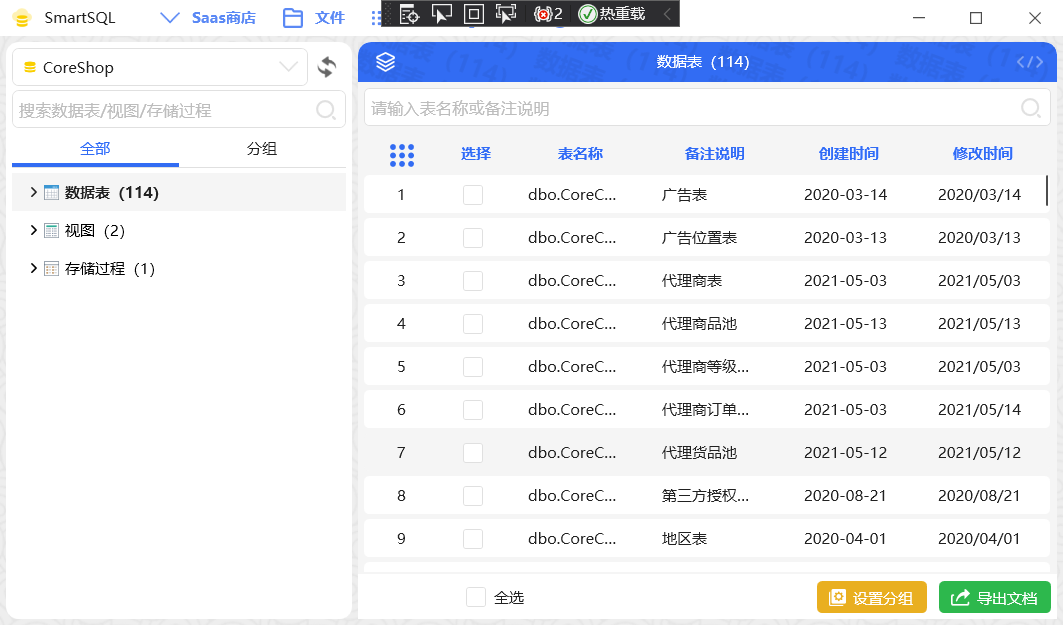
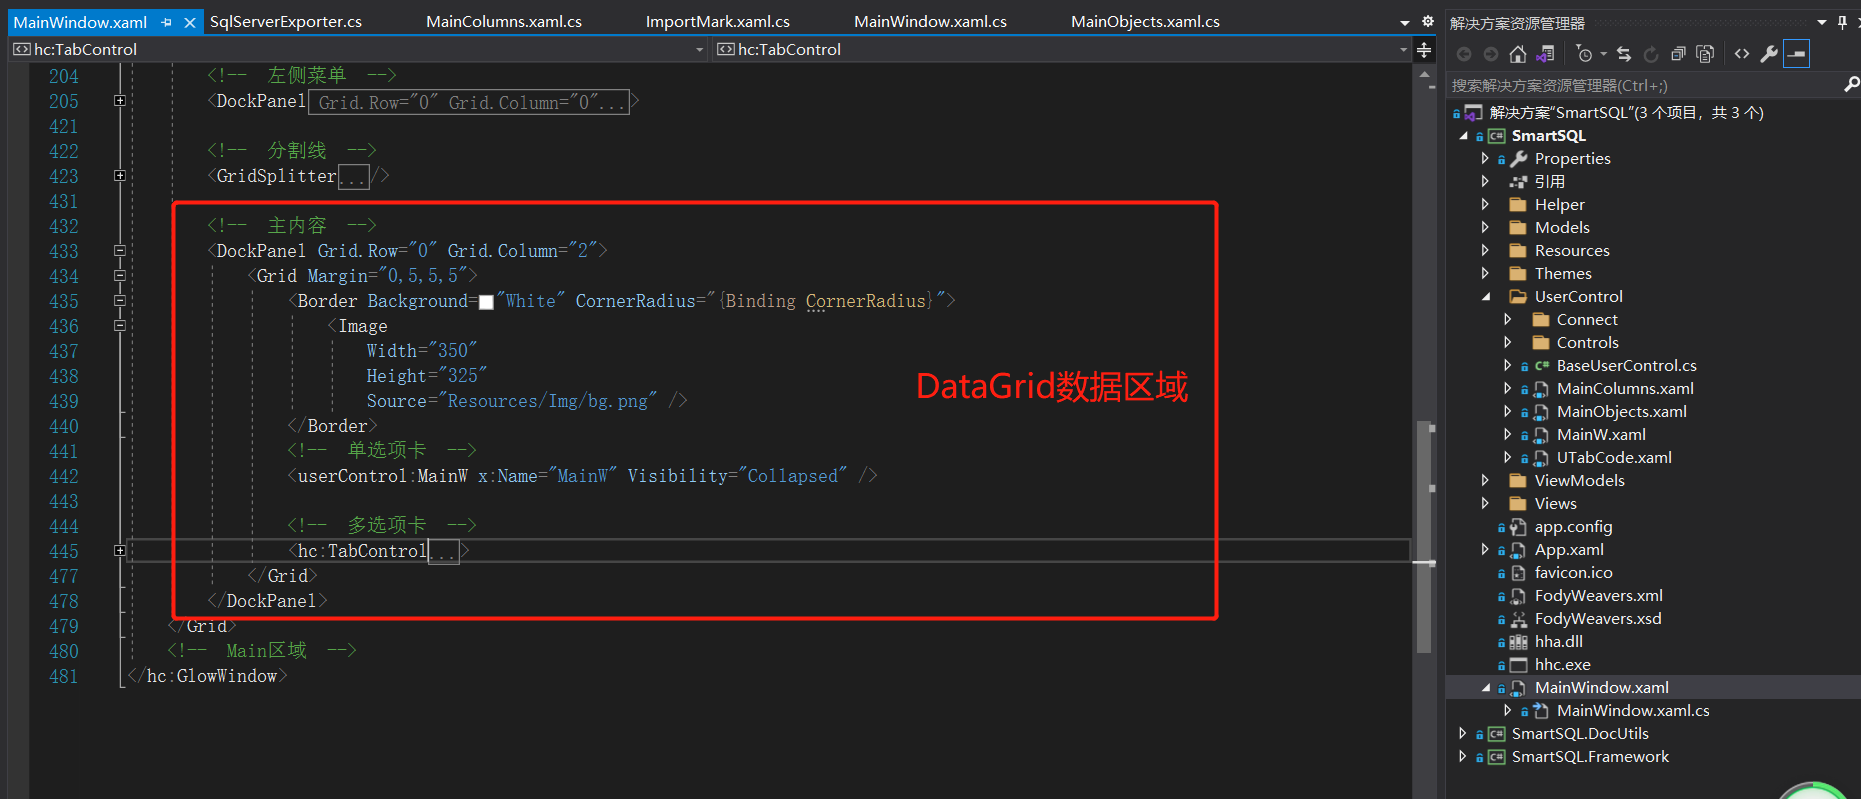
今天我们要实现的就是右边主界面展示的列表区域,其实这个区域是由多个用户控件组成的。下面截图就是列表区域的外层布局。
在这里我们也可以直接定义一个用户控件,然后使用MVVM的模式根据不同的类型展示不同的用户控件内容。
一.用户控件
下面贴一下我们用户控件的具体实现代码:
点击查看代码
<local:BaseUserControl x:Class="SmartSQL.UserControl.MainObjects" xmlns="http://schemas.microsoft.com/winfx/2006/xaml/presentation" xmlns:x="http://schemas.microsoft.com/winfx/2006/xaml" xmlns:d="http://schemas.microsoft.com/expression/blend/2008" xmlns:hc="https://handyorg.github.io/handycontrol" xmlns:i="http://schemas.microsoft.com/expression/2010/interactivity" xmlns:local="clr-namespace:SmartSQL.UserControl" xmlns:localBase="clr-namespace:SmartSQL.UserControl.Controls" xmlns:mc="http://schemas.openxmlformats.org/markup-compatibility/2006" mc:Ignorable="d"> <Grid Background="#f5f5f5"> <!-- 对象搜索框 --> <hc:SearchBar x:Name="SearchObject" Height="30" Margin="5,5,5,0" Padding="5,0,5,0" VerticalAlignment="Top" HorizontalContentAlignment="Left" hc:InfoElement.Placeholder="{Binding Placeholder}" FontSize="13" ShowClearButton="True" Style="{StaticResource SearchBarPlus}" TextChanged="SearchObject_OnTextChanged" /> <!-- 结构数据展现框 --> <DataGrid x:Name="TableGrid" Margin="0,38,0,32" hc:DataGridAttach.CanUnselectAllWithBlankArea="True" hc:DataGridAttach.ShowRowNumber="True" AutoGenerateColumns="False" Background="Transparent" BeginningEdit="TableGrid_OnBeginningEdit" CellEditEnding="TableGrid_OnCellEditEnding" ColumnWidth="*" HeadersVisibility="All" ItemsSource="{Binding ObjectsViewData, Mode=TwoWay}" MouseDoubleClick="TableGrid_OnMouseDoubleClick" MouseLeftButtonUp="TableGrid_OnMouseLeftButtonUp" RowHeaderWidth="60" SelectionUnit="CellOrRowHeader"> <DataGrid.CellStyle> <Style BasedOn="{StaticResource DataGridCellStyle}" TargetType="DataGridCell"> <Setter Property="VerticalAlignment" Value="Center" /> <EventSetter Event="MouseEnter" Handler="DisplayToolTip_MouseEnter" /> <Style.Triggers> <Trigger Property="IsSelected" Value="True"> <Setter Property="BorderThickness" Value="0" /> </Trigger> </Style.Triggers> </Style> </DataGrid.CellStyle> <DataGrid.Columns> <DataGridCheckBoxColumn Width="60" Binding="{Binding IsChecked}" CanUserSort="False" CellStyle="{StaticResource DataGridTextCenterColumnStyle}" Header="选择" /> <DataGridTextColumn x:Name="ObjHead" Binding="{Binding DisplayName}" Header="对象名" IsReadOnly="True" /> <DataGridTextColumn Binding="{Binding Comment}" CanUserSort="False" Header="备注说明" /> <DataGridTextColumn Binding="{Binding CreateDate, StringFormat='yyyy-MM-dd'}" CellStyle="{StaticResource DataGridTextCenterColumnStyle}" Header="创建时间" IsReadOnly="True" /> <DataGridTextColumn Binding="{Binding ModifyDate, StringFormat='yyyy/MM/dd'}" CellStyle="{StaticResource DataGridTextCenterColumnStyle}" Header="修改时间" IsReadOnly="True" /> </DataGrid.Columns> </DataGrid> <Grid x:Name="NoDataText" Margin="5,45,5,37" HorizontalAlignment="Stretch" Background="White" Cursor="Arrow"> <localBase:NoDataArea Margin="0" HorizontalAlignment="Center" ShowType="Img" /> </Grid> <Grid Height="36" VerticalAlignment="Bottom" Background="White" Cursor="Arrow"> <hc:SimpleStackPanel Margin="47,0,5,10" HorizontalAlignment="Left" VerticalAlignment="Bottom"> <hc:UniformSpacingPanel Spacing="10"> <CheckBox x:Name="ChkAll" Margin="39,0,0,0" Click="ChkAll_OnClick" Content="全选" /> </hc:UniformSpacingPanel> </hc:SimpleStackPanel> <hc:SimpleStackPanel Margin="5,0,5,5" HorizontalAlignment="Right" VerticalAlignment="Bottom"> <hc:UniformSpacingPanel Spacing="10"> <Button x:Name="BtnSetGroup" Height="26" hc:IconElement.Geometry="{StaticResource SetGroupGeometry}" Click="BtnSetGroup_OnClick" Content="设置分组" Cursor="Hand" Style="{StaticResource ButtonWarning}" /> <Button x:Name="BtnExport" Height="26" hc:IconElement.Geometry="{StaticResource ExportGeometry}" Click="BtnExport_OnClick" Content="导出文档" Cursor="Hand" Style="{StaticResource ButtonSuccess}" /> <!--<Button x:Name="BtnCreateEntity" Height="26" hc:IconElement.Geometry="{StaticResource SaveGeometry}" Content="生成实体类" Style="{StaticResource ButtonPrimary}" />--> </hc:UniformSpacingPanel> </hc:SimpleStackPanel> </Grid> </Grid></local:BaseUserControl>
然后再具体使用的页面按照下面这样写就可以实现一个用户控件的嵌入了:
<local:MainObjects x:Name="MainObjects" />
二.用户控件数据传递
虽然页面是嵌入成功了,我们要实现点击左边菜单的数据表然后加载对应表的列表内容该怎么做呢?
其实我这里做了两层嵌套,外面第一层主窗口,中间还有一层用户控件MainW.xaml,然后才是加载数据列表的MainObjects.xaml,下面来看看我们后台代码的实现:
/// <summary> /// 选中表加载主内容对应数据 /// </summary> /// <param name="sender"></param> /// <param name="e"></param> private void SelectedTable_OnClick(object sender, RoutedEventArgs e) { #region MyRegion var selectDatabase = (DataBase)SelectDatabase.SelectedItem; if (!(TreeViewTables.SelectedItem is TreeNodeItem objects) || objects.Type == ObjType.Group || objects.TextColor.Equals("Red")) { return; } var sqLiteHelper = new SQLiteHelper(); var isMultipleTab = sqLiteHelper.GetSysBool(SysConst.Sys_IsMultipleTab); if (!isMultipleTab) { if (TabItemData.Any()) { TabItemData.Clear(); } CornerRadius = 10; MainW.Visibility = Visibility.Visible; MainTabW.Visibility = Visibility.Collapsed; MainW.ObjChangeRefreshEvent += Group_ChangeRefreshEvent; MainW.SelectedConnection = SelectendConnection; MainW.SelectedDataBase = selectDatabase; MainW.SelectedObject = objects; MainW.LoadPage(TreeViewData); return; } CornerRadius = 0; MainW.Visibility = Visibility.Collapsed; MainTabW.Visibility = Visibility.Visible; var curItem = TabItemData.FirstOrDefault(x => x.DisplayName == objects.DisplayName); if (curItem != null) { MainTabW.SelectedItem = curItem; return; } var dic = new Dictionary<string, string> { {"Type", "pack://application:,,,/Resources/svg/category.svg"}, {"Table", "pack://application:,,,/Resources/svg/table.svg"}, {"View", "pack://application:,,,/Resources/svg/view.svg"}, {"Proc", "pack://application:,,,/Resources/svg/proc.svg"} }; var mainW = new MainW { SelectedConnection = SelectendConnection, SelectedDataBase = selectDatabase, SelectedObject = objects, }; mainW.LoadPage(TreeViewData); var tabItem = new MainTabWModel { DisplayName = objects.DisplayName, Icon = dic[objects.Type], MainW = mainW }; TabItemData.Insert(0, tabItem); MainTabW.SelectedItem = TabItemData.First(); #endregion }
上面代码就是通过用户控件的依赖属性将主界面的相关信息一层层往后面传递,这里暂时只贴主界面到中间界面的传递代码,想看详细传递的过程可以去我的开源项目中查看。
那么在用户控件中我们怎么实现加载具体的列表信息呢?其实我们在点击左边菜单的时候就去加载用户控件里面的初始化数据加载方法就行了,就像上面代码中的MainW.LoadPage(TreeViewData);,这个就是用户控件中加载页面初始数据的方法,在这个方法里面我们实现列表页面的DataGrid数据绑定,下面是相关代码:
/// <summary> /// 加载页面数据 /// </summary> public void LoadPageData() { ChkAll.IsChecked = false; NoDataText.Visibility = Visibility.Collapsed; if (SelectedObject.Type == ObjType.Type) { var headerT = "表名称"; var placeHolderT = "请输入表名称或备注说明"; switch (SelectedObject.Name) { case "treeTable": break; case "treeView": headerT = "视图名称"; placeHolderT = "请输入视图名称或备注说明"; break; default: headerT = "存储过程名称"; placeHolderT = "请输入存储过程名称或备注说明"; break; } ObjHead.Header = headerT; Placeholder = placeHolderT; if (SelectedObject.Parent == null) { ObjectsViewData = ObjectsViewData.First(x => x.Name == SelectedObject.Name).Children; } else { ObjectsViewData = ObjectsViewData.First(x => x.DisplayName == SelectedObject.Parent.DisplayName) .Children; ObjectsViewData = ObjectsViewData.First(x => x.Name == SelectedObject.Name).Children; } if (!ObjectsViewData.Any()) { NoDataText.Visibility = Visibility.Visible; } ObjectsViewData.ForEach(x => { x.IsChecked = false; }); ObjItems = ObjectsViewData; SearchObject.Text = string.Empty; } }
在这里我们的DataGrid就是用的MVVM模式实现的数据双向绑定,要实现这个绑定我们还要在页面的默认构造函数中写上一句代码:
public MainObjects() { InitializeComponent(); DataContext = this; }
这样就实现了DataGrid的数据绑定了。
好了,今天就分享到这了,想了解更多关于WPF相关的知识就请移步我的开源项目中查看吧。
https://gitee.com/dotnetchina/SmartSQL
声明:SmartSQL已于2022.08.01正式加入Gitee开源组织
dotNET China,为.net开源尽自己的绵薄之力,感谢各位的支持!
Recommend
About Joyk
Aggregate valuable and interesting links.
Joyk means Joy of geeK