

ow to use Jest spyOn with React.js and Fetch (includes step-by-step code example...
source link: https://meticulous.ai/blog/how-to-use-jest-spyon/
Go to the source link to view the article. You can view the picture content, updated content and better typesetting reading experience. If the link is broken, please click the button below to view the snapshot at that time.

How to use Jest spyOn with React.js and Fetch (includes step-by-step code example)
Jest is one of the most popular JavaScript testing frameworks these days. Some of the reasons for Jest’s popularity include out of the box code coverage, snapshot testing, zero-config, easy-to-use API, works for both frontend and backend frameworks, and of course, great mocking capabilities.
In this post, you will learn about how to use Jest’s spyOn method to peek into calls of some methods and optionally replace the method with a custom implementation. You will also learn how to return values from a spy and evaluate the parameters passed into it with a practical React code example.
What is Jest?
Jest is a batteries included JavaScirpt testing framework which ensures the correctness of applications that run on both the browser and the server with Node.js. In comparison to other JavaScript testing frameworks like Mocha and Jasmine, Jest really does have batteries included. There is no need to piece together multiple NPM packages like in other frameworks. For instance, mocking, code coverage, and snapshots are already available with Jest. As per Jest website:
Jest is a delightful JavaScript Testing Framework with a focus on simplicity.
This holds true most of the time :). It also comes bundled with many popular packages like React with the Create React App (CRA) and Nest JS. All these factors help Jest to be one of the most used testing frameworks in JavaScript, which is contested pretty frequently by the likes of Vitest and other frameworks.
In terms of usage and popularity, As per the state of JS survey of 2021, Jest is the most used testing framework among survey respondents for the third consecutive year with 73% using it. Another notable number is that 95% of the survey respondents are aware of Jest, which is another testament to its popularity.
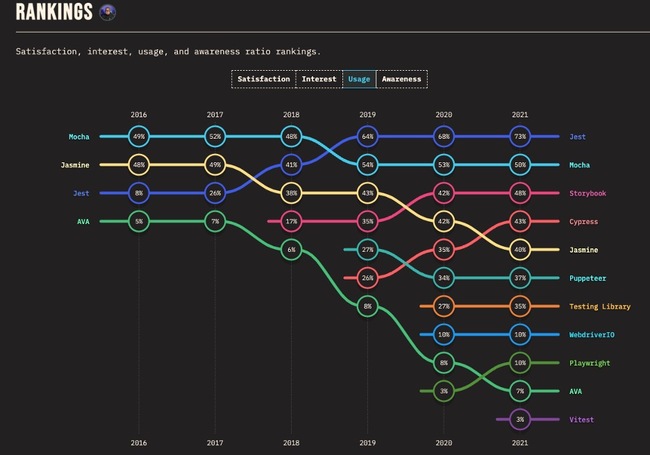
As seen above Jest overtook Jasmine in 2018 with 41% usage and beat Mocha in 2019 with 64% usage to take the number one spot and has held it for 3 years now.
What is Jest spyOn?
Good testing involves mocking out dependencies. Jest provides multiple ways to mock out dependencies while writing unit tests. The most common way to replace dependencies is with mocks. Another way to supplant dependencies is with use of Spies. Spies record some information depending on how they are called. Jest’s spyOn method is used to spy on a method call on an object. It is also very beneficial in cases where the Jest mock module or mock function might not be the best tool for the job on hand.
While writing unit tests you only test one particular unit of code, generally a function. So, the goal of mocking is to replace something that is beyond your control with something that is within your control. Replacing a dependency on the fly for the scope of the test is also enabled by Dependency Injection, which is another topic on its own.
Discussing Jest SpyOn specifically, it can spy or mock a function on an object. It is useful when you want to watch (spy) on the function call and can execute the original implementation as per need. A mock will just replace the original implementation with the mocked one.
The example used in the next section will show how to use Jest spyOn to spy on the native fetch and console object’s log method. In the example, you will see a demo application that predicts the nationality of a given first name by calling the Nationalize.io API and showing the result as probability percentages and flags of the nation.
Prerequisites
Before getting your hands dirty with the code, let's cover the prerequisites:
- Knowledge about JavaScript basics like variables, loops, etc would be expected
- Understanding async JavaScript with promise and async/await would be helpful
- Prior knowledge of React.js will be beneficial
- Any experience using Jest in the past will be valuable to understand the code examples
Given the prerequisites mentioned, the code example will help you understand how to use Jest spyOn for writing useful unit tests.
Example React.js app to Guess Nationalities of a Given Name
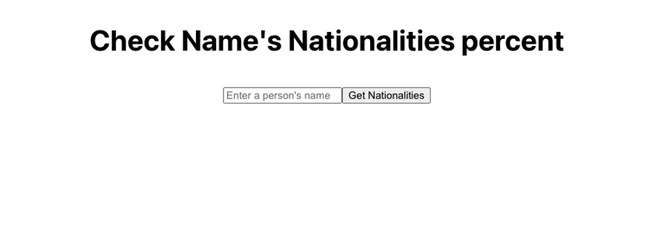
As an example, a simple yet useful application to guess the nationalities of a given first name will help you learn how to leverage Jest and spyOn. The working application will look like the below with a test for the name “Chris”:
The app hosted on Netlify and the code and tests are available on GitHub. The code is pretty straightforward, it is built on top of a Create React App boilerplate without much CSS styling. The main App.js file looks like:
import { useState } from 'react';
import './App.css';

function App() {
  const [nationalities, setNationalities] = useState([]);
  const [message, setMessage] = useState('');
  const [personName, setPersonName] = useState('');

  async function fetchNationalities() {
    try {

      const data = await (await fetch(`https://api.nationalize.io/?name=${personName}`)).json();
      const hasCountryData = data.country && data.country.length
      const nationalities =  hasCountryData ? data.country : [];
      setNationalities(nationalities);

      const message = hasCountryData ? `${data.country.length} guess(es) found` : 'No nationality match found';
      setMessage(message);
    } catch (err) {
      console.log(`err: ${err.message}`);
      setNationalities([]);
      setMessage('Could not fetch nationalities, try again later.');
    }
  }

  async function handleSubmit(e){
    e.preventDefault();
    await fetchNationalities();
  }

  return (
    <div className="App">
      <header className="App-header">
        <div className="title-form">
          <h2>Check Name's Nationalities percent</h2>
          <div style={{ marginBottom: '20px' }}>
            <form name="nationalities-form" onSubmit={handleSubmit}>
              <input
                name="personName"
                type="text"
                onChange={(e) => setPersonName(e.target.value)}
                value={personName}
                placeholder="Enter a person's name"
              />
              <button onClick={handleSubmit}>Get Nationalities</button>
            </form>
          </div>
        </div>
        <div className="results">
          <div className="message">{message}</div>
          <div className="nationalities">
            {Array.isArray(nationalities) && nationalities.map(
              nationality => {
                const flagUrl = `https://flagcdn.com/w160/${nationality.country_id.toLowerCase()}.jpg`;
                const altText = `${nationality.country_id} flag`;
                return <div key={nationality.country_id}><h3>{nationality.country_id} - {(nationality.probability * 100).toFixed(2)}%</h3> <img src={flagUrl} alt={altText} style={{
                  border: "1px solid black"
                }} /></div>
              }
            )}
          </div>
        </div>
      </header>
    </div>
  );
}

export default App;
First, useState is imported from React, then the modified CSS file is imported. After that, the main App function is defined which contains the whole app as a function component. The App has 3 state variables initialized with the useState hook, those are nationalities, message, and personName.
Consequently, define the fetchNationalities async function. This is the main function that calls the Nationalize.io API to get the nationalities of a given name. This function calls the API and checks if the country with the percent data is returned properly. Ultimately setting it in the nationalities variable and relevant message in the message variable.
If there is an error calling the API like a 429 rate limit exceeded it will land in the catch part. On a successful response, a further check is done to see that the country data is present. If the country data is found nationalities array and message string are set properly so that the flags can be displayed in the later section of the code.
Subsequently, write the handleSubmit async function. As the name suggests, it handles the form submission triggred either by clicking the button or hitting enter on the text field.
It is intentional that there is no check to see if the name field is empty for the sake of simplicity. This function prevents the default form submission and calls the above fetchNationalities function to get the nationalities which will paint the flags on the screen with their guess percentages.
Then, write down the return part. This segment returns the JSX that will render the HTML to show the empty form and flags with the returned response when the form is submitted.
It will also show the relevant message as per the Nationalize.io API’s response. The main part here is the Array.map loop which only works if there are elements in the nationalities array set as per the response from the API.
The crux of the matter is inside that same loop. The Flag CDN API is used to get the flag image from the ISO code of the country. The alt text for the flag is constructed with the same logic.
Another point to note here is, that the percent calculator is also done on the display level with the returned probability and for ease, styles are applied inline like the 1 px border on the flag image.
That comprehensive description of the code should form a good idea of what this basic but practical app does. You can see the working app deployed on Netlify. Feel free to peel the layers on how it progressed to the current state. In the subsequent section, you will learn how to write tests for the above app.
Tests for the Nationality Guessing App
The simple name to nationality guessing app is working with some edge cases deliberately not handled for the sake of brevity. It is time to add the first and most basic test for the nationality guessing app in the App.test.js, start by setting it up correctly as follows:
import { fireEvent, render, screen } from '@testing-library/react';
import mockFetch from './mocks/mockFetch';
import userEvent from '@testing-library/user-event';
import App from './App';

let windowFetchSpy;

beforeEach(() => {
  windowFetchSpy = jest.spyOn(window, 'fetch').mockImplementation(mockFetch);
})

afterEach(() => {
  jest.restoreAllMocks();
});
To start with, this is not a unit test but it is closer to an integration test with the dependencies mocked out. The fireEvent, render and screen are imported from the @testing-library/react package. React testing library comes bundled in the Create React App template. For this test, only use the screen object is used.
After that, import the ./mocks/mockFetch.js, this will also be used later. The contents of this file will be discussed in a bit. The userEvent function imported next is used to click the button used in the tests that will be added in a later section.
Consequently, the Jest beforeEach and afterEach hooks are used to set up the spy on fetch function of the window object as part of setup and teardown. As the name implies, these methods will be called before and after each test run. If there are 5 tests in the file, both before each and after each will run 5 times before and after every test.
Fetch Mock File
The important ingredient of the whole test is the file where fetch is mocked. The HTTP call and a stubbed response can be seen in the ./mocks/mockFetch.js file with the following contents:
const nameNationalizeResponse = {
  name: 'john',
  country:[
    {
      country_id: 'US',
      probability: 0.048398225615958565
    },
    {
      country_id: 'IM',
      probability:0.04438246053773764
    },
    {
      country_id: 'IE',
      probability: 0.042102085396037124
    }
  ]
}

export default async function mockFetch(url) {
  if(url.startsWith('https://api.nationalize.io') && url.includes('john')) {
    return {
      ok: true,
      status: 200,
      json: async () => nameNationalizeResponse,
    };
  }

  throw new Error(`Unhandled request: ${url}`);
}
The mock implementation named mockFetch gives back a stubbed response only if the URL starts with https://api.nationalize.io and for the name john which is used in the test shown in the next section. The mock responds following the fetch API having attributes like status and ok. For any other input for example if the name chris or any other URL, the mock function will throw an Error indicating Unhandled request with the passed-in URL. Next the first basic test to validate the form renders correctly will be elaborated.
Testing the Form Render
After all the setup, the first basic test to check if the screen loads with the text and form initially is as follows:
The first test is to make sure the screen looks as desired, the code for the test is as follows:
test('renders initial heading and form with elements correctly', () => {
  render(<App />);
  const titleElement = screen.getByText(/Check Name/i);
  expect(titleElement).toBeInTheDocument();
  expect(screen.getByRole('form')).toBeInTheDocument();
  expect(screen.getByRole('textbox')).toBeInTheDocument();
  expect(screen.getByRole('button', {name: 'Get Nationalities'})).toBeInTheDocument();
});
The test is appropriately named renders initial heading and form with elements correctly. First, the App component is rendered. Then the title element by searching by text provided in the testing library is grabbed. After that, make sure the element is visible in the document with toBeInTheDocument method.
Consequently, it is time to check if the form has been rendered correctly. For this, the getByRole method is used to find the form, textbox, and button. Check all three elements to be in the document. For the button element, it is fetched by passing the name which is the text in the button.
Till now, it has been a basic test, in the consequent section, we will test the happy path where the form has a name and it is submitted.
How Jest SpyOn Helps to Mock the Fetch Network Call
In this part, a test where the form has a name and is submitted by clicking the button will be added. The test to evaluate this interaction looks as follows:
test('should get nationalities for a name', async() => {
  render(<App />);

  //simulate filling up the textbox
  const personNameInput = screen.getByRole('textbox');
  fireEvent.change(personNameInput, {target: {value: 'john'}})
  expect(personNameInput.value).toBe('john');

  //click the button
   const getNationalitiesBtn = screen.getByRole('button', { name: 'Get Nationalities' });
   expect(getNationalitiesBtn).not.toBeDisabled();
   userEvent.click(getNationalitiesBtn);

   //verify percent and flag images are displayed
   expect(await screen.findByText('3 guess(es) found')).toBeVisible();

   expect(windowFetchSpy).toHaveBeenCalled();
   expect(windowFetchSpy).toHaveBeenCalledWith('https://api.nationalize.io/?name=john');
   expect(screen.getByText('US - 4.84%')).toBeVisible();
   expect(screen.getByText('IM - 4.44%')).toBeVisible();
   expect(screen.getByText('IE - 4.21%')).toBeVisible();

   const flagImages = screen.getAllByRole('img');
   expect(flagImages).toHaveLength(3);
   expect(flagImages[0]).toHaveAccessibleName('US flag');
   expect(flagImages[1]).toHaveAccessibleName('IM flag');
   expect(flagImages[2]).toHaveAccessibleName('IE flag');
});
This test similar to the last one starts by rendering the App component. Then we fill up the textbox the word john using the fireEvent object’s change method. This method was imported in the previous section. After that the button is clicked by calling the click method on the userEvent object simulating the user clicking the button.
This is where the important part happens, as we have added the following line in beforeEach hook:
windowFetchSpy = jest.spyOn(window, 'fetch').mockImplementation(mockFetch);The request to nationalize via fetch will never reach the real API but it will be intercepted as the fetch method on the window object has been spied. With the above spy, it is instructing to not use the original implementation and use the mock implementation. Given the name is exactly john and it is calling the API endpoint starting with https://api.nationalize.io it will get back the stubbed response object from the mock. It is being verified by:
 expect(windowFetchSpy).toHaveBeenCalled();
   expect(windowFetchSpy).toHaveBeenCalledWith('https://api.nationalize.io/?name=john');
This means the spy has been called once and it has been called with the above URL. It had all been set up aptly in the above set up section.
For the remainder of the test, it checks if the element with 3 guess(es) found is visible. This also verifies the country ISO code and percent are as expected, for example US - 4.84% for the US. Similarly, it inspects that there are flag images with expected alt text.
Congratulations! Now we have successfully mocked the fetch call with Jest SpyOn and also verified the happy path result. Still, in distributed systems all requests don’t succeed, thereby another test to check how the app will behave when an error occurs is added in the next part.
Using Jest SpyOn with console.log to Spy Only
Next, the test for the case when the API responds with an error like 429 Too many requests or 500 internal server error will be appended. This is the part testing for an edge case. Below is the test code where we simulate an error from the API:
test('should handle error while getting nationalities for a name', async() => {
  //const consoleLogSpy = jest.spyOn(console, 'log').mockReturnValue(undefined);
  const consoleLogSpy = jest.spyOn(console, 'log');

  const { container } = render(<App />);

  const personNameInput = screen.getByRole('textbox');
  fireEvent.change(personNameInput, {target: {value: 'error'}})
  expect(personNameInput.value).toBe('error');

  const getNationalitiesBtn = screen.getByRole('button', { name: 'Get Nationalities' });
  expect(getNationalitiesBtn).not.toBeDisabled();
  userEvent.click(getNationalitiesBtn);

  expect(await screen.findByText('Could not fetch nationalities, try again later.')).toBeVisible();
  expect(consoleLogSpy).toHaveBeenCalled();
  expect(consoleLogSpy).toHaveBeenCalledWith(expect.stringContaining('err: Unhandled request'));

  const nationalities = container.getElementsByClassName('nationalities')[0];
  expect(nationalities).toBeEmptyDOMElement();
});
In this abovetest, the console.log method is spied on without any mock implementation or canned return value. The commented line before it mocks the return value but it is not used.
This is the main difference between SpyOn and Mock module/function. A spy may or may not mock the implementation or return value and just observe the method call and its parameters. On the other hand, a mock will always mock the implementation or return value in addition to listening to the calls and parameters passed for the mocked function.
Next, render the App component and do a destructuring assignment to a variable called container. Similar to the above test, the textbox is filled with the name error and submitted by clicking the button. After that, expect the text Could not fetch nationalities, try again later to be on the screen. The test also expects the element with nationalities class that would display the flags to be empty.
The main part here is, that spy calls are expected as follows:
expect(consoleLogSpy).toHaveBeenCalled();
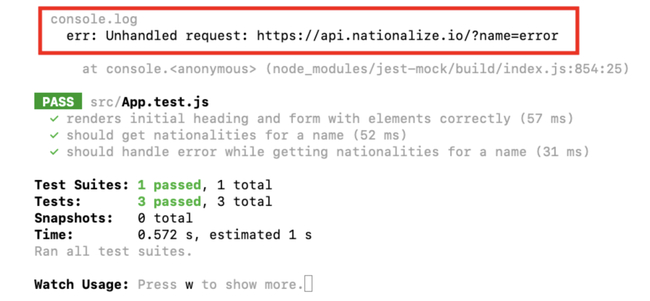
expect(consoleLogSpy).toHaveBeenCalledWith(expect.stringContaining('err: Unhandled request'));Given it is a spy, the main implementation is also called. Verify this by running the tests with npm test and it will show the console log output as seen below:
Great! You have not covered one edge case when the API responds with an error. The full test code file is available on Github for your reference. At this point, it will be advantageous to know when to use SpyOn compared to mock, that is what will be unraveled next.
When is Jest SpyOn a Better Option Compares to Mock
In the above example, for mocking fetch a jest.fn could have been easily used. It can be done with the following line of code replacing the spyOn line in the beforeEach hook:
global.fetch = jest.fn().mockImplementation(mockFetch);Notice here the implementation is still the same mockFetch file used with Jest spyOn. On the contrary, now it is a bit more difficult to verify that the mock is called in the test. This is where using spyOn on an object method is easier. Jest spyOn can target only the function relevant for the test rather than the whole object or module.
Along the same line, in the previous test console.log was spied on and the original implementation was left intact with:
const consoleLogSpy = jest.spyOn(console, 'log');Using the above method to spy on a function of an object, Jest will only listen to the calls and the parameters but the original implementation will be executed as we saw from the text execution screenshot. This is the compelling reason to use spyOn over mock where the real implementation still needs to be called in the tests but the calls and parameters have to be validated.
Conclusion
You have learned what Jest is, its popularity, and Jest SpyOn. A small but functional app with React that can guess the nationality of a given name by calling an API was created. The app was showing the probability percentages with the country's flags. The flags for the countries were also shown calling another API.
Then you ventured into writing tests for the Name’s nationality guessing app with a stark focus on Jest SpyOn. First, tested that the form was loaded and then carried on to the happy path. After that, wrote a test for an edge case if the API fails. You also learned when to use Jest spyOn as well as how it differs from Jest Mock.
If there is one point to take away from this post, it is Jest spyOn can spy on the method calls and parameters like Jest Mock/fn, on top of that it can also call the underlying real implementation. Mock can only respond with mocks and cannot call the underlying real code. Understand this difference and leverage Jest spyOn to write more effective tests.
Meticulous
Meticulous is a tool to easily create end-to-end tests and UI tests without writing code and without requiring a staging environment. Use their CLI to open an instrumented browser which records your actions as you execute a workflow on your web app.
This sequence of actions can then be used to create a visual regression test. It’s easy to integrate Meticulous tests into your continuous integration system, like GitHub Actions. Check out the official docs or watch the demo.
Authored by Geshan Manandhar
Recommend
About Joyk
Aggregate valuable and interesting links.
Joyk means Joy of geeK