

CreateML Tutorial for iOS: Creating a Customized Image Filter using Style Transf...
source link: https://www.raywenderlich.com/34375110-createml-tutorial-for-ios-creating-a-customized-image-filter-using-style-transfer
Go to the source link to view the article. You can view the picture content, updated content and better typesetting reading experience. If the link is broken, please click the button below to view the snapshot at that time.

CreateML Tutorial for iOS: Creating a Customized Image Filter using Style Transfer
Style Transfer is a machine learning technique. Through this, you can transform any given image stylized as another! In this tutorial, you’ll learn how to leverage Apple’s ML Frameworks to achieve this on your iOS device.
Version

Apple’s machine learning frameworks have become more and more powerful over the years. Style Transfer, or Neural Style Transfer, one technique which the frameworks provide. Through style transfer, you turn one image into a new image, having it stylized as a third. In this tutorial, you’ll learn how to leverage Apple’s ML Frameworks to achieve this directly on your iOS device!
Machine learning (ML) in iOS and macOS relies on two core Apple frameworks — CreateML and CoreML. While CreateML allows you to build & train an ML model, CoreML allows you to run these models.
CreateML initially was only available for macOS for generating models. You can then bundle these models for use in macOS, iOS or iPadOS applications.
In 2021, Apple made this framework available for iOS 15 and iPadOS 15. Now, CreateML framework allows on-device model training and creation.
In this tutorial, you’ll learn:
- How to create an ML model on-device.
- How to use the model to generate a stylized image.
- Core concepts in ML training and prediction.
Getting Started
Use the Download Materials button at the top or bottom of this tutorial to download the starter project.
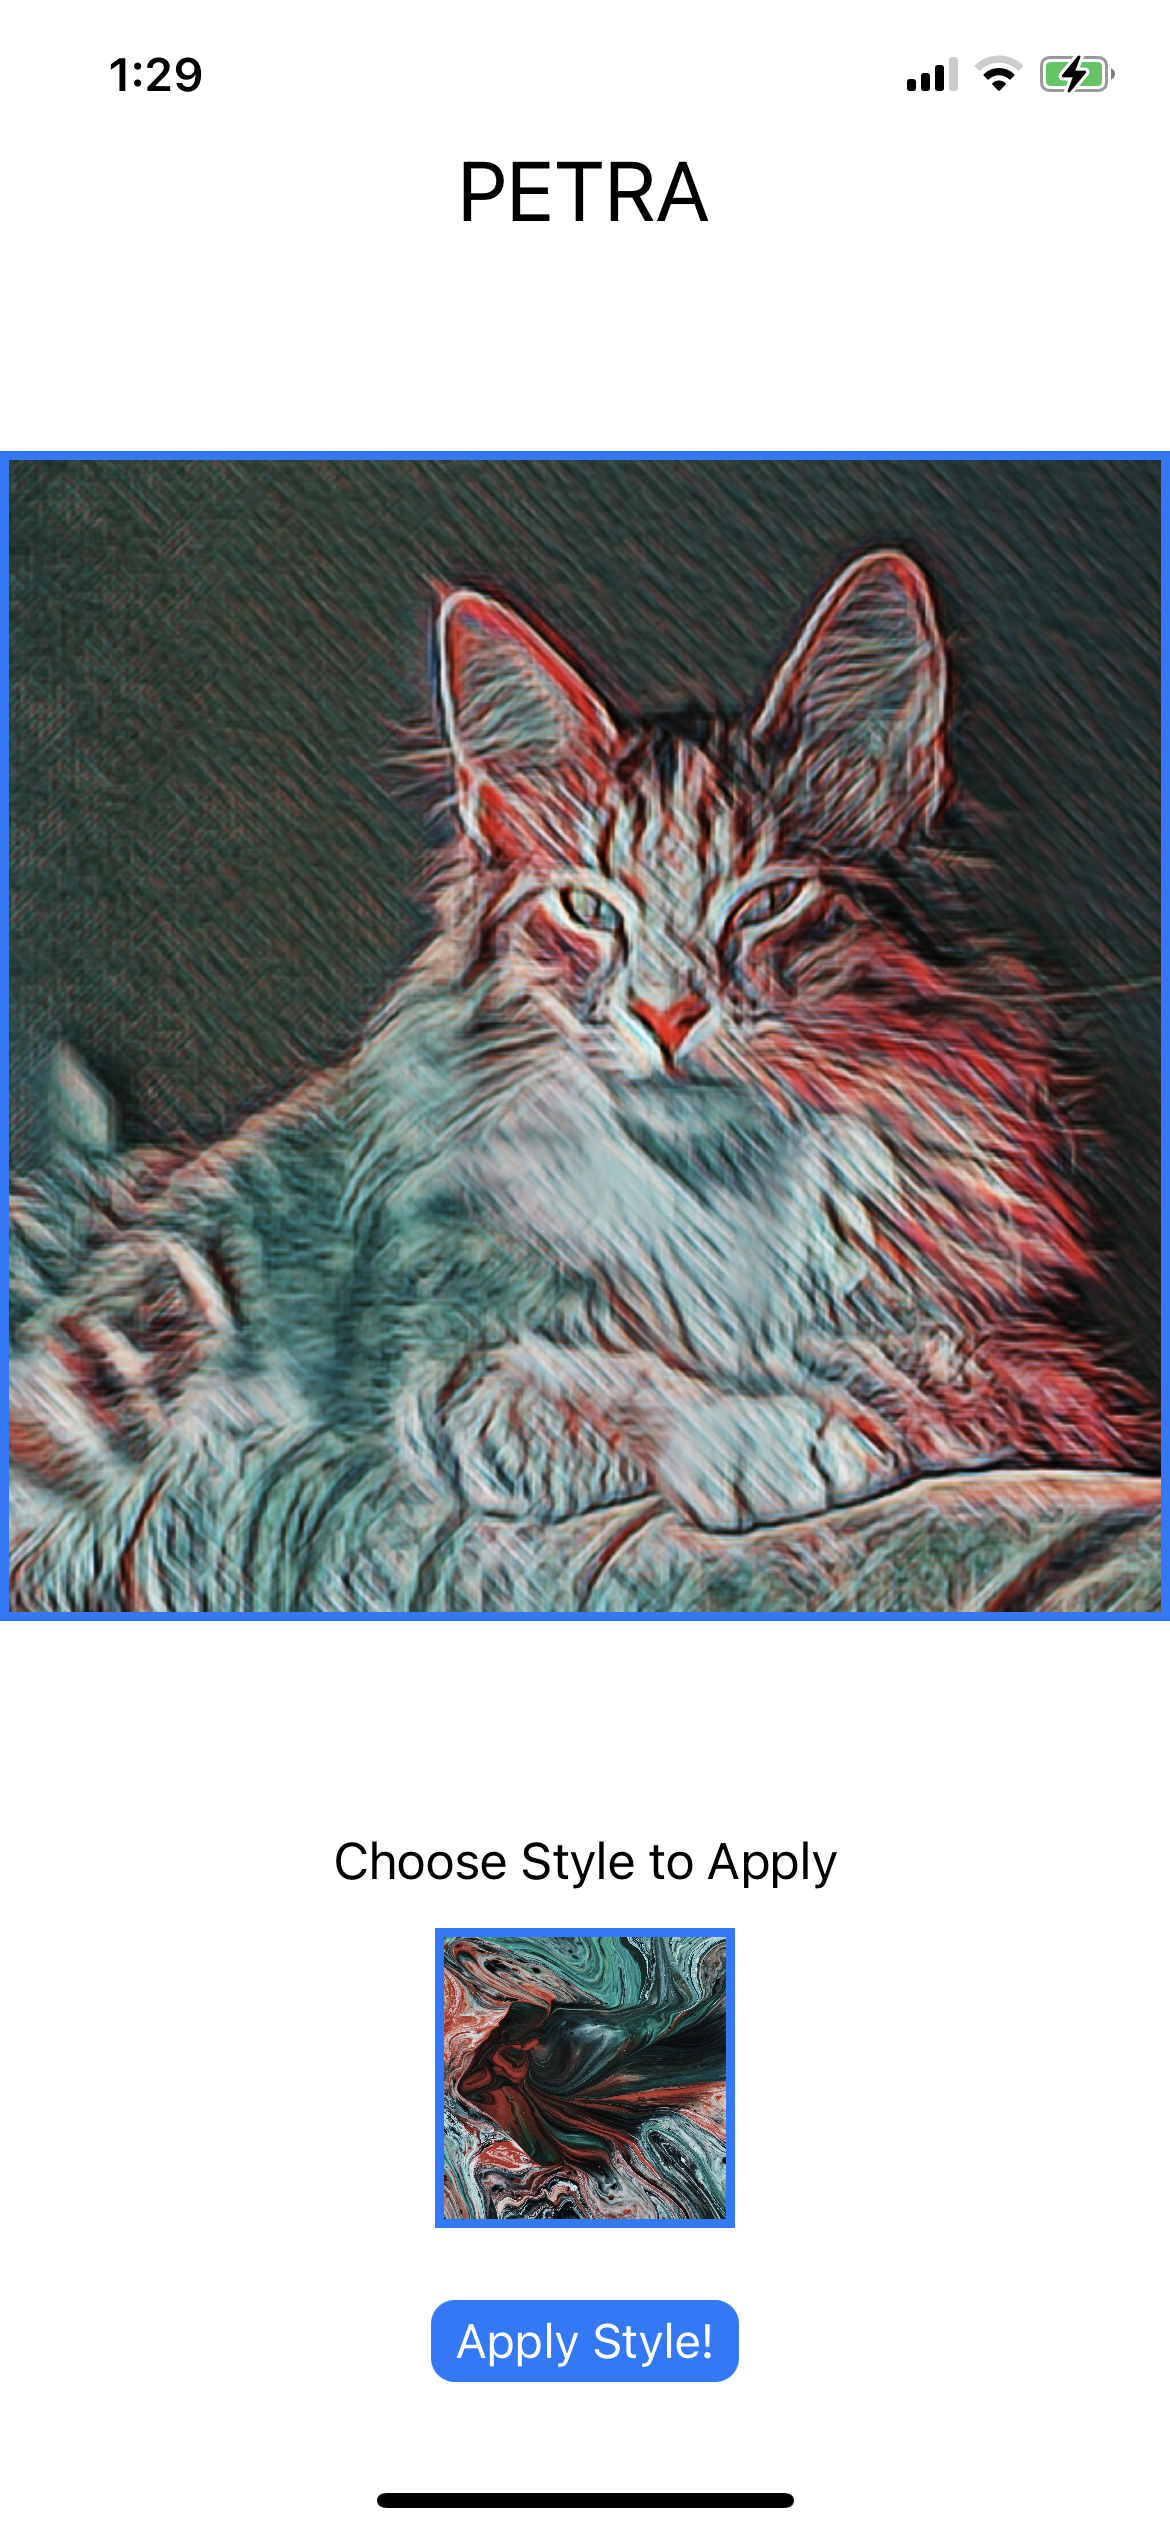
The starter project is a simple app called Petra.
Open the starter project in Xcode, then build and run it on your device. Make yourself familiar with the UI of the app and the codebase.


This app has a single screen that allows you to choose two images. The first image is a style image which indicates what style is desired. The second image, the user-selected image, will have the desired style applied to it.
The button on the bottom Apply Style! should transform the user image into the selected style. This button will work after you put in the missing pieces by the end of this tutorial.
For this app, you’ll create an MLModel that you’ll use to stylize photos of your pet.
In this tutorial, you’ll train the model to apply the style to a pet such as a cat or a dog — or an elephant or a chicken. You can apply the same principles to create your model trained just for your pet.

What is Style Transfer?
Style transfer is a technique that blends the content of one image with the style of another. An ML model learns the style, including pattern, color or texture, from a style input. It then uses it to recompose the content input in that style.
The model creates building blocks from the style content. It then recreates your content with these blocks, just as you’d do in a game of Minecraft.

In the example above, a tiled/pattern image A acts as a source for extracting the style (e.g., color, pattern, texture). The style is applied to the image B to generate a stylized output image C.
Sounds like magic, doesn’t it?
This technique has varied applications ranging from digital art to virtual reality. It has also found its place in gaming as demoed in the Google Stadia platform. Apple’s ARKit also supports style transfer to stylize a specific scene.

Preparing the Dataset
To create a model, you must work with a training set using a machine learning algorithm. The CreateML framework in iOS is no different and provides all the functionality you need to train a model.
The training data should be as close as possible to the expected user content.
For instance, for an app that stylizes a human face, you’ll need portraits of people to train the model.
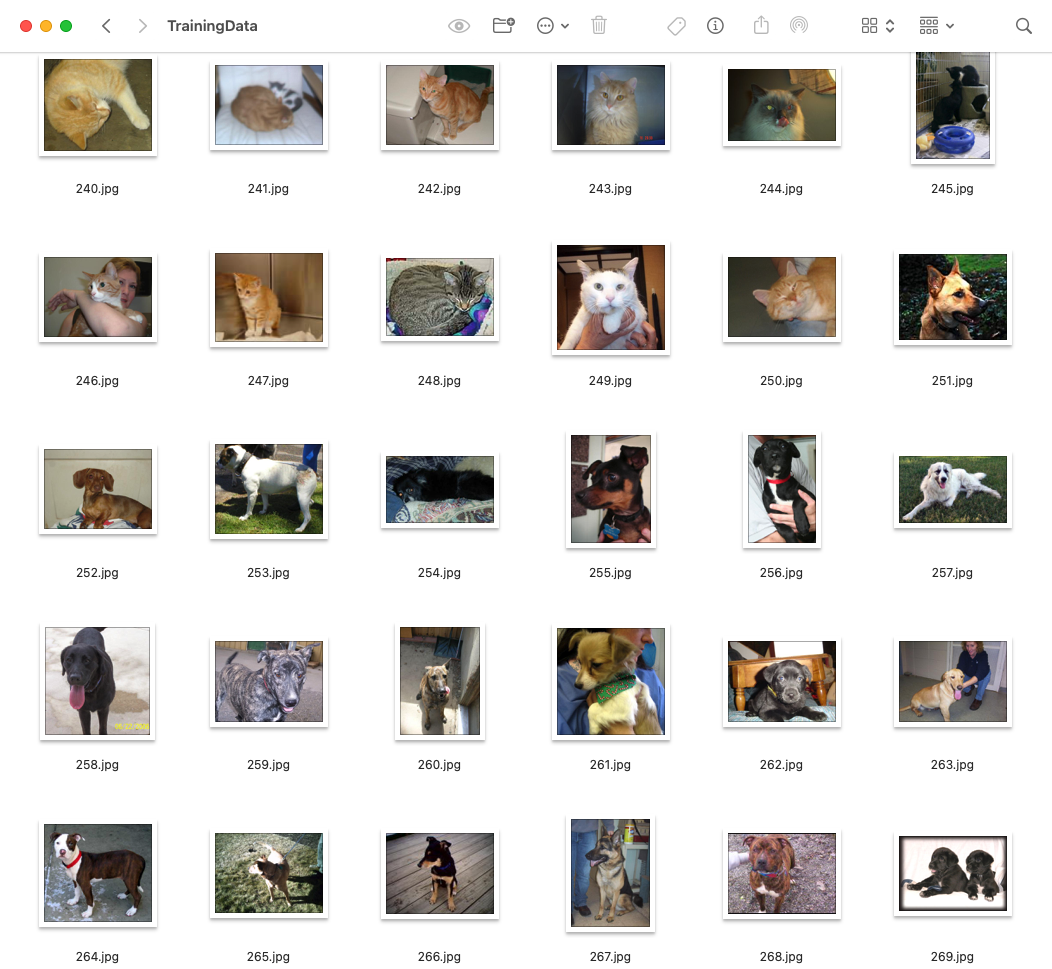
For this tutorial, you’ll need images of pets for training the model. You’ll use a tiny subset of this data from Kaggle containing cat and dog pictures. Don’t worry about downloading the entire dataset. The sample project already has our small dataset, which you’ll use for the tutorial.
Open the project directory in Finder and find the TrainingData folder.
For demo purposes, the project contains a sample stylized image. You can see the PresetStyle_1 image under Assets.xcassets in the project.

To recap, this is what you have in the starter project:
- Training Data: A directory containing pet images as our training set.
- Sample Style Image: A sample artistic or tiled image with a distinct texture, color or pattern.
Next, you’ll create and train a model using the data.
Training the Model
As with any machine learning, model training is the primary step in style transfer. Let the training begin!
Open MLModelTrainer.swift in the MLModelHandling group. Replace the contents oftrainModel(using:validationImage:sessionDir:onCompletion:) method with the code below.
// 1
let dataSource = MLStyleTransfer.DataSource.images(
    styleImage: styleImage,
    contentDirectory: Constants.Path.trainingImagesDir ?? Bundle.main.bundleURL,
    processingOption: nil)
// 2
let sessionParams = MLTrainingSessionParameters(
    sessionDirectory: sessionDir,
    reportInterval: Constants.MLSession.reportInterval,
    checkpointInterval: Constants.MLSession.checkpointInterval,
    iterations: Constants.MLSession.iterations)
// 3
let modelParams = MLStyleTransfer.ModelParameters(
    algorithm: .cnn,
    validation: .content(validationImage),
    maxIterations: Constants.MLModelParam.maxIterations,
    textelDensity: Constants.MLModelParam.styleDensity,
    styleStrength: Constants.MLModelParam.styleStrength)
Here’s what’s going on with the code:
- You create dataSource which is a MLStyleTransfer.DataSource. This tells the model where the data is to train from.
- You specify parameters to the training session through
MLTrainingSessionParameters:
a. sessionDirectory: To hold the data generated during the session.
b. reportInterval: Number of iterations after which the session reports the progress.
c. checkpointInterval: Number of iterations after which the session saves a checkpoint.
d. iterations: Total number of iterations to run for the session. - You also set
ModelParameters:
a. algorithm: The style transfer task’s training algorithm that prioritizes either speed (.cnnLite) or quality (.cnn).
b. validation: Image used for validation during the training — one from the training set.
c. maxIterations: Maximum number of training iterations the style transfer model can use. This is ignored when you set the iterations insessionParams.
d. textelDensity: Defines how coarse or fine the style details are.
e. styleStrength: Specifies how heavy the influence of style will be on the content image.
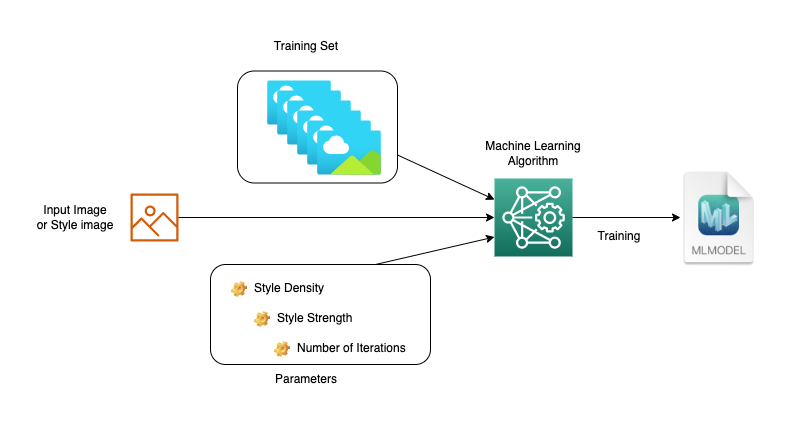
You’ll review the effects of some of these parameters in the following sections.
Finally, add the following code after modelParams in the same method:
// 4
guard let job = try? MLStyleTransfer.train(
    trainingData: dataSource,
    parameters: modelParams,
    sessionParameters: sessionParams) else {
    onCompletion(nil)
    return
}
The MLStyleTransfer.train(trainingData:parameters:sessionParameters:) is one method that does it all! You pass the above created parameters and the data source to it. It returns an MLJob object for handling the training result.
Calling this method starts an asynchronous style transfer model-training session.

Next, you’ll learn how to use the output of the training.
On-Device Model Generation
Once the training is complete, the model is ready for use. Right now you’re not doing anything with the created model. So let’s fix that now.
Open MLModelTrainer.swift. Then add the code below to the end of the trainModel(using:validationImage:sessionDir:onCompletion:) method:
// 5
let modelPath = sessionDir.appendingPathComponent(Constants.Path.modelFileName)
job.result.sink(receiveCompletion: { result in
    debugPrint(result)
}, receiveValue: { model in
    do {
        try model.write(to: modelPath)
        onCompletion(modelPath)
        return
    } catch {
        debugPrint("Error saving ML Model: \(error.localizedDescription)")
    }
    onCompletion(nil)
})
.store(in: &subscriptions)
Here, you’re using Combine to get the result once the training completes. In the receiveValue closure, you’ll get the trained model, which we store in the file system for later use.
Build and run.
When you run the app, choose an image for the style and a picture of your lovely pet (or find an image on the internet if you don’t have a pet!). You can then choose Apply Style! and see what happens.
Even though it’s completed, you won’t yet see the stylized image of the pet. However, the model generation is complete. The Xcode console shows information similar to what’s below:
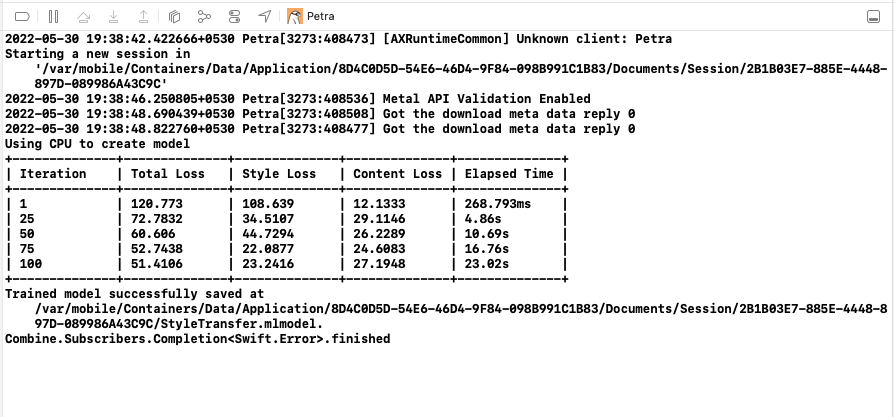
Note: Check the reference section for links to know more about various loss equations. One matter you’ll notice is that the total loss keeps reducing as iterations increase. Total loss is the sum of content and style losses. Hence, the less the total loss, the more efficient the model will be.
The devices generates important data. To view them, choose Window ▸ Devices and Simulators from Xcode menu. Now, select your device under Devices and choose Petra under Installed Apps. Select the Actions button and choose Download Container as in the screenshot below.

Save the file to your Mac. This can take a while to download so make sure you wait until it has completed. Using Finder, navigate to the downloaded file, right-click — Show Package Contents to look inside. The contents will look like below:

Navigate into AppData ▸ Documents ▸ Session. There will be one folder here per session, i.e. each time you tap on the Apply Style button.
Inside each session’s folder, you’ll see the training data, various metadata and most importantly, the generated CoreML model which is saved under the filename StyleTransfer.mlmodel.

Learning From User’s Data
The customization with on-device learning becomes limitless when you use the user data. Because inspiration strikes anytime and anywhere, the user can simply take a picture and use it for styling. Personalization doesn’t mean losing your privacy in this case because the data never has to leave the device with on-device learning.
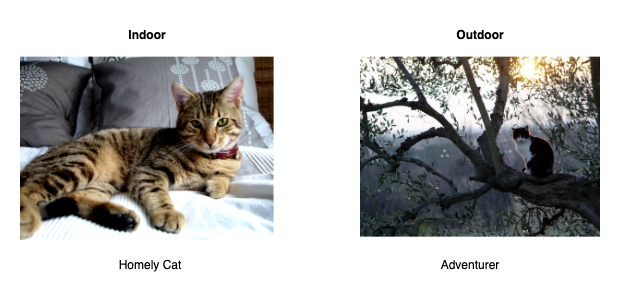
Results can improve when learning from user data. However the training set should be as close as possible to the expected input image. If the user has a pet cat, then a training set containing cat images will yield better results.
Likewise, a model trained using indoor images might not perform well on an outdoor test image because of the differences in lighting and background, as seen below.
Good training results in good learning. But in some cases, too many iterations and too much training data might result in overfitting. This means the model is learning nuances that don’t apply to most cases. In such cases, reducing the training iterations can help.
Open the Constants.swift file and check the following:
enum MLModelParam {
  static var maxIterations = 200
  static var styleDensity = 128 // Multiples of 4
  static var styleStrength = 5 // Range 1 to 10
}
The model training uses the values defined here. You’ll see how these values affect the style transfer output shortly.
Now, go to MLModelTrainer.swift file and find the code below.
// 3
let modelParams = MLStyleTransfer.ModelParameters(
    algorithm: .cnn,
    validation: .content(validationImage),
    maxIterations: Constants.MLModelParam.maxIterations,
    textelDensity: Constants.MLModelParam.styleDensity,
    styleStrength: Constants.MLModelParam.styleStrength)
As you saw earlier, you can use one of two different algorithms — .cnn and .cnnLite. As per Apple’s documentation:
- cnn: A style-transfer training algorithm that generates a model that prioritizes image quality over speed.
- cnnLite: A style-transfer training algorithm that generates a model that ranks speed over image quality.
Using these parameters, you’ll be able to fine-tune your model for better personalization.
In the next session, you’ll put the model and the training to good use and actually style an image. Ready?
Style On!
Now that you have a perfect model, use it to generate your distinct Pet Art.
Open MLPredictor.swift and replace the contents of predictUsingModel(_: inputImage: onCompletion:) method with the below code.
// 1
guard
    let compiledModel = try? MLModel.compileModel(at: modelPath),
    let mlModel = try? MLModel.init(contentsOf: compiledModel)
else {
    debugPrint("Error reading the ML Model")
    return onCompletion(nil)
}
// 2
let imageOptions: [MLFeatureValue.ImageOption: Any] = [
    .cropAndScale: VNImageCropAndScaleOption.centerCrop.rawValue
]
guard
    let cgImage = inputImage.cgImage,
    let imageConstraint = mlModel.modelDescription.inputDescriptionsByName["image"]?.imageConstraint,
    let inputImg = try? MLFeatureValue(cgImage: cgImage, constraint: imageConstraint, options: imageOptions),
    let inputImage = try? MLDictionaryFeatureProvider(dictionary: ["image": inputImg])
else {
    return onCompletion(nil)
}
A few things are happening here:
- Before you can use the model for prediction, the model is first compiled. It’s then initialized as an
MLModelobject. The compiled file gets saved in a temporary directory as ModelName.mlmodelc.
mlmodel file consumes less space compared with the compiled mlmodelc file. This is a technique for saving space in your app or if the model is downloaded from a server.- Here, you create an
MLDictionaryFeatureProviderdictionary required by the model for prediction. You’re also formatting the input image using the model’s constraints and options. You generate anMLFeatureValueand passed to the constructor of theMLDictionaryFeatureProvider.
To finally generate the stylized image, add the code below after that.
// 3
guard
  let stylizedImage = try? mlModel.prediction(from: inputImage),
  let imgBuffer = stylizedImage.featureValue(for: "stylizedImage")?.imageBufferValue
else {
  return onCompletion(nil)
}
let stylizedUIImage = UIImage(withCVImageBuffer: imgBuffer)
return onCompletion(stylizedUIImage)
Here’s what that code does:
- Calling the
prediction(from:)method performs a single prediction and outputs an MLFeatureProvider. You then extract the generated image from it and create an UIImage instance from the image buffer.
Voila! The stylizedUIImage is the output image with the style blended into your pet image.
Build and run.
Tap Apply Style! after selecting the pet image and style. The processing takes a few minutes to complete as before. After that, you should now see the result on the screen:
Isn’t it amazing how you can train and generate stylized images with only a few lines of code?
.cropAndScale as .centerCrop in the imageOptions earlier.Wait! That’s not all! If the results fall short of your imagination, you can fine-tune it.
You’ll now see how tweaking the parameters of the training model can affect the result. Head to the Constants.swift and find the MLModelParam enum. In the following sections you’ll learn what each of these means. Feel free to play with the numbers and re-run the app as you go.
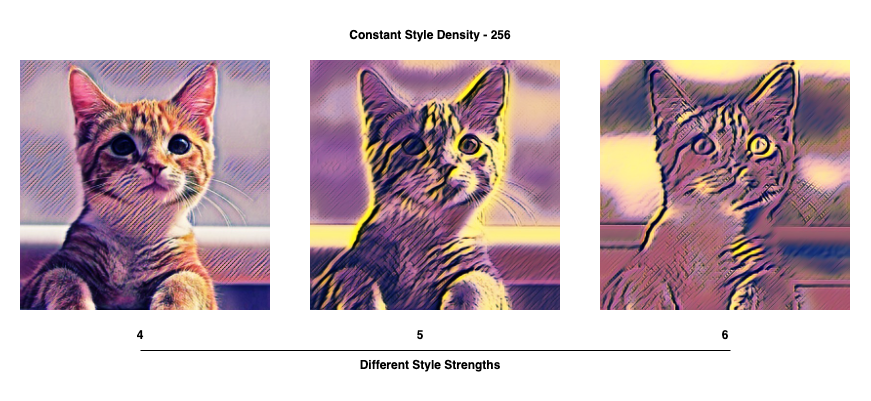
Style Density
Style density is also called Textel Density. This controls how coarse or fine the model should learn the style. That gives a distinct stylized result when you use a higher/lower value.
The style density is currently set to 128, which is less than the default value of 256. Note that this should always be a multiple of 4 and the recommended range is 64 to 1024.
In the example below, you can see how the style density affects the output.

Style Strength
A higher value will make the model learn more style and less content. A smaller value learns to do less styling.
In the sample it’s set to 5, which is the default value. It can range from 1 to 10.
Below is an example of how it affects your results:
Note that maxIterations value in the model parameter is ignored when you set the iterations session parameter.
Play around with iterations, style density and style strength to get a likeable model for your pets. :]
And that’s it! Congratulations you’ve completed the tutorial and learned how to train and use an ML model for style transfer!
Where to Go From Here?
Click the Download Materials button at the top and bottom of this tutorial to download the starter and final projects.
If style transfer for images was cool, consider extending this app to apply style on videos.
If you’re interested in learning more about style transfer or Apple’s ML frameworks, check out:
Sources used for images in this tutorial and sample project:
We hope you enjoyed this tutorial. If you have any questions or comments, please join the forum discussion below.
raywenderlich.com Weekly
The raywenderlich.com newsletter is the easiest way to stay up-to-date on everything you need to know as a mobile developer.
Recommend
-
24
Image filter in react Image processing and manipulation has been interesting field to work from the beginning. I had...
-
6
#SASUsers #LearnSASSAS Tutorial | How to Build Customized Object D...
-
3
RBI mulls introducing charges on UPI-based funds transfer (UPI as a funds transfer system is like IMPS) August 18, 2022
-
2
SAP S/4HANA Finance update for 2022: Empowering industries’ agile finance transformation based on a unique business foundation, sustainably & resiliently, thanks to the Cloud
-
2
Running faster up the down escalator - a Marks & Spencer omni-channel transformation update, complete with ‘super app’ ambitions By
-
3
CreateML 使用以及在 iOS 中应用介绍 作者:ELab.jiangdailin 2022-12-06 23:43:53 Create ML 是苹果于2018年 WWDC 推出的生成机器学习模型的工具。它可以接收用户给定的数据,生成 iOS 开发中需要的机器学习模型...
-
1
Ampro TechValley specializes in creating customized ecommerce solutions tailored to meet the unique requirements of each client. We use the latest technologies and industry best practices to develop high-quality ecommerce websites that are user-...
-
6
CEO SpotlightPriority CEO Thomas Priore on Harnessing the Power of Embedded Finance to Transform the Small Businesses Ecosystem
-
5
-
3
Creating Stunning Visuals with Customized Smart Templates for Advertising " This article is part of in the series
About Joyk
Aggregate valuable and interesting links.
Joyk means Joy of geeK