

How to Use the SwiftUI PhotosPicker
source link: https://swiftsenpai.com/development/swiftui-photos-picker/
Go to the source link to view the article. You can view the picture content, updated content and better typesetting reading experience. If the link is broken, please click the button below to view the snapshot at that time.

How to Use the SwiftUI PhotosPicker
In this year’s WWDC, Apple brings in tons of improvements to SwiftUI, one particular that catches my attention is the PhotosPicker view. Yes, you are right! SwiftUI is finally getting its own native photo picker view in iOS 16.
The PhotosPicker view supports all the common functionalities that PHPickerViewController has. Functionalities such as single and multiple selections, asset type filtering, and album switching are all included.
The way of using the PhotosPicker view is actually pretty straightforward. Let me show you how.
Using the PhotosPicker view
First things first, let’s first import the SwiftUI and PhotosUI module. After that, define a state named selectedItem of type PhotosPickerItem.
import SwiftUI
import PhotosUI

struct ContentView: View {

    @State private var selectedItem: PhotosPickerItem? = nil

    // ...
    // ...
    // ...
}
For better memory efficiency, the asset selected by the user will be given to us in the form of PhotosPickerItem. We will use it to retrieve the underlying asset later on.
With that in mind, we can add the PhotosPicker view to the content view’s body like so:
var body: some View {

    PhotosPicker(
        selection: $selectedItem,
        matching: .images,
        photoLibrary: .shared()) {
            Text("Select a photo")
        }
}
For simplicity’s sake, I have configured the PhotosPicker view to show a single selection photos picker that only displays images. Feel free to check out the official documentation for more configuration options.
Based on my personal experience, I notice that it is mandatory to set photoLibrary to .shared() when initializing the PhotosPicker view. If we omit it, the binding of $selectedItem will not work. I am not sure why is it so, maybe it is a bug in the beta release that will be fixed in the near future. If anyone knows the reason behind it, do hit me up on Twitter.
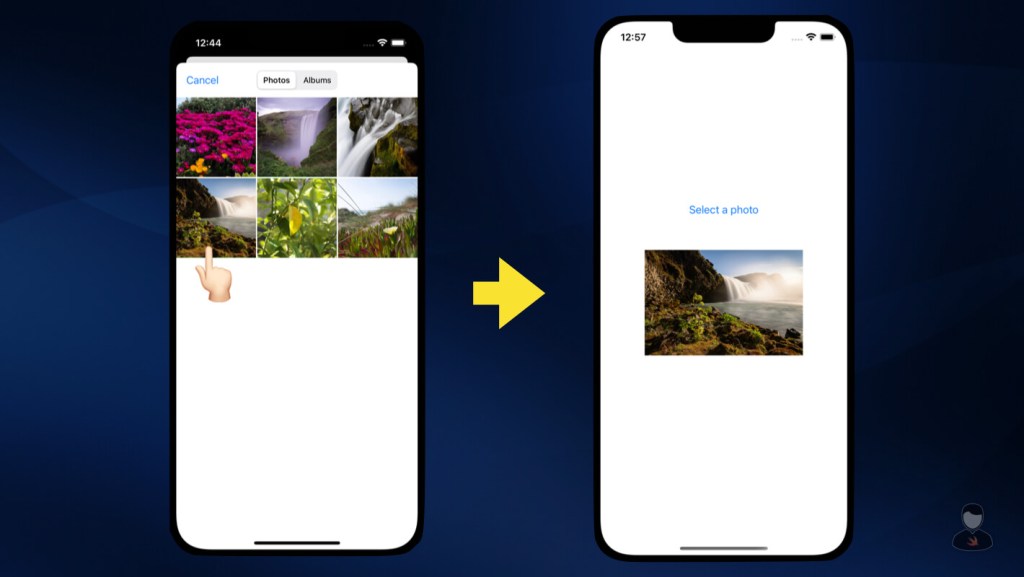
Now, if you go ahead and run the sample code, you will see the PhotosPicker view labeled as “Select a photo” at the center of the screen. Tapping on it will bring up the iOS native photos picker.

Handling Asset Selection
We are going to retrieve the user-selected asset in the form of Data. Thus let’s go ahead and define the state for that:
@State private var selectedImageData: Data? = nilThe way to handle asset selection is pretty straightforward. The concept is to use the PhotosPicker view’s onChange() modifier to detect the change of selectedItem. After that, we will use the selectedItem‘s loadTransferable() method to get the underlying asset.
.onChange(of: selectedItem) { newItem in
    Task {
        // Retrive selected asset in the form of Data
        if let data = try? await newItem?.loadTransferable(type: Data.self) {
            selectedImageData = data
        }
    }
}
Lastly, let’s show the selected image right below the PhotosPicker view.
if let selectedImageData,
   let uiImage = UIImage(data: selectedImageData) {
    Image(uiImage: uiImage)
        .resizable()
        .scaledToFit()
        .frame(width: 250, height: 250)
}
That’s it for handling asset selection. Run the sample code again to see everything in action.
Here’s the full sample code:
import SwiftUI
import PhotosUI

struct ContentView: View {

    @State private var selectedItem: PhotosPickerItem? = nil
    @State private var selectedImageData: Data? = nil

    var body: some View {

        PhotosPicker(
            selection: $selectedItem,
            matching: .images,
            photoLibrary: .shared()) {
                Text("Select a photo")
            }
            .onChange(of: selectedItem) { newItem in
                Task {
                    // Retrieve selected asset in the form of Data
                    if let data = try? await newItem?.loadTransferable(type: Data.self) {
                        selectedImageData = data
                    }
                }
            }

        if let selectedImageData,
           let uiImage = UIImage(data: selectedImageData) {
            Image(uiImage: uiImage)
                .resizable()
                .scaledToFit()
                .frame(width: 250, height: 250)
        }
    }
}
The Caveat
If you have watched the WWDC session about the PhotosPicker view, you will notice that the way we retrieve the selected image is a little bit different from what we saw in the video. Instead of loading it in the form of Image, we are loading it in the form of Data.

Source: WWDC22 – What’s new in the Photos picker
As explained in this forum post, the Image type only supports public.png as its content type. If the photos picker contains assets of type other than png, such as jpeg or heic, we will not be able to retrieve it. Until Apple adds more content type support to Image, it is still advisable to use Data when retrieving images from the photos picker.
Wrapping Up
Throughout this article, I have been running the sample code on iOS, but in fact, the sample code will run totally fine on macOS, iPadOS, and watchOS.
According to Apple, the photos picker will automatically choose the best layout depending on the platform and the available screen space. This will definitely come out pretty handy for those who need to support multiple platforms.
If you enjoy reading this article, feel free to check out my other iOS development-related articles. You can also follow me on Twitter, and subscribe to my monthly newsletter.
Thanks for reading. 👨🏻💻
Further Readings
Recommend
About Joyk
Aggregate valuable and interesting links.
Joyk means Joy of geeK