

devops-1:代码仓库git的使用 - vfanCloud
source link: https://www.cnblogs.com/v-fan/p/16544722.html
Go to the source link to view the article. You can view the picture content, updated content and better typesetting reading experience. If the link is broken, please click the button below to view the snapshot at that time.

devops-gitlab
gitlab同github、gitee和bitbucket功能一致,都是提供一个存储代码的服务,这里就以gitlab为例,学习一下如何结合git工具使用。
运行一个gitlab
有很多方法可以运行gitlab服务,可以直接在Ubuntu或centos等linux主机中运行,或者使用docker启动,再或者使用helm chart方式运行在k8s中,具体可以参考官方文档:https://gitlab.cn/install/
我这里使用docker运行,用于poc或者测试环境,没有冗余功能。
export GITLAB_HOME=/srv/gitlab
sudo docker run --detach \
  --hostname gitlab.example.com \
  --publish 4443:443 --publish 880:80 --publish 222:22 \
  --name gitlab \
  --restart always \
  --volume $GITLAB_HOME/config:/etc/gitlab \
  --volume $GITLAB_HOME/logs:/var/log/gitlab \
  --volume $GITLAB_HOME/data:/var/opt/gitlab \
  --shm-size 256m \
  registry.gitlab.cn/omnibus/gitlab-jh:latest
--shm-size 256m:指定此容器shm共享内存为256m,默认为64m。
因为修改了默认ssh和http的端口,所以容器启动后要在配置文件中重新修改并生效一下:
# docker exec -it gitlab /bin/bash
# vi /etc/gitlab/gitlab.rb
...
external_url "http://gitlab.example.com:880"  # 外部的访问地址及端口
gitlab_rails['gitlab_shell_ssh_port'] = 222
nginx['listen_port'] = 80  # 指的container内部的端口,这个必须指定,不指定会继承上边的880.
...
# gitlab-ctl reconfigure
notice:这里只启用了http,若要启用https,还要手动将其打开。
做个hosts解析,然后访问http://gitlab.example.com:880来登录web页。
用户名为root,密码用以下方法查看:
sudo docker exec -it gitlab grep 'Password:' /etc/gitlab/initial_root_password
此文件24h后会变删除,登录成功后,尽快修改密码。
创建群组、项目
创建群组:
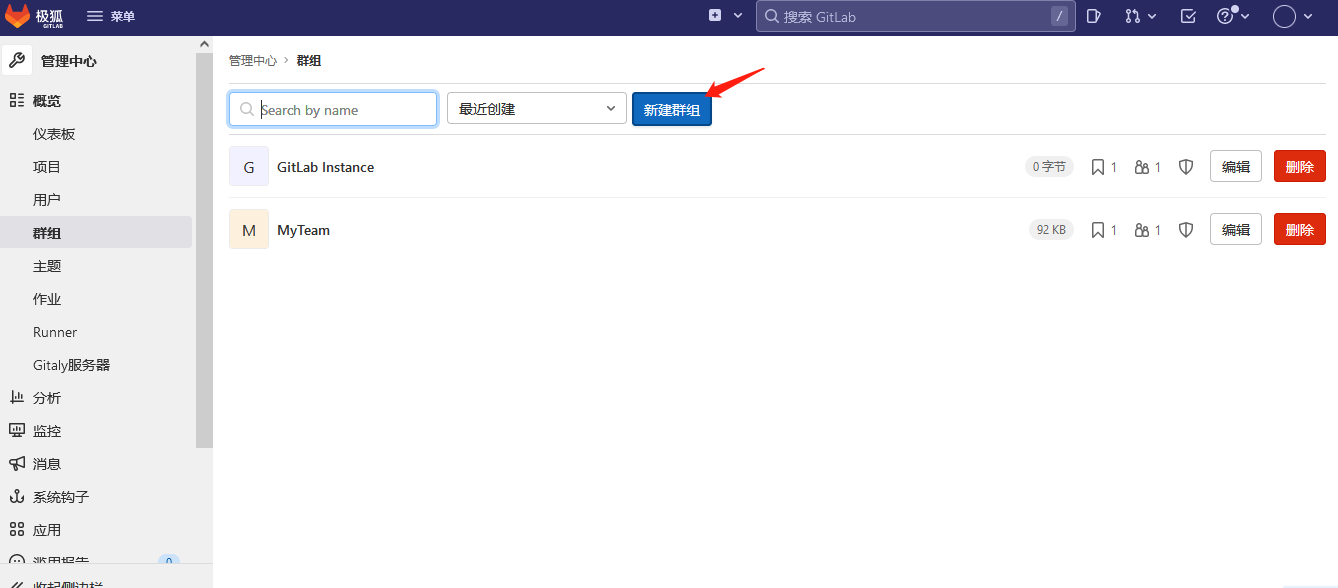
根据需求写上自己群组的名称,选择是私有群组、内部群组还是共有群组,自己定义即可。
群组创建完毕后,默认只有创建者自己,后续可以添加新用户到群组。
我这里测试群组为MyTeam。
创建新用户:
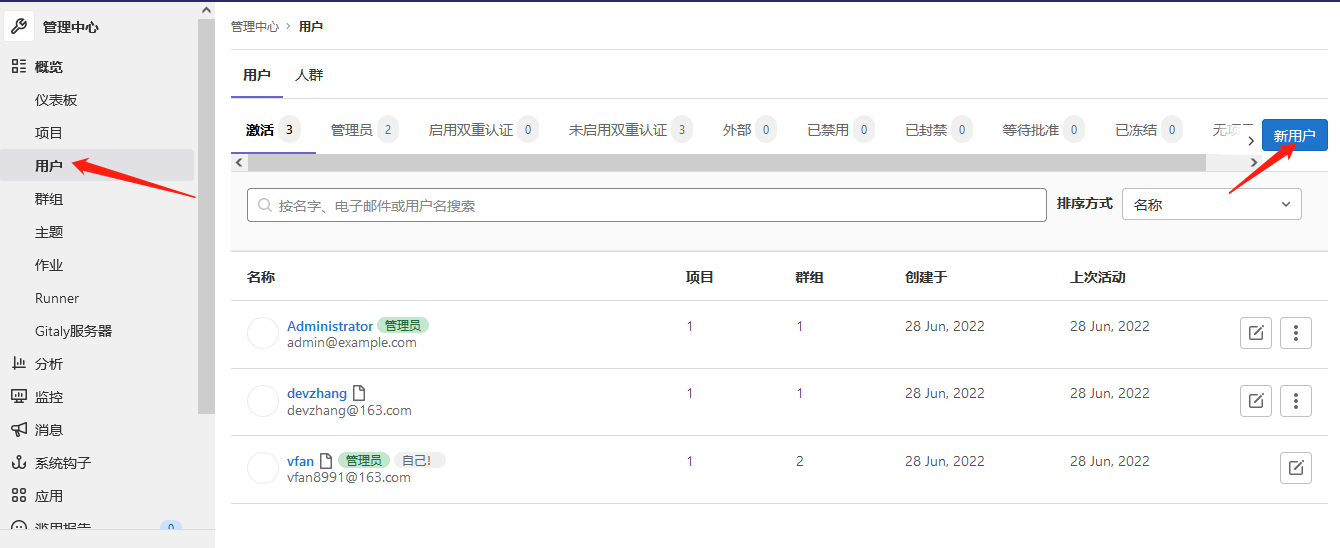
填写用户信息及权限设置即可,例如devzhang。
将新用户加入群组,一起来为我们的Team做贡献:
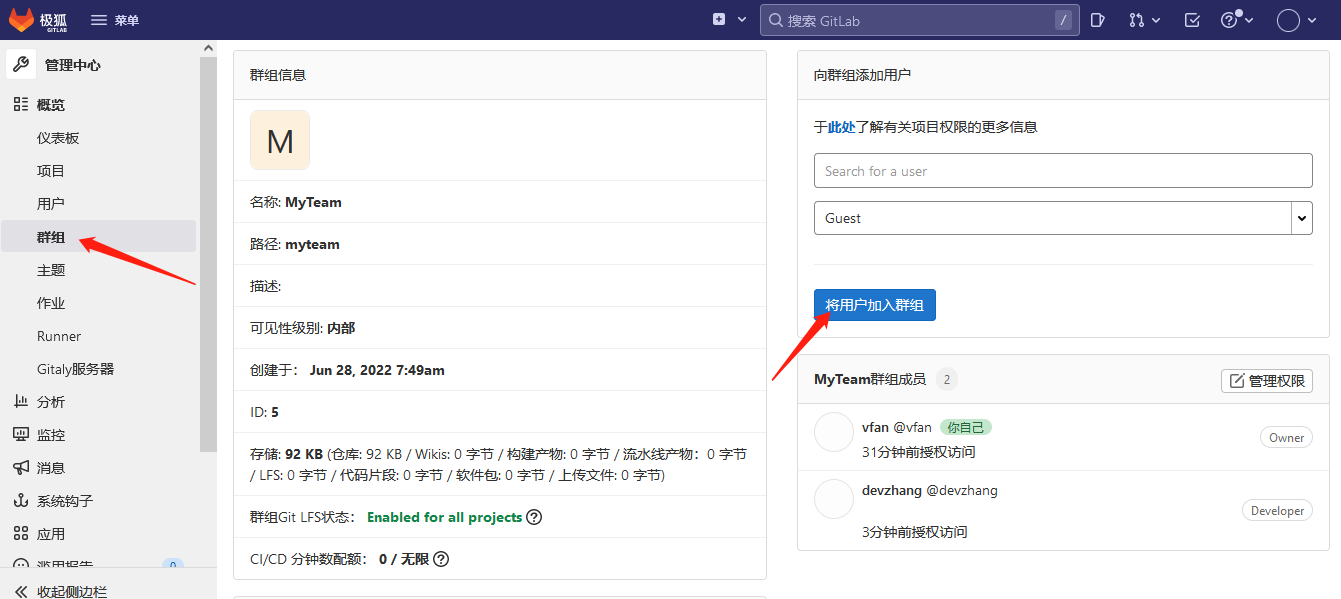
加入此群组后,就可以创建基于此群组的项目。
开始创建项目:
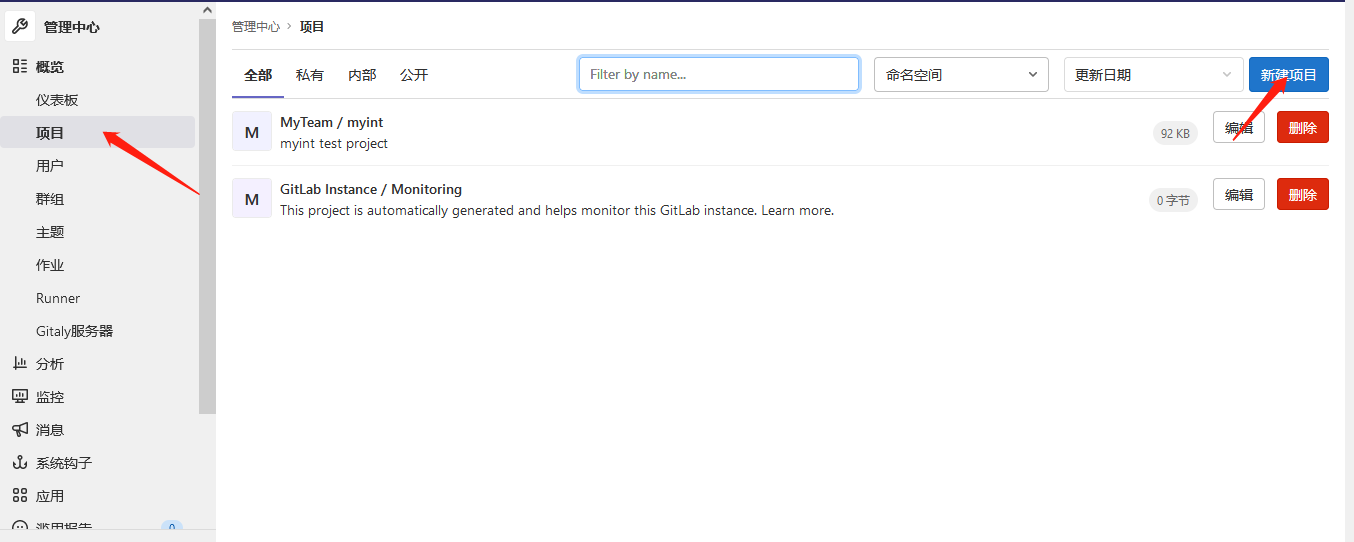
需要注意的是,创建项目时要选定是属于哪个群组或者哪个个人的。
再就是注意可见性级别,有私有、内部和公开三种。
我这里创建了一个名为myint的内部项目,使用的gitlab自带的项目模板,如下:

开始使用git来管理gitlab
Git 是一个快速、可扩展的分布式版本控制系统,具有异常丰富的命令集,可提供高级操作和对内部的完全访问。Git 易于学习,占用空间小,性能快如闪电。它超越了SCM工具,如Subversion,CVS,Perforce和ClearCase,具有廉价的本地分支,方便的暂存区域和多个工作流程等功能。
git工作流程
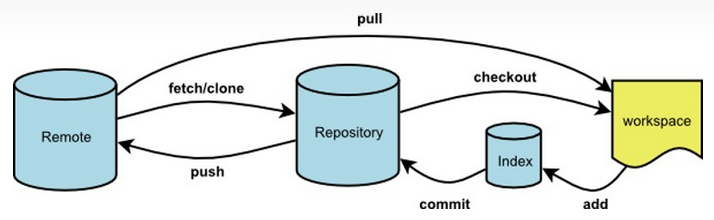
首先,git分为三个区域,分别是:
- 工作区(working directory)就是上图黄色部分,就是我们实际修改代码做操作的区域
- 暂存区(stage index)就是上图标注index的桶装部分,代码完成编辑后,会先将代码添加到缓存区
- 历史记录区(history)就是记录操作的历史记录或版本的
其次,git有两个仓库,既远程仓库和本地仓库:
- 远程仓库:上图的remote部分,就是远程存储代码的仓库,例如咱们这里的gitlab
- 本地仓库:上图的repository部分,就是.git目录,通过本地修改代码后,一般都会先提交到本地,再push到远程仓库
常用操作演示
- 首先初始化git,生成.git本地目录
# git init
Initialized empty Git repository in /opt/gitlab/.git/
会在当前目录下生成.git文件
- 添加、查看远程仓库
# git remote add origin http://gitlab.example.com:880
# git remote show
- 拷贝远程仓库项目到本地
# git clone http://gitlab.example.com:880/vfan/mypublic.git
# ls
mypublic
# ls mypublic
README.md
- 修改项目文件内容,提交到暂存区
# git add .
# git status
	modified:   README.md
git add . --> 把当前目录下所有更改,添加到暂存区。
git add -a --> 把当前项目下所有更改,添加到暂存区。
git add xxx.sh xxx.py --> 添加指定文件到暂存区。
- 将修改变提交到本地仓库
# git commit -m "test modify readme.md"

*** Please tell me who you are.

Run

  git config --global user.email "[email protected]"
  git config --global user.name "Your Name"

to set your account's default identity.
Omit --global to set the identity only in this repository.

fatal: unable to auto-detect email address (got 'root@iZ2ze20w5xm11rfza1h8ejZ.(none)')
报错是因为,安装git后,要设置下你的邮箱地址和用户名,才可以commit,执行:
# git config --global user.email "[email protected]"
# git config --global user.name "vfan"
重新commit即可:
# git commit -m "test modify readme.md"
[main 8cc5b90] test modify readme.md
 1 file changed, 5 insertions(+), 92 deletions(-)
 rewrite README.md (99%)
- 推送至远程仓库
# git push -u origin main
Username for 'http://gitlab.example.com:880': vfan
Password for 'http://[email protected]:880':
Counting objects: 5, done.
Delta compression using up to 2 threads.
Compressing objects: 100% (2/2), done.
Writing objects: 100% (3/3), 297 bytes | 0 bytes/s, done.
Total 3 (delta 0), reused 0 (delta 0)
To http://gitlab.example.com:880/vfan/mypublic.git
   52bc770..8cc5b90  main -> main
Branch main set up to track remote branch main from origin.
第一次推时需要用-u参数关联上仓库,后边再推直接git push即可。
如果觉得每次都要输入账号密码很麻烦,可以将账号密码直接储存:
# git config --global credential.helper store

## 实际会将配置保存到此文件中
# cat ~/.gitconfig
[user]
	email = [email protected]
	name = vfan
[credential]
	helper = store
这个时候,再次push,输入账号密码后,系统就会记住,以后便不用再输入。
- 代码撤销和撤销同步
已经修改文件,但还未添加到暂存区时
# git diff README.md
diff --git a/README.md b/README.md
index 074b4a5..3d82a16 100644
--- a/README.md
+++ b/README.md
@@ -4,4 +4,4 @@

 test add commit push ...

-one two three four
+one two three four five
git diff xxx.md --> 列出某文件的修改,不指定文件为列出全部文件修改。
撤销修改(将工作区的状态修改为与暂存区一致)
# git checkout README.md

# git clean -f
# git clean -df
git checkout . --> 撤销当前目录下所有文件的修改
git checkout --> 撤销当前项目下所有文件修改
git clean -f --> 撤销新增加的文件
git clean -df --> 撤销新增加的文件和文件夹
当文件修改已添加到暂存区,但还未提交时,就不能再使用git diff,因为此命令是对比工作区和暂存区的差异,这时就要加参数--cache:
# git diff --cached
diff --git a/README.md b/README.md
index 074b4a5..3d82a16 100644
--- a/README.md
+++ b/README.md
@@ -4,4 +4,4 @@

 test add commit push ...

-one two three four
+one two three four five
再次撤销修改(暂存区的修改恢复到工作区):
# git reset README.md
Unstaged changes after reset:
M	README.md
git reset --soft --> 等价于git reset
git reset --head --> 回到未修改状态,清空暂存区和工作区的修改
当文件已提交,还未push到远端仓库时,执行完commit后,会在仓库中生成一个版本号(hash值),之后任何时候,都可以借助这个hash值回退到这次提交:
# git diff main origin/main --> 本地main分支和远程仓库main分支对比
# git diff dev master --> 本地dev分支和master分支对比
# git reset --hard HEAD^ --> 恢复到本地仓库的上一个版本,并清空暂存区和工作区的修改
# git reset HEAD^ --> 恢复到本地仓库的上一个版本,并清空暂存区的修改
# git reset --hard <任意版本号> --> 恢复到本地仓库的指定版本,并清空暂存区和工作区的修改
- 合并分支
创建并切换到dev分支
# git checkout -b dev
Switched to a new branch 'dev'
如果只是新建,不切换,则去掉-b参数
查看当前存在的分支
# git branch
* dev
  main

# git branch -a
* dev
  main
  remotes/origin/HEAD -> origin/main
  remotes/origin/main
-a 参数表示查看本地仓库和远程仓库所有的分支
将dev分支合并到main分支
# git checkout main --> 首先要切换到要合并的分支,例如这里要合并到main
Switched to branch 'main'

# git pull --> 拉取最新代码到本地

# git merge dev  --> 合并dev分支到main
Updating 3dd81b4..4554445
Fast-forward
 dev-readme.md | 1 +
 1 file changed, 1 insertion(+)
 create mode 100644 dev-readme.md
- 删除分支
方法一:gitlab页面上删除此分支,然后执行:
## 查看需要清理的分支
# git remote prune origin --dry-run

## 刷新分支列表
# git remote update origin --prune

## 删除本地分支
# git branch -d dev
Deleted branch dev (was 4554445).

## 查看全部分支
# git branch -a
方法二:直接使用git删除分支
# git push origin --delete dev
# git branch -d dev
Recommend
-
9
2.5 Git 基础 - 远程仓库的使用 远程仓库的使用 为了能在任意 Git 项目上协作,你需要知道如何管理自己的远程仓库。 远程仓库是指托管在因特网或其他网络中的你的项目的版本库。 你可以有好几个远程仓库,通常有些仓库对你只读...
-
8
从 Git 仓库拉取代码到本地 #!/bin/bash # 从 Git 仓库拉取代码到本地 #------------------------------------------------- # 命令执行示例: # ./pull_git_repository.sh -u USERNAME -p PASSW...
-
19
GlusterFS在Kubernetes中的应用 GlusterFS服务简介 GlusterFS是一个可扩展,分布式文件系统,集成来自多台服务器上的磁盘存储资源到单一全局命名空间,以提供共享文件存储。
-
4
k8s中为什么要用CPU Manager? 默认情况下,kubelet 使用CFS配额来执行 Pod 的 CPU 约束。Kubernetes的Node节点会运行多个Pod,其中会有部分的Pod属于CPU密集型的工作负载。在这种情况下,Pod之间会争抢节点的CPU资源。当...
-
5
Azure Devops(十五) 使用Azure的私有Maven仓库 上一篇...
-
2
DevOps-Jenkins Jenkins简介 Jenkins是一个开源软件项目,是基于Java开发的一种持续集成工具,用于监控持续重复的工作,旨在提供一个开放易用的软件平台,使软件项目可以进行持续集成。
-
3
Jenkins管理动态节点 上文介绍Jenkins增加静态agent的步骤,除了静态增加外,还有动态管理的功能,两者最大的差异在于动态可以在有job运行时,临时加入一个agent到jenkins master,然后等job执行完毕之后,所加入的agent再自动删...
-
3
1、查看远程分支 [root@linux-node1 opslinux]# git remote -v origin https://github.com/Lancger/opslinux.git (fetch) origin https://github.com/Lancger/opslinux.git (push)
-
4
【vscode】如何直接克隆git仓库代码? | VPS小白 VPS小白 >
-
7
黑盒监控blackbox_exporter 前边介绍有很多exporter可以直接将metrics暴露给Prometheus进行监控,这些称为“白盒监控”,那些exporter无法监控到的指标呢?或者未暴露Metrics给Prometheus的一些服务怎么办?这时就要用到 blackbox_...
About Joyk
Aggregate valuable and interesting links.
Joyk means Joy of geeK