

Spring Boot 整合 Swagger3 指北
source link: http://www.javaboy.org/2022/0721/springboot-swagger3.html
Go to the source link to view the article. You can view the picture content, updated content and better typesetting reading experience. If the link is broken, please click the button below to view the snapshot at that time.

Spring Boot 整合 Swagger3 指北
Swagger 好早之前就更新到 3 了,不过一直没空和小伙伴们分享下具体玩法,主要是也是因为 Swagger 虽然升级了,但是我们在 Spring Boot 中却依然可以使用老版本的 Swagger,不过好像是从 Spring Boot2.6 开始,你会发现用不了老版本的 Swagger 了,哎,反正迟早都得搞,那不如就今天吧!
今天我们就来看看,在 Spring Boot2.7.1 中如何使用 Swagger3。
首先我们创建一个 Spring Boot 项目,引入 Swagger3 依赖,如下:
<dependency>
    <groupId>io.springfox</groupId>
    <artifactId>springfox-boot-starter</artifactId>
    <version>3.0.0</version>
</dependency>
以前在 Swagger2 的时代,这个依赖我们需要引入两个,现在就只需要这一个即可。
接下来在启动类上添加两个注解,开启 Swagger:
@SpringBootApplication
//开启swagger
@EnableSwagger2
@EnableOpenApi
@EnableWebMvc
public class SwaggerDemoApplication {

public static void main(String[] args) {
        SpringApplication.run(SwaggerDemoApplication.class, args);
    }

}
现在,基本工作就已经完成了,此时即使我们不做任何额外的事情,Swagger 文档也已经可以自动生成了。
启动项目,浏览器输入 http://localhost:8080/swagger-ui/index.html 查看 Swagger 文档:
小伙伴们需要注意,这个默认的文档访问路径跟以前的 Swagger2 不一样哦!
现在扫描出来的接口中有一个是 BasicErrorController,这个是 Spring Boot 默认提供的异常处理器,因为我们现在没有为 Swagger 设置包扫描路径,所以就连同这个一起被扫描出来了。
好了,现在我们可以对这个网页稍微做一些定制,如下:
@Configuration
public class Swagger2Config {

@Bean
    Docket docket() {
        return new Docket(DocumentationType.OAS_30)
                //配置网站的基本信息
                .apiInfo(new ApiInfoBuilder()
                        //网站标题
                        .title("TienChin项目在线接口文档")
                        //标题后面的版本号
                        .version("v1.0")
                        .description("TienChin项目接口文档")
                        //联系人信息
                        .contact(new Contact("javaboy", "http://www.javaboy.org", "[email protected]"))
                        .build())
                .select()
                //指定接口的位置
                .apis(RequestHandlerSelectors.basePackage("org.javaboy.swagger_demo.controller"))
                .build();
    }
}
这段配置基本上和之前的 Swagger2 的一致,配置完成后,Swagger 页面的基本信息就会更新过来:
3. 接口配置
接下来就是一些具体的接口配置了。
这个和 Swagger2 也基本一致,而且很容易懂,下面我来分别向小伙伴们举例说明:
@RestController
@Api(tags = "用户管理相关接口")
@RequestMapping("/user")
public class UserController {
    @PostMapping("/")
    @ApiOperation("添加用户的接口")
    @ApiImplicitParams({
            @ApiImplicitParam(name = "username", value = "用户名", defaultValue = "李四"),
            @ApiImplicitParam(name = "address", value = "用户地址", defaultValue = "深圳", required = true)
    })
    public RespBean addUser(String username, @RequestParam(required = true) String address) {
        return new RespBean();
    }
    @GetMapping("/")
    @ApiOperation("根据id查询用户的接口")
    @ApiImplicitParam(name = "id", value = "用户id", defaultValue = "99", required = true)
    public User getUserById(@PathVariable Integer id) {
        User user = new User();
        user.setId(id);
        return user;
    }
    @PutMapping("/{id}")
    @ApiOperation("根据id更新用户的接口")
    public User updateUserById(@RequestBody User user) {
        return user;
    }
}
这里边涉及到多个 API,我来向小伙伴们分别说明:
- @Api 注解可以用来标记当前 Controller 的功能。
- @ApiOperation 注解用来标记一个方法的作用。
- @ApiImplicitParam 注解用来描述一个参数,可以配置参数的中文含义,也可以给参数设置默认值,这样在接口测试的时候可以避免手动输入。
- 如果有多个参数,则需要使用多个 @ApiImplicitParam 注解来描述,多个 @ApiImplicitParam 注解需要放在一个 @ApiImplicitParams 注解中。
- 需要注意的是,@ApiImplicitParam 注解中虽然可以指定参数是必填的,但是却不能代替 @RequestParam(required = true) ,前者的必填只是在 Swagger 框架内必填,抛弃了 Swagger ,这个限制就没用了,所以假如开发者需要指定一个参数必填, @RequestParam(required = true) 注解还是不能省略。
- 如果参数是一个对象(例如上文的更新接口),对于参数的描述也可以放在实体类中。例如下面一段代码:
@ApiModel
public class User {
    @ApiModelProperty(value = "用户id")
    private Integer id;
    @ApiModelProperty(value = "用户名")
    private String username;
    @ApiModelProperty(value = "用户地址")
    private String address;
    //getter/setter
}
好了,经过如上配置之后,接下来,刷新刚刚打开的页面,可以看到如下效果:
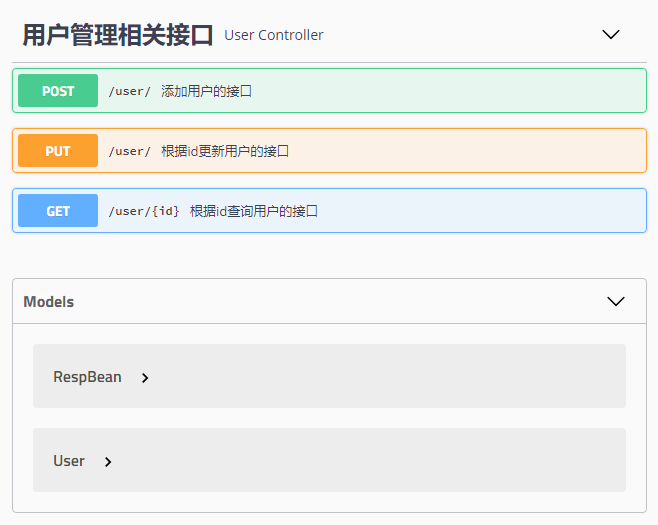
可以看到,所有的接口这里都列出来了,包括接口请求方式,接口地址以及接口的名字等,点开一个接口,可以看到如下信息:
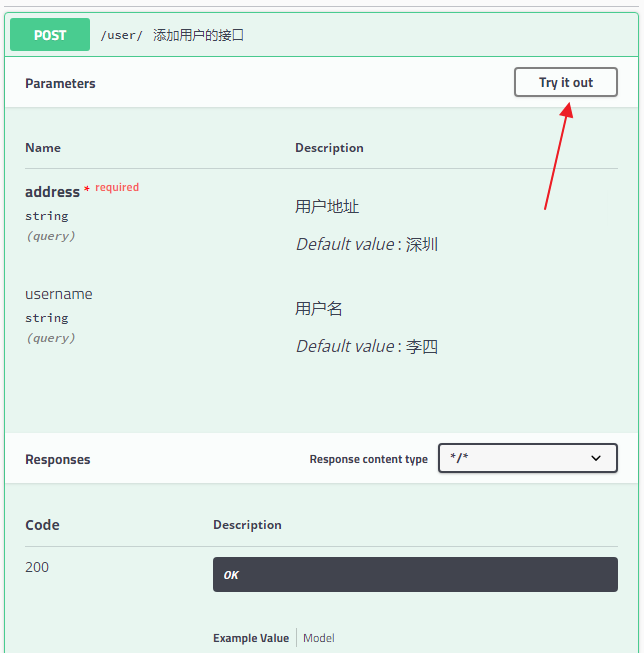
可以看到,接口的参数,参数要求,参数默认值等等统统都展示出来了,参数类型下的 query 表示参数以 key/value 的形式传递,点击右上角的 Try it out,就可以进行接口测试:
点击 Execute 按钮,表示发送请求进行测试。测试结果会展示在下面的 Response 中。
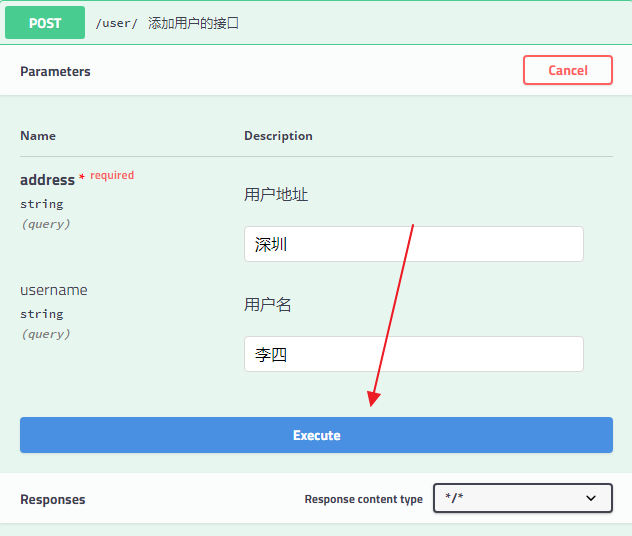
小伙伴们注意,参数类型下面的 query 表示参数以 key/value 的形式传递,这里的值也可能是 body,body 表示参数以请求体的方式传递,例如上文的更新接口,如下:

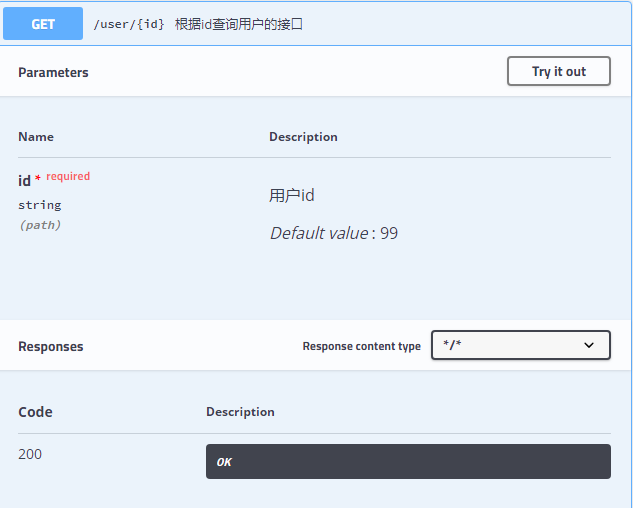
当然还有一种可能就是这里的参数为 path,表示参数放在路径中传递,例如根据 id 查询用户的接口:
当然,除了这些之外,还有一些响应值的注解,都比较简单,小伙伴可以自己摸索下。
4. 在 Security 中的配置
如果我们的 Spring Boot 项目中集成了 Spring Security,那么如果不做额外配置,Swagger 文档可能会被拦截,此时只需要在 Spring Security 的配置类中为 Swagger 相关的文件和接口放行即可(SpringBoot2.7.1 最新写法):
@Configuration
public class SecurityConfig {
    @Bean
    WebSecurityCustomizer webSecurityCustomizer() {
        return new WebSecurityCustomizer() {
            @Override
            public void customize(WebSecurity web) {
                web.ignoring().antMatchers("/swagger-ui/**")
                        .antMatchers("/swagger-resources/**")
                        .antMatchers("/v3/**");
            }
        };
    }
}
如此之后,Swagger 文件就不需要认证就能访问了。不知道小伙伴们有没有看懂呢?有问题欢迎留言讨论。
喜欢这篇文章吗?扫码关注公众号【江南一点雨】,【江南一点雨】专注于 SPRING BOOT+微服务以及前后端分离技术,每天推送原创技术干货,关注后回复 JAVA,领取松哥为你精心准备的 JAVA 干货!

Recommend
About Joyk
Aggregate valuable and interesting links.
Joyk means Joy of geeK