

基于MIndSpore框架的道路场景语义分割方法研究 - 想要赚到老秃顶少不了
source link: https://www.cnblogs.com/geniusJinming/p/16505828.html
Go to the source link to view the article. You can view the picture content, updated content and better typesetting reading experience. If the link is broken, please click the button below to view the snapshot at that time.

基于MIndSpore框架的道路场景语义分割方法研究
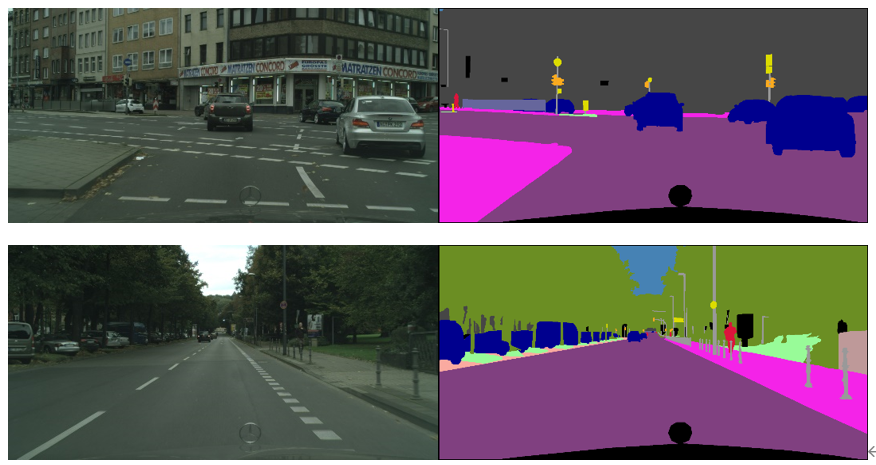
本文以华为最新国产深度学习框架Mindspore为基础,将城市道路下的实况图片解析作为任务背景,以复杂城市道路进行高精度的语义分割为任务目标,对上述难处进行探究并提出相应方案,成功地在Cityscapes数据集上完成了语义分割任务。
整体的技术方案见图:
本帖仅对代码上的更改以及项目进行介绍。
https://gitee.com/xujinminghahaha/mindspore_model
| 操作系统 | Ubuntu 18.04 | 硬件架构 | X86_64 |
|---|---|---|---|
| CPU | Intel(R) Xeon(R) Gold 6154 CPU @ 3.00GHz | GPU | NVIDIA-A100(40G) |
| 深度学习框架 | Mindspore 1.6.0 | Batch_sizes | 7 |
Cityscapes数据集:
Cityscapes数据集提供了3475张细粒度分割标签图,以及20 000张粗略分割的图像,本文使用了细粒度标注的train/val集进行训练和验证,此数据集与之前的CamVid,Leuven,Daimler 城市数据集不同,Cityscapes更多的捕捉到了真实世界的城市道路场景的多样性与复杂性,尤其是为城市环境中的自动驾驶量身定制,涉及范围更广的高度复杂的市中心街道场景,并且这些场景分别在50个不同城市采集。
数据集下载地址:https://www.cityscapes-dataset.com/
实现流程记录
1、 参考华为官方gitee仓库的modelzoo克隆至本地,找到research/cv/PSPNet目录,在此代码基础上进行修改。
本项目基于GPU平台,对modelzoo中原有的昇腾文件已清除。代码中shell_command提供了训练脚本和验证脚本的启动命令,同时附带linux服务器一键下载Cityscapes下载方式。
2、由于选题是道路场景,所以需要更改数据集为Cityscapes,由于modelzoo上的数据集仅支持VOC2012和ADE20K,所以需要增加对数据集的适配和标签信息转换。
在代码中已经添加了对于cityscapes的像素点和label的转换代码,可以直接使用,其中颜色和类别的映射关系请见:config/cityscapes_colors.txt以及config/cityscapes_names.txt
3、网络架构选用可插拔的残差网络,以及金字塔池化模块解码。相关代码实现在src/model目录下。
ResNet论文地址:https://arxiv.org/abs/1512.03385
PSPNet论文地址:https://arxiv.org/abs/1612.01105
网络结构图:
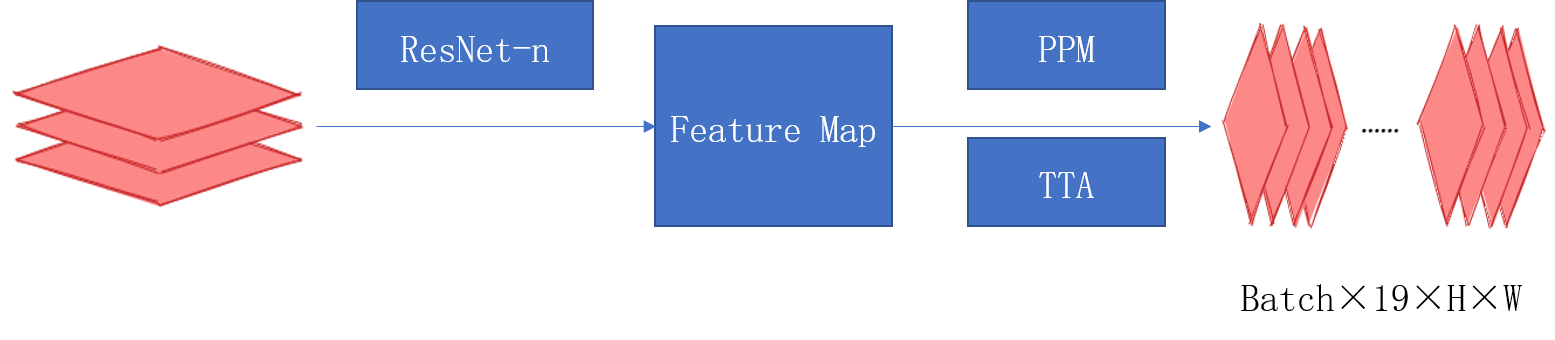
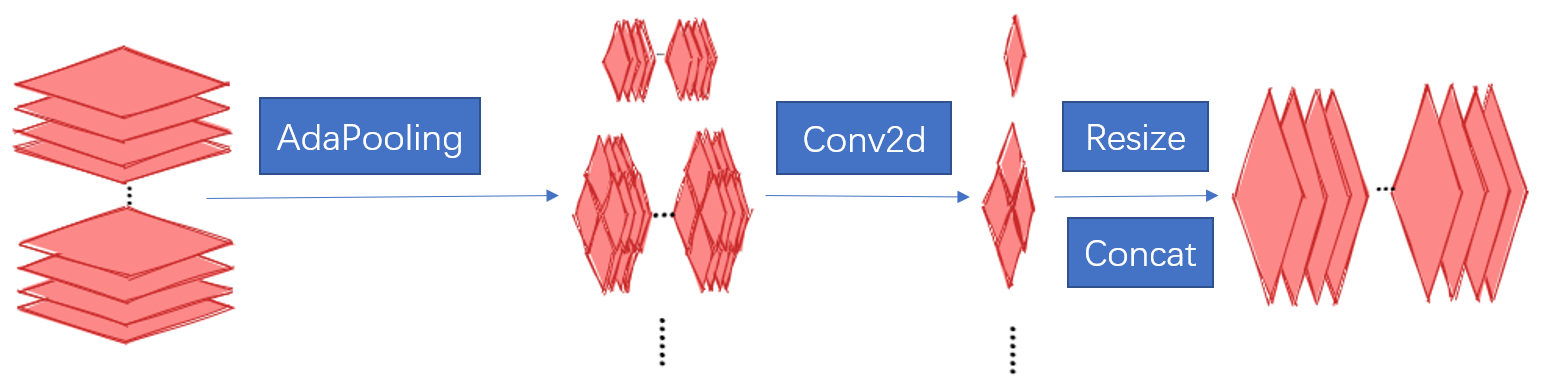
金字塔池化模块:
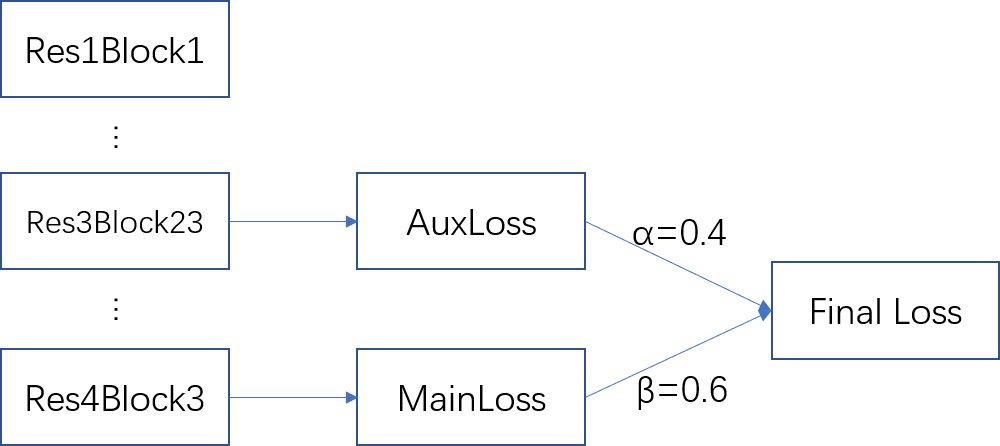
loss函数的设计:
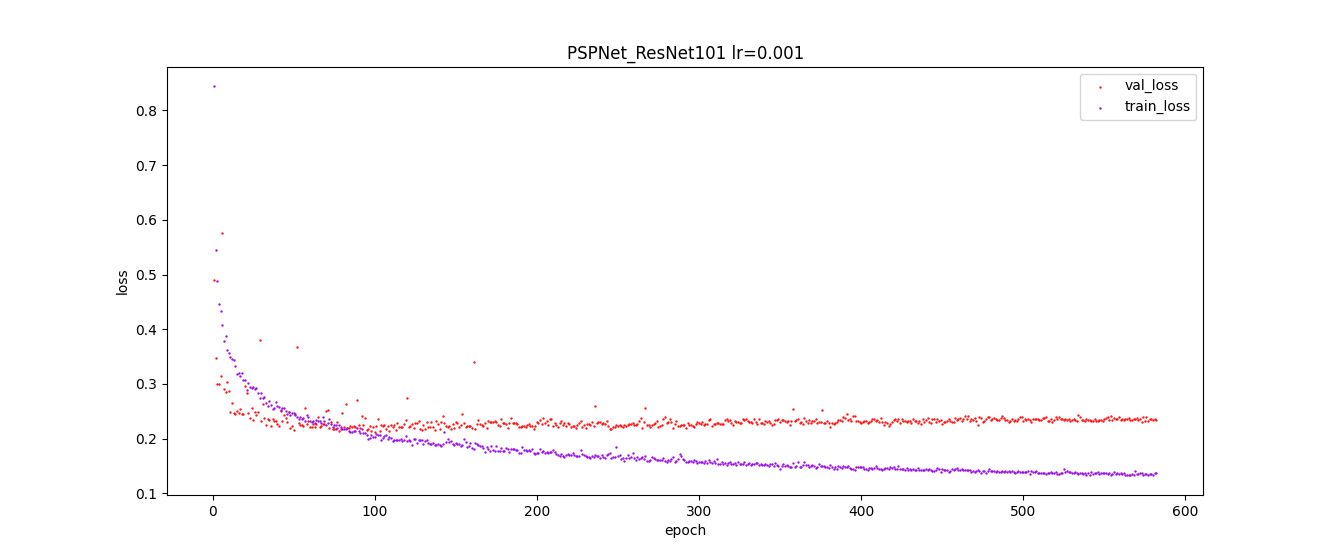
实际训练时的loss值变化趋势:
4、测试时增强(TTA, Test Time Augmentation),通过多尺度推理最后取平均的方法获得更好的效果:
以下给出方法伪码,供大家参考,具体实现请结合代码仓库查阅。
# Algorithm 1: TTA(Test Time Augmentation)
# Input:Image,Scales,Crop_size,Net
# OutPut:Image with Label

batch, _,ori_height, ori_width = image.shape #获取图像shape
stride_h ,stride_w = crop_size #步长,cropsize为训练时设置的crop参数
final_pred = Tensor(np.zeros([1, dataset.num_classes, ori_height, ori_width])) #初始化结果
for scales:
  image = dataset.multi_scale_aug(image,scale)
  height, width = image.shape[:-1]
  new_h, new_w = image.shape[:-1]
  rows, cols = GetParam(new_h, new_w) #一张图片分为row行和col列分块推理
  preds = np.zeros([1, dataset.num_classes, new_h, new_w]).astype(np.float32)#初始化
  count = np.zeros([1, 1, new_h, new_w]).astype(np.float32)#记录像素点推理次数
  for rows,cols:
    h0 , w0, h1, w1 = GetIndex(rows,cols,stride_h,strid_w) #获得格点坐标
    crop_img = new_img[h0:h1, w0:w1, :]
    crop_img = crop_img.transpose((2, 0, 1))
    crop_img = np.expand_dims(crop_img, axis=0)
    pred = dataset.inference(model, crop_img, flip)
    preds[:, :, h0:h1, w0:w1] += pred.asnumpy()[:, :, 0:h1 - h0, 0:w1 - w0]
    count[:, :, h0:h1, w0:w1] += 1   #将推理矩阵相加,再把标记矩阵相加
  preds = preds / count	#求得平均推理像素值
  preds = preds[:, :, :height, :width]
  preds = P.ResizeBilinear((ori_height, ori_width))(preds)	#恢复原始大小
  final_pred = P.Add()(final_pred, preds)
return final_pred
在config/pspnet_resnet_cityscapes_gpu.yaml下scales那一行,可以输入一个数组,该数组中每一个Value对应一个Scale,inference将会在此scale下输出一次。
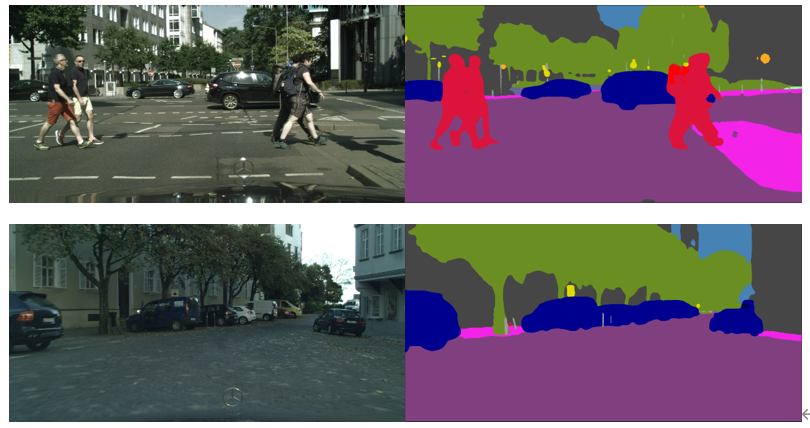
5、 结果展示:
| road | traffic light | rider | bicycle | sidewalk | traffic sign | car | pole |
|---|---|---|---|---|---|---|---|
| 97.81% | 63.08% | 56.61% | 74.33% | 83.69% | 69.24% | 92.79% | 45.66% |
| building | vegetation | truck | person | fence | sky | train | mIoU |
| 90.71% | 90.43% | 71.73% | 75.35% | 55.50% | 92.89% | 43.63% | 74.874% |
Recommend
About Joyk
Aggregate valuable and interesting links.
Joyk means Joy of geeK