

Exploring the Go language as a medium for creative programming
source link: https://itnext.io/exploring-the-go-language-as-a-medium-for-creative-programming-ef0fd4372b61
Go to the source link to view the article. You can view the picture content, updated content and better typesetting reading experience. If the link is broken, please click the button below to view the snapshot at that time.

Exploring the Go language as a medium for creative programming
This article is about exploring the Go language and its capabilities in fields like generative and creative coding, visual programming, Webassembly, face detection and image processing, areas that might look weird or unusual for casual Go developers; considering that the vast majority of the Go developers are opting for using the language because of its simplicity, wide support for concurrency primitives, ingredients which are making it very convenient for Cloud computing and DevOps related works. These are the areas where Go excels, but we are trying to prove the contrary, ie. the language can be used as a general purpose language and might be appealing also to creative minds, though the limited creative frameworks and libraries built around it might require more work and perseverance.
This will be quite technical writing which means, that besides knowing the Go language it requires also some understanding of the HTML5 Canvas API, some Webassembly concepts, and also minimal Javascript knowledge. Along the way, we will showcase a few real-time demos accompanied by some code excerpts for a better understanding. So let’s get started.
Working with Webassembly in Go
As the author of Pigo computer vision library, I needed to prove its real time capabilities, but unfortunately, the Go ecosystem was missing a cross-platform library for accessing the webcam. There is GoCV, which is a wrapper around OpenCV, and as it is the case with most of the C bindings it came with a nonnegligible performance cost. Pigo is written 100% in Go, based on the Pixel Intensity Comparison-based Object detection paper (https://arxiv.org/pdf/1305.4537.pdf) and it’s fast. So in order to have access to the webcam, I opted to port it to Webassembly. For someone who doesn’t know what is Webassembly (abbreviated Wasm), it is a binary instruction format for a stack-based virtual machine. Wasm is designed as a portable target for compilation of high-level languages like C/C++/Rust.
Since all of the modern web browsers already integrates WASM, this means also that we can access the webcam too. Let’s see how can we access it in Go. Bear in mind that before using the generated wasm binary file we need to build the program with some specific Go build directives targeting Webassembly. On one side, at the top of each Go files we have to provide the // +build js,wasmdirective and on the other hand when building the application we should specify the target OS and architecture. A regular build command should look like this:
$ GOOS=js GOARCH=wasm go build -o lib.wasm main.go
To make it easier the building process we can create a Makefile and with one simple command we are able to build the wasm file, spawn a new web server and also running the web application in the browser.
Executing the make command will copy wasm_exec.js file from the Go source directory over to our local js folder. This is important because we have to make sure that we are using the latest version of the wasm_exec.js file (which will be served when we are running the web server), otherwise it could happen that some functions are getting outdated due to the code changes between releases.
Now let’s see how we can access the webcam in a simple Webassembly program. Since this is a standalone web application, some static assets needs to be served through a web server. Some of these static assets are the above mentioned wasm_exec.js file and the generated wasm binary file. So to serve these files is as simple as to include them in a static html file.
Now each time when we are executing the make command it will build the wasm file and will run a web server on a specific IP address and port. This is the basic skeleton for a sample application, but if you are running it now nothing should happen. We need to create the main Go application, in order to have a fully functional program for accessing the webcam and processing the supplied raw data.
The API for the main.go file is very intuitive: we are creating a new Canvas which underneath is accessing the HTML5 Canvas API. Once a webcam is found we are calling the Render method which spawn a new goroutine and runs until it’s not terminated by the cancelAnimationFrame JS method. This looks very easy, but the reality is a bit more complex.
As I mentioned in the very first part of the article, my intention is to explore Go as medium for creative programming, so it’s not the scope of this writing to give you a technical description about the syscall/js package used for the WASM integration. So let’s move on and discover some real use cases.
Face detection
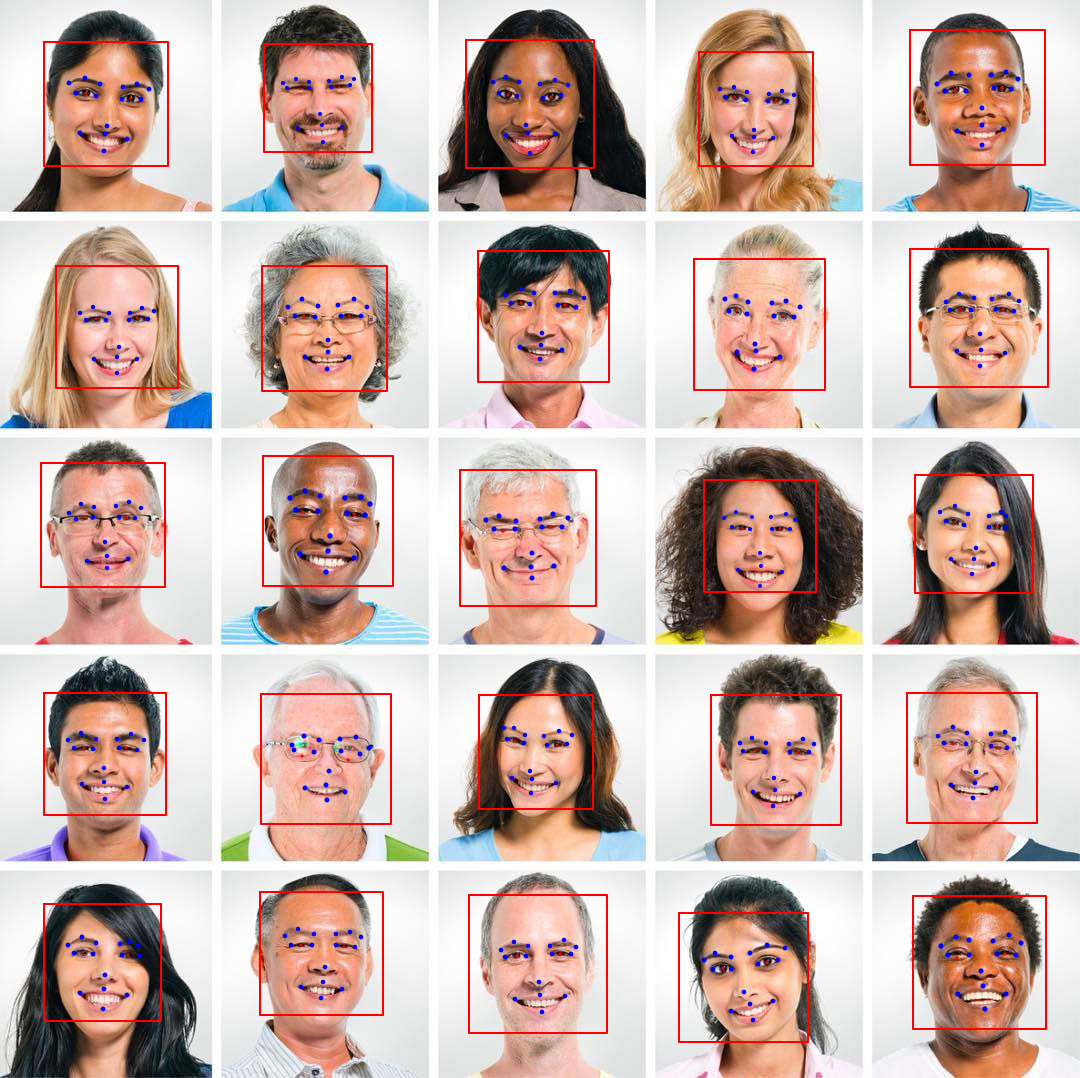
All of the demos which will be showcased in the upcoming section have something in common: they require to detect faces prior processing the supplied raw data. The Pigo face detection library is just meant to do that in a very lightweight way, since it does not require any third party modules or external libraries. It can detect human faces, but is also capable for pupil/eyes and facial landmark points detection. So we have all the required ingredients for making some awesome creative works.
Using the HTML5 Canvas API in Go
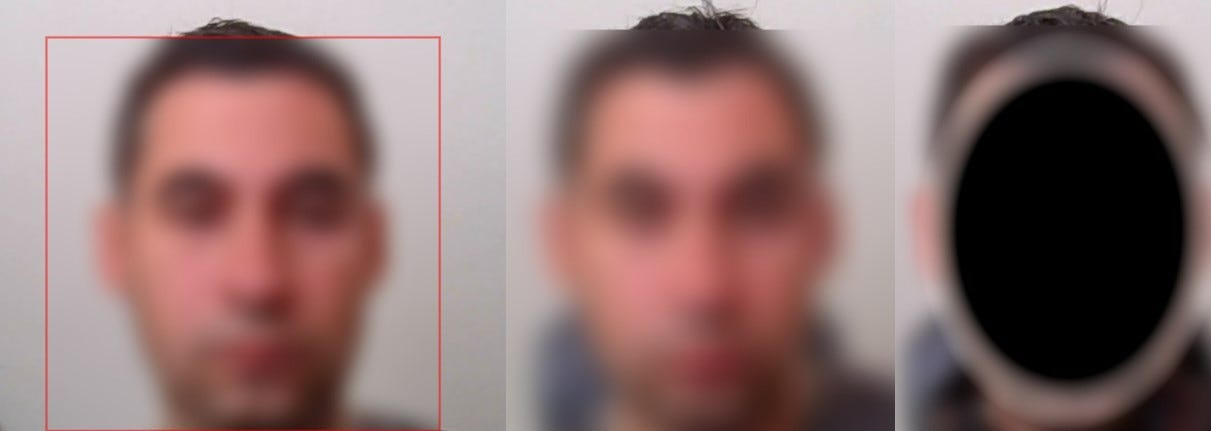
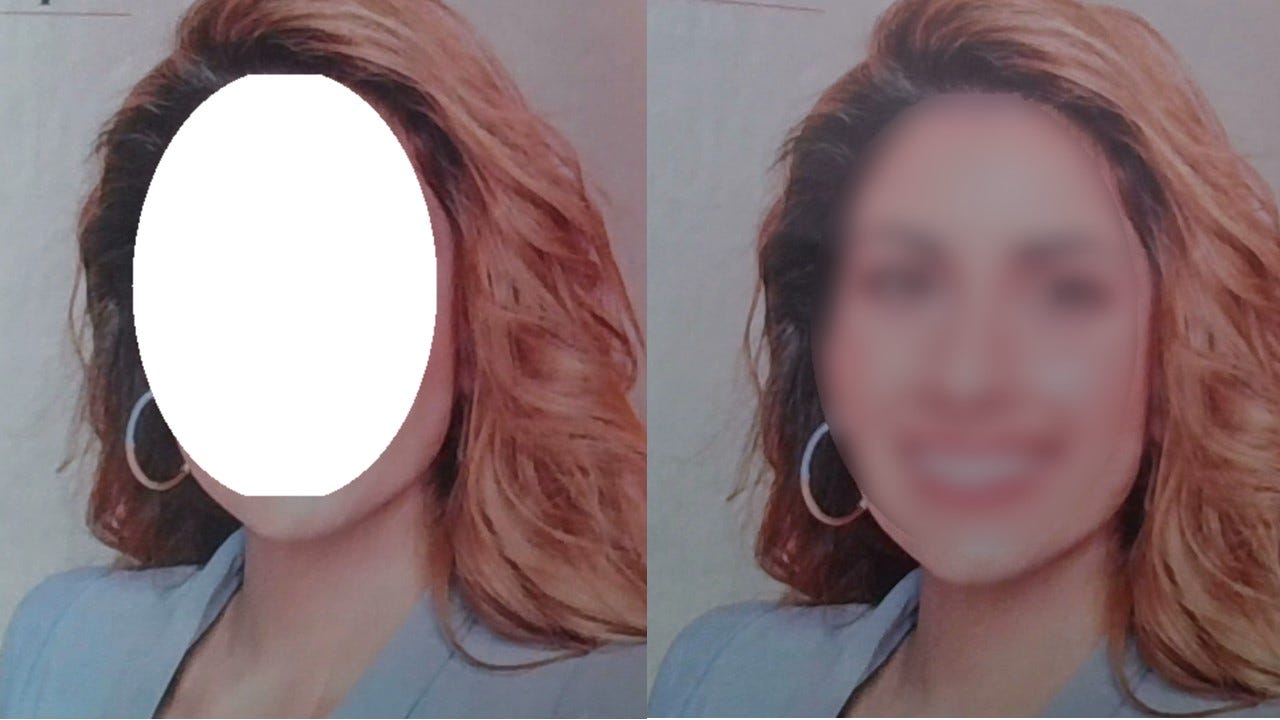
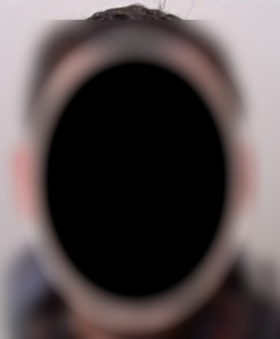
As a first demo we wanted to blur out the detected faces, but since Pigo returns only the detection coordinates only along with the dimension (which is usually a square), we needed to convert it to an ellipse, so we had to apply the ellipse formula over the obtained rectangle. The desired final result should be a blurred facemask of an ellipse shape, layered over to the detected face, where the edges are faded towards transparency. Below is a snapshot about the effect we are aiming for.

In order to achieve the desired effect the plan is quite simple: retrieve the coordinates of the detected face, subtract the image and apply a blurring mask over it. We have Pigo for face detection, stackblur-go to blur out the detected face region, but the problem is that we should blur out only the face (which naturally is an oval) and not the whole region. Below is a step-by-step visualization of the process.
First try
As a starting point I opted to integrate the ellipse formula directly in Go and apply the gradient overlay afterwards. As it turns out this proved to be completely inefficient, since on each frame rate we had to subtract the detected face region to a sub-image, convert the pixel data to an image and draw the ellipse gradient mask over the subtracted image. The culprit was not necessarily the image subtraction but the idea that we had to create a new gradient mask on each frame.
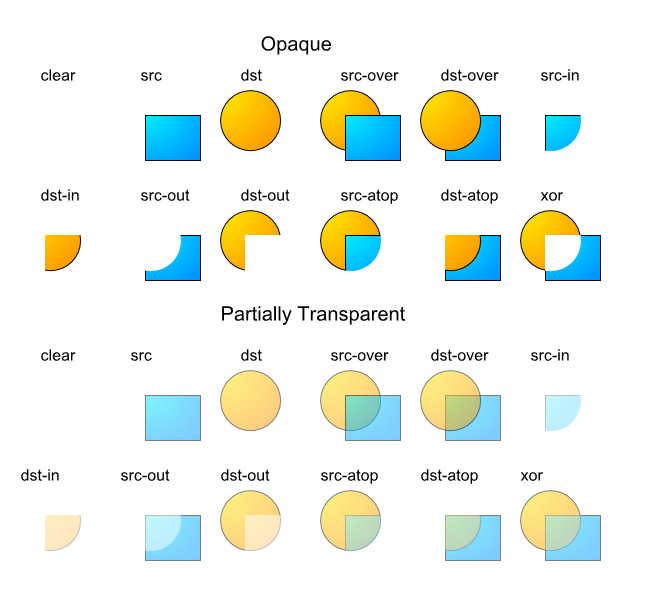
But why do we need an overlay mask at all? The answer is because the Draw method of the image/draw package can apply a composite operation to the source image by taking as input the mask which is drawn on top of the image in order to create the desired final image. The following article explains this in more details: https://go.dev/blog/image-draw.
Composition is performed pixel by pixel in the style of the Plan 9 graphics library and the X Render extension. The model is based on the classic “Compositing Digital Images” paper by Porter and Duff, with an additional mask parameter:
dst = (src IN mask) OP dst. For a fully opaque mask, this reduces to the original Porter-Duff formula:dst = src OP dst.The Porter-Duff paper presented 12 different composition operators, but with an explicit mask, only 2 of these are needed in practice: source-over-destination and source.
Because the draw.Drawmask method require as third parameter an image.Image and since this is an interface, this means also that we can write our own image type, the only condition is to implement the methods defined by the Image interface.
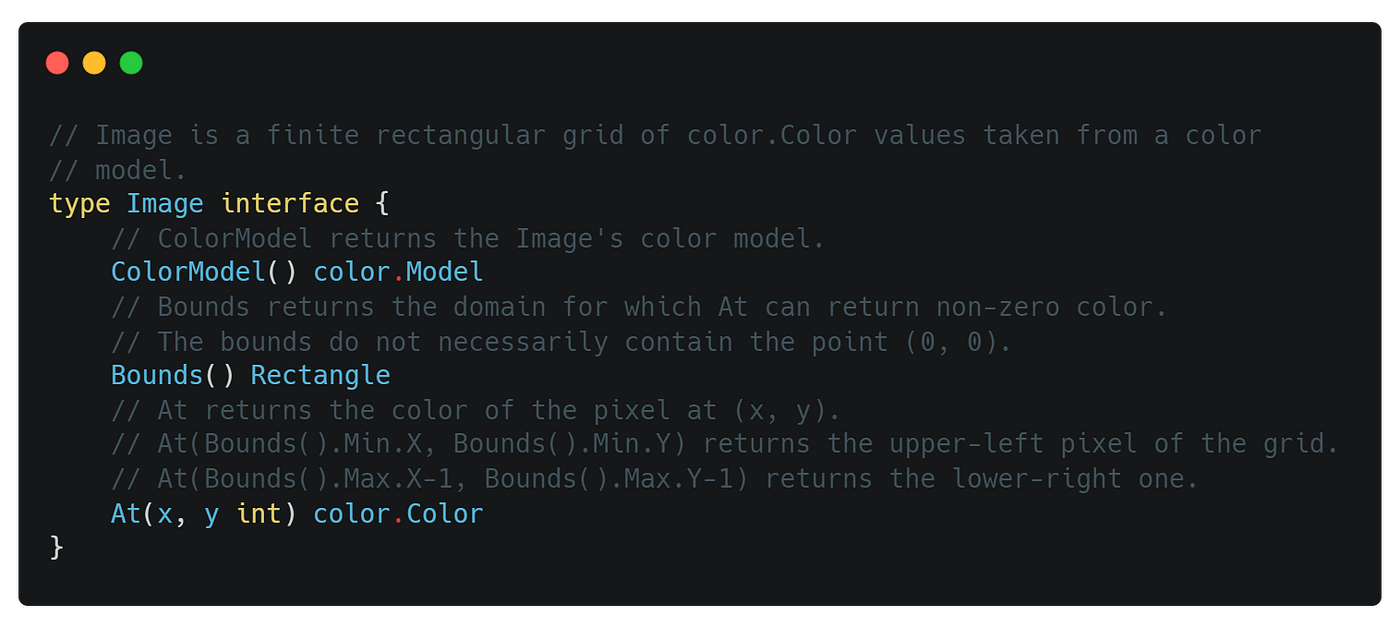
So we have our custom image type defined by the ellipse formula which we can apply as a third parameter to the draw.DrawMask method.
But unfortunately the results was not what we have expected: the ellipse gradient mask was not faded out towards the edges. What we got was an uniform and plain blurred mask which looked kind of awkward.
The next step was to create a gradient overlay and use it as a filler for the ellipse mask. I’m not posting here the implementation of the upgraded gradient ellipse mask, but you can find it here and here. The performance was utterly disappointing, so I dropped this version too. What else we could try to obtain a quite satisfactory performance?
Another try: using the Javascript Canvas API
The HTML5 Canvas API has a globalCompositeOperation property which is meant to do exactly the same thing as the draw.Draw function presented above: it applies a compositing operation over a shape. Using the Call method from the syscall/js package we can invoke native Javascript methods. This is our rescue plan.

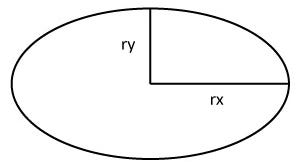
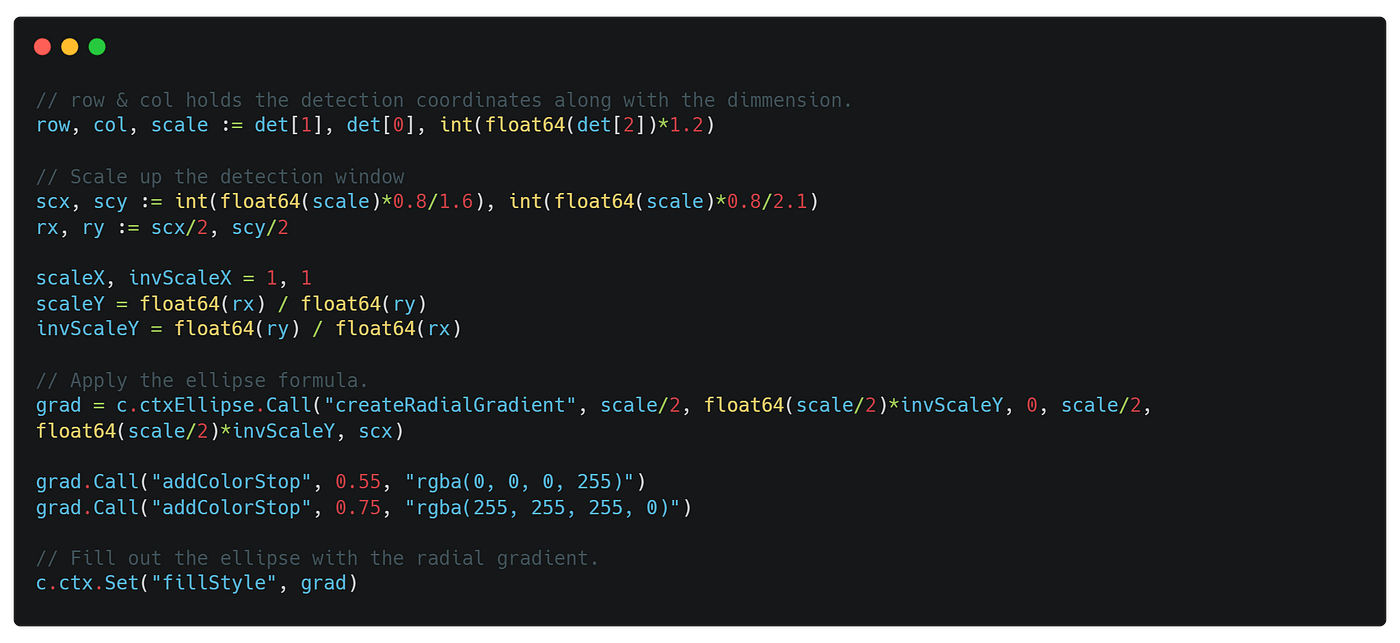
Now let’s see how we can apply the gradient overlay mask over the subtracted face region. First we need to create the elliptical radial gradient. There is a createRadialGradient HTML5 Canvas method, which creates a radial gradient, but not with an elliptical shape. There is no native elliptical gradient method in the HTML5 standard, but we can create one quite easily. We need only to plug in the ellipse formula into this method. The method is defined in the following way:
createRadialGradient(x0, y0, r0, x1, y1, r1)
where (x0,y0) is the x and y coordinate of the start circle, r0is the radius, while the (x1,y1) is the ending circle with radius r1.
In the elliptical gradient code, the center of the gradient is placed at the position (cx, cy), and the size of the gradient is defined by two radii: rx and ry.
We can translate this into a real code like the following:
Cool, we’ve got a nice looking gradient overlay ellipse, but though something was missing as it’s visible in the image below. The solution was quite simple: we had to set the globalCompositeOperation canvas property to destination-atop.
Other interesting experiments
The upcoming demos follows the same concept with a few differences here and there. How about creating a Zoom like background blur effect?
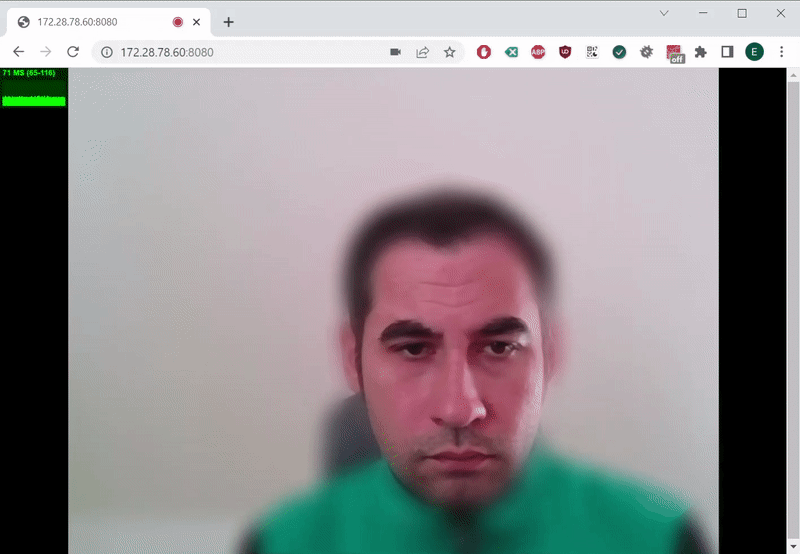
This might look quite identical with the earlier experiment, but it has one major technical difference: before blurring out the background we need to draw the raw pixel data of the webcam frames into a separate canvas context and only afterwards calling the face detection algorithm. The step-by-step process is like the following:
- Draw the webcam frames into an offscreen canvas context.
- Obtain the raw pixel data converted to an image. This is required because the Pigo face detection library operates with image and not pixel values. We can easily convert an image to pixel array and vice-versa (see below).
- Subtract the image under the detected face region and convert it to an ellipse as presented earlier.
- Blur out the webcam frames drawn into the offscreen canvas. These are stored as raw pixel data, so they needs to be converted to images.
- Merged together the blurred canvas with the canvas which is storing the detected face region.
- Apply the
globalCompositeOperationusingdestination-inas value.
Key takeaways
There is one important thing which we need to keep in mind when we are interoperating with the syscall/js package and the HTML5 Canvas API:the values returned by the getImageData Canvas method are of type Uint8ClampedArray. These needs to be converted to Uint8Array in order to be transferable from JS to Go via the js.CopyBytesToGo method. Go panics otherwise.
The putImageData Canvas method on the other hand requires the first parameter to be of type Uint8ClampedArray, which means that the pixel array of type Uint8Arrayneeds to be converted to the requested type. We can do this very easily in the following way:
Let’s see another final example: face triangulation. This example uses the ▲ Triangle library.
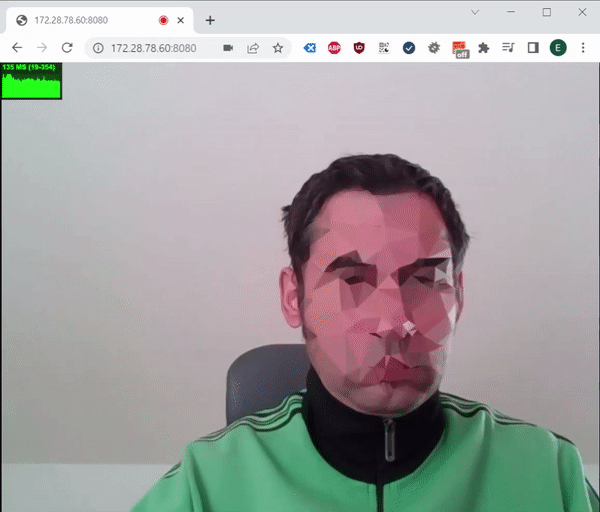
The scope of this demo is to triangulate the detected faces giving them some cool aesthetic look and also to anonymize a person’s face at the same time. As it was the case with the other demos, some parts can be reused, we just need to plug in the image triangulation process.
Once we have subtracted the detected face region we are calling the triangle.Draw method, which returns the triangulated image along with an error and some other values, which we are not important for our case.
We have to convert the resulted image to a pixel array (using the utility functions presented before) because we need to draw back these pixels into the canvas context and apply the same composite operation over the ellipse gradient which is holding the triangulated image.
Final notes
As you can see the whole process might look complicated, but in fact it can be reduced to a few things:
- Image to pixels conversion and back.
- Working with different canvas layers and merging them together using the composite operation.
- Using the Javascript and HTML5 Canvas API in the way requested by the syscall/js package.
- Converting Javascript arrays to Go byte slices and vice versa: converting byte slices to Javascript arrays.
You can check the source code of the presented demos on Github under the following link: https://github.com/esimov/pigo-wasm-demos
Useful resources
Also if you are interested below are some articles and presentations about the Pigo face detection library.
Recommend
About Joyk
Aggregate valuable and interesting links.
Joyk means Joy of geeK