

k8s+crio+podman搭建集群 - eryoung2
source link: https://www.cnblogs.com/young233/p/16474971.html
Go to the source link to view the article. You can view the picture content, updated content and better typesetting reading experience. If the link is broken, please click the button below to view the snapshot at that time.

在传统的k8s集群中,我们都是使用docker engine做为底层的容器管理软件的,而docker engine因为不是k8s亲生的解决方案,所以实际使用中会有更多的分层。之前我们也讲过,k8s为了调用docker engine,专门写了一个dockershim做为CRI,而在1.20版本的时候,k8s就宣布停止更新dockershim了,也就是说再往后的版本就不推荐使用k8s+dockershim+docker engine的方案了。
而k8s官方比较推荐的解决方案中,官方比较推荐的是cri-o或者containerd,前者是基于开放容器计划(OCI)的实现,后者是基于docker的containerd,后脱离出来进行独立开发的组件,现归属于CNCF组织。
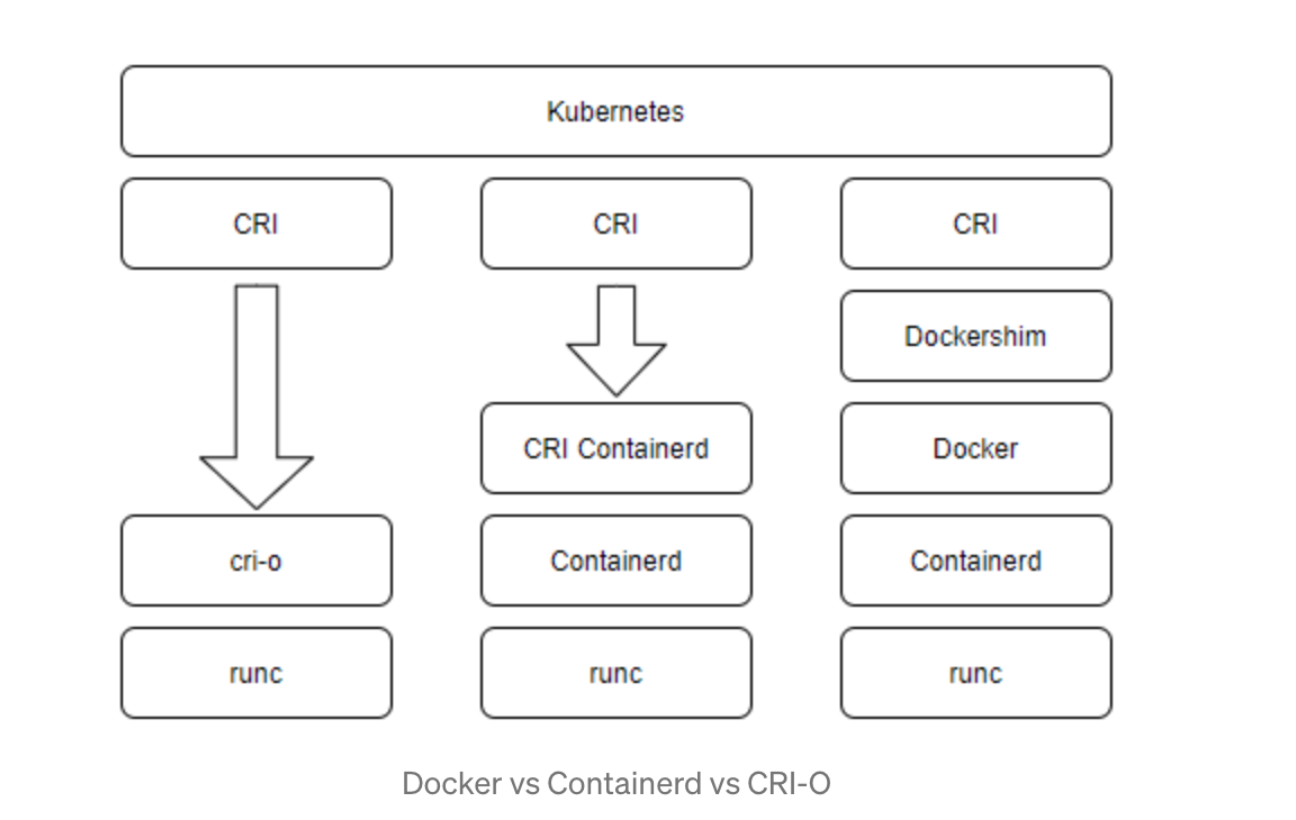
CRI-O vs containerd vs docker daemon
这三者有啥区别呢?
首先,cri-o是cri的实现,可以直接调用底层的runc
其次,containerd是CRI-Containerd的实现,可以调用底层的runc
而docker则需要先调用dockershim,然后调用docker,再调用containerd,最后调用底层的runc
三者区别如图:
k8s+crio+podman实现
podman安装
可参考我前一篇文章
docker的平替--podman - eryoung2 - 博客园
三台机都需要安装podman
k8s的安装
可参考我另一篇文章
kubernetes 搭建集群 - eryoung2 - 博客园
三台机都需要安装kubelet/kubeadm/kubectl,并启动kubelet
cri-o的安装
Ubuntu(18.04)
modprobe overlay  # 打开overlay
modprobe br_netfilter  # 打开netfilter
cat > /etc/sysctl.d/99-kubernetes-cri.conf <<EOF #内核处理
net.bridge.bridge-nf-call-iptables  = 1
net.ipv4.ip_forward                 = 1
net.bridge.bridge-nf-call-ip6tables = 1
EOF
sysctl --system
swapoff -a #kube scheduler要求关闭swap
2 安装CRI-O
# 指定版本
OS=xUbuntu_18.04
CRIO_VERSION=1.23
# 加源
echo "deb https://download.opensuse.org/repositories/devel:/kubic:/libcontainers:/stable/$OS/ /"|sudo tee /etc/apt/sources.list.d/devel:kubic:libcontainers:stable.list
echo "deb http://download.opensuse.org/repositories/devel:/kubic:/libcontainers:/stable:/cri-o:/$CRIO_VERSION/$OS/ /"|sudo tee /etc/apt/sources.list.d/devel:kubic:libcontainers:stable:cri-o:$CRIO_VERSION.list
# 加key
curl -L https://download.opensuse.org/repositories/devel:kubic:libcontainers:stable:cri-o:$CRIO_VERSION/$OS/Release.key | sudo apt-key add -
curl -L https://download.opensuse.org/repositories/devel:/kubic:/libcontainers:/stable/$OS/Release.key | sudo apt-key add -
# 安装
sudo apt update -y
sudo apt install cri-o cri-o-runc cri-tools -y
3 检查CRI-O
root@home:~# apt show cri-o
Package: cri-o
Version: 1.23.3~0
Priority: optional
Section: devel
Maintainer: Peter Hunt <[email protected]>
Installed-Size: 98.3 MB
Depends: libgpgme11, libseccomp2, conmon, containers-common (>= 0.1.27) | golang-github-containers-common, tzdata
Suggests: cri-o-runc | runc (>= 1.0.0), containernetworking-plugins
Replaces: cri-o-1.19, cri-o-1.20, cri-o-1.21, cri-o-1.22
Homepage: https://github.com/cri-o/cri-o
Download-Size: 19.9 MB
APT-Manual-Installed: yes
APT-Sources: http://download.opensuse.org/repositories/devel:/kubic:/libcontainers:/stable:/cri-o:/1.23/xUbuntu_18.04  Packages
Description: OCI-based implementation of Kubernetes Container Runtime Interface.

N: Ignoring file 'ystemctlqq' in directory '/etc/apt/sources.list.d/' as it has no filename extension
systemctl enable crio.service
systemctl start crio.service
root@home:~# systemctl status crio
● crio.service - Container Runtime Interface for OCI (CRI-O)
   Loaded: loaded (/usr/lib/systemd/system/crio.service; enabled; vendor preset: enabled)
   Active: active (running) since Wed 2022-07-13 01:26:03 CST; 16h ago
     Docs: https://github.com/cri-o/cri-o
 Main PID: 5338 (crio)
    Tasks: 15
   CGroup: /system.slice/crio.service
           └─5338 /usr/bin/crio
4 使用cri-o
root@home:~# crictl info
{
  "status": {
    "conditions": [
      {
        "type": "RuntimeReady",
        "status": true,
        "reason": "",
        "message": ""
      },
      {
        "type": "NetworkReady",
        "status": true,
        "reason": "",
        "message": ""
      }
    ]
  }
}
root@home:~# crictl images
IMAGE                                TAG                 IMAGE ID            SIZE
docker.io/calico/cni                 v3.23.2             a87d3f6f1b8fd       263MB
docker.io/calico/node                v3.23.2             a3447b26d32c7       224MB
docker.io/library/nginx              latest              41b0e86104ba6       146MB
k8s.gcr.io/coredns/coredns           v1.8.6              a4ca41631cc7a       47MB
k8s.gcr.io/etcd                      3.5.3-0             aebe758cef4cd       301MB
k8s.gcr.io/kube-apiserver            v1.24.2             d3377ffb7177c       131MB
k8s.gcr.io/kube-controller-manager   v1.24.2             34cdf99b1bb3b       121MB
k8s.gcr.io/kube-proxy                v1.24.2             a634548d10b03       112MB
k8s.gcr.io/kube-scheduler            v1.24.2             5d725196c1f47       52.3MB
k8s.gcr.io/pause                     3.6                 6270bb605e12e       690kB
k8s.gcr.io/pause                     3.7                 221177c6082a8       718kB
Centos(7)
VERSION=1.22
sudo curl -L -o /etc/yum.repos.d/devel:kubic:libcontainers:stable.repo https://download.opensuse.org/repositories/devel:kubic:libcontainers:stable/CentOS_7/devel:kubic:libcontainers:stable.repo
sudo curl -L -o /etc/yum.repos.d/devel:kubic:libcontainers:stable:cri-o:${VERSION}.repo https://download.opensuse.org/repositories/devel:kubic:libcontainers:stable:cri-o:${VERSION}/CentOS_7/devel:kubic:libcontainers:stable:cri-o:${VERSION}.repo
yum update -y
yum install cri-o cri-tools -y
3 查看cri-o版本
[root@node1 systemd]# rpm -qi cri-o
Name        : cri-o
Epoch       : 0
Version     : 1.22.5
Release     : 2.2.el7
Architecture: x86_64
Install Date: 2022年07月13日 星期三 01时36分47秒
Group       : Unspecified
Size        : 236845729
License     : ASL 2.0
Signature   : RSA/SHA256, 2022年07月10日 星期日 12时53分28秒, Key ID 4d64390375060aa4
Source RPM  : cri-o-1.22.5-2.2.el7.src.rpm
Build Date  : 2022年07月10日 星期日 12时53分00秒
Build Host  : sheep87
Relocations : (not relocatable)
Vendor      : obs://build.opensuse.org/devel:kubic
URL         : https://github.com/cri-o/cri-o
Summary     : Open Container Initiative-based implementation of Kubernetes Container Runtime Interface
Description :
Open Container Initiative-based implementation of Kubernetes Container Runtime
Interface.
4 启动cri-o
systemctl enable --now cri-o
5 查看cri-o状态
[root@node1 systemd]# systemctl status crio
● crio.service - Container Runtime Interface for OCI (CRI-O)
   Loaded: loaded (/usr/lib/systemd/system/crio.service; enabled; vendor preset: disabled)
   Active: active (running) since 三 2022-07-13 01:41:06 CST; 16h ago
     Docs: https://github.com/cri-o/cri-o
 Main PID: 24127 (crio)
    Tasks: 15
   Memory: 13.7M
   CGroup: /system.slice/crio.service
           └─24127 /usr/bin/crio
三台机都安装cri-o并启动。
K8S启动
在master上,跑下列命令:
kubeadm init --apiserver-advertise-address 192.168.1.150 --apiserver-bind-port 6443 --kubernetes-version 1.24.2 --pod-network-cidr 10.244.0.0/16
然后等5分钟,就创建了一个k8s集群的master node。
Your Kubernetes control-plane has initialized successfully!

To start using your cluster, you need to run the following as a regular user:

  mkdir -p $HOME/.kube
  sudo cp -i /etc/kubernetes/admin.conf $HOME/.kube/config
  sudo chown $(id -u):$(id -g) $HOME/.kube/config

Alternatively, if you are the root user, you can run:

  export KUBECONFIG=/etc/kubernetes/admin.conf

You should now deploy a pod network to the cluster.
Run "kubectl apply -f [podnetwork].yaml" with one of the options listed at:
  https://kubernetes.io/docs/concepts/cluster-administration/addons/

Then you can join any number of worker nodes by running the following on each as root:

kubeadm join 192.168.1.150:6443 --token gjxt6y.0wljlhfkjz90v12m --discovery-token-ca-cert-hash sha256:d69fc5929e442210c97ab85c05a8c2906f5819a74d5b0fa3481032d6a8f3fc07
在三台机上跑这三条命令
  mkdir -p $HOME/.kube
  sudo cp -i /etc/kubernetes/admin.conf $HOME/.kube/config
  sudo chown $(id -u):$(id -g) $HOME/.kube/config
否则会报错。
The connection to the server localhost:8080 was refused - did you specify the right host or port?
在以上所有内容都完成之后,我们可以看一下nodes或者pods
root@home:~# kubectl get nodes
NAME    STATUS   ROLES           AGE    VERSION
home    Ready    control-plane   179m   v1.24.2
node1   Ready    <none>          179m   v1.24.2
node2   Ready    <none>          179m   v1.24.2
root@home:~# kubectl get pods -A
NAMESPACE     NAME                           READY   STATUS    RESTARTS   AGE
kube-system   coredns-6d4b75cb6d-4wxjh       1/1     Running   0          179m
kube-system   coredns-6d4b75cb6d-7qxpv       1/1     Running   0          179m
kube-system   etcd-home                      1/1     Running   2          3h
kube-system   kube-apiserver-home            1/1     Running   2          3h
kube-system   kube-controller-manager-home   1/1     Running   2          3h
kube-system   kube-proxy-9w7mf               1/1     Running   0          179m
kube-system   kube-proxy-hpw6c               1/1     Running   0          179m
kube-system   kube-proxy-tbpr8               1/1     Running   0          179m
kube-system   kube-scheduler-home            1/1     Running   2          3h
Recommend
About Joyk
Aggregate valuable and interesting links.
Joyk means Joy of geeK