

初步认识低代码 - 彭加李
source link: https://www.cnblogs.com/pengjiali/p/16458405.html
Go to the source link to view the article. You can view the picture content, updated content and better typesetting reading experience. If the link is broken, please click the button below to view the snapshot at that time.

初步认识低代码
本篇主要介绍低代码是什么、低代码平台的分类、低代码能力指标、低代码平台的调查问卷,最后使用低代码前端框架 amis 初步搭建一个后台系统。
低代码是什么
低代码不是一个纯粹的编程工具,把它叫做生产力提高工具更为合适。
以前人们会在简历中写熟练使用 office等办公软件,以后人们可能会写熟练使用低代码平台(办公自动化的一种新能力)
程序员可以跟各个部门配合,把各种重复性的、最常用的流程沉淀成服务模块,在加上低代码平台或无代码平台,普通的办公人员(即非程序员,比如运营)就能用最简单、人性化的方式把它调用出来解决问题(或流程自动化),而无需额外的程序员投入。
简单的应用场景
某公司有个网上商城,每到大促期间,比如国庆节,运营就会要求开发许多活动页,通常一个活动页需要一个程序员约1天的时间,由于人力的限制,造成了开发需求和交付能力的差距。
该公司程序员小c通过和运营沟通,发现 90% 的活动页都很相似的,可以把这部分需求沉淀下来变成一个服务,另外的 10% 的活动页交由程序员定制开发。
最终小c花了2个月做了一个活动生成器(基于图形化拖拽、参数化配置,实现快速构建活动页的工具),据公司的运营反馈,大促期间,绝大多数的常规活动由运营自己通过活动生成器生成,无需程序员的额外投入,提高了生产力,解决了问题。
低代码平台的概念和分类
低代码这一概念由 Forrester 在 2014 年正式提出。
低代码,顾名思义,就是指开发者写很少的代码,通过低代码平台提供的界面、逻辑、对象、流程等可视化编排工具来完成大量的开发工作,降低软件开发中的不确定性和复杂性。实现软件的高效构建,无需重复传统的手动编程,同时兼顾业务人员和专业开发人员的更多参与。
广义的低代码:指所有可以帮助缺少编程基础的人员快速完成软件开发的技术和工具。
高德纳(Gartner) 认为,低代码主要有以下几个分支(或细分市场):
- 无代码开发平台
- 低代码应用平台(
LCAP) - 多重体验开发平台(
MXDP) - 智能业务流程管理套件(
iBPMS)
无代码开发平台
无代码开发平台(或“0代码”)属于低代码平台的一种,不提供或者仅支持有限的编程扩展能力。比如用来开发内部管理类或市场营销类表单。
如果需要没有专业开发人员协助的情况下进行“非编程开发”,可以考虑它。技术门槛低,需要注意工具的能力范围(应用场景有限),它们是专门为非编程人员设计的。
低代码应用平台(LCAP)
LCAP 属于狭义的低代码平台,是万金油类(什么都能应付)的产品,可用来开发前端和后端的应用。
这个市场囊括了大部分低代码技术供应商。
它通过声明式的模型驱动和基于元数据的服务来提供快速的应用开发、部署和执行。
多重体验开发平台(MXDP)
MXDP 提供快速开发跨平台 APP 的工具,一般用来开发多平台/多终端应用。
这类产品通常提供一套包含前端开发工具和后端服务的集成套件,使开发人员(有时甚至非开发人员)能够跨各种数字设备进行应用开发。
智能业务流程管理套件(iBPMS)
整合了AI 等技术的业务流程管理系统突出后端流程定义和数据整合能力,一般用于解决大型企业的跨系统业务流程。
Tip:低代码平台还可以根据其他维度进行分类,比如全栈平台还是仅前端页面、通用领域还是聚焦于 erp、crm、供应链等专业领域、开源的还是收费的、国内的还是国外的等等。
低代码的能力指标
高德纳(Gartner) 列出了低代码平台的 11 个关键能力指标。
Tip:在选择低代码平台的时候,这些指标可以给我们提供参考。
易用性是低代码平台生产力的关键指标,指在不写代码的情况下能完成功能的多少。
这个指标能够决定最终用户对开发者的评价。
比如给企业的客户或供应商的项目对用户体验的要求会高于企业内部用户使用的项目,对于内部(B2E)应用程序,简单的 web 表单或许就已满足。
- 数据建模和管理的便利性
这个指标就是通常所讲的”模型驱动“,模型驱动能够提供满足数据库设计范式的数据模型设计和管理能力。开发的应用复杂度越高,系统集成越高,这个能力就越关键。
- 流程与业务逻辑开发能力和效率
这个能力包含两点:
① 该低代码平台能否开发出复杂的工作流和业务。决定了项目是否可以成功交付
② 开发这些功能的便利性和易用性。决定了项目的开发成本。
- 开发平台的生态系统
低代码平台的本质是开发工具,内置的、开箱即用的功能无法覆盖全部的应用场景。这时,就得基于该平台的生态系统来提供更深入、更全面的开发能力。很多开发平台都在建立自己的插件机制,这也是平台生态的一个典型体现。
- 编程接口和系统集成能力
为避免数据孤岛,企业级应用通常需要与其他系统进行集成,协同增效。此时,内置的集成能力和编程接口就变得至关重要。除非确认在可预期的未来,项目不涉及系统集成和扩展开发。
- 支持更先进的架构和技术
开发出来的应用是否支持更先进的架构,比如对接IoT(物联网)、机器学习
此时深入了解低代码平台产品的架构就尤为重要
服务质量指通常所说的”无故障使用时间“。
- 用户模型与软件生命周期的支持
软件开发整个生命周期,除了开发和交付,还有设计、测试、运维等环节。比如系统开发早期的用户模型建立和验证过程通常需要快速模拟和迭代,投入的开发力量甚至不少于正式开发。
如果一套低代码平台具备全生命周期所需的各项功能,将会大大简化开发者的技术栈,进一步提高工作效率。
开发的系统规模越大,这一能力就越重要。
开发管理用于帮助开发团队负责人,降低软件开发管理过程中的各种人为风险。例如代码库权限管理、版本权限管理、发布权限管理。
现代软件开发中的敏捷开发能否在低代码中落地,也是衡量开发管理的重要指标。
开发规模越大,该指标越应当关注。
- 安全与合规
大型企业、特定行业企业(如军工、金融)通常对该指标的关注程度要更高一些。
该功能的具体体现有:支持本地部署、全SSL数据传输、密码强度策略、跨域访问控制、细粒度的用户权限控制等等
低代码平台的调查问卷
2018 年,高德纳(Gartner)追踪了 200 多家低代码开发工具供应商,对这些供应商进行了调查,发现在回应的 82 家供应商中,有 40% 的低代码供应商,每年可以从超过 54,000 个最终用户组织中收取 25 亿美元的工具收入(包括许可和订阅)。
在这些供应商中:
- 85% 的供应商认为自己是覆盖了用户体验、逻辑和数据的
全栈,而不是专门处理应用程序的一部分 - 96% 的供应商认为自己提供了
完整的软件开发生命周期(SDLC),而不仅仅是设计和开发的加速器 - 88% 的供应商提供了
公有云部署,62% 的供应商提供了私有云部署能力 - 84% 的供应商提供了 WebIDE(在线集成开发环境),30% 的供应商提供了桌面 IDE
- 78% 的供应商将
数据库作为其工具的一部分 - 47% 的供应商生成的代码在大多数情况下可以进行
手工编辑 - 79% 的供应商提供
基于表单的用户界面,62% 的提供移动应用程序界面,而 5% 不到的提供了聊天机器人 - 95% 的供应商目标客户是业务线开发人员(技术型非编程开发人员)的前三个开发人员角色,而 40% 的供应商选择的头部开发人员角色是业务高级用户(业务型非编程开发人员)
- 55% 的供应商的主要终端用户类型是 B2E(企业对雇员),而 B2B(企业与企业) 和 B2C 的占比分别为 20% 和 25%
Tip:数据来源 Low-Code Development Technologies Evaluation Guide,仅作参考。
低代码平台 amis
实践出真理。我们尝试使用 amis 做一个后台系统。
amis 是什么
amis 是一个低代码前端框架,它使用 JSON 配置来生成页面,可以减少页面开发工作量,极大提升效率。—— amis 官网
此刻(2022/07/08)在 github 上有 11.3k 的 Star。
amis 是百度的一个低代码平台。它不是全栈平台,仅处理应用程序的一部分,也就是前端页面。
终端用户类型不是B2C(企业对客户),他专注于中后台页面。虽然提供了大量常规UI组件,但对于面向普通客户(toC)的页面,往往追求个性化的视觉效果。
易用性方面,通过 json 配置来生成页面。
目标用户包括普通用户和开发者,据官网介绍:
- 没写过前端页面的人员可以做出专业且复杂的后台界面,做出来的页面不需要经过二次开发就能直接上线。
- 支持扩展。支持90%低代码,10%代码开发的混合模式,既提升效率,又不失灵活。
文档直接看amis 官网。文档内容很多,光组件倘若每个都用一下,至少得一天以上,笔者就不一一介绍,这里稍微提几个我们就马上开始实战:
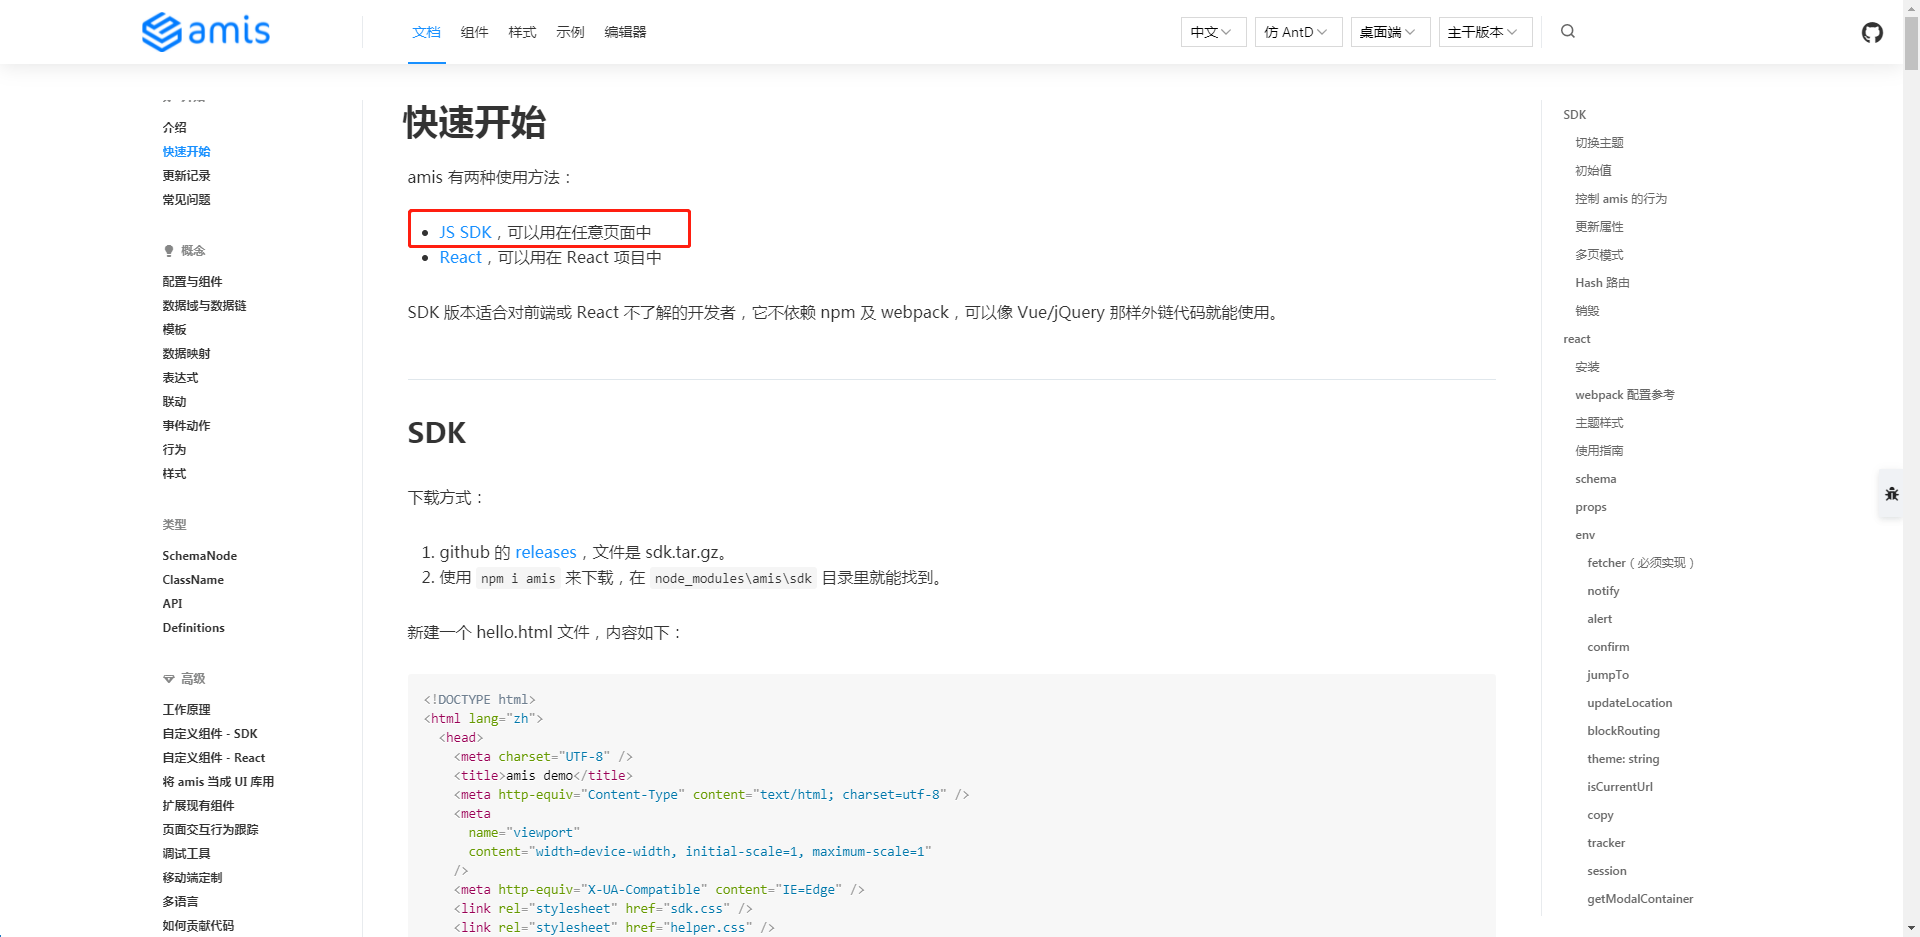
amis 有两种使用方法,笔者这里使用 JS SDK 的方式:
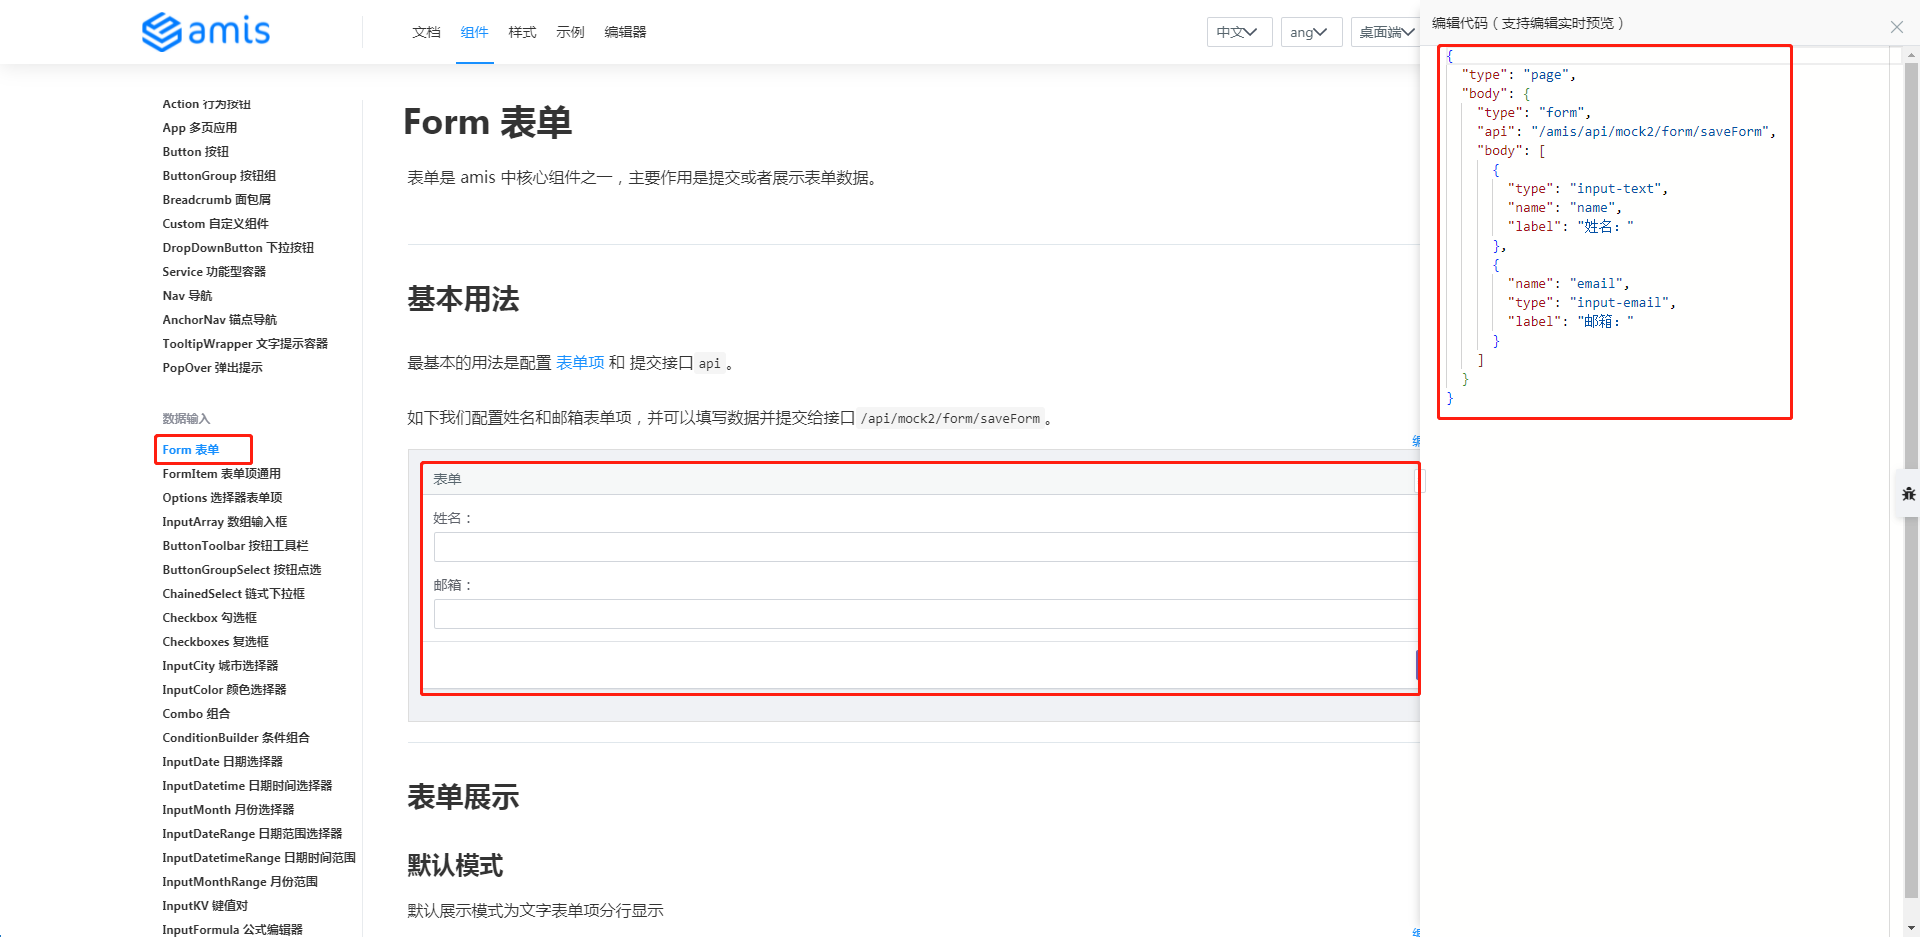
比如要实现某个样式的表单,需要的 json 配置文件就在右侧的编辑代码处:
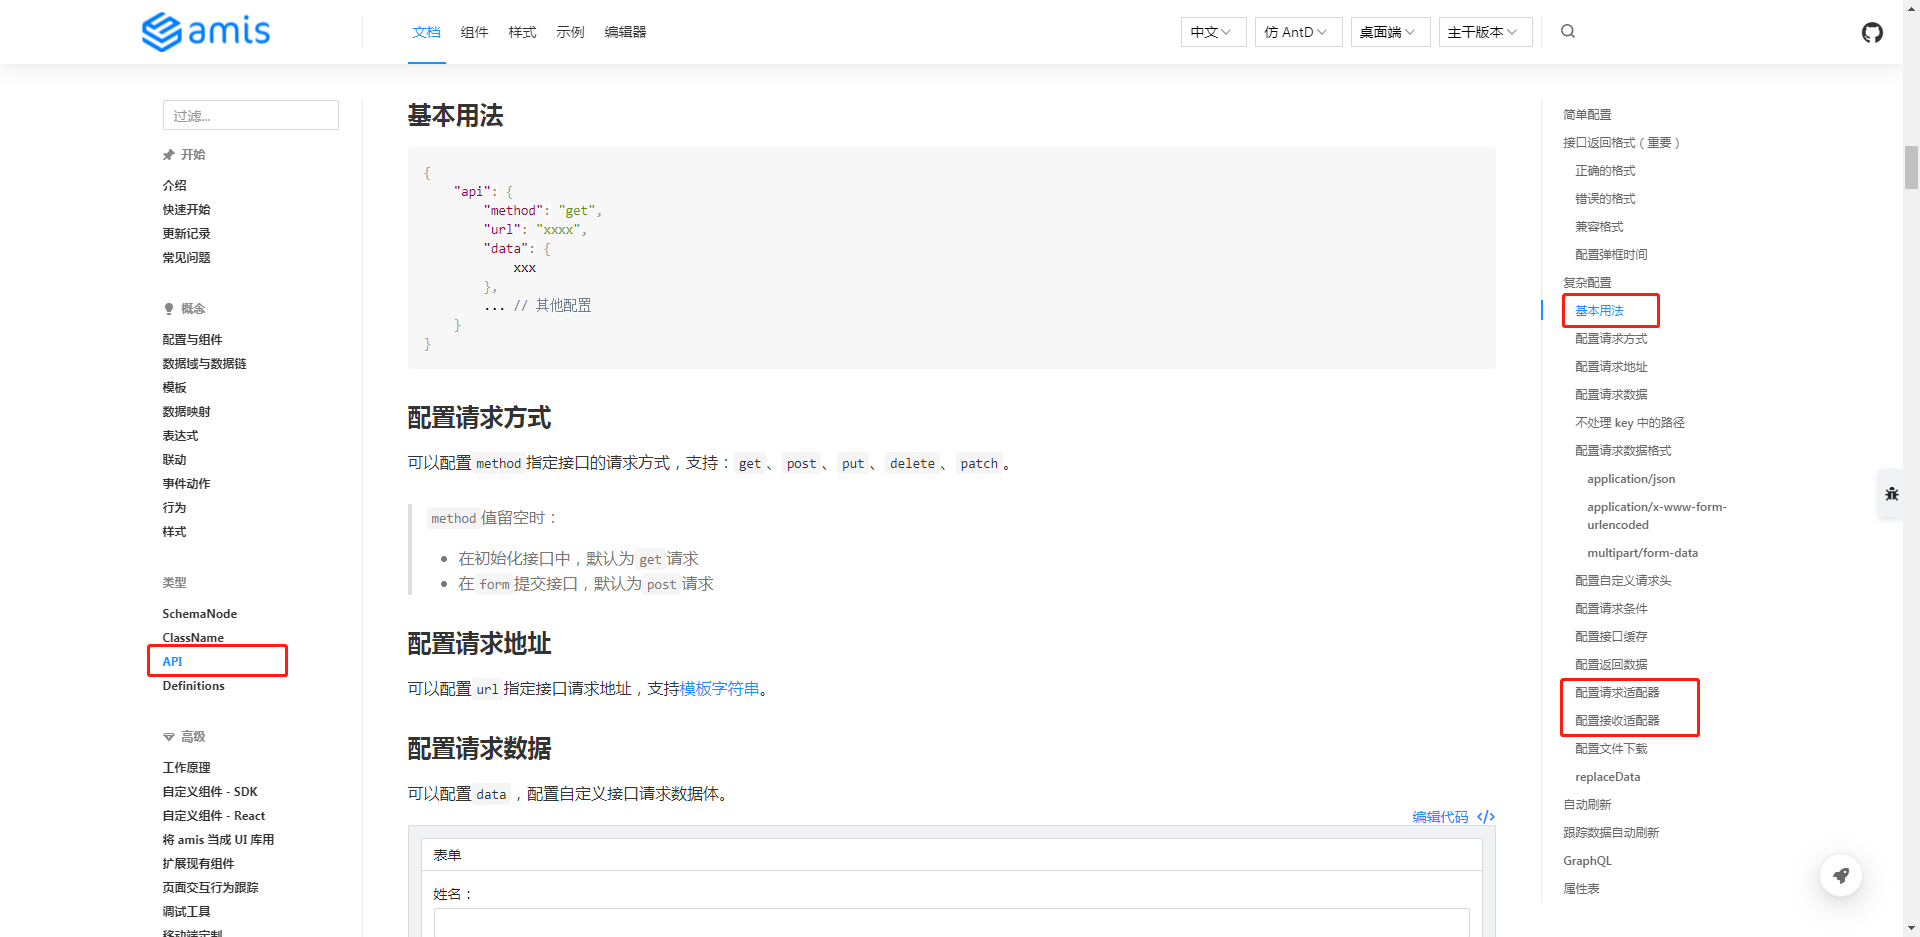
得发送接口出去,所以 API 这一篇得看一下:
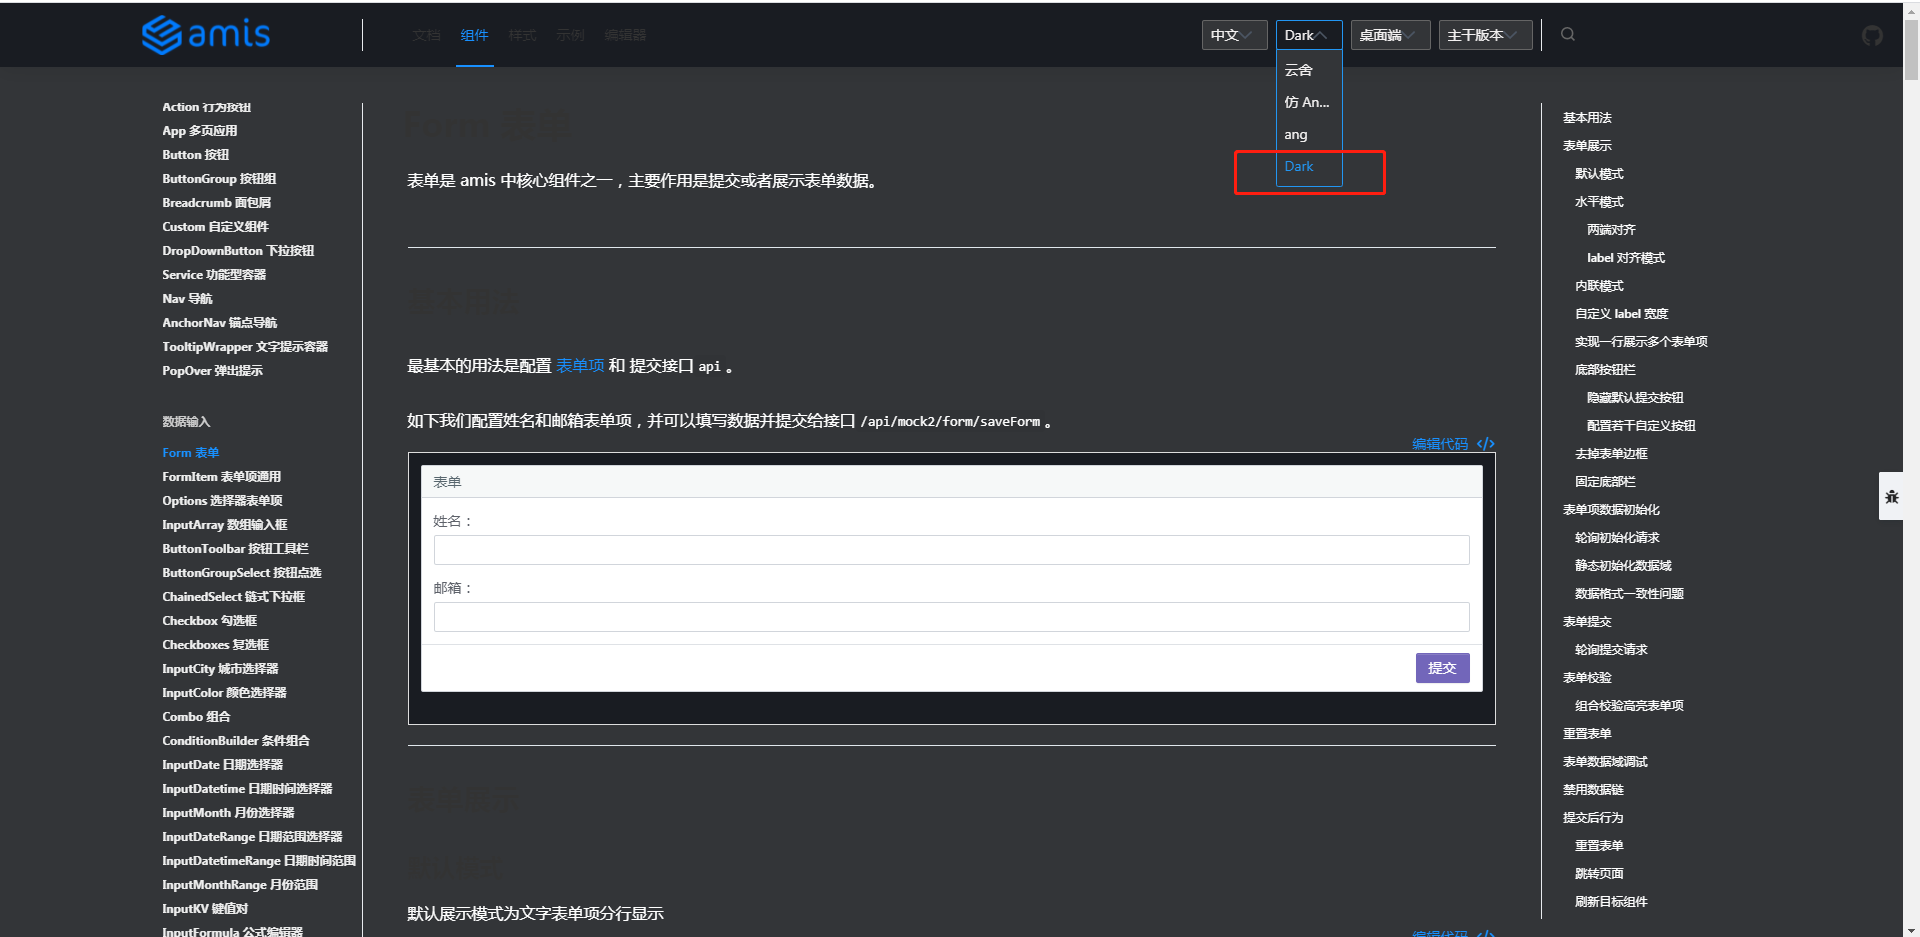
amis 提供了4种(云舍、Antd、ang、Dark)主题样式,比如选择Dark,样式变黑了:
通过 amis 做初步搭建一个后台系统,包含登录和一个一级模块(任务计划),任务计划中包含列表,还有增加、删除、编辑和查询。
项目初始化
amis 提供两种使用方法:一种是用在 react(react 方式) 项目中,一种是对前端不甚了解的开发者(即 JS SDK 方式)。
笔者选用 JS SDK 方式。先用起来再说,笔者相信同样的需求用另一种方式(react)应该也能够实现。
新建项目 amis-test:
// 新建项目
$ mkdir amis-test

// 通过 npm 初始化项目
amis-test> npm init -y
通过 npm i amis 下载包,但报错如下:
amis-test> npm i amis
npm ERR! code ERESOLVE
npm ERR! ERESOLVE unable to resolve dependency tree
npm ERR!
npm ERR! Found: [email protected]
npm ERR! node_modules/react
npm ERR!   peer react@">=16.8.6" from [email protected]
npm ERR!   node_modules/amis
npm ERR!     amis@"*" from the root project
npm ERR!   peer react@"^18.2.0" from [email protected]
npm ERR!   node_modules/react-dom
npm ERR!     peer react-dom@">=16.8.6" from [email protected]
npm ERR!     node_modules/amis
npm ERR!       amis@"*" from the root project
npm ERR!     peer react-dom@">=16.8.6" from [email protected]
npm ERR!     node_modules/amis-core
npm ERR!       amis-core@"*" from [email protected]
npm ERR!       node_modules/amis
npm ERR!         amis@"*" from the root project
npm ERR!       1 more (amis-ui)
npm ERR!     1 more (amis-ui)
npm ERR!   2 more (amis-core, amis-ui)
npm ERR!
npm ERR! Could not resolve dependency:
npm ERR! peer react@"^16.3.2 || ^17.0.0" from [email protected]
npm ERR! node_modules/amis/node_modules/ansi-to-react
npm ERR!   ansi-to-react@"^6.1.6" from [email protected]
npm ERR!   node_modules/amis
npm ERR!     amis@"*" from the root project
npm ERR!
npm ERR! Fix the upstream dependency conflict, or retry
npm ERR! this command with --force, or --legacy-peer-deps
npm ERR! to accept an incorrect (and potentially broken) dependency resolution.
npm ERR!
换一种下载方式:
github 的 releases,文件是 sdk.tar.gz —— 官网_快速开始
chrome 下载失败、edge 下载成功,解压到项目根目录。
hello-world
新建文件 hello-world.html,内容直接拷贝于官网(快速开始):
<!DOCTYPE html>
<html lang="zh">
  <head>
    <meta charset="UTF-8" />
    <title>amis demo</title>
    <meta http-equiv="Content-Type" content="text/html; charset=utf-8" />
    <meta
      name="viewport"
      content="width=device-width, initial-scale=1, maximum-scale=1"
    />
    <meta http-equiv="X-UA-Compatible" content="IE=Edge" />
    <link rel="stylesheet" href="sdk.css" />
    <link rel="stylesheet" href="helper.css" />
    <link rel="stylesheet" href="iconfont.css" />
    <!-- 这是默认主题所需的,如果是其他主题则不需要 -->
    <!-- 从 1.1.0 开始 sdk.css 将不支持 IE 11,如果要支持 IE11 请引用这个 css,并把前面那个删了 -->
    <!-- <link rel="stylesheet" href="sdk-ie11.css" /> -->
    <!-- 不过 amis 开发团队几乎没测试过 IE 11 下的效果,所以可能有细节功能用不了,如果发现请报 issue -->
    <style>
      html,
      body,
      .app-wrapper {
        position: relative;
        width: 100%;
        height: 100%;
        margin: 0;
        padding: 0;
      }
    </style>
  </head>
  <body>
    <div id="root" class="app-wrapper"></div>
    <script src="sdk.js"></script>
    <script type="text/javascript">
      (function () {
        let amis = amisRequire('amis/embed');
        // 通过替换下面这个配置来生成不同页面
        let amisJSON = {
          type: 'page',
          title: '表单页面',
          body: {
            type: 'form',
            mode: 'horizontal',
            api: '/saveForm',
            body: [
              {
                label: 'Name',
                type: 'input-text',
                name: 'name'
              },
              {
                label: 'Email',
                type: 'input-email',
                name: 'email'
              }
            ]
          }
        };
        let amisScoped = amis.embed('#root', amisJSON);
      })();
    </script>
  </body>
</html>
Tip:amis-test 项目结构如下:
$ ls
hello-world.html  package.json  package-lock.json  sdk/
需要更改一下 css、js 资源引用路径。更改内容:
$ git diff
diff --git a/hello-world.html b/hello-world.html
...
-    <link rel="stylesheet" href="sdk.css" />
-    <link rel="stylesheet" href="helper.css" />
-    <link rel="stylesheet" href="iconfont.css" />
+    <link rel="stylesheet" href="./sdk/sdk.css" />
+    <link rel="stylesheet" href="./sdk/helper.css" />
+    <link rel="stylesheet" href="./sdk/iconfont.css" />
...
-    <script src="sdk.js"></script>
+    <script src="./sdk/sdk.js"></script>
     ...
页面效果如下:
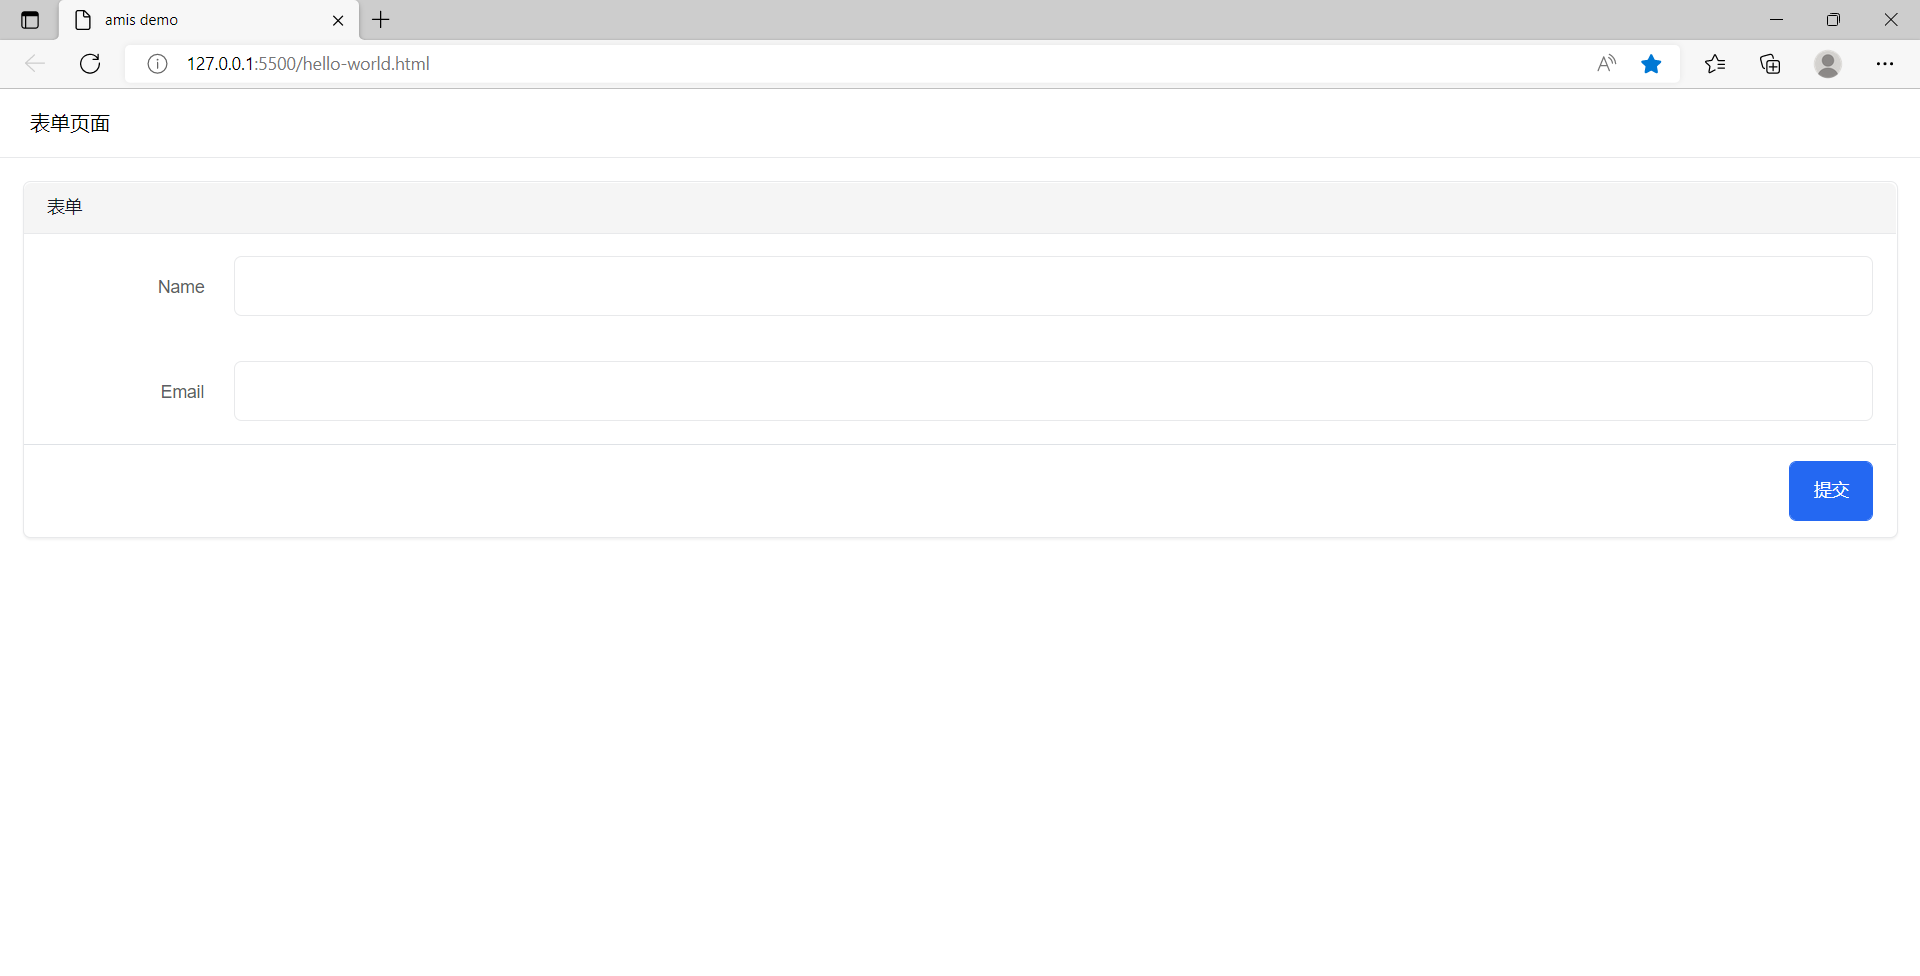
Tip:笔者使用 vscode 的 live Server 插件,可直接右键启动一服务预览该页面。
为了方便演示,笔者使用 Node+Express 实现后端接口。
Tip: 用其他方式实现后端服务也是没有问题的。有关 Express 的介绍可以看 这里
最初目录结构如下:
$ ls
hello-world.html  package.json  package-lock.json  sdk/
执行如下操作:
- 新建
public文件夹,并将 skd 目录、hello-world.html 放到 public 文件夹中。 - 修改
hello-world.html的配置部分(amisJSON) - 新建
home.html。这是一个普通的 html 页面,登录成功后跳转至此页 - 重写服务
server.js,其中数据库用对象模拟,直接放于内存。
调整后的目录结构如下:
$ ll
total 125
drwxr-xr-x 1 Administrator 197121     0 Jun  4 13:49 node_modules/
-rw-r--r-- 1 Administrator 197121 56939 Jun  4 13:49 package-lock.json
-rw-r--r-- 1 Administrator 197121   348 Jun  4 13:49 package.json
drwxr-xr-x 1 Administrator 197121     0 Jun  4 14:38 public/
-rw-r--r-- 1 Administrator 197121  1002 Jun  4 15:08 server.js
Administrator@ /e/pengjiali/amis-test/public (master)
$ ll
total 13
-rw-r--r-- 1 Administrator 197121 3023 Jun  4 14:47 hello-world.html
-rw-r--r-- 1 Administrator 197121  278 Jun  4 11:24 home.html
drwxr-xr-x 1 Administrator 197121    0 Jun  3 16:35 sdk/
server.js 会开启一个服务,并将 public目录作为静态资源对外开放,能接收前端请求,并存入数据库并返回接口数据。
// server.js
const path = require('path')
const express = require('express')
const app = express()
const port = 3000

app.use(express.json()) // for parsing application/json
app.use(express.urlencoded({ extended: true })) // for parsing application/x-www-form-urlencoded

// 将静态资源对外开放
app.use('/public', express.static(path.join(__dirname, 'public')))

// 登录接口
app.post('/api/login', function (req, res) {
    const {name, password} = req.body

    // 存在该用户
    if(db.selectUser(name, password).length){
        res.json({"status": 0, "msg": "登录成功", data:{token: 'token00001'}})
    }else{
        res.json({"status": 1, "msg": "用户名密码错误。请试试 admin/123456"})
    }
});

// 开启服务
app.listen(port, () => {
  console.log(`Example app listening at http://localhost:${port}`)
})

// 处理 404 响应
app.use(function (req, res, next) {
    res.status(404).send("404")
})

// 模拟数据库
class DB{
    constructor(){
        this.database = {
            userTable: [
                {name: 'a', password: 'a'},
                {name: 'admin', password: '123456'},
            ]
        }
    }
    selectUser(name, password){
        const table = this.database.userTable
        return table.filter(item => item.name === name && item.password === password)
    }
}
const db = new DB()
// public/hello-world.html
...
<body>
    <div id="root" class="app-wrapper"></div>
    <script src="./sdk/sdk.js"></script>
    <script type="text/javascript">
        (function () {
            let amis = amisRequire('amis/embed');
            // 通过替换下面这个配置来生成不同页面
            let amisJSON = {
                type: 'page',
                title: '精美效能登录',
                body: {
                    type: 'form',
                    mode: 'horizontal',
                    api: {
                        method: 'post',
                        url: '/api/login',
                        adaptor: function (payload, response) {
                            if (payload.status === 0) {
                                localStorage.setItem('token', payload.data.token)
                            }
                            console.log('payload', payload)
                            return payload
                        }
                    },
                    // 官网 -> 组件 -> Form 表单 -> 页面跳转
                    redirect: "/public/home.html",
                    body: [
                        {
                            label: '姓名',
                            type: 'input-text',
                            name: 'name'
                        },
                        {
                            label: '密码',
                            type: 'input-password',
                            name: 'password'
                        }
                    ]
                }
            };
            let amisScoped = amis.embed('#root', amisJSON);
        })();
    </script>
</body>
// public/home.html
<!DOCTYPE html>
<html lang="en">
<head>
    <meta charset="UTF-8">
    <meta http-equiv="X-UA-Compatible" content="IE=edge">
    <meta name="viewport" content="width=device-width, initial-scale=1.0">
    <title>主页</title>
</head>
<body>
    主页
</body>
</html>
启动服务:
Administrator@ /e/pengjiali/amis-test (master)
$ nodemon server.js
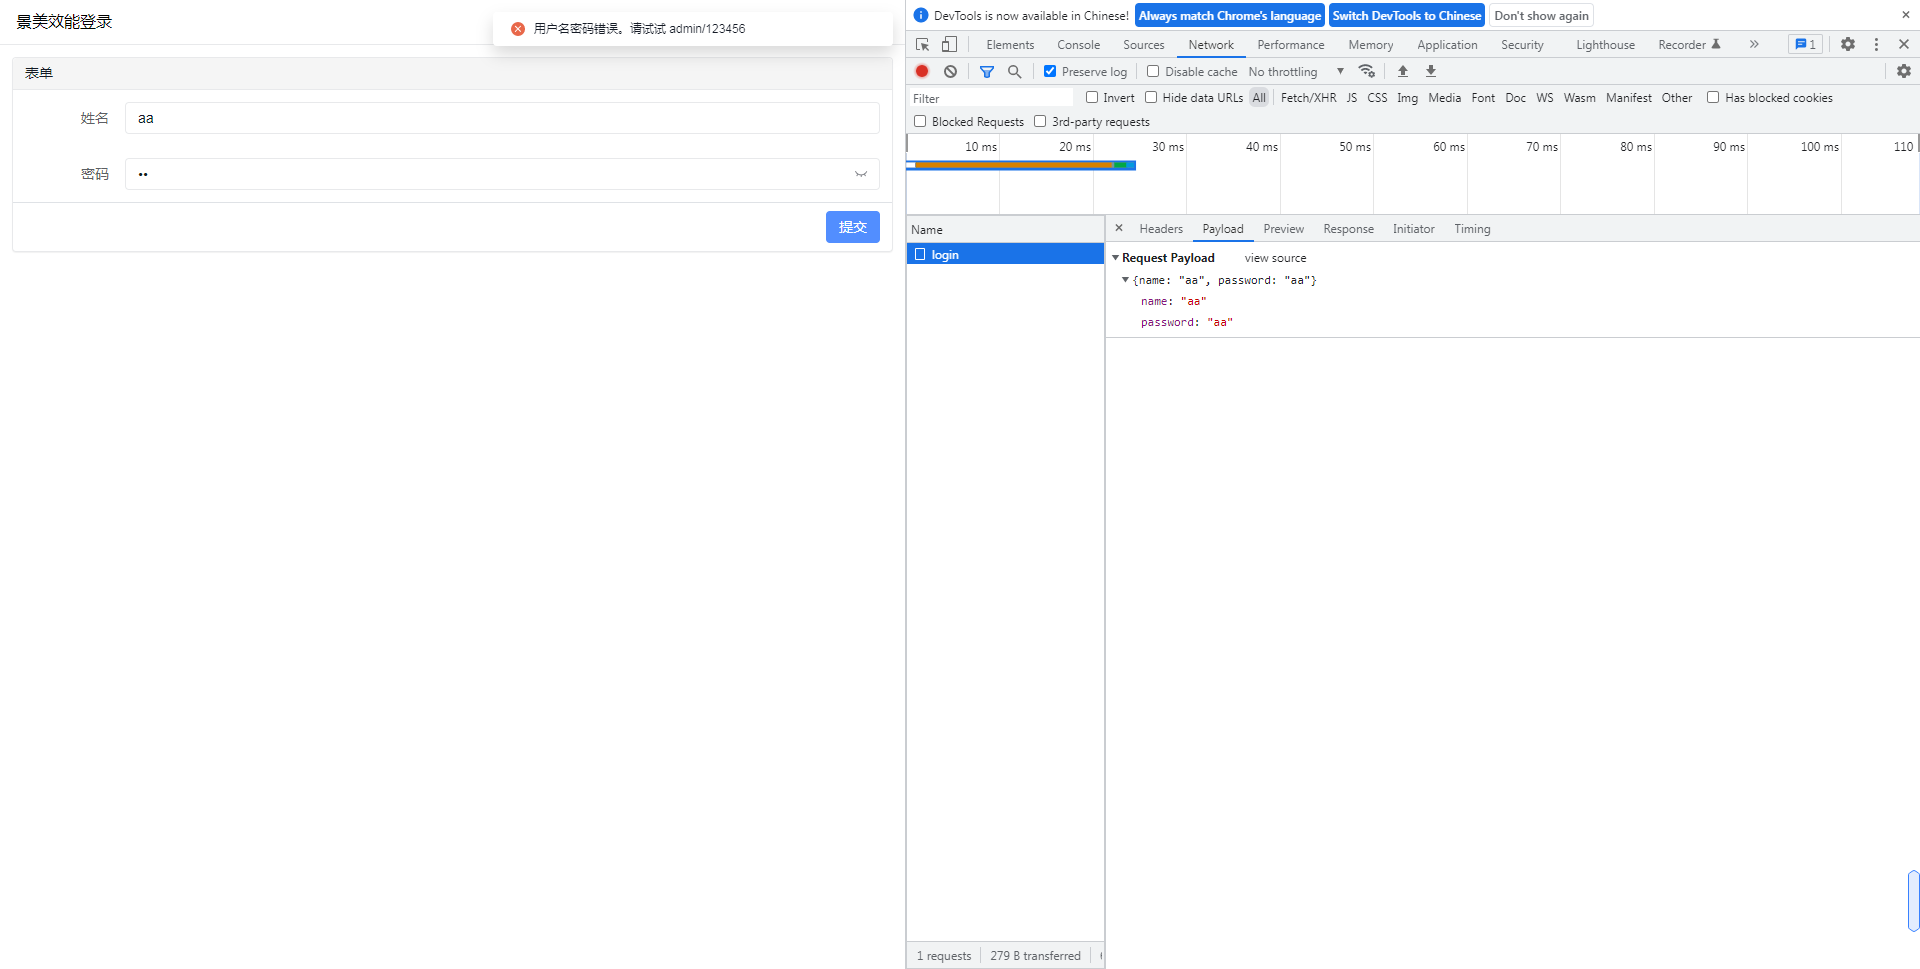
输入正确的用户名密码,点击登录,就会跳转到系统主页。
笔者最初是用 express 做一个服务,并想通过第三方插件 cors(Node.js CORS middleware) 解决跨域问题,但终究未能成功。报错如下:
Access to XMLHttpRequest at 'http://127.0.0.1:3000/login' from origin 'http://localhost:5500' has been blocked by CORS policy: Response to preflight request doesn't pass access control check: The value of the 'Access-Control-Allow-Origin' header in the response must not be the wildcard '*' when the request's credentials mode is 'include'. The credentials mode of requests initiated by the XMLHttpRequest is controlled by the withCredentials attribute.
于是笔者换一种方式:不跨域了。将前端和后端代码写在一起。直接利用 Express 托管静态文件,也就是上面的解决方案。
引入后台模板
amis 在 github 的 readme.md 中提供了一个后台模板(amis-admin),我们将其引入。
解压完毕后的目录结构如下:
Administrator /d/Downloads/amis-admin-master
$ ll
total 22
-rw-r--r-- 1 Administrator 197121  458 Dec 21  2021 README.md
-rw-r--r-- 1 Administrator 197121 6184 Dec 21  2021 index.html
-rw-r--r-- 1 Administrator 197121   54 Dec 21  2021 nodemon.json
-rw-r--r-- 1 Administrator 197121  647 Dec 21  2021 package.json
drwxr-xr-x 1 Administrator 197121    0 Dec 21  2021 pages/
drwxr-xr-x 1 Administrator 197121    0 Dec 21  2021 public/
-rw-r--r-- 1 Administrator 197121 1077 Dec 21  2021 server.js
将 index.html 和 pages 拷贝到 public 目录,并将 index.html 重命名为 home.html。
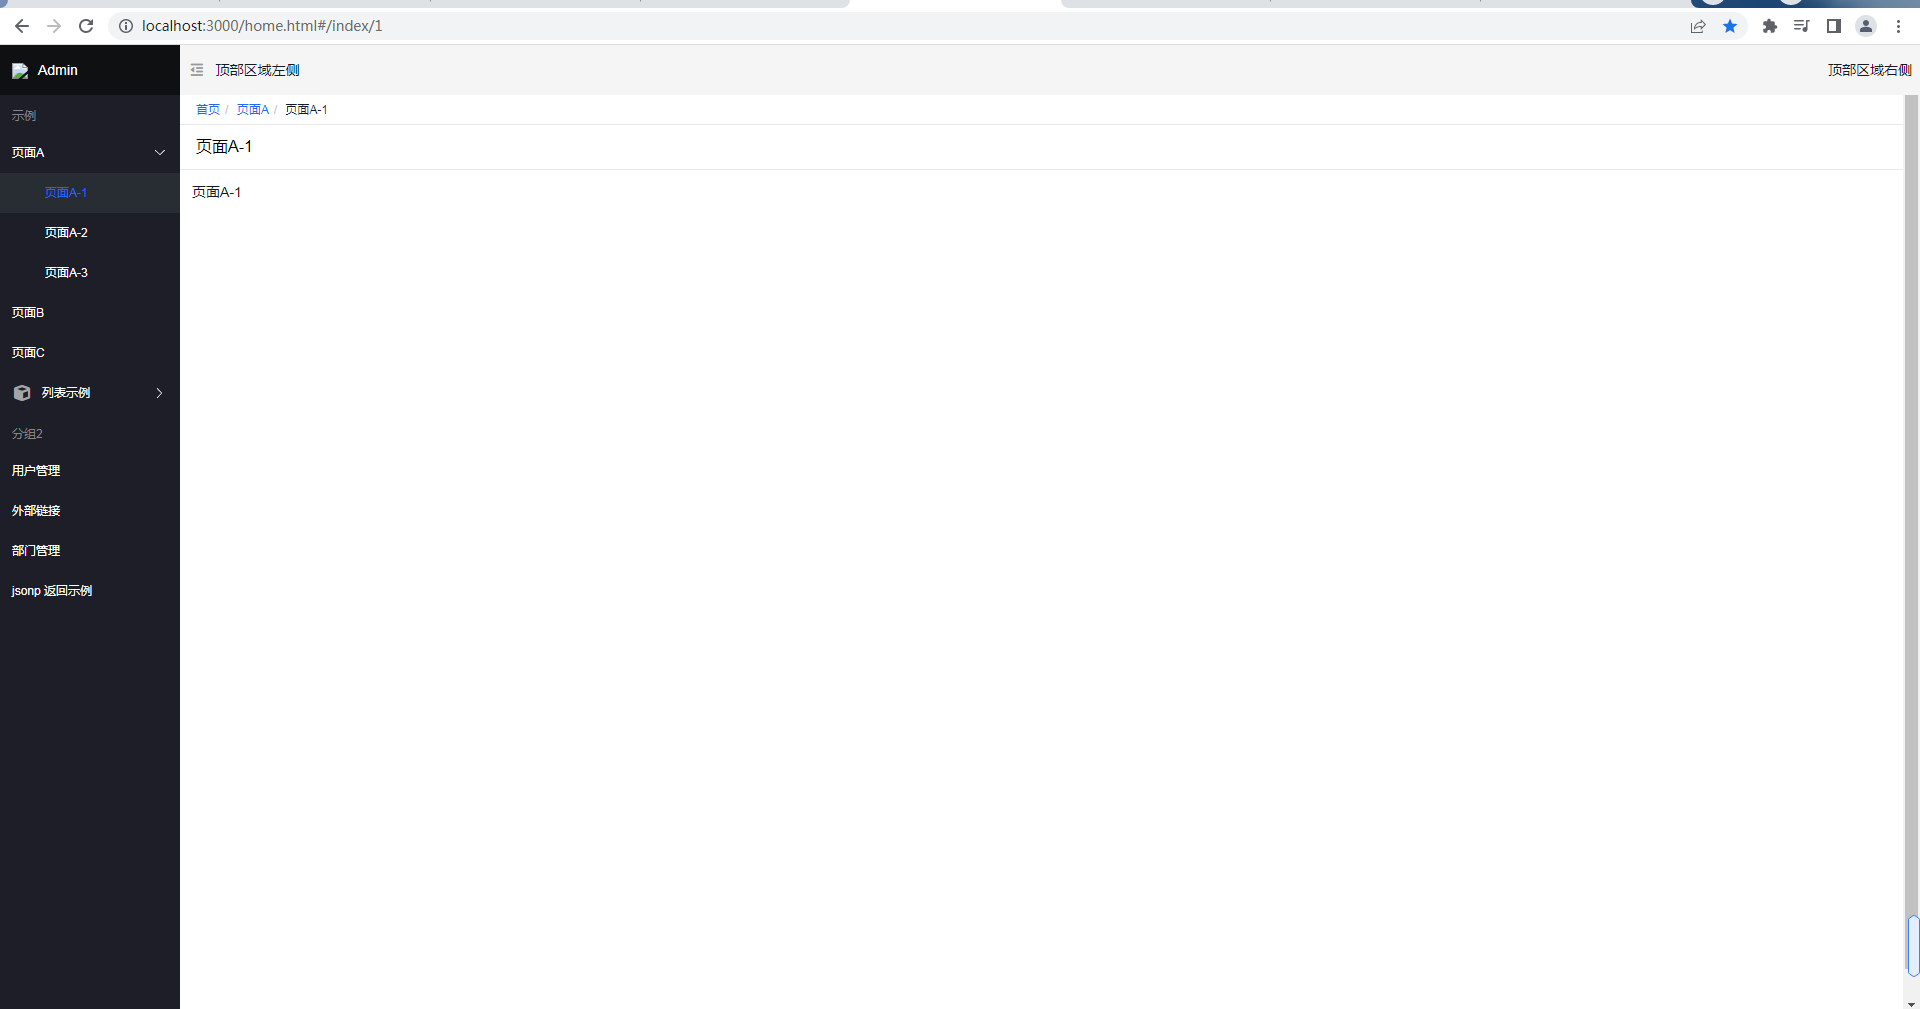
直接访问 http://localhost:3000/home.html,界面如下:
任务计划初始化
接着我们将后台模板精简一下,将任务计划初始页完成。
pages 中只有一个 js 文件,其他都是 .json 文件。
Administrator@ /e/pengjiali/amis-test/public/pages (master)
$ ll
total 43
-rw-r--r-- 1 Administrator 197121   66 Dec 21  2021 console.json
-rw-r--r-- 1 Administrator 197121 8023 Dec 21  2021 crud-advance.json
-rw-r--r-- 1 Administrator 197121 1385 Dec 21  2021 crud-edit.json
-rw-r--r-- 1 Administrator 197121 3966 Dec 21  2021 crud-list.json
-rw-r--r-- 1 Administrator 197121 1425 Dec 21  2021 crud-new.json
-rw-r--r-- 1 Administrator 197121 1341 Dec 21  2021 crud-view.json
-rw-r--r-- 1 Administrator 197121  368 Dec 21  2021 editor.json
-rw-r--r-- 1 Administrator 197121 5847 Dec 21  2021 form-basic.json
-rw-r--r-- 1 Administrator 197121  202 Dec 21  2021 jsonp.js
-rw-r--r-- 1 Administrator 197121 3282 Dec 21  2021 site.json
-rw-r--r-- 1 Administrator 197121 2636 Dec 21  2021 wizard.json
保留唯一的 js 文件和 site.json,其他都删除。并将 jsonp.js 重命名为 schedule.js。
// site.json
{
  "status": 0,
  "msg": "",
  "data": {
    "pages": [
      {
        "label": "Home",
        "url": "/",
        "redirect": "/index/1"
      },
      {
        "children": [
          {
            "label": "任务计划",
            "schemaApi": "jsonp:/pages/schedule.js?callback=jsonpCallback"
          }

        ]
      }

    ]
  }
}
// schedule.js
(function() {
	const response = {
		data: {
			type: "page",
			title: "标题",
			body: "this result is from jsonp"
		},
		status: 0
	}

	window.jsonpCallback && window.jsonpCallback(response);
})();
Tip: site.json 是网站配置,这里只保留一个一级菜单;schedule.js 是一级菜单的配置文件,这里单独提取出来,方便维护。也能写注释,.json 文件中不能写注释,页面会报错的;
最后稍微修改一下 home.html,比如 logo、主题改为antd:
$ git diff  ../home.html
warning: LF will be replaced by CRLF in public/home.html.
The file will have its original line endings in your working directory
diff --git a/public/home.html b/public/home.html
index 59ee0fa..bddb186 100644
--- a/public/home.html
+++ b/public/home.html
@@ -12,7 +12,7 @@
     <link
       rel="stylesheet"
       title="default"
-      href="https://unpkg.com/amis@beta/sdk/sdk.css"
+      href="https://unpkg.com/amis@beta/sdk/antd.css"
     />
     <link
       rel="stylesheet"
@@ -47,13 +47,13 @@

         const app = {
           type: 'app',
-          brandName: 'Admin',
-          logo: '/public/logo.png',
+          brandName: '后台系统',
+          logo: 'https://aisuda.bce.baidu.com/amis/static/logo_408c434.png',
           header: {
             type: 'tpl',
             inline: false,
             className: 'w-full',
-            tpl: '<div class="flex justify-between"><div>顶部区域左侧</div><div>顶部区域右侧</div></div>'
+            tpl: '<div class="flex justify-between"><div></div><div>退出登录</div></div>'
           },
           // footer: '<div class="p-2 text-center bg-light">底部区域</div>',
           // asideBefore: '<div class="p-2 text-center">菜单前面区域</div>',
@@ -183,7 +183,7 @@
               }
             },
             isCurrentUrl: isCurrentUrl,
-            theme: 'cxd'
+            theme: 'antd'
           }
         );
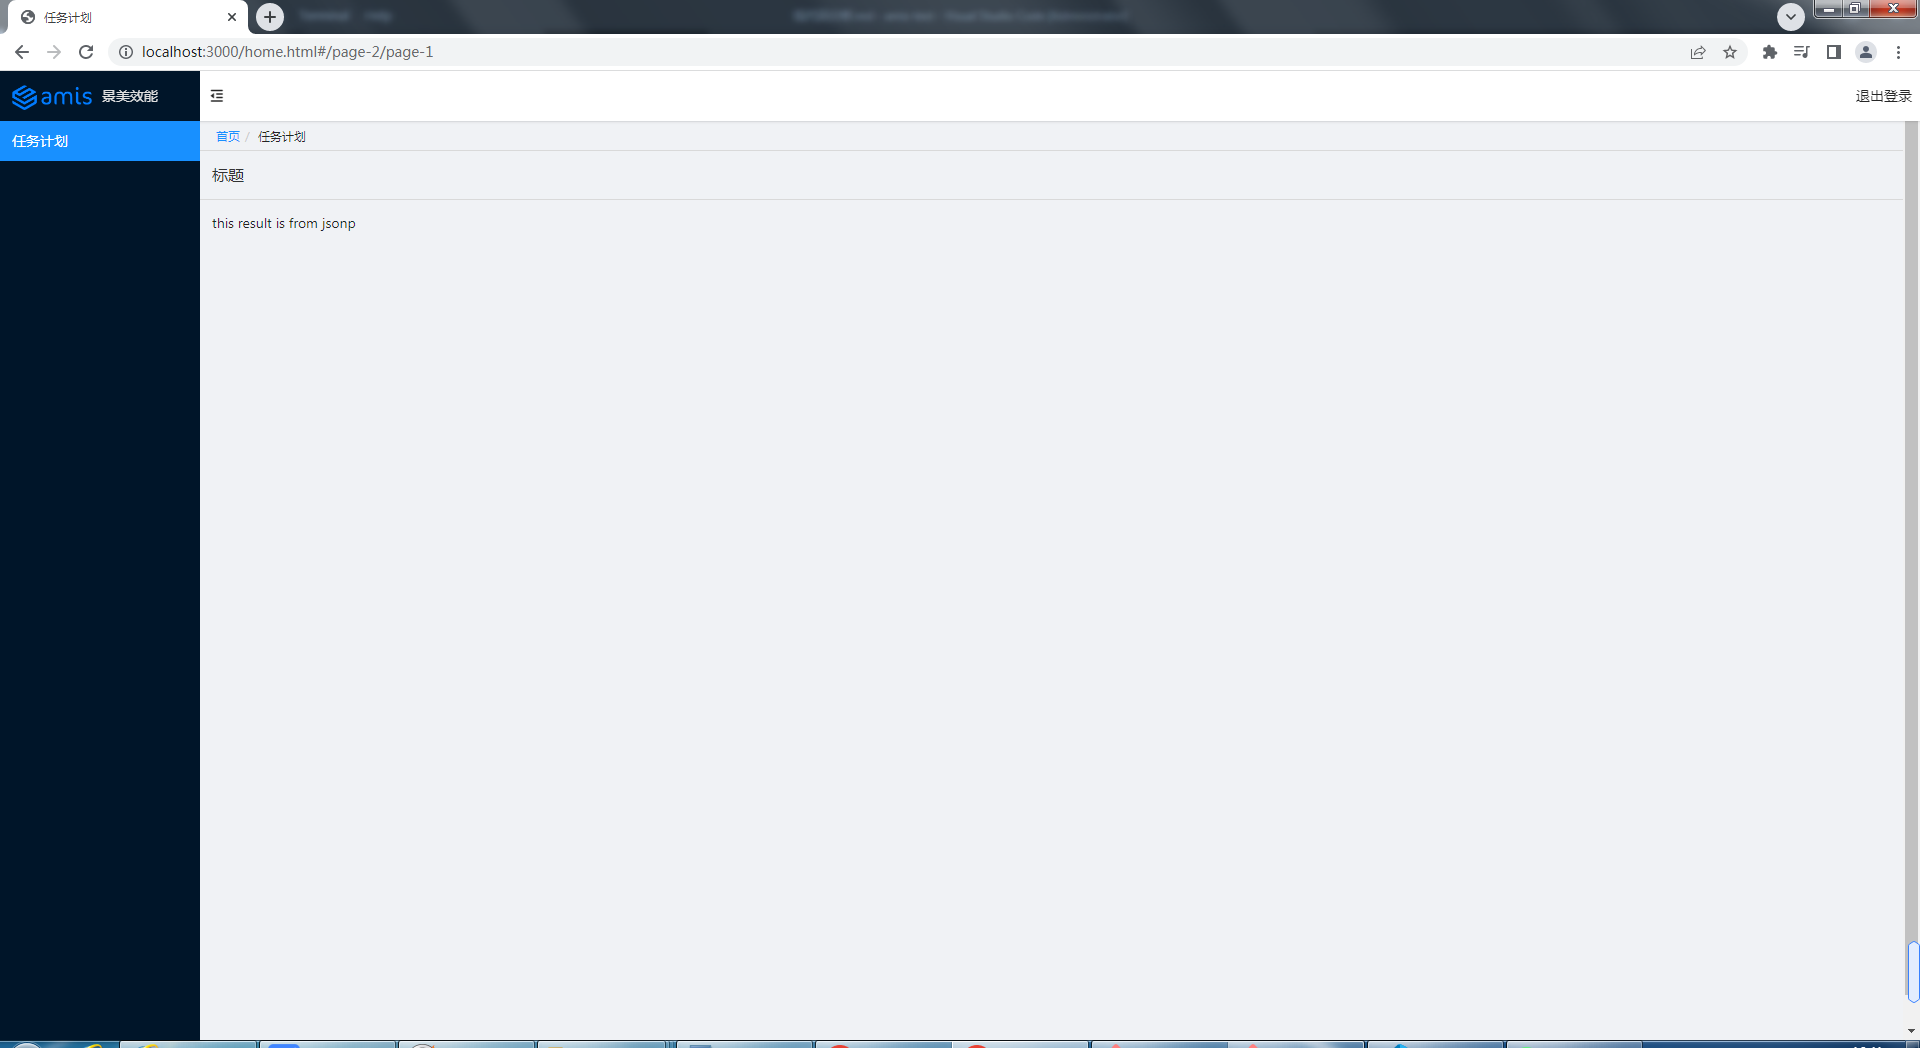
最终效果如下图所示:
任务计划列表
我们首先给任务计划添加表格列表的功能。根据官网 table 示例,将配置赋值给 response 变量:
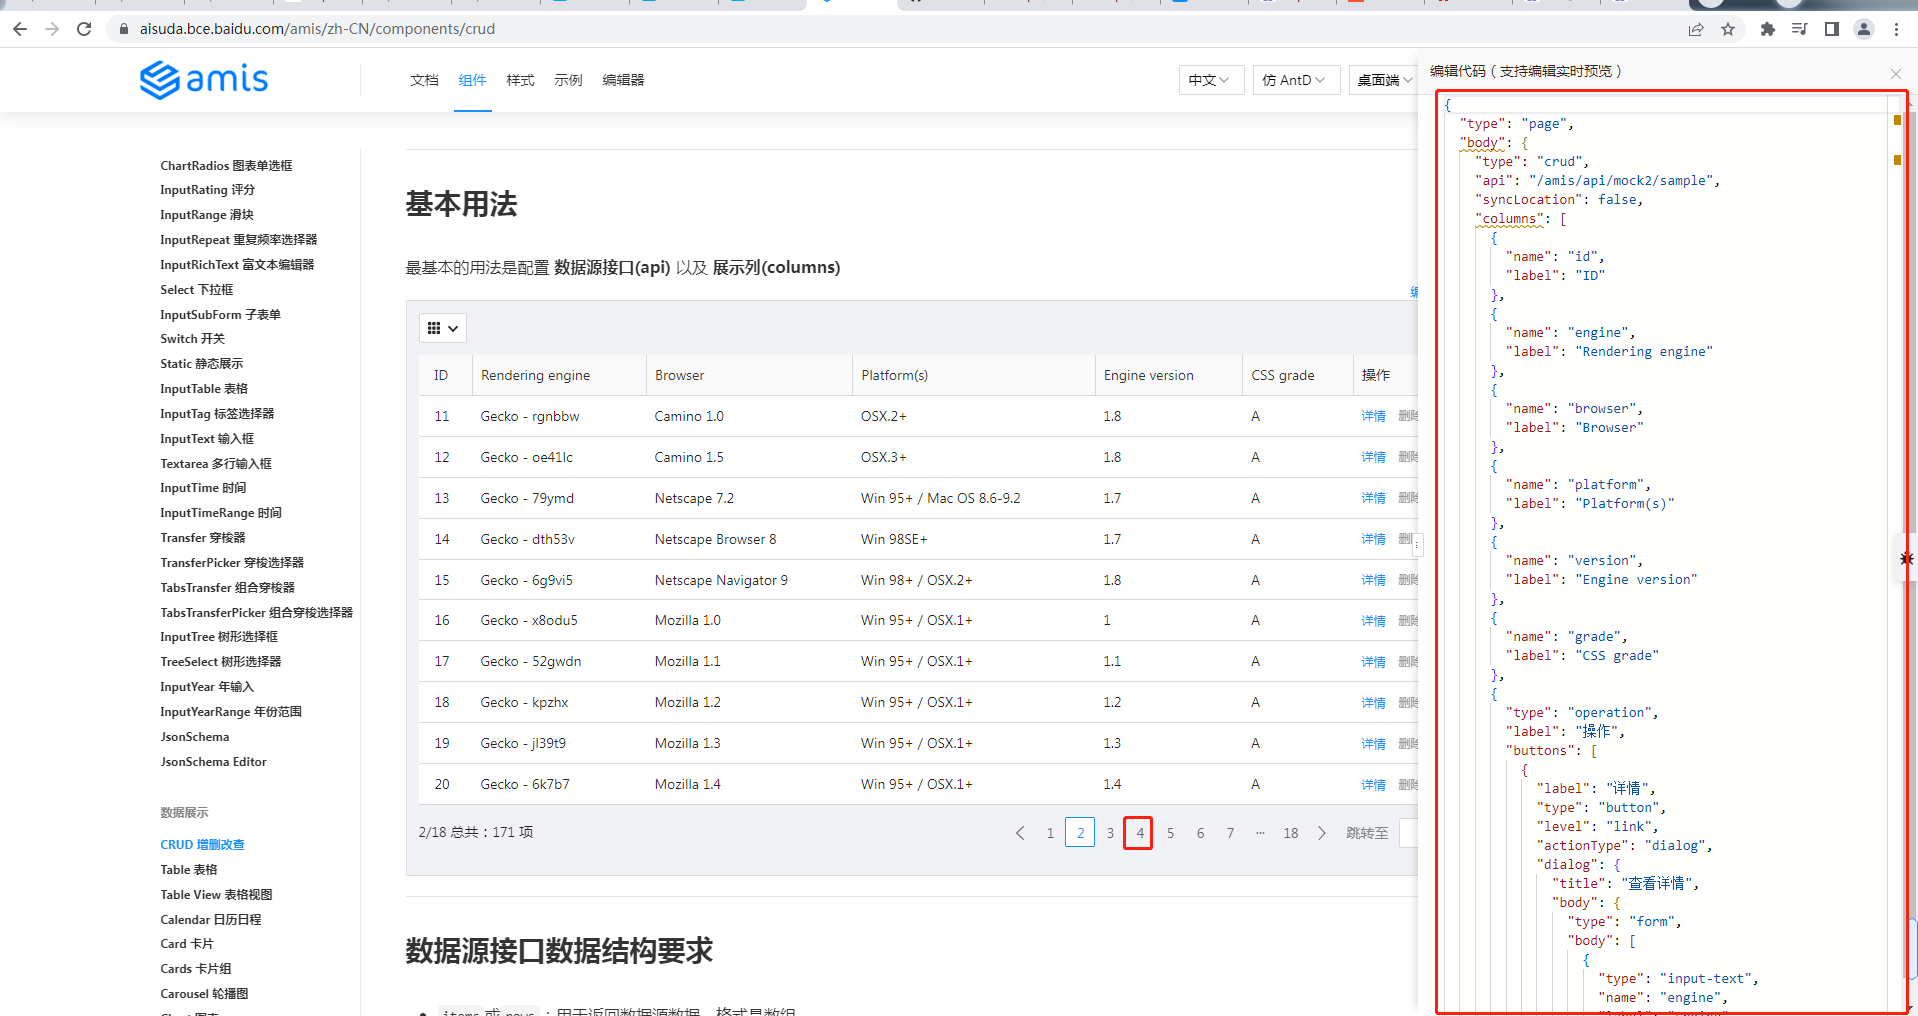
Administrator@ /e/pengjiali/amis-test/public/pages (master)
$ git diff  schedule.js
diff --git a/public/pages/schedule.js b/public/pages/schedule.js
index 9612fb8..5f133b8 100644
--- a/public/pages/schedule.js
+++ b/public/pages/schedule.js
@@ -1,12 +1,96 @@
 (function() {
        const response = {
-               data: {
-                       type: "page",
-                       title: "标题",
-                       body: "this result is from jsonp"
-               },
-               status: 0
-       }
+               "type": "page",
+               "body": {
+                 "type": "crud",
+                 "api": "/api/schedule",
+                 "syncLocation": false,
+                 "columns": [
+                       {
+                         "name": "id",
+                         "label": "ID"
+                       },
+                       {
+                         "name": "engine",
+                         "label": "Rendering engine"
+                       },
...
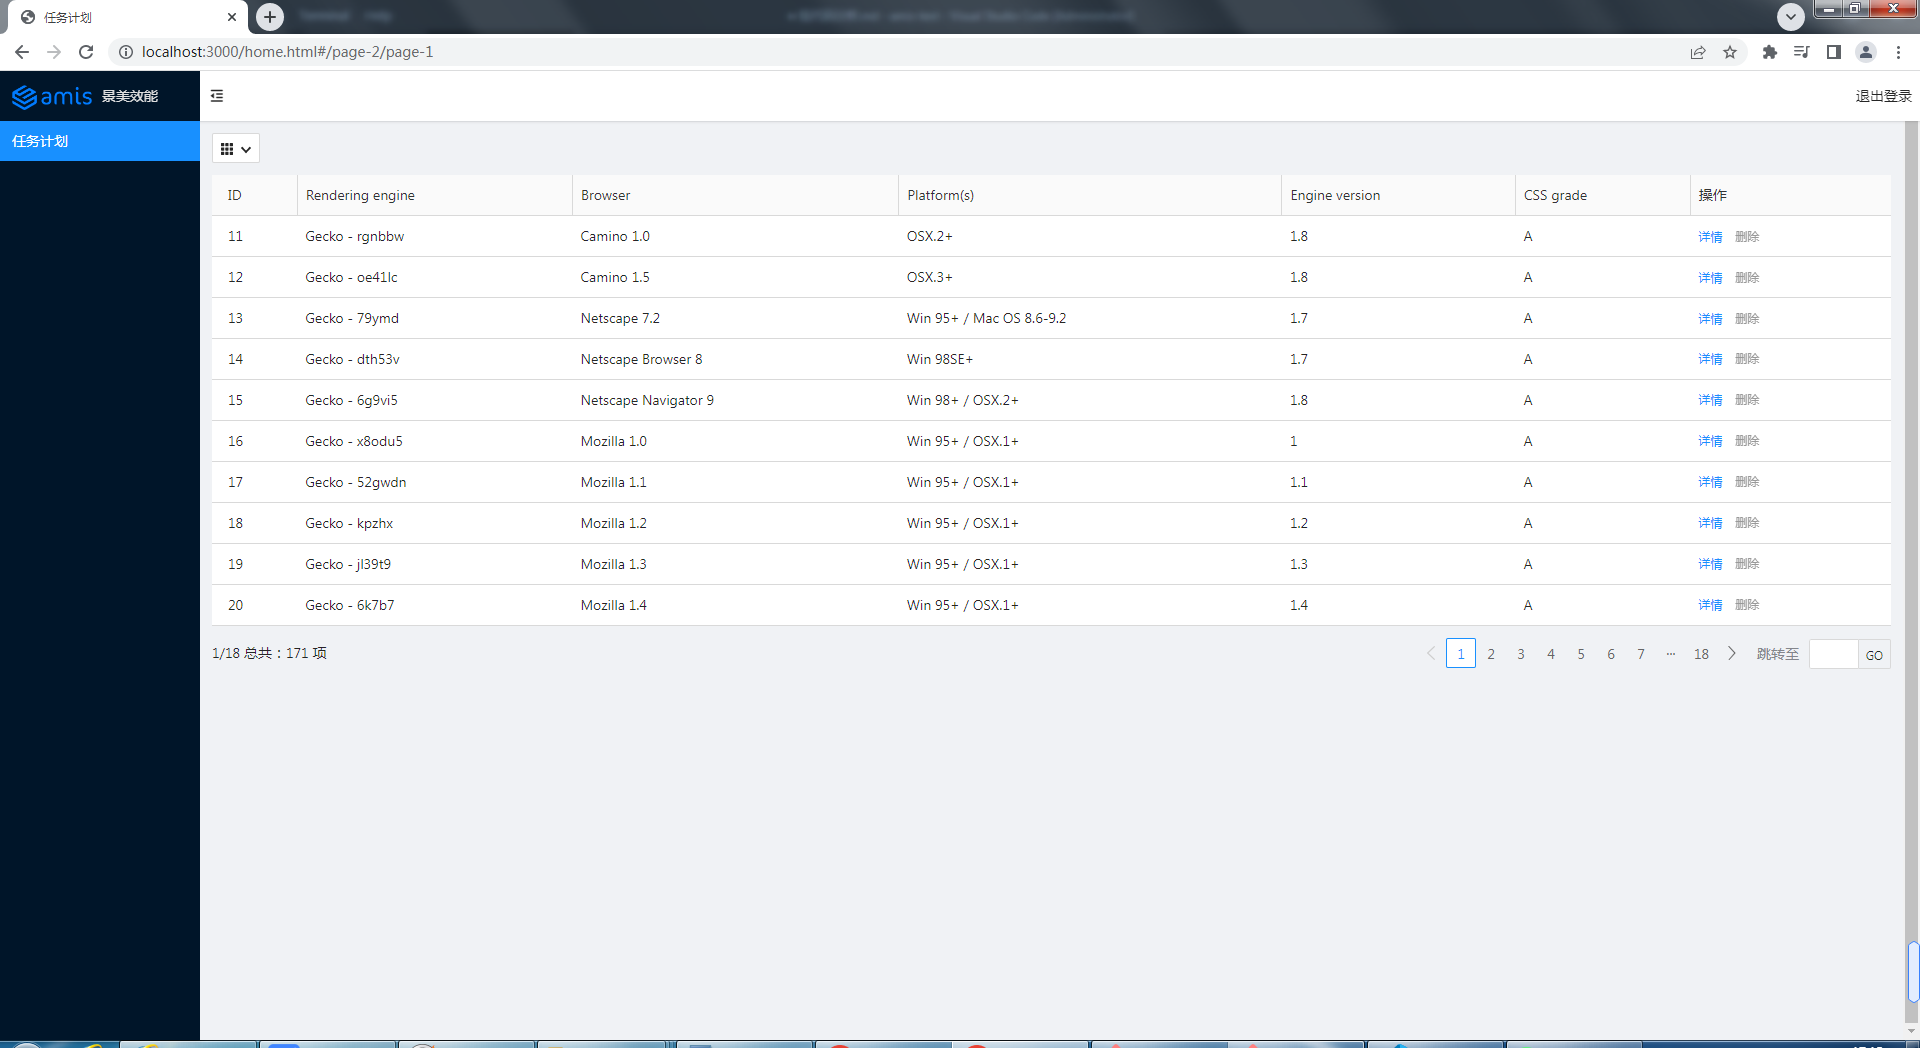
然后编写获取任务计划的接口(/api/schedule),接口内容直接来自官网(点击下一页,查看源数据),笔者将 id 改为动态的。
Administrator@ /e/pengjiali/amis-test/public/pages (master)
$ git diff ../../server.js
diff --git a/server.js b/server.js
index a55a683..4cfb1b1 100644
--- a/server.js
+++ b/server.js
@@ -21,6 +21,11 @@ app.post('/api/login', function (req, res) {
     }
 });

+app.get('/api/schedule', function (req, res) {
+    const {page, perPage} = req.query
+    res.json({"status":0,"msg":"ok","data":{"count":171,"rows":[{"engine":"Gecko - rgnbbw","browser":"Camino 1.0","platform":"OSX.2+","version":"1.8","grade":"A","id":page*perPage + 1},{"engine":"Gecko - oe41lc","browser":"Camino 1.5","platform":"OSX.3+","version":"1.8","grade":"A","id":page*perPage + 2},{"engine":"Gecko - 79ymd","browser":"Netscape 7.2","platform":"Win 95+ / Mac OS 8.6-9.2","version":"1.7","grade":"A","id":page*perPage + 3},{"engine":"Gecko - dth53v","browser":"Netscape Browser 8","platform":"Win 98SE+","version":"1.7","grade":"A","id":page*perPage + 4},{"engine":"Gecko - 6g9vi5","browser":"Netscape Navigator 9","platform":"Win 98+ / OSX.2+","version":"1.8","grade":"A","id":15},{"engine":"Gecko - x8odu5","browser":"Mozilla 1.0","platform":"Win 95+ / OSX.1+","version":"1","grade":"A","id":16},{"engine":"Gecko - 52gwdn","browser":"Mozilla 1.1","platform":"Win 95+ / OSX.1+","version":"1.1","grade":"A","id":17},{"engine":"Gecko - kpzhx","browser":"Mozilla 1.2","platform":"Win 95+ / OSX.1+","version":"1.2","grade":"A","id":18},{"engine":"Gecko - jl39t9","browser":"Mozilla 1.3","platform":"Win 95+ / OSX.1+","version":"1.3","grade":"A","id":19},{"engine":"Gecko - 6k7b7","browser":"Mozilla 1.4","platform":"Win 95+ / OSX.1+","version":"1.4","grade":"A","id":20}]}})
+});
+
 // 开启服务
 app.listen(port, () => {
   console.log(`Example app listening at http://localhost:${port}`)
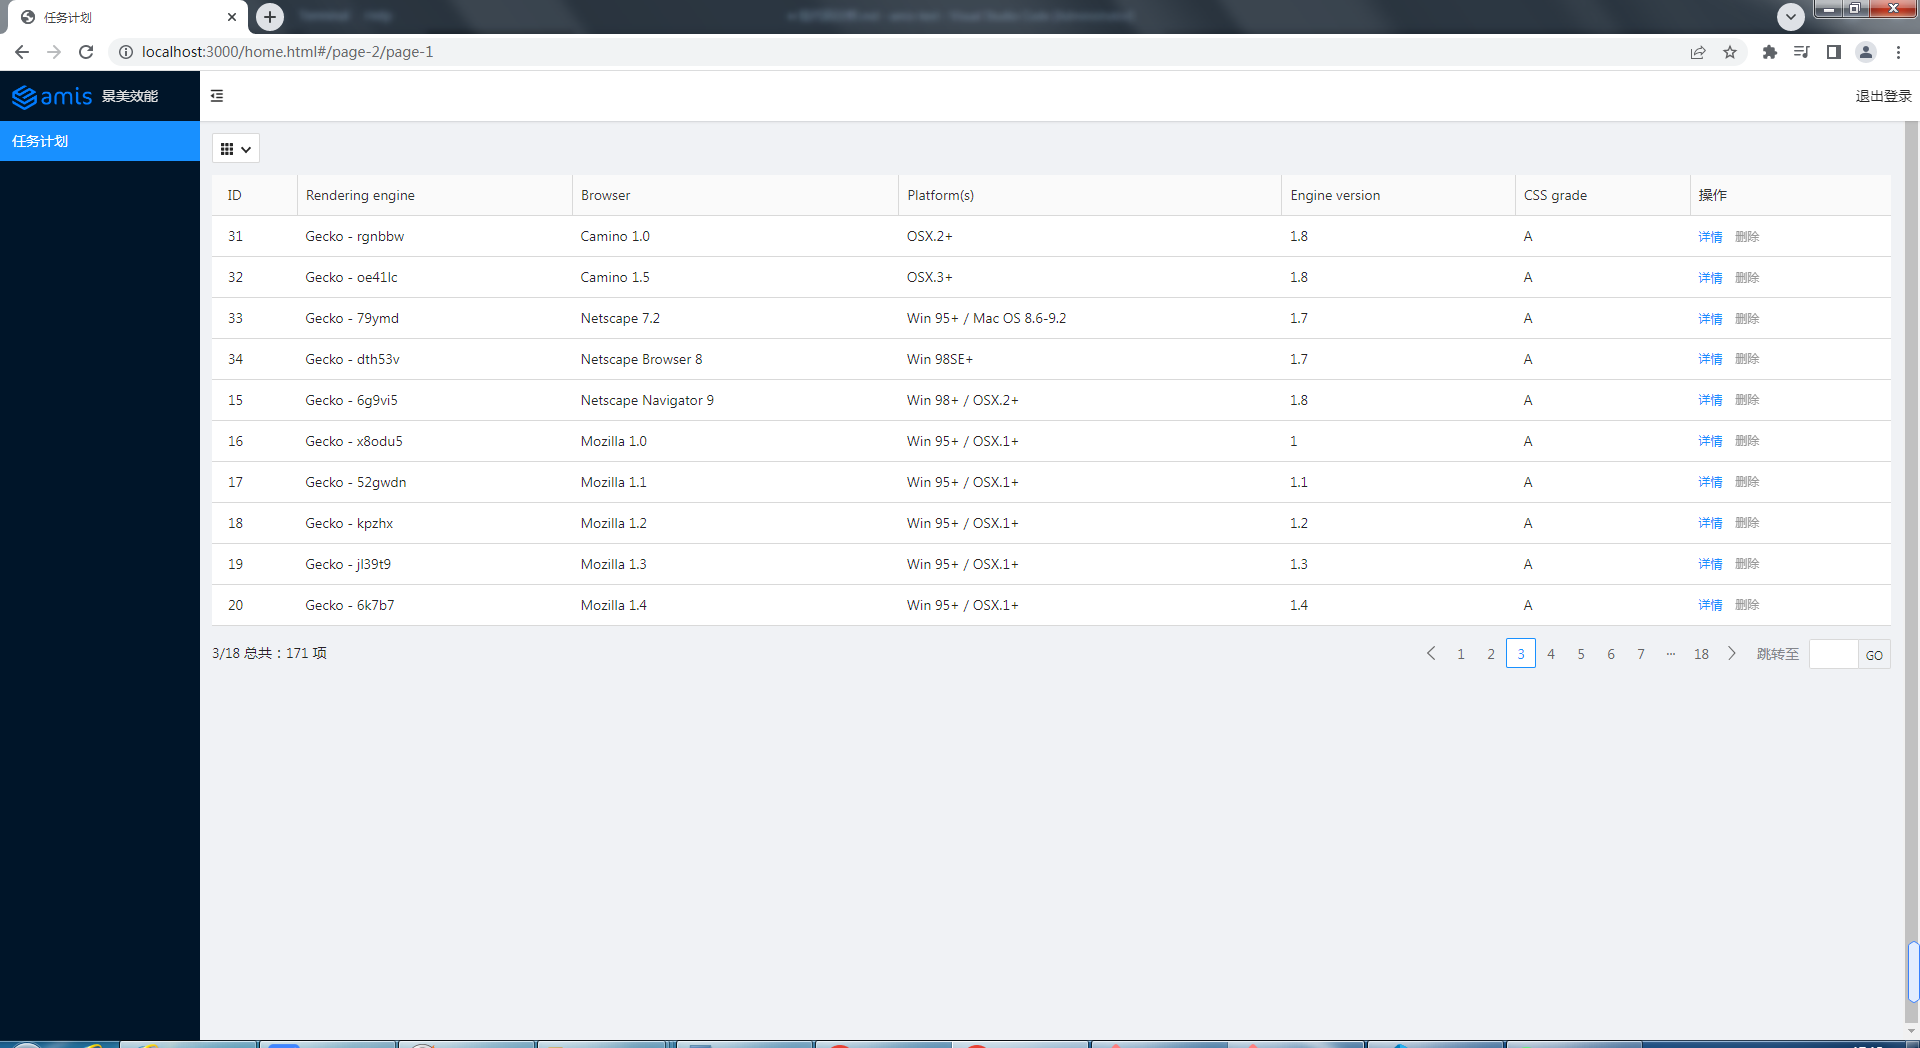
效果如下图所示:
授权(Token)
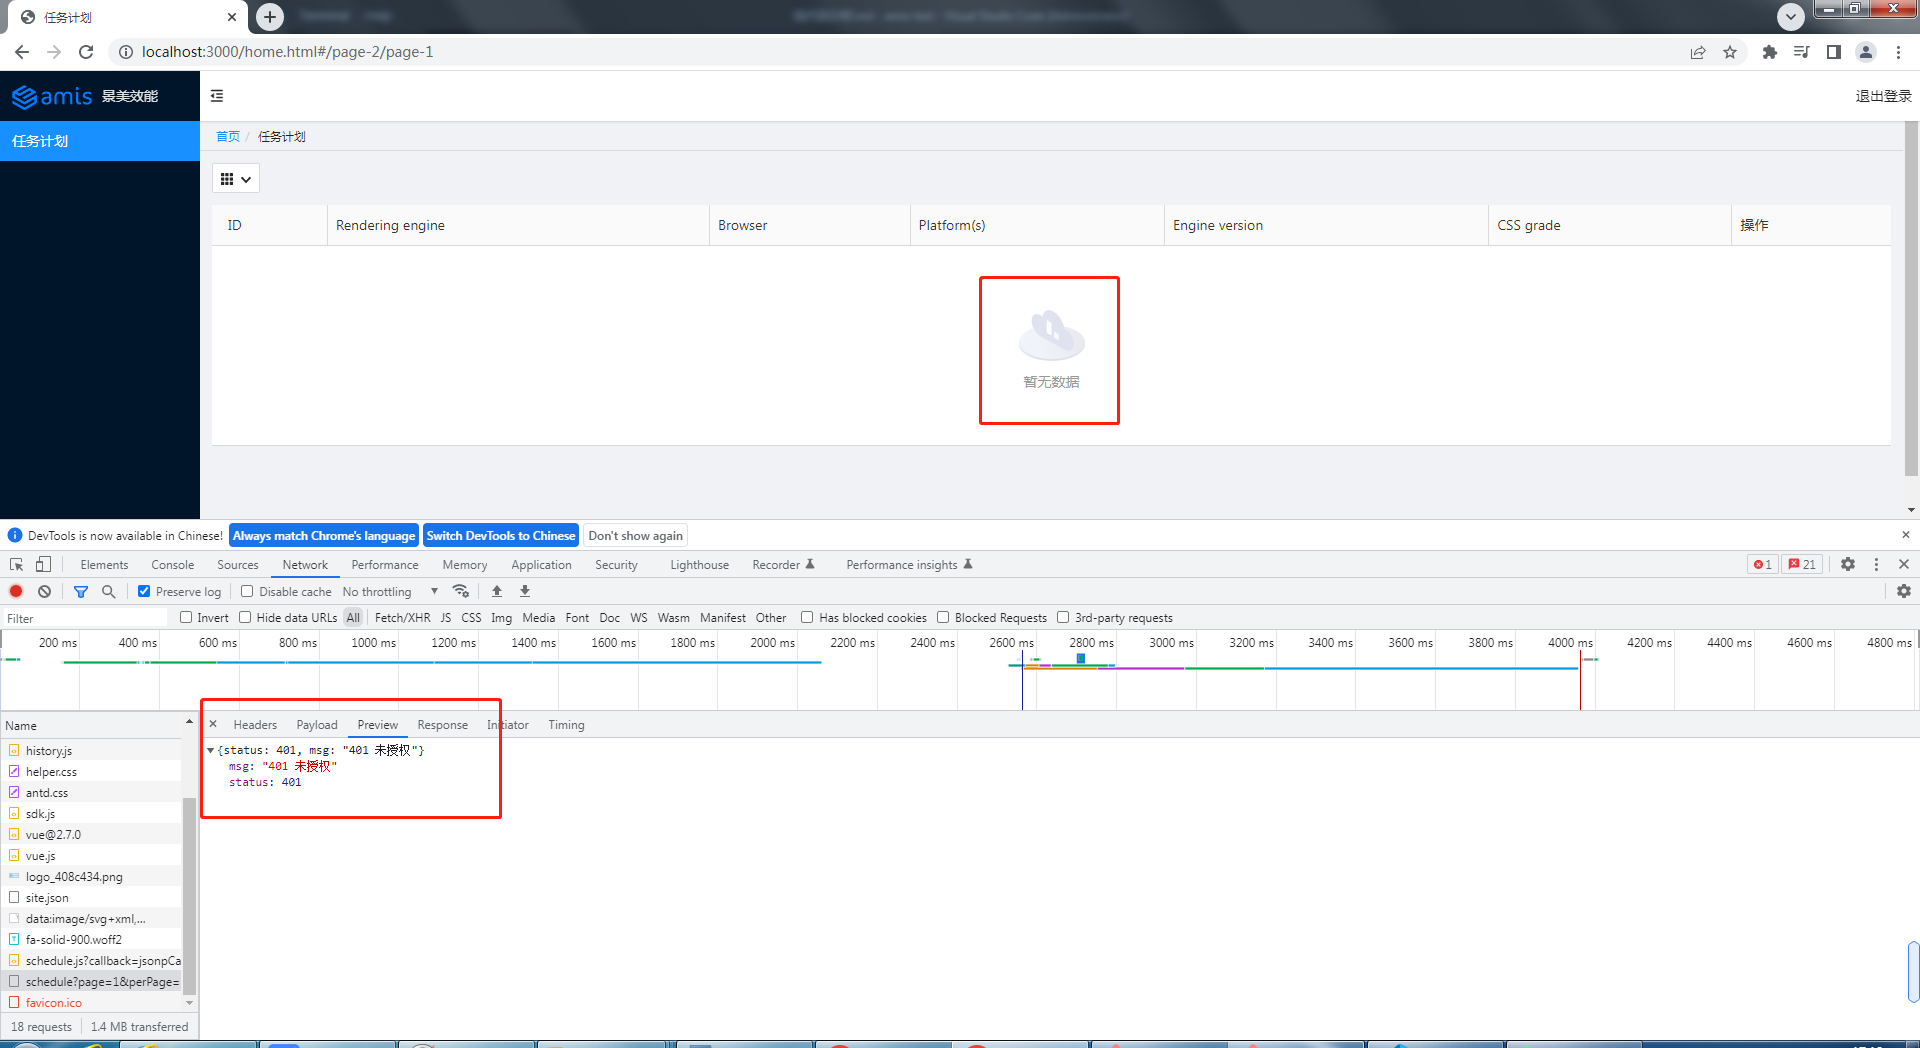
通常,只有登录后才能看到数据。比如我们给列表查询接口添加如下权限:
// schedule.js
app.get('/api/schedule', function (req, res) {
    res.json({status: 401, msg: '401 未授权'})
});
再次请求后端数据,效果如下图所示:
下面我们在发送请求时添加 token(全局添加),并给 api 加上授权限制。代码如下:
Administrator@ /e/pengjiali/amis-test/public/pages (master)
$ git diff ../home.html
...
--- a/public/home.html
+++ b/public/home.html
@@ -120,6 +120,12 @@
           location: history.location
         },
         {
+          // 参考:官网 -> 快速开始 -> 控制 amis 的行为
+          requestAdaptor(api) {
+            api.headers.Authorization = localStorage.getItem('token')
+            console.log('api', api)
+            return api;
+          },
           // watchRouteChange: fn => {
           //   return history.listen(fn);
           // },
// server.js
app.get('/api/schedule', function (req, res) {
    // req.get(field) - 返回指定的HTTP请求标头字段(不区分大小写的匹配)
    const token = req.get('Authorization')
    if (token === 'null') {
        res.json({ status: 401, msg: '401 未授权' })
        return
    }
    const { page, perPage } = req.query
    res.json({ "status": 0, "msg": "ok", "data": { "count": 171, "rows": [{...}] } })
});
Tip:前面我们已经实现登录的时候将 token 存入 localStorage 中。
api: {
    method: 'post',
    url: '/api/login',
    adaptor: function (payload, response) {
        if (payload.status === 0) {
            // 存入 token
            localStorage.setItem('token', payload.data.token)
        }
        console.log('payload', payload)
        return payload
    }
},
现在,登录后就会将 token 存入 localStorage,再次请求“任务列表”,请求头就能获取 token 值,后端也就能返回数据。
如果在浏览器控制台清空 token(localStorage.removeItem('token')),再次请求,就看不到任务列表数据了。
路径美化 & 未登录的重定向
现在存在几个问题:
- 登录页和主页的 url 有点丑。比如登录页是
http://localhost:3000/login.html,希望改成http://localhost:3000/login - 期望输入
http://localhost:3000/能直接到主页去,如果没有登录,就重定向到登录页
修复共涉及 4 个文件:
home.html,资源路劲的变化,添加一个全局响应适配器,未授权则重定向到登录页login.html,资源路劲的变化,登录成功后跳转至/homesite.json,url 的修改server.js,api 的修改
$ git diff
--- a/public/home.html
+++ b/public/home.html
@@ -50,7 +50,7 @@
         // footer: '<div class="p-2 text-center bg-light">底部区域</div>',
         // asideBefore: '<div class="p-2 text-center">菜单前面区域</div>',
         // asideAfter: '<div class="p-2 text-center">菜单后面区域</div>',
-        api: '/pages/site.json'
+        api: '/static/pages/site.json'
       };

       function normalizeLink(to, location = history.location) {
@@ -120,12 +120,20 @@
           location: history.location
         },
         {
-          // 官网 -> 快速开始 -> 控制 amis 的行为
+          // 全局请求适配器。参考:官网 -> 快速开始 -> 控制 amis 的行为
           requestAdaptor(api) {
             api.headers.Authorization = localStorage.getItem('token')
             console.log('api', api)
             return api;
           },
+          // 全局响应适配器。参考:官网 -> 快速开始 -> 控制 amis 的行为
+          responseAdaptor(api, payload, query, request, response) {
+            if(payload.status === 401){
+              console.log('未授权,请重新登录')
+              location.href = '/login'
+            }
+            return payload;
+          },
           // watchRouteChange: fn => {
           //   return history.listen(fn);
           // },
diff --git a/public/login.html b/public/login.html
index 4a58e4e..28a9fa0 100644
--- a/public/login.html
+++ b/public/login.html
@@ -7,9 +7,9 @@
     <meta http-equiv="Content-Type" content="text/html; charset=utf-8" />
     <meta name="viewport" content="width=device-width, initial-scale=1, maximum-scale=1" />
     <meta http-equiv="X-UA-Compatible" content="IE=Edge" />
-    <link rel="stylesheet" href="./sdk/sdk.css" />
-    <link rel="stylesheet" href="./sdk/helper.css" />
-    <link rel="stylesheet" href="./sdk/iconfont.css" />
+    <link rel="stylesheet" href="/static/sdk/sdk.css" />
+    <link rel="stylesheet" href="/static/sdk/helper.css" />
+    <link rel="stylesheet" href="/static/sdk/iconfont.css" />
     <!-- 这是默认主题所需的,如果是其他主题则不需要 -->
     <!-- 从 1.1.0 开始 sdk.css 将不支持 IE 11,如果要支持 IE11 请引用这个 css,并把前面那个删了 -->
     <!-- <link rel="stylesheet" href="sdk-ie11.css" /> -->
@@ -29,7 +29,7 @@

 <body>
     <div id="root" class="app-wrapper"></div>
-    <script src="./sdk/sdk.js"></script>
+    <script src="/static/sdk/sdk.js"></script>
     <script type="text/javascript">
         (function () {
             let amis = amisRequire('amis/embed');
@@ -52,7 +52,7 @@
                         }
                     },
                     // 官网 -> 组件 -> Form 表单 -> 页面跳转
-                    redirect: "/home.html",
+                    redirect: "/home",
                     body: [
                         {
                             label: '姓名',
diff --git a/public/pages/site.json b/public/pages/site.json
index 1a9f63e..523258a 100644
--- a/public/pages/site.json
+++ b/public/pages/site.json
@@ -6,13 +6,14 @@
       {
         "label": "Home",
         "url": "/",
-        "redirect": "/index/1"
+        "redirect": "/schedule"
       },
       {
         "children": [
           {
             "label": "任务计划",
-            "schemaApi": "jsonp:/pages/schedule.js?callback=jsonpCallback"
+            "schemaApi": "jsonp:/static/pages/schedule.js?callback=jsonpCallback",
+            "url": "/schedule"
           }

         ]
diff --git a/server.js b/server.js
index 225a4be..6591ea3 100644
--- a/server.js
+++ b/server.js
@@ -7,8 +7,19 @@ app.use(express.json()) // for parsing application/json
 app.use(express.urlencoded({ extended: true })) // for parsing application/x-www-form-urlencoded

 // 将静态资源对外开放
-app.use('/', express.static(path.join(__dirname, 'public')))
+app.use('/static', express.static(path.join(__dirname, 'public')))

+app.get('/', function(req, res){
+    res.redirect('/home')
+})
+
+app.get('/home', function(req, res){
+    res.sendFile(path.join(__dirname, 'public', 'home.html'))
+})
+
+app.get('/login', function(req, res){
+    res.sendFile(path.join(__dirname, 'public', 'login.html'))
+})

 // 登录接口
 app.post('/api/login', function (req, res) {
(END)
Tip: url 跟资源路径是没有关系的。比如请求 /login,服务器却可以返回 home.html 的内容。
接下来测试:
首先在控制台执行 localStorage.clear(),清空 token。
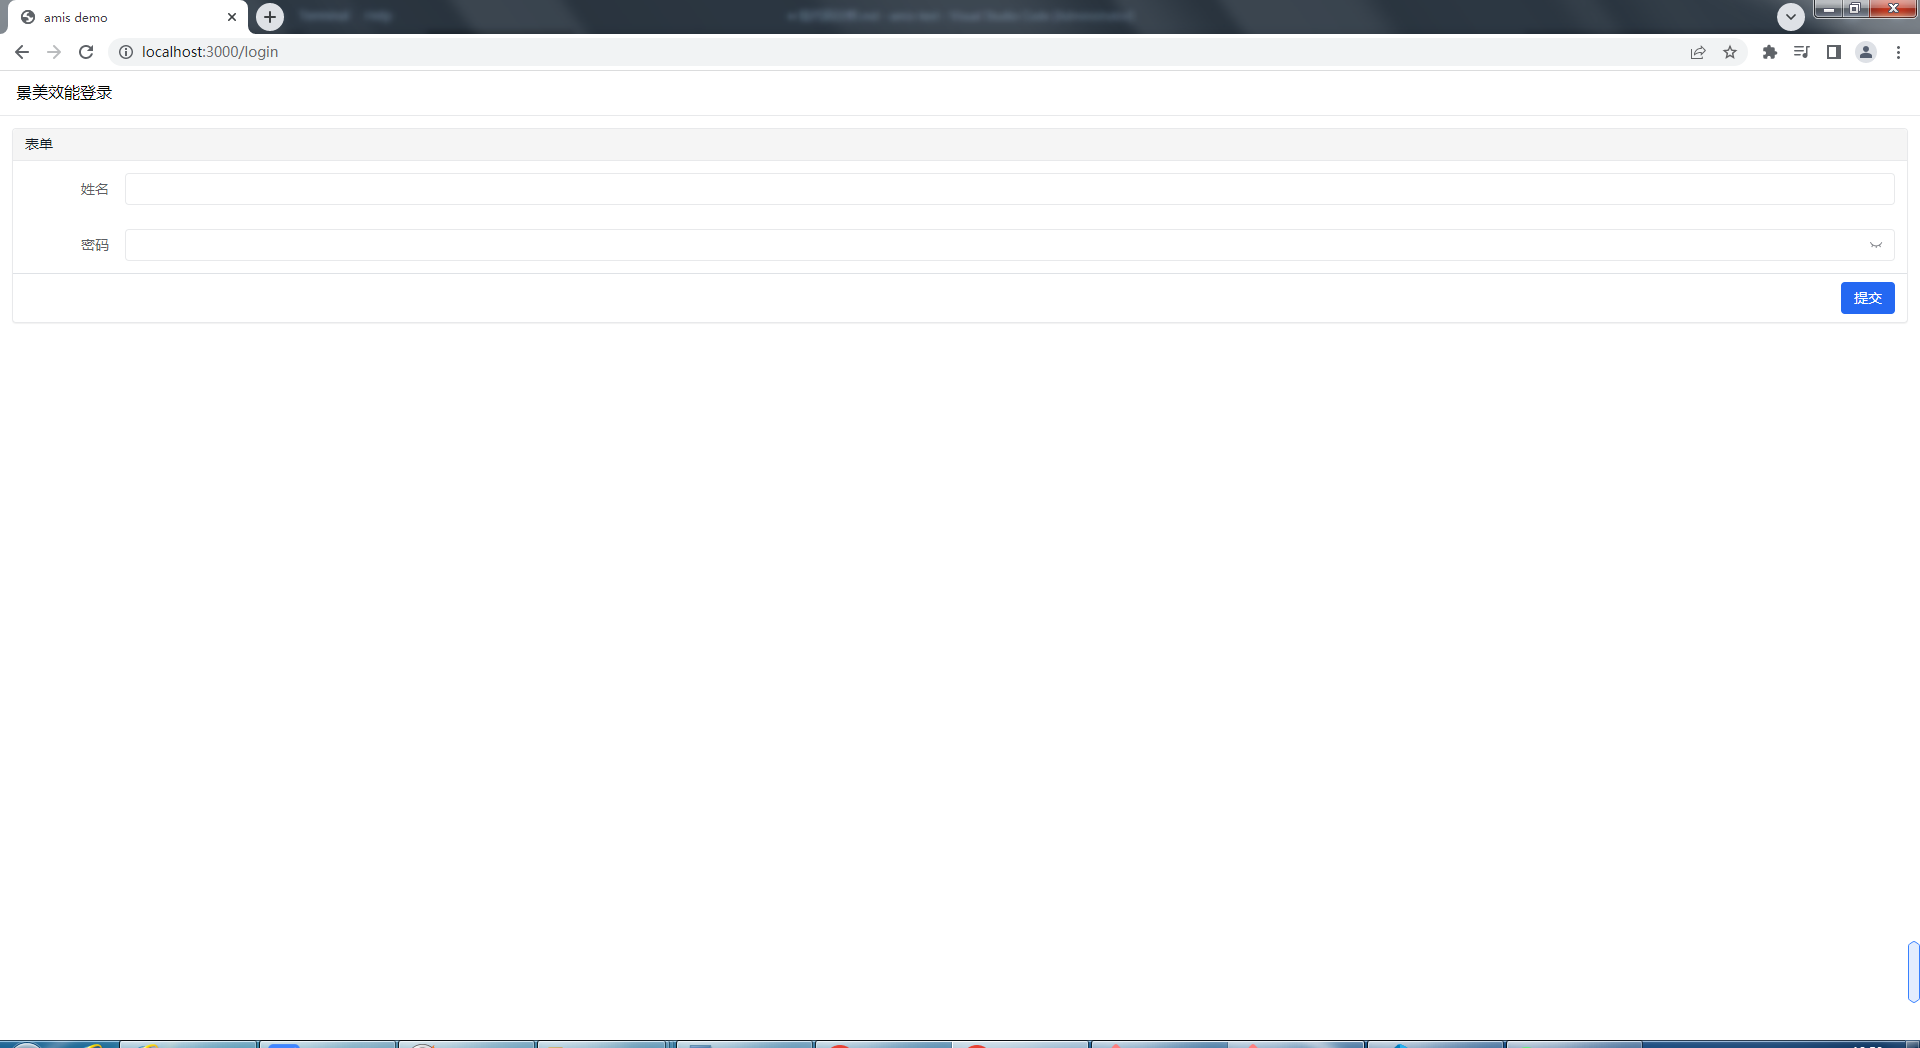
接着在浏览器中输入 http://localhost:3000/,你会发现浏览器首先重定向到 http://localhost:3000/home,然后由于没有 token,于是在重定向到 http://localhost:3000/login。如下图所示:
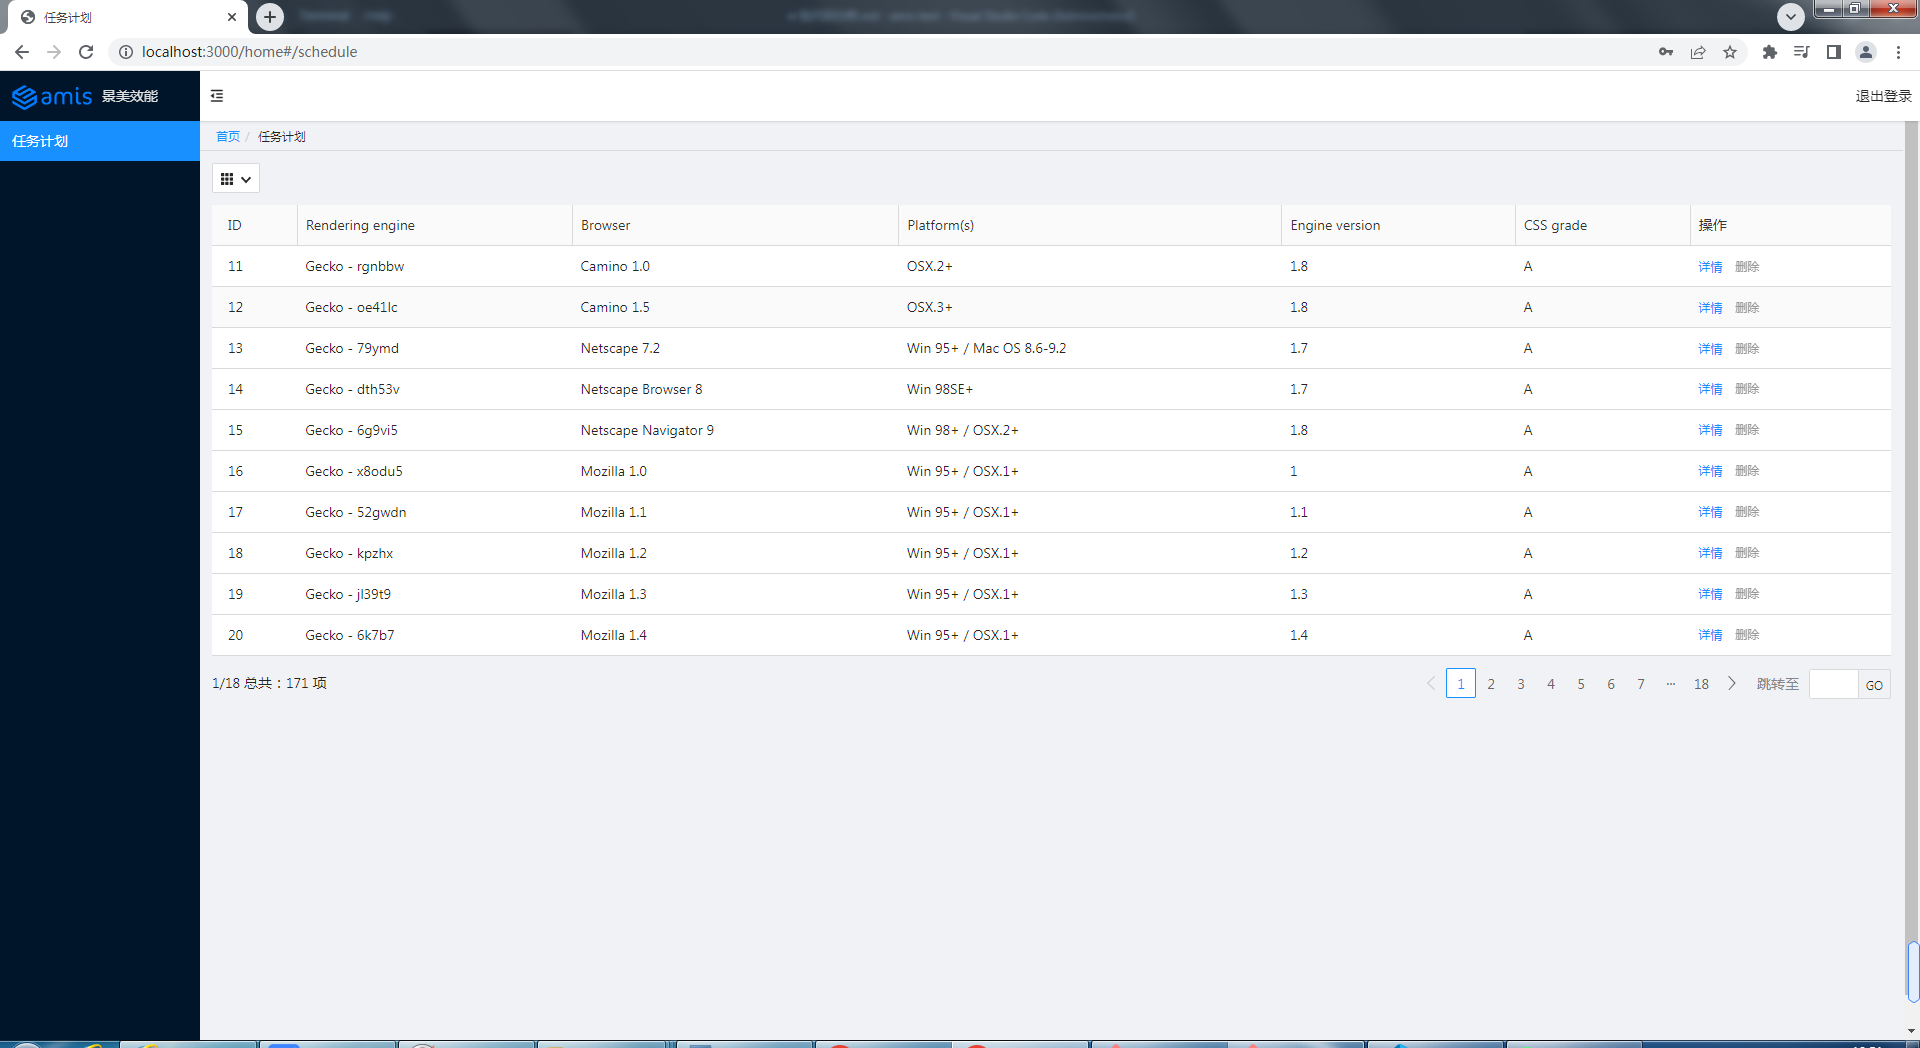
输入正确的用户名和密码(a/a),登录成功,直接来到任务计划。请看下图:
任务计划的CURD
创建(Create)
直接将官网的新增代码拷贝到 schedule.js 中。
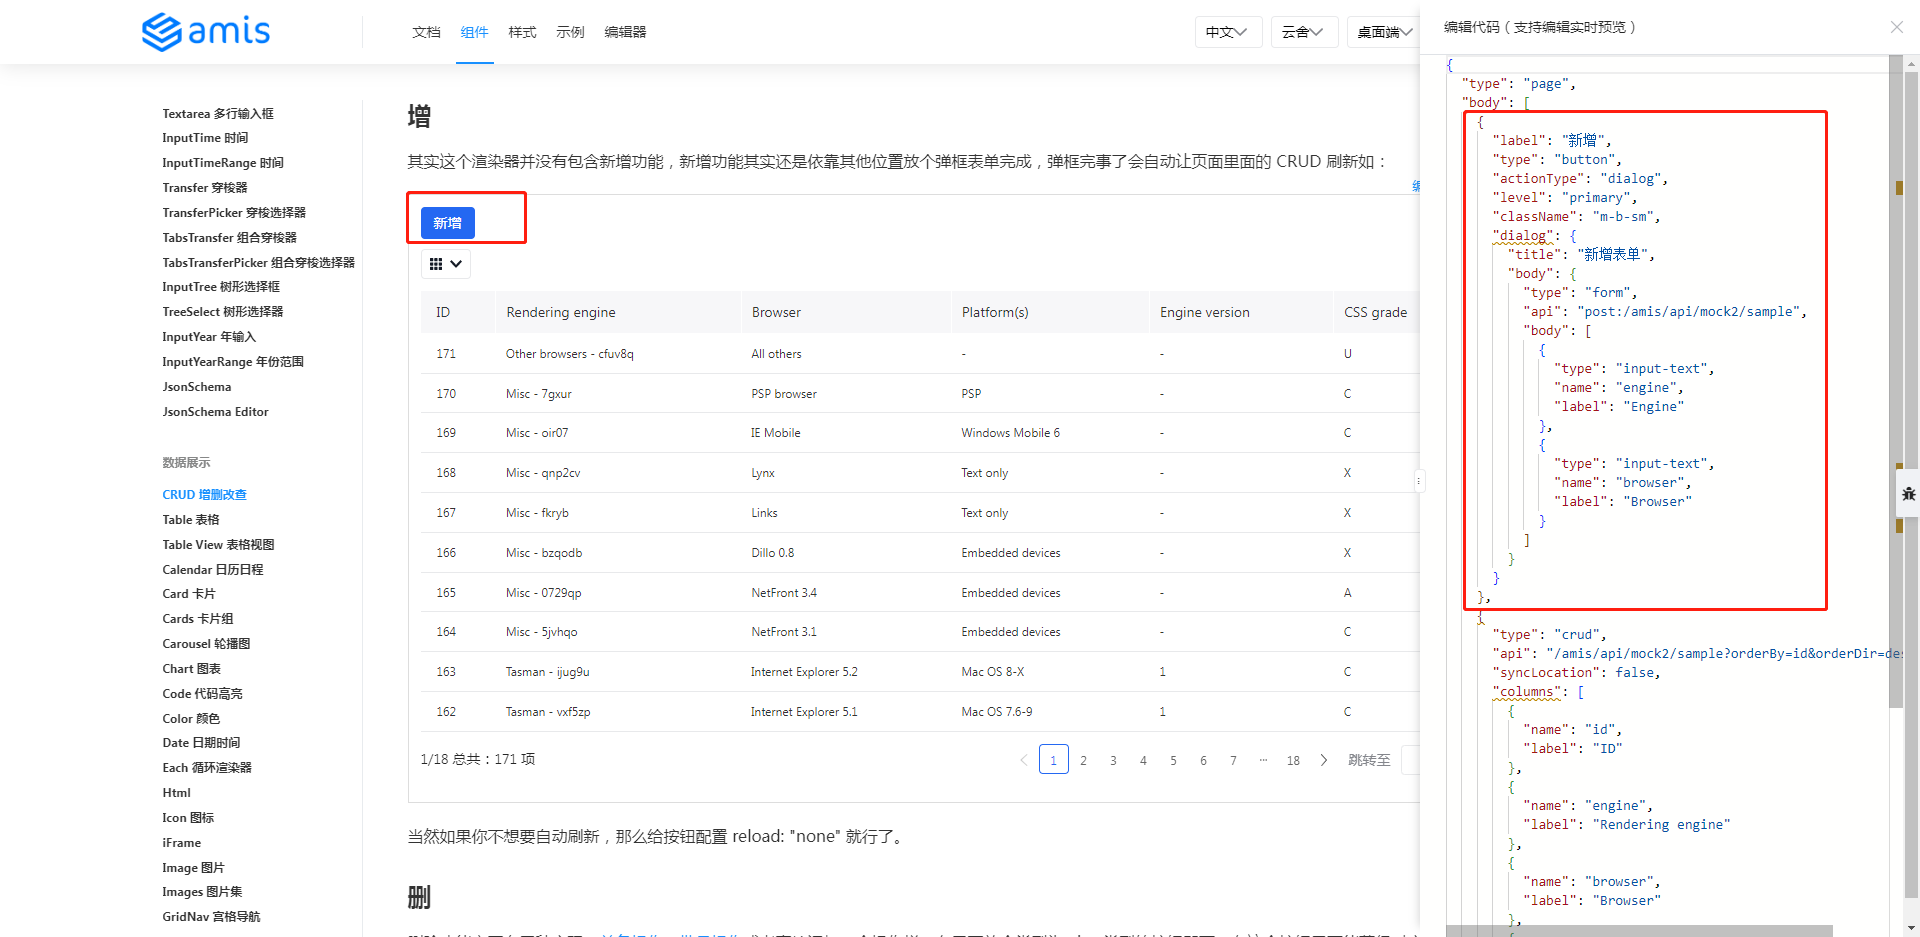
Administrator@ /e/pengjiali/amis-test (master)
$ git diff public/pages/schedule.js
...
-(function() {
+(function () {
        const response = {
                "type": "page",
-               "body": {
-                 "type": "crud",
-                 "api": "/api/schedule",
-                 "syncLocation": false,
-                 "columns": [
-                       {
-                         "name": "id",
-                         "label": "ID"
-                       },
...
+               "body": [{
+                       "label": "新增",
+                       "type": "button",
+                       "actionType": "dialog",
+                       "level": "primary",
+                       "className": "m-b-sm",
+                       "dialog": {
+                               "title": "新增表单",
+                               "body": {
+                                       "type": "form",
+                                       "api": "post:/amis/api/mock2/sample",
+                                       "body": [
                                                {
-                                                 "type": "input-text",
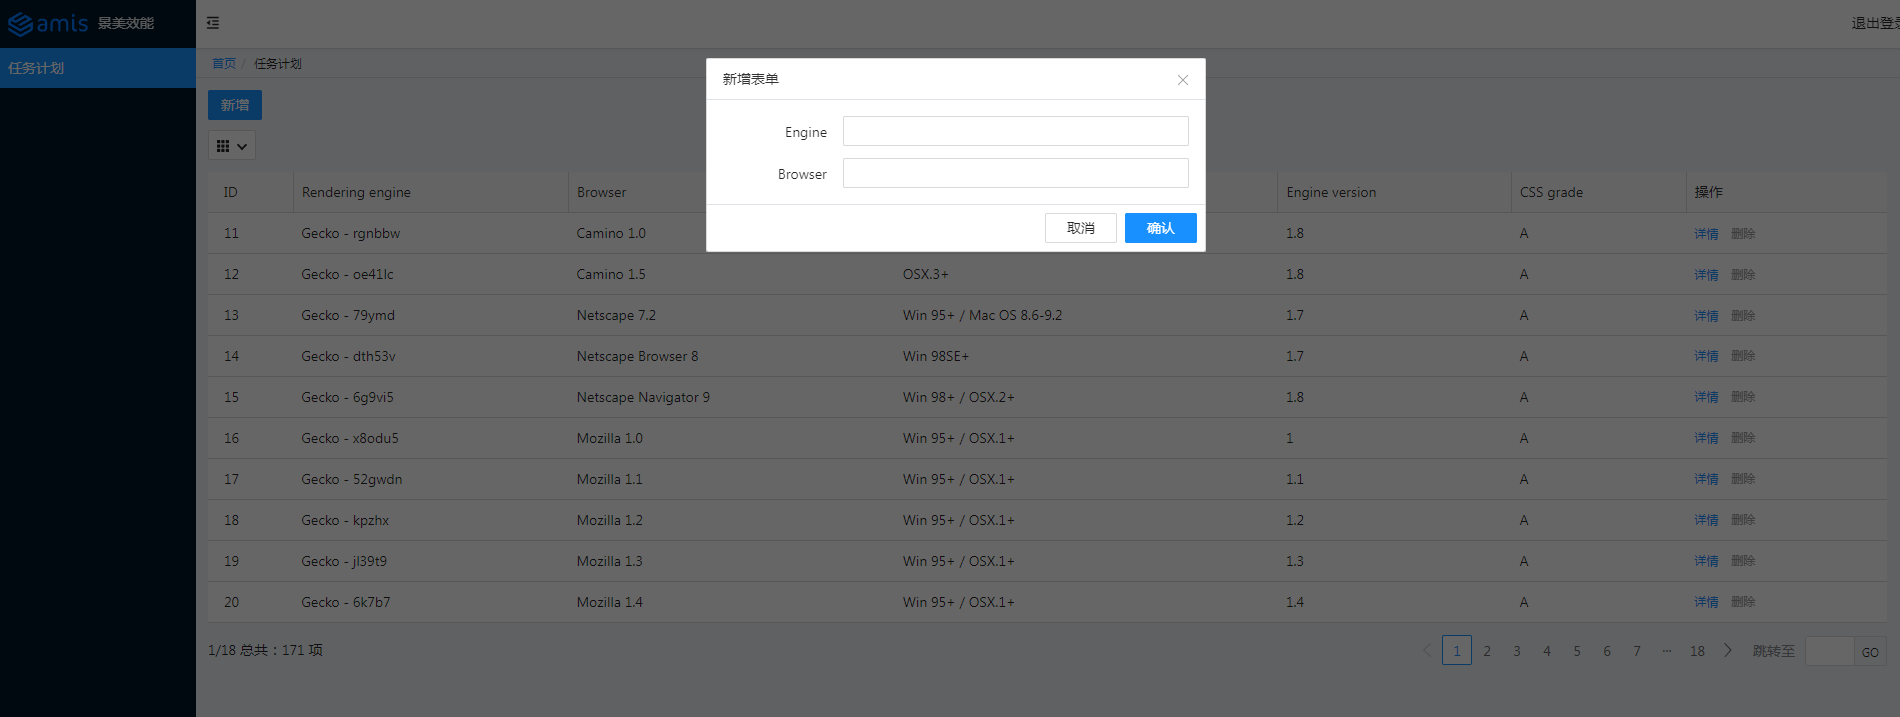
点击新增,效果如下图所示:
修改接口,后端接收到新增的信息,在控制台中输入。代码如下所示:
Administrator@ /e/pengjiali/amis-test (master)
$ git diff public/pages/schedule.js
...
                                "title": "新增表单",
                                "body": {
                                        "type": "form",
-                                       "api": "post:/amis/api/mock2/sample",
+                                       "api": "post:/api/schedule",
                                        "body": [
                                                {
                                                        "type": "input-text",
// server.js
// 新增
app.post('/api/schedule', function (req, res) {
    const { engine, browser } = req.body
    // 授权部分应该可以提取到一个地方,这里仅做演示
    const token = req.get('Authorization')
    if (token === 'null') {
        res.json({ status: 401, msg: '401 未授权' })
        return
    }

    console.log(`存入数据库:engine=${engine} browser=${browser}`)
    res.json({ "status": 0, "msg": "保存成功", "data": {} })
});
再次点击“新增”,输入 engine11 和 browser11,点击保存,界面提示保存成功,同时表格也会刷新当前页。如下图所示:

服务器控制台输出如下信息:
存入数据库:engine=engine11 browser=browser11
更新(Update)
参考官网的示例,将对应代码拷贝至 schedule.js:
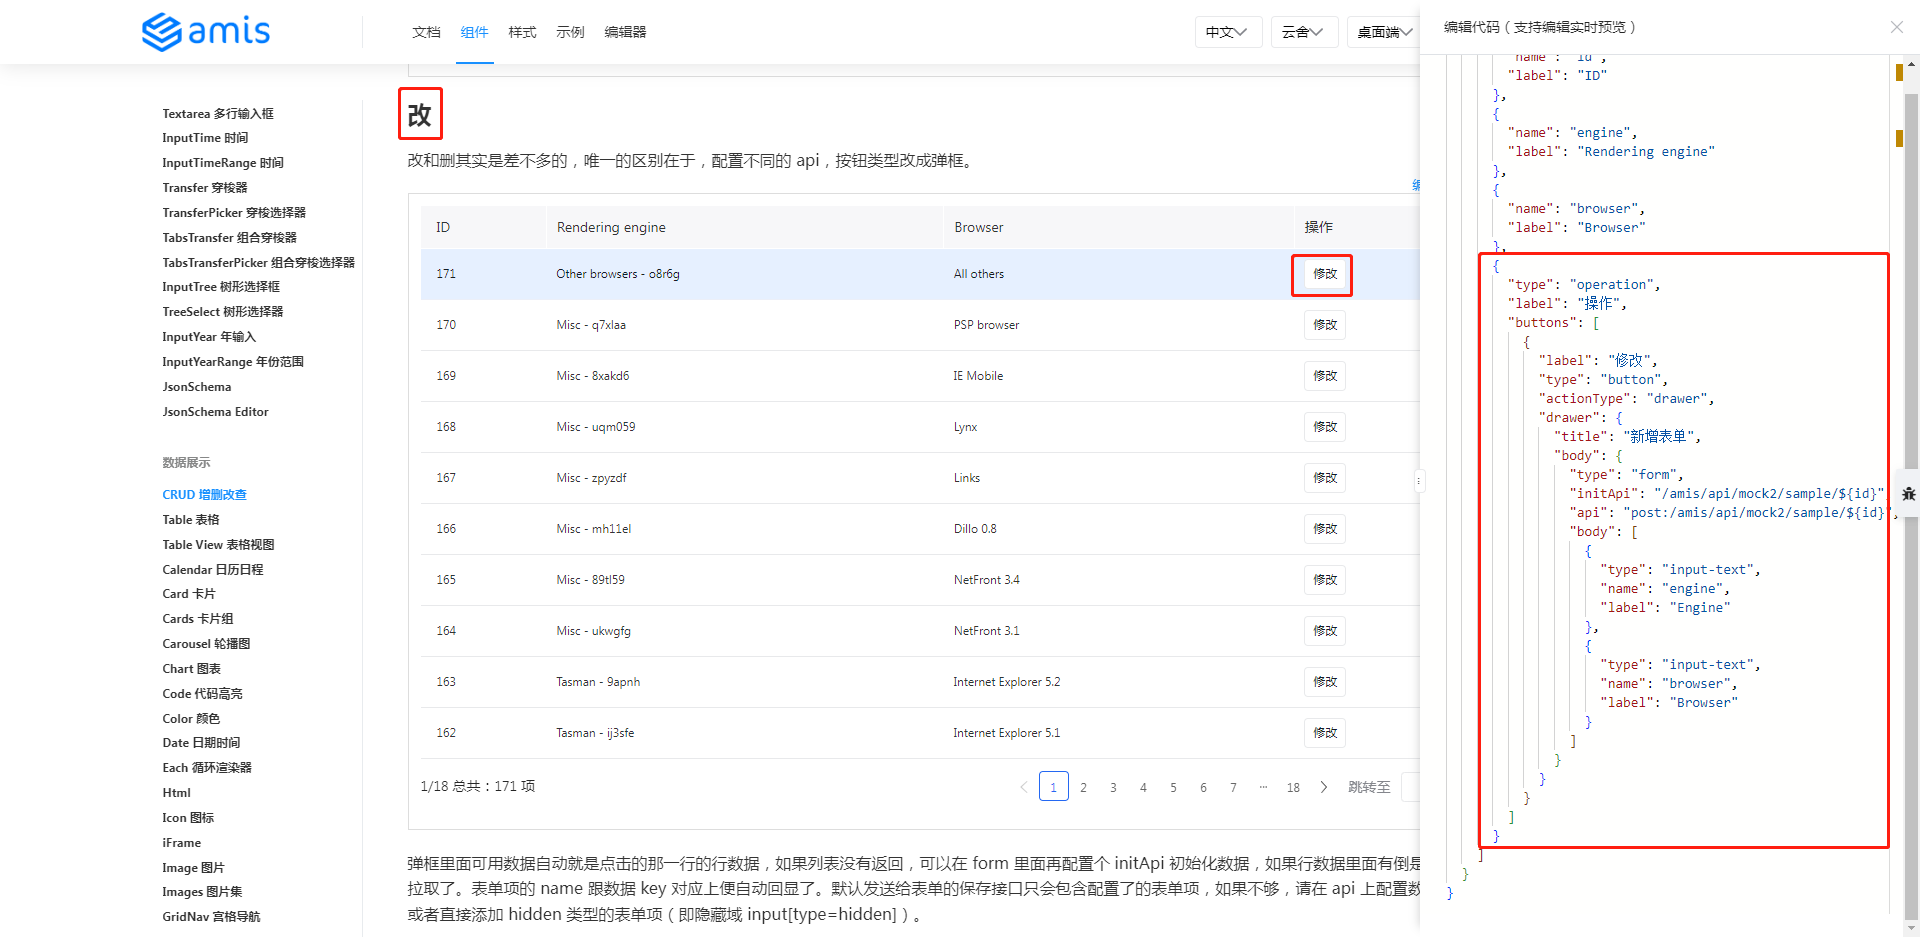
笔者新增两个 api,一个是根据 id 查询(如果不提供这个 api,amis 则使用前端的数据),一个是真正修改的 api。代码如下所示:
Administrator@ /e/pengjiali/amis-test (master)
$ git diff public/pages/schedule.js
...
    "type": "operation",
    "label": "操作",
    "buttons": [
+           {
+                   "label": "修改",
+                   "type": "button",
+                   // 默认是抽屉样式,也提供了通常的弹框样式
+                   "actionType": "drawer",
+                   "drawer": {
+                           "title": "新增表单",
+                           "body": {
+                                   "type": "form",
+                                   // 表单初始化。如果不配置,表单中的数据直接来自前端
+                                   "initApi": "/api/schedule/${id}",
+                                   "api": "post:/api/schedule/${id}",
+                                   "body": [
+       {
+               "type": "input-text",
+               "name": "engine",
+               "label": "Engine"
+       },
+       {
+               "type": "input-text",
+               "name": "browser",
+               "label": "Browser"
+       }
+                                   ]
+                           }
+                   }
+           },
            {
                    "label": "详情",
                    "type": "button",
Administrator@ /e/pengjiali/amis-test (master)
$ git diff server.js
...

+// 修改-查询
+app.get('/api/schedule/:id', function (req, res) {
+    // /api/schedule/:id { id: '11' }
+    console.log('/api/schedule/:id', req.params)
+
+    const {id} = req.params
+    // 数据来自官网
+    res.json({"status":0,"data":{"engine":"Other browsers" + id,"browser":"All others" + id,"platform":"-","version":"-","grade":"U","id":id}})
+})
+
+// 修改-提交
+app.post('/api/schedule/:id', function (req, res) {
+    const {id} = req.params
+    // post:/api/schedule/:id 11
+    console.log('post:/api/schedule/:id', id)
+    res.json({"status":0, "msg": "修改成功", "data":{}})
+})
点击修改按钮,默认是抽屉式弹框。效果如下图所示:
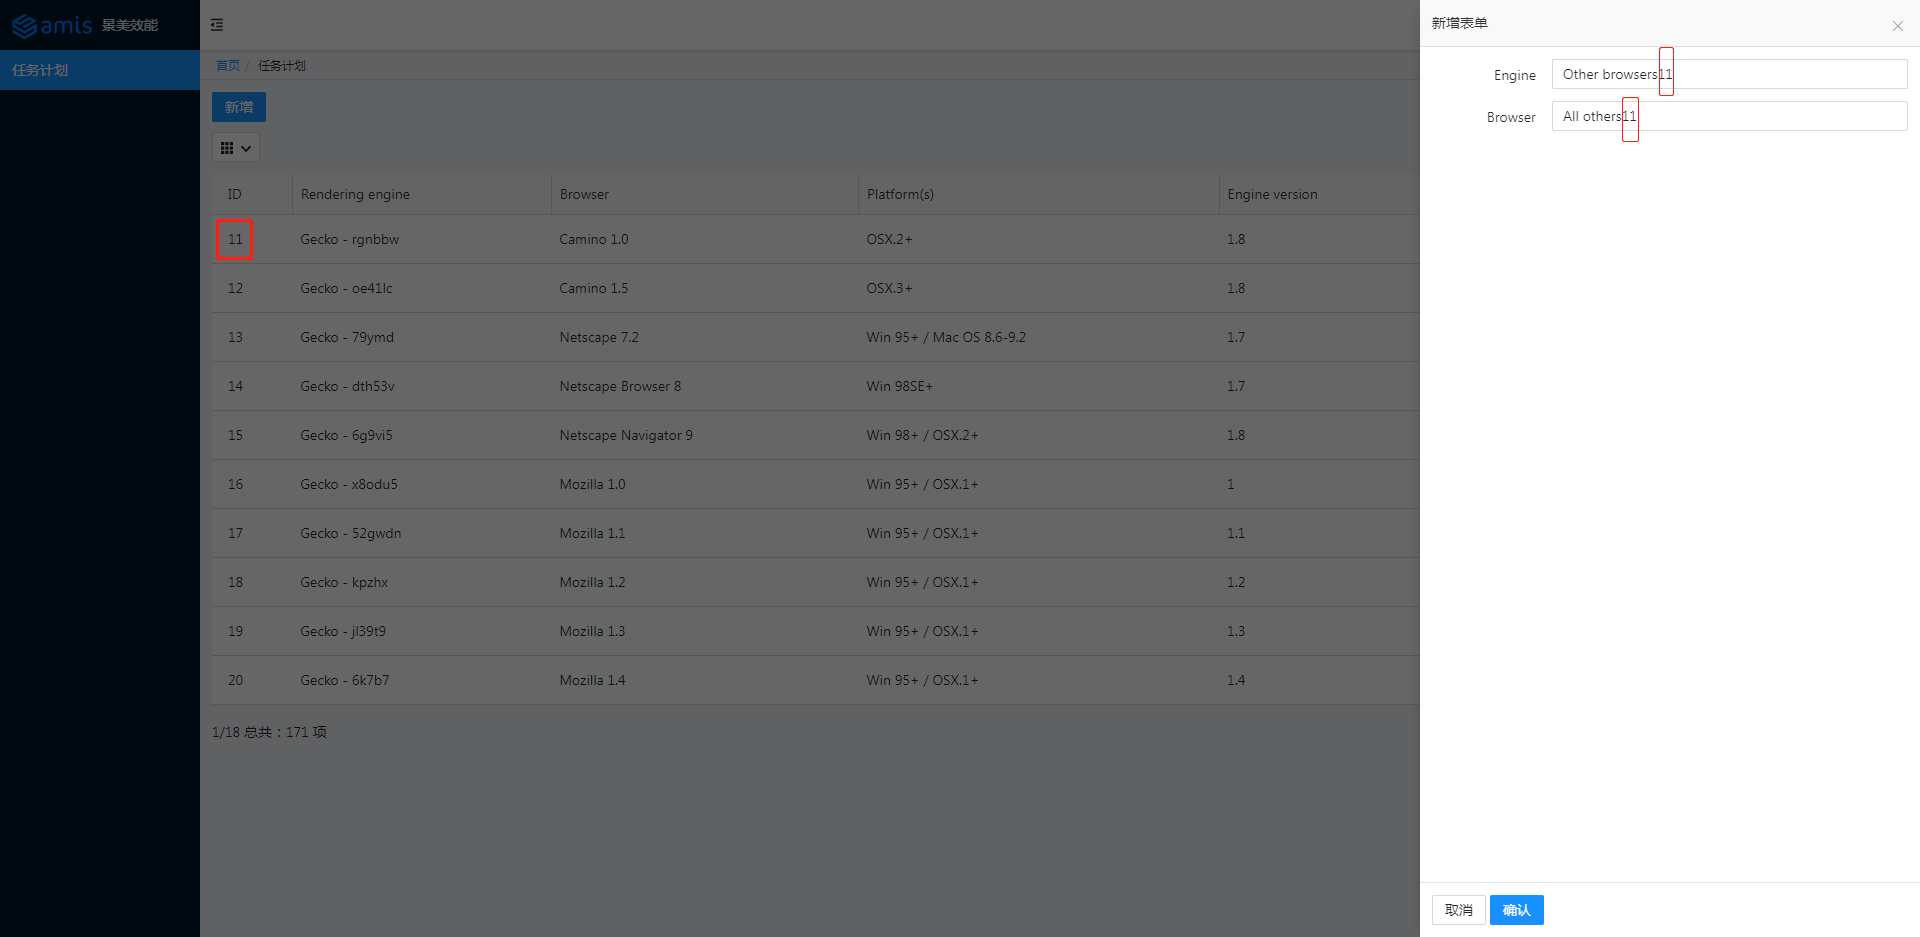
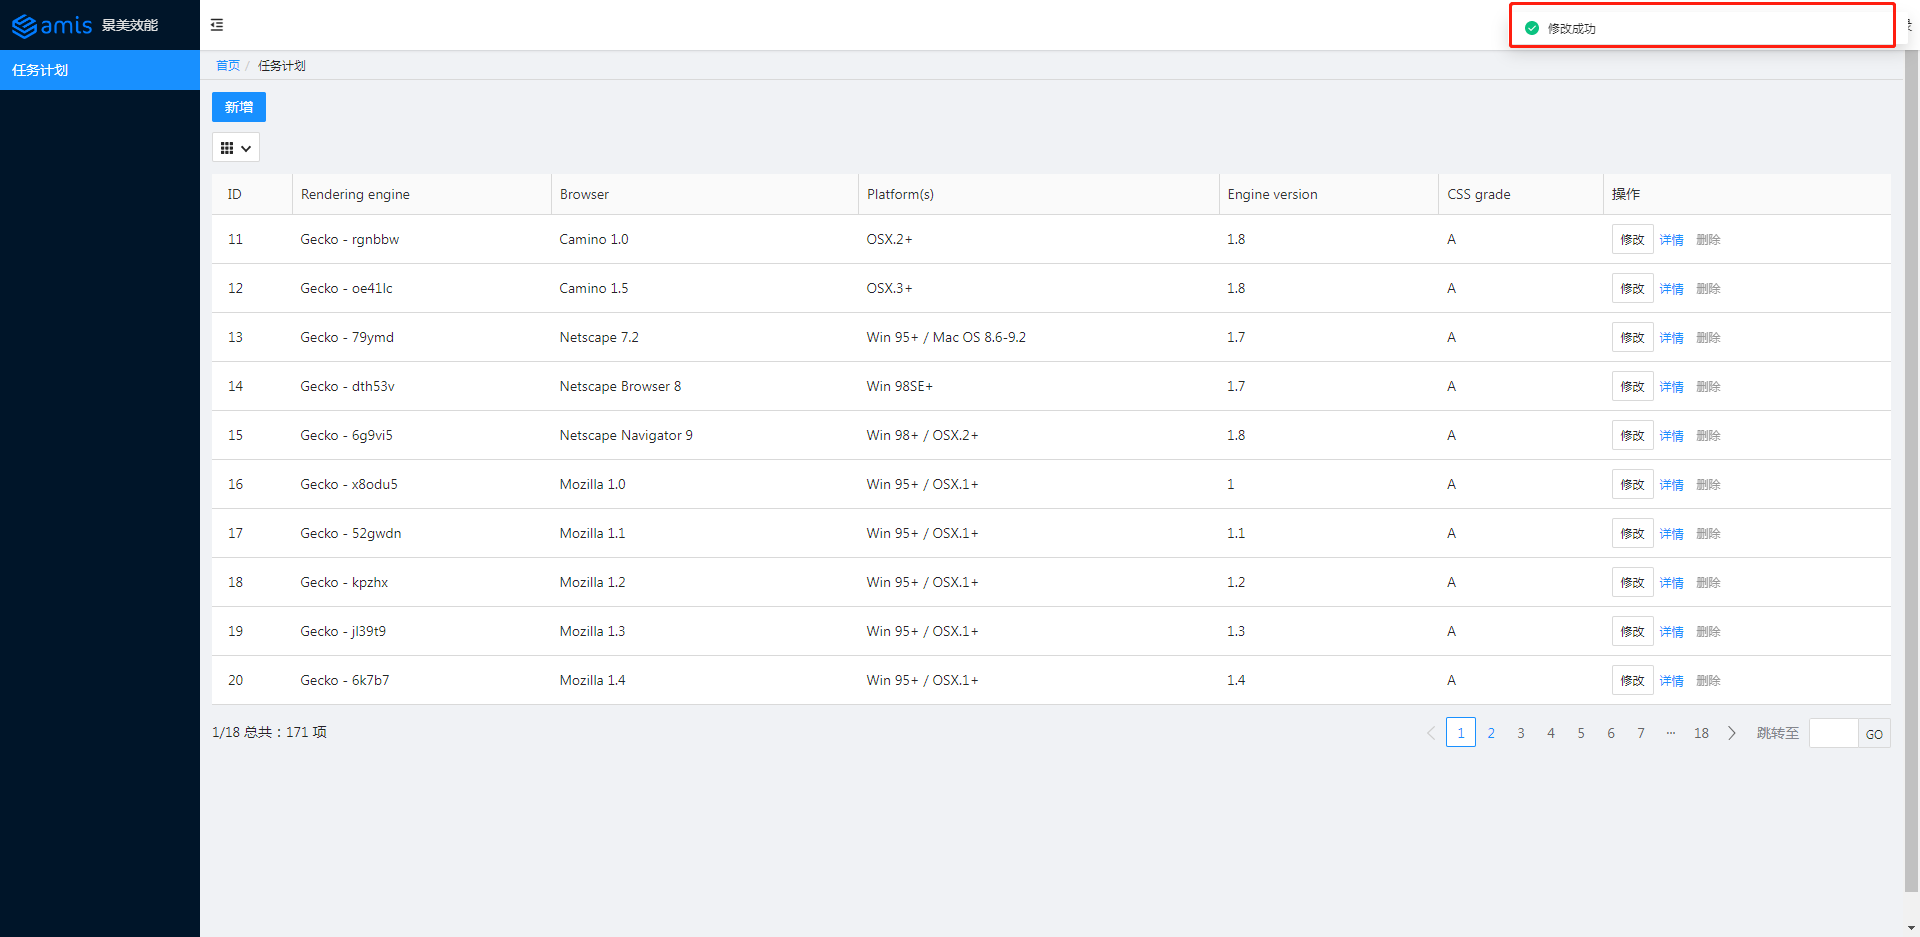
点击保存。效果如下图所示:
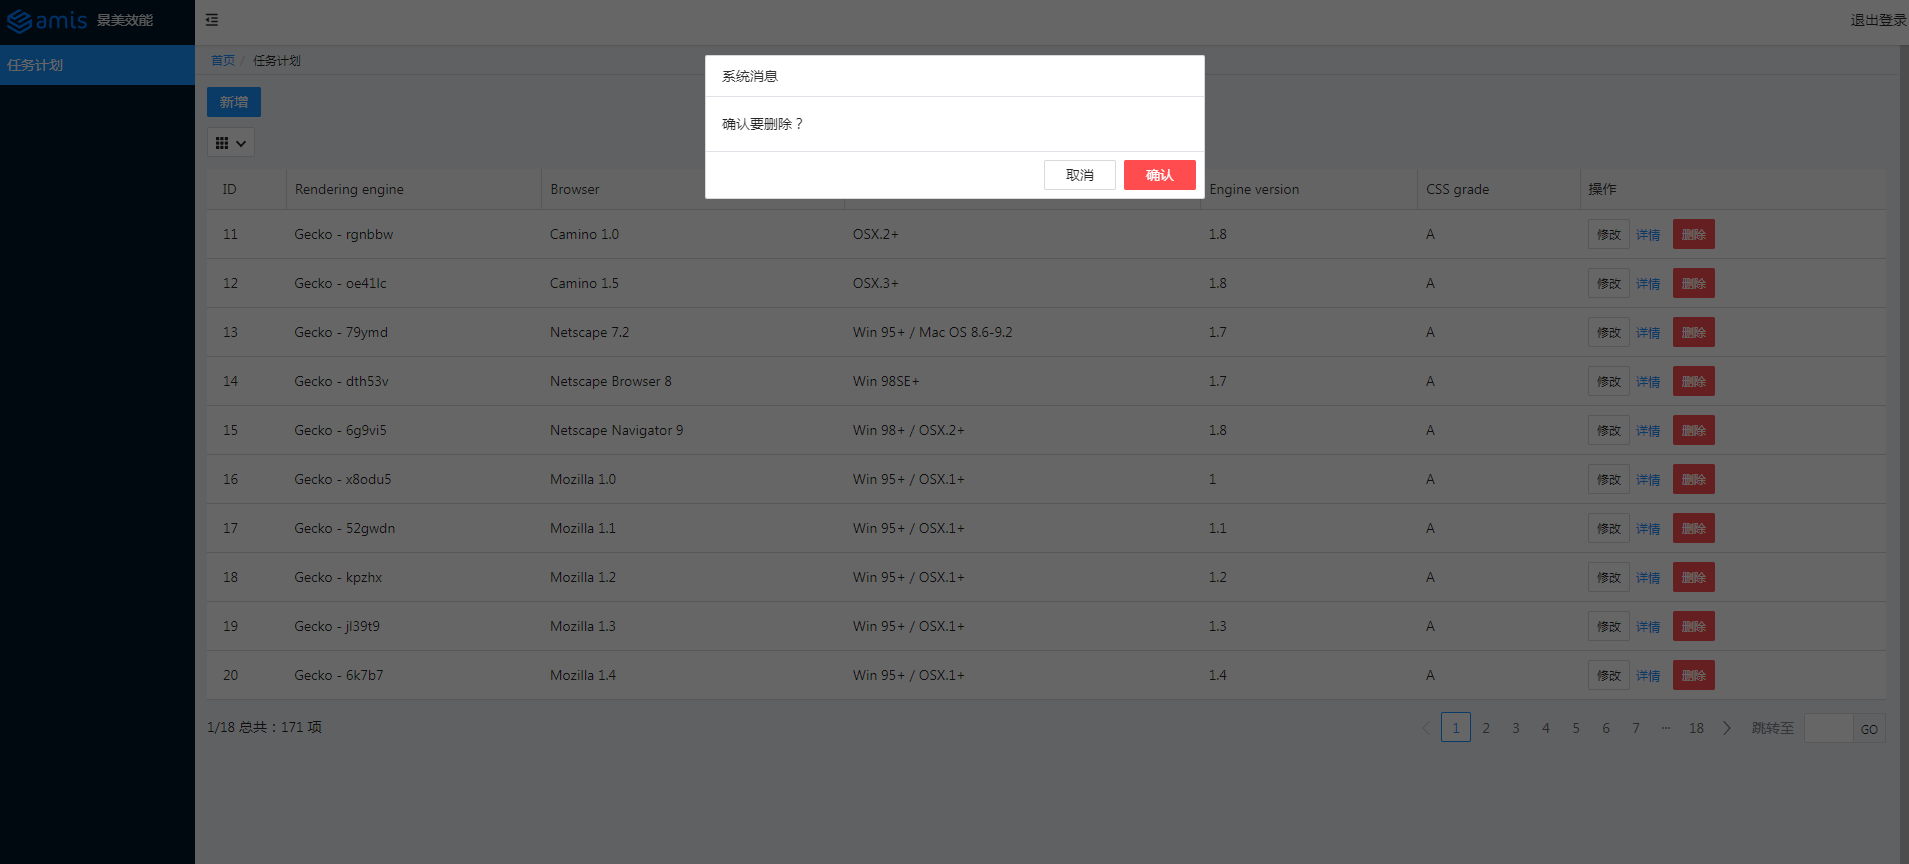
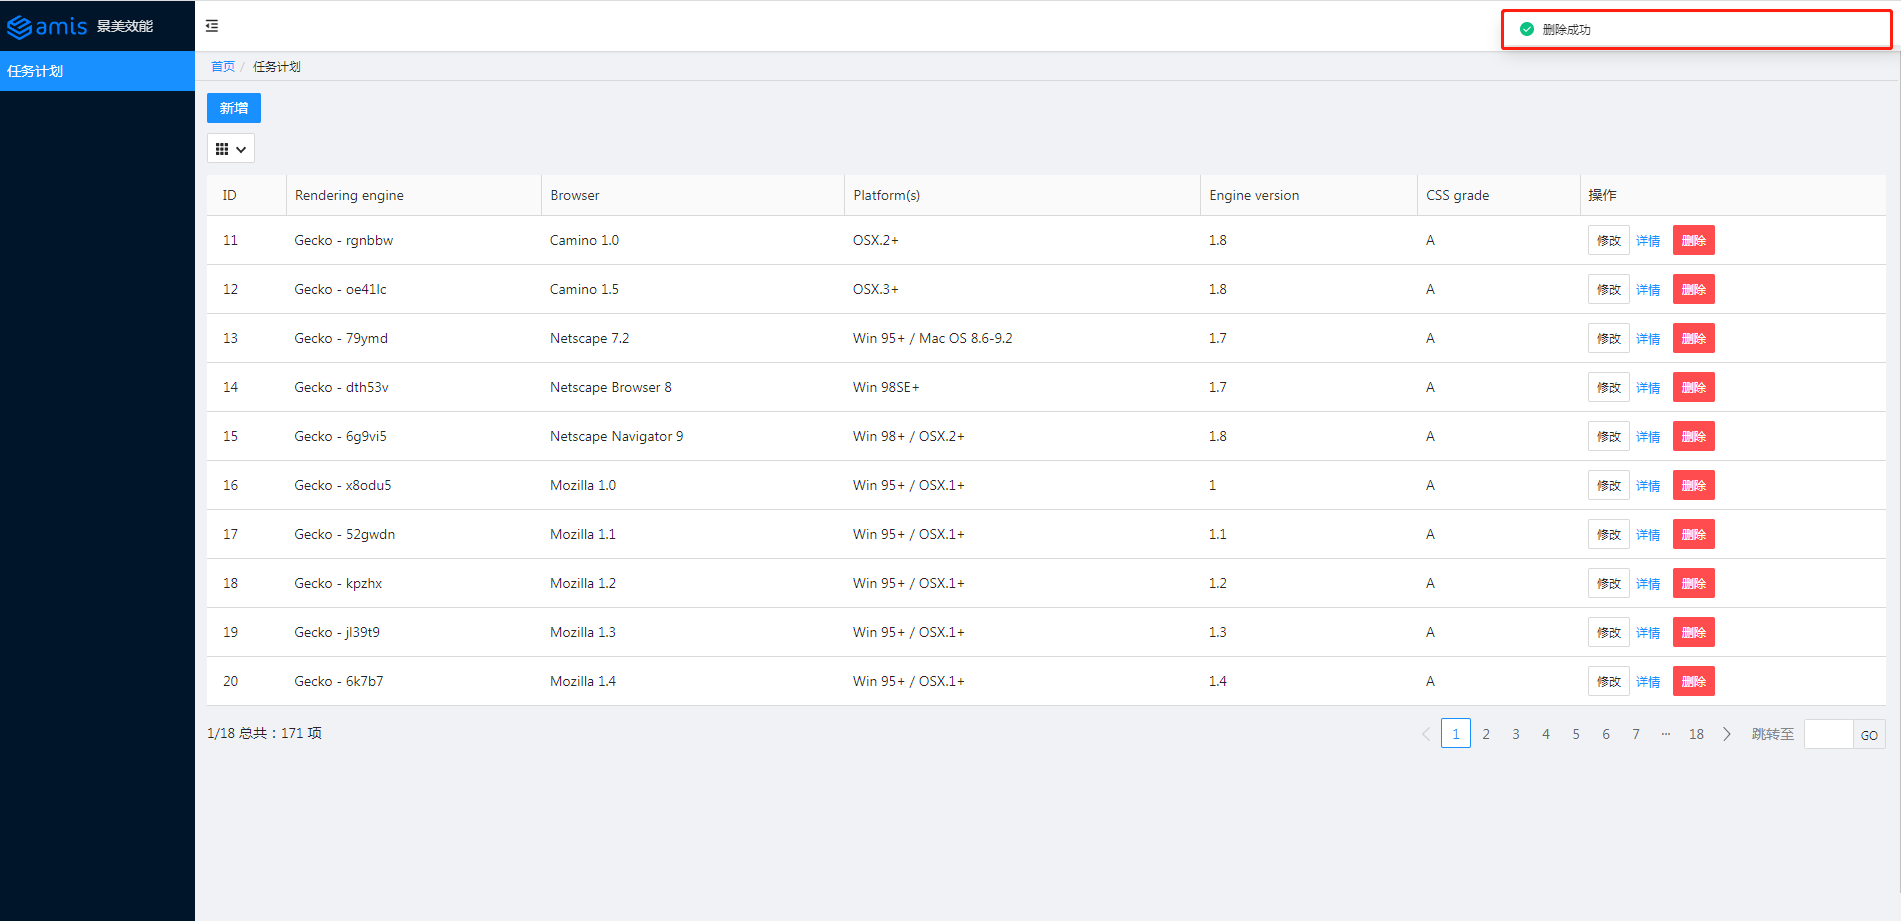
删除(Delete)
参考官网的示例,将对应代码拷贝至 schedule.js:
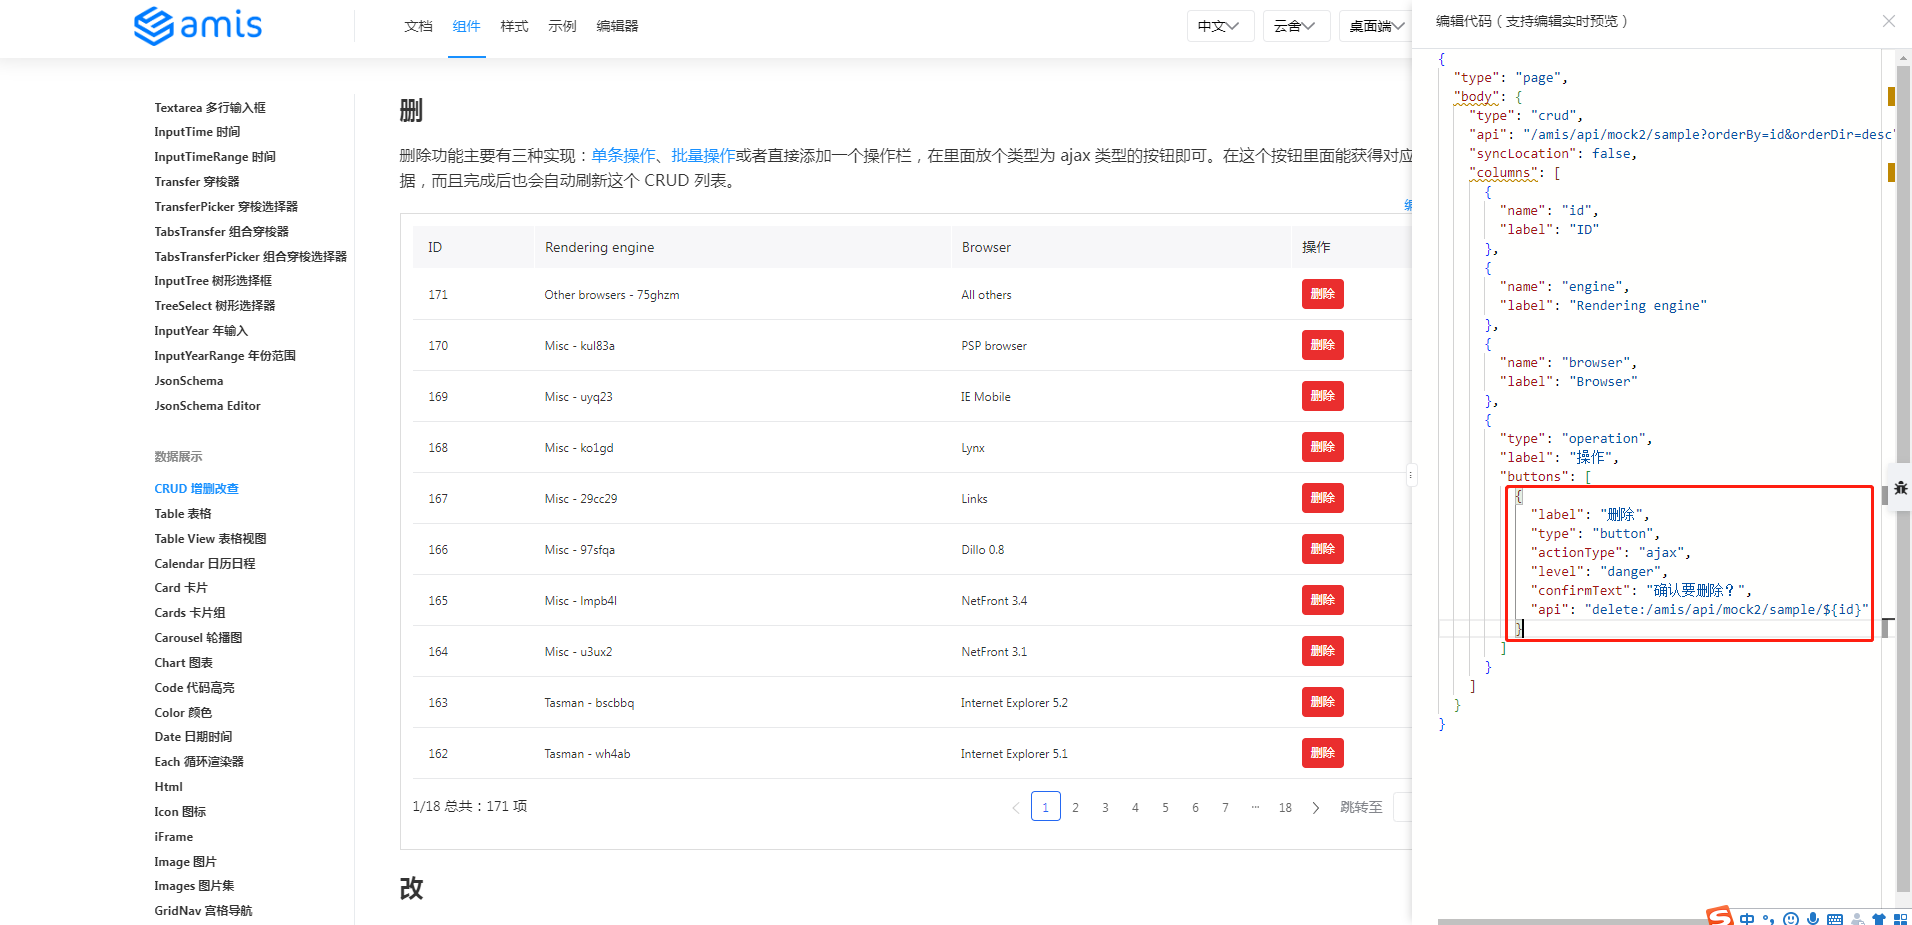
代码修改如下:
// schedule.js
{
    "label": "删除",
    "type": "button",
    "actionType": "ajax",
    "level": "danger",
    "confirmText": "确认要删除?",
    "api": "delete:/api/schedule/${id}"
}
// server.js
// 删除
app.delete('/api/schedule/:id', function (req, res) {
    const {id} = req.params
    // post:/api/schedule/:id 11
    console.log('delete:/api/schedule/:id', id)
    res.json({"status":0, "msg": "删除成功", "data":{}})
})
效果如下图所示:
读取(Retrieve)
参考官网的示例,将对应代码拷贝至 schedule.js,主要是 autoGenerateFilter 和 searchable:
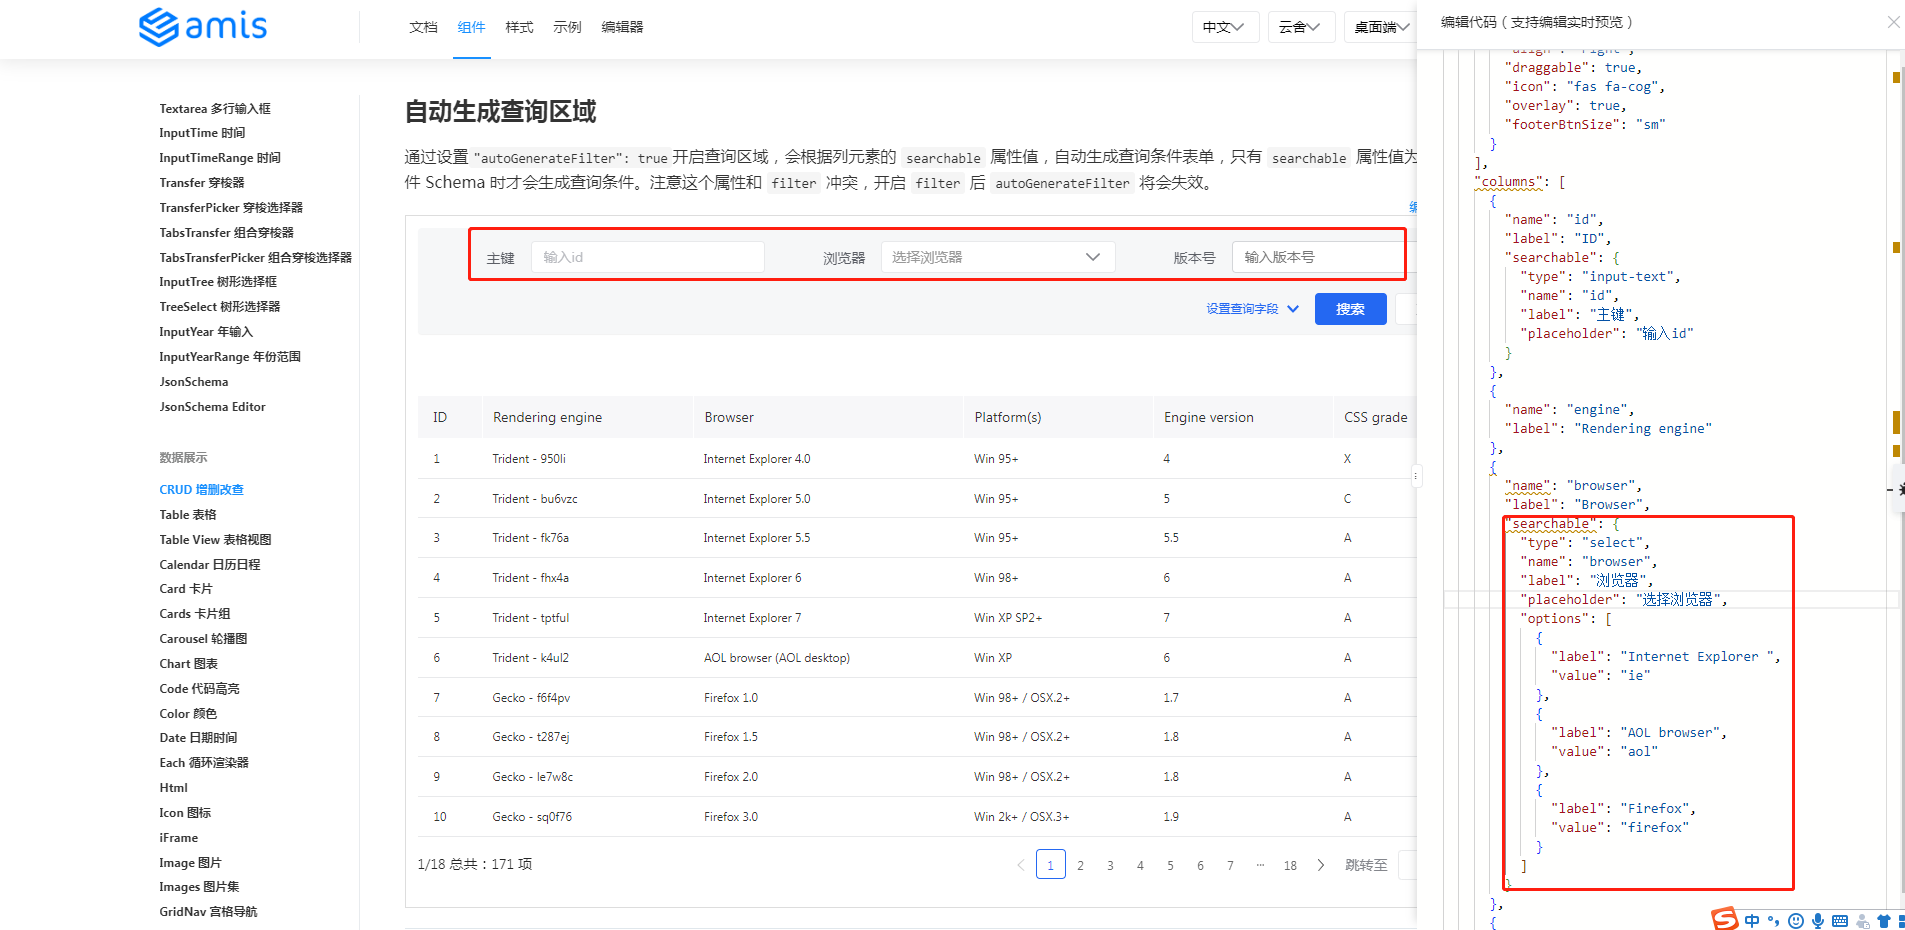
代码修改如下:
Administrator@ /e/pengjiali/amis-test (master)
$ git diff  public/pages/schedule.js
...
                        "type": "crud",
                        "api": "/api/schedule",
                        "syncLocation": false,
+                       // 通过设置"autoGenerateFilter": true开启查询区域
+                       "autoGenerateFilter": true,
                        "columns": [
                                {
                                        "name": "id",
@@ -37,11 +39,34 @@
                                },
                                {
                                        "name": "engine",
-                                       "label": "Rendering engine"
+                                       "label": "Rendering engine",
+                                       // 简单型
+                                       "searchable": true,
                                },
                                {
                                        "name": "browser",
-                                       "label": "Browser"
+                                       "label": "Browser",
+                                       // 复制型。重新定义传给后端的name等等
+                                       "searchable": {
+                                               "type": "select",
+                                               "name": "browser",
+                                               "label": "浏览器",
+                                               "placeholder": "选择浏览器",
+                                               "options": [
+                                                 {
+                                                       "label": "Internet Explorer ",
+                                                       "value": "ie"
+                                                 },
+                                                 {
+                                                       "label": "AOL browser",
+                                                       "value": "aol"
+                                                 },
+                                                 {
+                                                       "label": "Firefox",
+                                                       "value": "firefox"
+                                                 }
+                                               ]
+                                         }
                                },
                                {
                                        "name": "platform",
效果如下图所示:
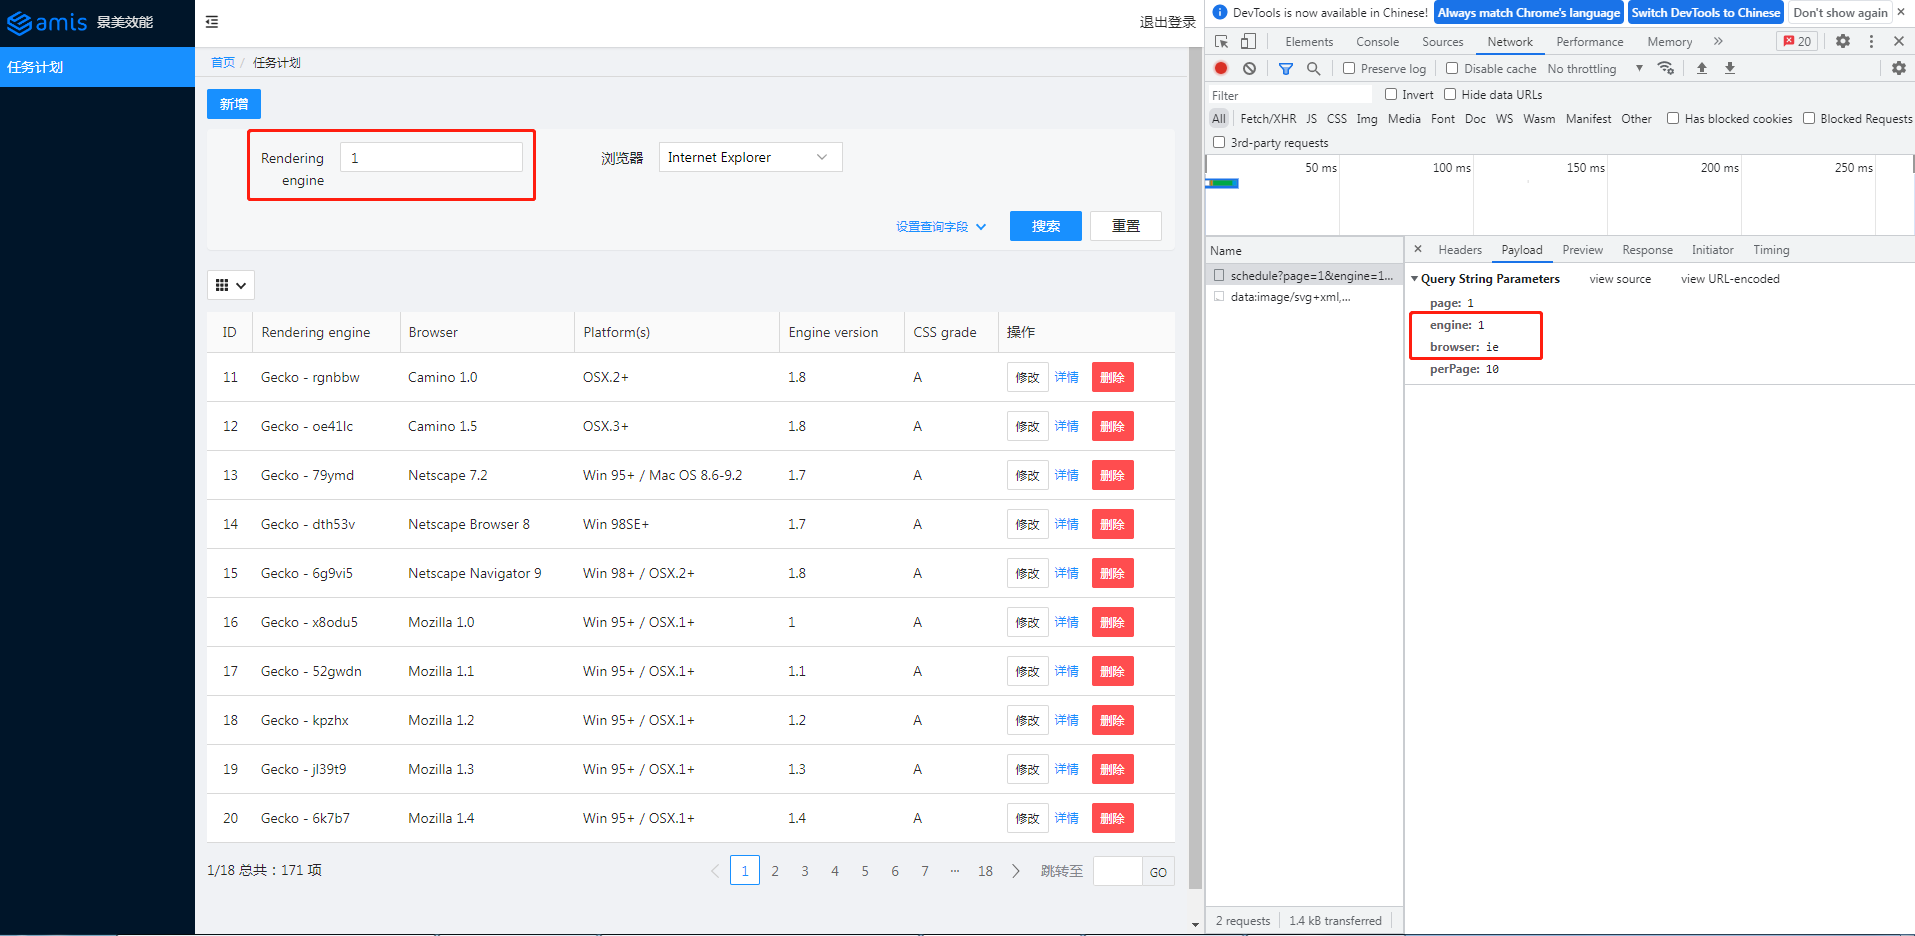
查询字段 1 和 ie 已发送给后端。
amis 后台系统完整代码
至此,我们就用 amis 搭建了一个后台系统,包括登录页、简单的权限控制以及任务计划模块。
后续如果需要添加其他类似的模块,差不多只需要写配置。
这里的任务计划模块(schedule.js)不到 200 行,包含的功能却比较丰富:分页的表格列表、增加、删除、修改、详情和查询。
schedule.js
(function () {
	const response = {
		"type": "page",
		"body": [{
			"label": "新增",
			"type": "button",
			"actionType": "dialog",
			"level": "primary",
			"className": "m-b-sm",
			"dialog": {
				"title": "新增表单",
				"body": {
					"type": "form",
					"api": "post:/api/schedule",
					"body": [
						{
							"type": "input-text",
							"name": "engine",
							"label": "Engine"
						},
						{
							"type": "input-text",
							"name": "browser",
							"label": "Browser"
						}
					]
				}
			}
		}, {
			"type": "crud",
			"api": "/api/schedule",
			"syncLocation": false,
			// 通过设置"autoGenerateFilter": true开启查询区域
			"autoGenerateFilter": true,
			"columns": [
				{
					"name": "id",
					"label": "ID"
				},
				{
					"name": "engine",
					"label": "Rendering engine",
					// 简单型
					"searchable": true,
				},
				{
					"name": "browser",
					"label": "Browser",
					// 复制型。重新定义传给后端的name等等
					"searchable": {
						"type": "select",
						"name": "browser",
						"label": "浏览器",
						"placeholder": "选择浏览器",
						"options": [
						  {
							"label": "Internet Explorer ",
							"value": "ie"
						  },
						  {
							"label": "AOL browser",
							"value": "aol"
						  },
						  {
							"label": "Firefox",
							"value": "firefox"
						  }
						]
					  }
				},
				{
					"name": "platform",
					"label": "Platform(s)"
				},
				{
					"name": "version",
					"label": "Engine version"
				},
				{
					"name": "grade",
					"label": "CSS grade"
				},
				{
					"type": "operation",
					"label": "操作",
					"buttons": [
						{
							"label": "修改",
							"type": "button",
							// 默认是抽屉样式,也提供了通常的弹框样式
							"actionType": "drawer",
							"drawer": {
								"title": "新增表单",
								"body": {
									"type": "form",
									// 表单初始化。如果不配置,表单中的数据直接来自前端
									"initApi": "/api/schedule/${id}",
									"api": "post:/api/schedule/${id}",
									"body": [
										{
											"type": "input-text",
											"name": "engine",
											"label": "Engine"
										},
										{
											"type": "input-text",
											"name": "browser",
											"label": "Browser"
										}
									]
								}
							}
						},
						{
							"label": "详情",
							"type": "button",
							"level": "link",
							"actionType": "dialog",
							"dialog": {
								"title": "查看详情",
								"body": {
									"type": "form",
									"body": [
										{
											"type": "input-text",
											"name": "engine",
											"label": "Engine"
										},
										{
											"type": "input-text",
											"name": "browser",
											"label": "Browser"
										},
										{
											"type": "input-text",
											"name": "platform",
											"label": "platform"
										},
										{
											"type": "input-text",
											"name": "version",
											"label": "version"
										},
										{
											"type": "control",
											"label": "grade",
											"body": {
												"type": "tag",
												"label": "${grade}",
												"displayMode": "normal",
												"color": "active"
											}
										}
									]
								}
							}
						},
						{
							"label": "删除",
							"type": "button",
							"actionType": "ajax",
							"level": "danger",
							"confirmText": "确认要删除?",
							"api": "delete:/api/schedule/${id}"
						}
					]
				}
			]
		}
		]
	}

	window.jsonpCallback && window.jsonpCallback(response);
})();
site.json
{
  "status": 0,
  "msg": "",
  "data": {
    "pages": [
      {
        "label": "Home",
        "url": "/",
        "redirect": "/schedule"
      },
      {
        "children": [
          {
            "label": "任务计划",
            "schemaApi": "jsonp:/static/pages/schedule.js?callback=jsonpCallback",
            "url": "/schedule"
          }

        ]
      }

    ]
  }
}
home.html
<!DOCTYPE html>
<html>

<head>
  <meta charset="UTF-8" />
  <title>amis admin</title>
  <meta http-equiv="Content-Type" content="text/html; charset=utf-8" />
  <meta name="viewport" content="width=device-width, initial-scale=1, maximum-scale=1" />
  <meta http-equiv="X-UA-Compatible" content="IE=Edge" />
  <link rel="stylesheet" title="default" href="https://unpkg.com/amis@beta/sdk/antd.css" />
  <link rel="stylesheet" href="https://unpkg.com/amis@beta/sdk/helper.css" />
  <script src="https://unpkg.com/amis@beta/sdk/sdk.js"></script>
  <script src="https://unpkg.com/vue@2"></script>
  <script src="https://unpkg.com/[email protected]/umd/history.js"></script>
  <style>
    html,
    body,
    .app-wrapper {
      position: relative;
      width: 100%;
      height: 100%;
      margin: 0;
      padding: 0;
    }
  </style>
</head>

<body>
  <div id="root" class="app-wrapper"></div>
  <script>
    (function () {
      let amis = amisRequire('amis/embed');
      const match = amisRequire('path-to-regexp').match;

      // 如果想用 browserHistory 请切换下这处代码, 其他不用变
      // const history = History.createBrowserHistory();
      const history = History.createHashHistory();

      const app = {
        type: 'app',
        brandName: '后台系统',
        logo: 'https://aisuda.bce.baidu.com/amis/static/logo_408c434.png',
        header: {
          type: 'tpl',
          inline: false,
          className: 'w-full',
          tpl: '<div class="flex justify-between"><div></div><div>退出登录</div></div>'
        },
        // footer: '<div class="p-2 text-center bg-light">底部区域</div>',
        // asideBefore: '<div class="p-2 text-center">菜单前面区域</div>',
        // asideAfter: '<div class="p-2 text-center">菜单后面区域</div>',
        api: '/static/pages/site.json'
      };

      function normalizeLink(to, location = history.location) {
        to = to || '';

        if (to && to[0] === '#') {
          to = location.pathname + location.search + to;
        } else if (to && to[0] === '?') {
          to = location.pathname + to;
        }

        const idx = to.indexOf('?');
        const idx2 = to.indexOf('#');
        let pathname = ~idx
          ? to.substring(0, idx)
          : ~idx2
            ? to.substring(0, idx2)
            : to;
        let search = ~idx ? to.substring(idx, ~idx2 ? idx2 : undefined) : '';
        let hash = ~idx2 ? to.substring(idx2) : location.hash;

        if (!pathname) {
          pathname = location.pathname;
        } else if (pathname[0] != '/' && !/^https?\:\/\//.test(pathname)) {
          let relativeBase = location.pathname;
          const paths = relativeBase.split('/');
          paths.pop();
          let m;
          while ((m = /^\.\.?\//.exec(pathname))) {
            if (m[0] === '../') {
              paths.pop();
            }
            pathname = pathname.substring(m[0].length);
          }
          pathname = paths.concat(pathname).join('/');
        }

        return pathname + search + hash;
      }

      function isCurrentUrl(to, ctx) {
        if (!to) {
          return false;
        }
        const pathname = history.location.pathname;
        const link = normalizeLink(to, {
          ...location,
          pathname,
          hash: ''
        });

        if (!~link.indexOf('http') && ~link.indexOf(':')) {
          let strict = ctx && ctx.strict;
          return match(link, {
            decode: decodeURIComponent,
            strict: typeof strict !== 'undefined' ? strict : true
          })(pathname);
        }

        return decodeURI(pathname) === link;
      }

      let amisInstance = amis.embed(
        '#root',
        app,
        {
          location: history.location
        },
        {
          // 全局请求适配器。参考:官网 -> 快速开始 -> 控制 amis 的行为
          requestAdaptor(api) {
            api.headers.Authorization = localStorage.getItem('token')
            console.log('api', api)
            return api;
          },
          // 全局响应适配器。参考:官网 -> 快速开始 -> 控制 amis 的行为
          responseAdaptor(api, payload, query, request, response) {
            if (payload.status === 401) {
              console.log('未授权,请重新登录')
              location.href = '/login'
            }
            return payload;
          },
          // watchRouteChange: fn => {
          //   return history.listen(fn);
          // },
          updateLocation: (location, replace) => {
            location = normalizeLink(location);
            if (location === 'goBack') {
              return history.goBack();
            } else if (
              (!/^https?\:\/\//.test(location) &&
                location ===
                history.location.pathname + history.location.search) ||
              location === history.location.href
            ) {
              // 目标地址和当前地址一样,不处理,免得重复刷新
              return;
            } else if (/^https?\:\/\//.test(location) || !history) {
              return (window.location.href = location);
            }

            history[replace ? 'replace' : 'push'](location);
          },
          jumpTo: (to, action) => {
            if (to === 'goBack') {
              return history.goBack();
            }

            to = normalizeLink(to);

            if (isCurrentUrl(to)) {
              return;
            }

            if (action && action.actionType === 'url') {
              action.blank === false
                ? (window.location.href = to)
                : window.open(to, '_blank');
              return;
            } else if (action && action.blank) {
              window.open(to, '_blank');
              return;
            }

            if (/^https?:\/\//.test(to)) {
              window.location.href = to;
            } else if (
              (!/^https?\:\/\//.test(to) &&
                to === history.pathname + history.location.search) ||
              to === history.location.href
            ) {
              // do nothing
            } else {
              history.push(to);
            }
          },
          isCurrentUrl: isCurrentUrl,
          theme: 'antd'
        }
      );

      history.listen(state => {
        amisInstance.updateProps({
          location: state.location || state
        });
      });
    })();
  </script>
</body>

</html>
login.html
<!DOCTYPE html>
<html lang="zh">

<head>
    <meta charset="UTF-8" />
    <title>amis demo</title>
    <meta http-equiv="Content-Type" content="text/html; charset=utf-8" />
    <meta name="viewport" content="width=device-width, initial-scale=1, maximum-scale=1" />
    <meta http-equiv="X-UA-Compatible" content="IE=Edge" />
    <link rel="stylesheet" href="/static/sdk/sdk.css" />
    <link rel="stylesheet" href="/static/sdk/helper.css" />
    <link rel="stylesheet" href="/static/sdk/iconfont.css" />
    <!-- 这是默认主题所需的,如果是其他主题则不需要 -->
    <!-- 从 1.1.0 开始 sdk.css 将不支持 IE 11,如果要支持 IE11 请引用这个 css,并把前面那个删了 -->
    <!-- <link rel="stylesheet" href="sdk-ie11.css" /> -->
    <!-- 不过 amis 开发团队几乎没测试过 IE 11 下的效果,所以可能有细节功能用不了,如果发现请报 issue -->
    <style>
        html,
        body,
        .app-wrapper {
            position: relative;
            width: 100%;
            height: 100%;
            margin: 0;
            padding: 0;
        }
    </style>
</head>

<body>
    <div id="root" class="app-wrapper"></div>
    <script src="/static/sdk/sdk.js"></script>
    <script type="text/javascript">
        (function () {
            let amis = amisRequire('amis/embed');
            // 通过替换下面这个配置来生成不同页面
            let amisJSON = {
                type: 'page',
                title: 'amis 后台系统登录',
                body: {
                    type: 'form',
                    mode: 'horizontal',
                    api: {
                        method: 'post',
                        url: '/api/login',
                        adaptor: function (payload, response) {
                            if (payload.status === 0) {
                                localStorage.setItem('token', payload.data.token)
                            }
                            console.log('payload', payload)
                            return payload
                        }
                    },
                    // 官网 -> 组件 -> Form 表单 -> 页面跳转
                    redirect: "/home",
                    body: [
                        {
                            label: '姓名',
                            type: 'input-text',
                            name: 'name'
                        },
                        {
                            label: '密码',
                            type: 'input-password',
                            name: 'password'
                        }
                    ]
                }
            };
            let amisScoped = amis.embed('#root', amisJSON);
        })();
    </script>
</body>

</html>
server.js:
// server.js

const path = require('path')
const express = require('express')
const app = express()
const port = 3000

app.use(express.json()) // for parsing application/json
app.use(express.urlencoded({ extended: true })) // for parsing application/x-www-form-urlencoded

// 将静态资源对外开放
app.use('/static', express.static(path.join(__dirname, 'public')))

app.get('/', function(req, res){
    res.redirect('/home')
})

app.get('/home', function(req, res){
    res.sendFile(path.join(__dirname, 'public', 'home.html'))
})

app.get('/login', function(req, res){
    res.sendFile(path.join(__dirname, 'public', 'login.html'))
})

// 登录接口
app.post('/api/login', function (req, res) {
    const { name, password } = req.body

    // 存在该用户
    if (db.selectUser(name, password).length) {
        res.json({ "status": 0, "msg": "登录成功", data: { token: 'token00001' } })
    } else {
        res.json({ "status": 1, "msg": "用户名密码错误。请试试 admin/123456" })
    }
});

// 修改-查询
app.get('/api/schedule/:id', function (req, res) {
    // /api/schedule/:id { id: '11' }
    console.log('/api/schedule/:id', req.params)

    const {id} = req.params
    // 数据来自官网
    res.json({"status":0,"data":{"engine":"Other browsers" + id,"browser":"All others" + id,"platform":"-","version":"-","grade":"U","id":id}})
})

// 修改-提交
app.post('/api/schedule/:id', function (req, res) {
    const {id} = req.params
    // post:/api/schedule/:id 11
    console.log('post:/api/schedule/:id', id)
    res.json({"status":0, "msg": "修改成功", "data":{}})
})

// 删除
app.delete('/api/schedule/:id', function (req, res) {
    const {id} = req.params
    // post:/api/schedule/:id 11
    console.log('delete:/api/schedule/:id', id)
    res.json({"status":0, "msg": "删除成功", "data":{}})
})

// 列表
app.get('/api/schedule', function (req, res) {
    console.log('/api/schedule')
    // req.get(field) - 返回指定的HTTP请求标头字段(不区分大小写的匹配)
    const token = req.get('Authorization')
    if (token === 'null') {
        res.json({ status: 401, msg: '401 未授权' })
        return
    }
    const { page, perPage } = req.query
    res.json({ "status": 0, "msg": "ok", "data": { "count": 171, "rows": [{ "engine": "Gecko - rgnbbw", "browser": "Camino 1.0", "platform": "OSX.2+", "version": "1.8", "grade": "A", "id": page * perPage + 1 }, { "engine": "Gecko - oe41lc", "browser": "Camino 1.5", "platform": "OSX.3+", "version": "1.8", "grade": "A", "id": page * perPage + 2 }, { "engine": "Gecko - 79ymd", "browser": "Netscape 7.2", "platform": "Win 95+ / Mac OS 8.6-9.2", "version": "1.7", "grade": "A", "id": page * perPage + 3 }, { "engine": "Gecko - dth53v", "browser": "Netscape Browser 8", "platform": "Win 98SE+", "version": "1.7", "grade": "A", "id": page * perPage + 4 }, { "engine": "Gecko - 6g9vi5", "browser": "Netscape Navigator 9", "platform": "Win 98+ / OSX.2+", "version": "1.8", "grade": "A", "id": 15 }, { "engine": "Gecko - x8odu5", "browser": "Mozilla 1.0", "platform": "Win 95+ / OSX.1+", "version": "1", "grade": "A", "id": 16 }, { "engine": "Gecko - 52gwdn", "browser": "Mozilla 1.1", "platform": "Win 95+ / OSX.1+", "version": "1.1", "grade": "A", "id": 17 }, { "engine": "Gecko - kpzhx", "browser": "Mozilla 1.2", "platform": "Win 95+ / OSX.1+", "version": "1.2", "grade": "A", "id": 18 }, { "engine": "Gecko - jl39t9", "browser": "Mozilla 1.3", "platform": "Win 95+ / OSX.1+", "version": "1.3", "grade": "A", "id": 19 }, { "engine": "Gecko - 6k7b7", "browser": "Mozilla 1.4", "platform": "Win 95+ / OSX.1+", "version": "1.4", "grade": "A", "id": 20 }] } })
});

// 新增
app.post('/api/schedule', function (req, res) {
    const { engine, browser } = req.body
    // 授权部分应该可以提取到一个地方,这里仅做演示
    const token = req.get('Authorization')
    if (token === 'null') {
        res.json({ status: 401, msg: '401 未授权' })
        return
    }

    console.log(`存入数据库:engine=${engine} browser=${browser}`)
    res.json({ "status": 0, "msg": "保存成功", "data": {} })
});

// 开启服务
app.listen(port, () => {
    console.log(`Example app listening at http://localhost:${port}`)
})

// 处理 404 响应
app.use(function (req, res, next) {
    res.status(404).send("404")
})

// 模拟数据库
class DB {
    constructor() {
        this.database = {
            userTable: [
                { name: 'a', password: 'a' },
                { name: 'admin', password: '123456' },
            ]
        }
    }
    selectUser(name, password) {
        const table = this.database.userTable
        return table.filter(item => item.name === name && item.password === password)
    }
}
const db = new DB()
package.json:
// package.json
{
  "name": "amis-test",
  "version": "1.0.0",
  "description": "",
  "main": "index.js",
  "scripts": {
    "test": "echo \"Error: no test specified\" && exit 1"
  },
  "keywords": [],
  "author": "",
  "license": "ISC",
  "dependencies": {
    "cors": "^2.8.5",
    "express": "^4.18.1"
  },
  "devDependencies": {
    "nodemon": "^2.0.18"
  }
}
低代码平台
github 这里罗列了许多低代码平台,可自行查看。
Recommend
About Joyk
Aggregate valuable and interesting links.
Joyk means Joy of geeK