
HarmonyOS - 实现带日期效果的待办事项-51CTO.COM
source link: https://os.51cto.com/article/712094.html
Go to the source link to view the article. You can view the picture content, updated content and better typesetting reading experience. If the link is broken, please click the button below to view the snapshot at that time.

HarmonyOS - 实现带日期效果的待办事项-51CTO.COM

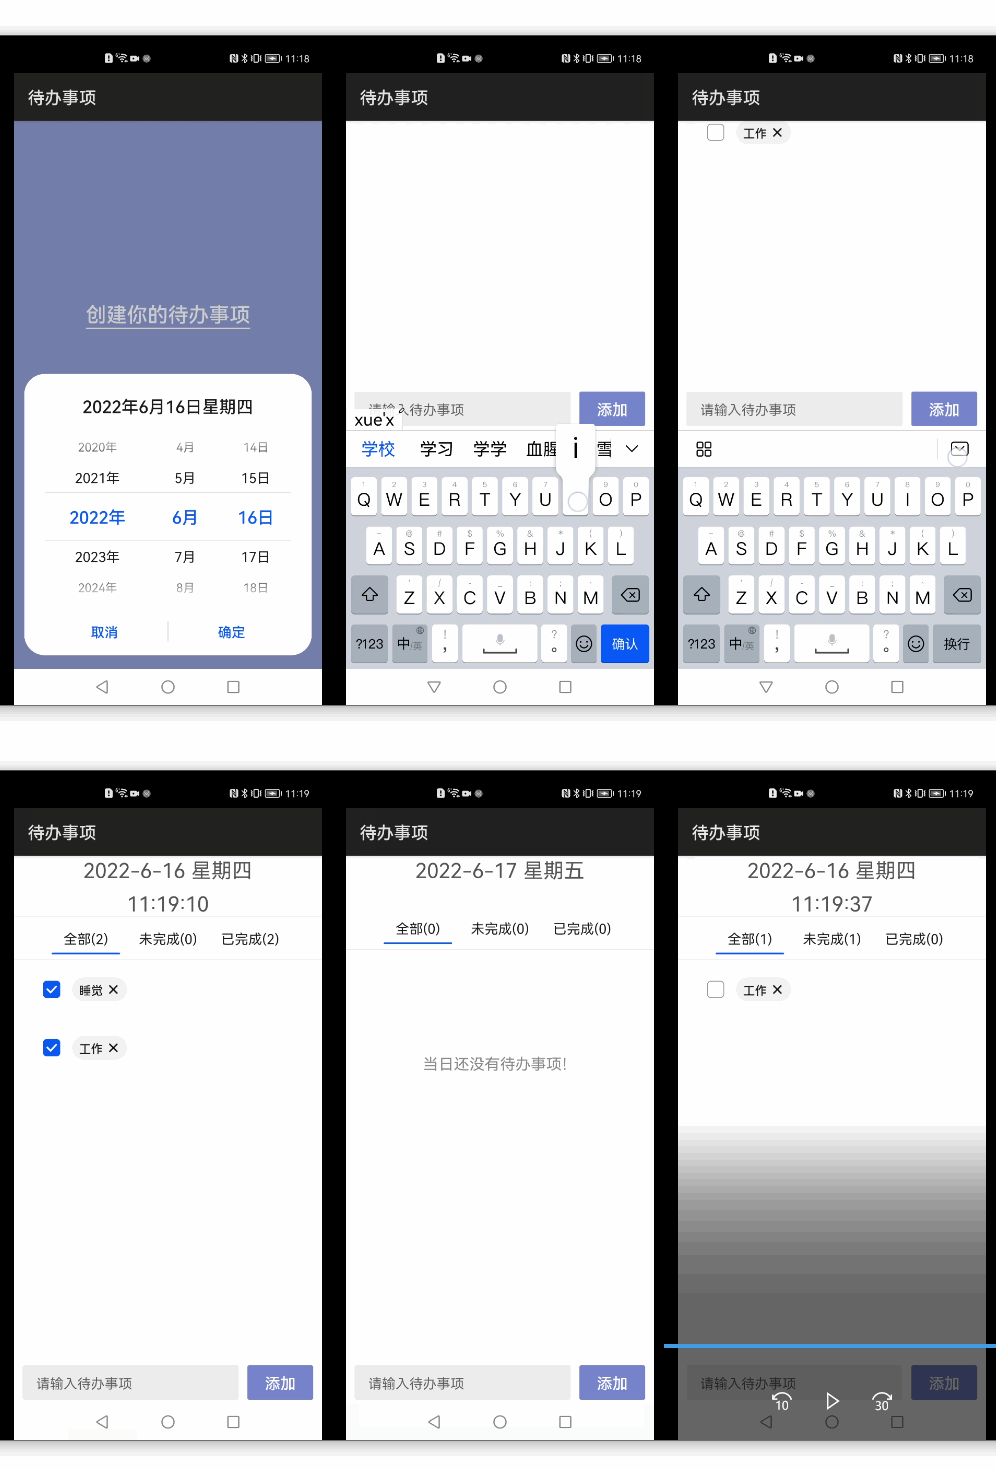
初学鸿蒙JS开发技术不久,想要快速结合官方文档上手鸿蒙JS组件开发,本文主要结合HarmonyOS官网上的相关组件及API实现一个根据日期持久化存储待办事项。

1、确定两个页面
首先确定有两个页面:选择日期页面、待办事项页面。选择日期页面将选择的日期如:'2022-6-16' 作为路由参数传递到代办事项页,后者把这个日期作为缓存的key去取数据,并渲染在页面上。
2、选择日期页面
页面结构如下:
<!-- index.hml -->
<div class="container">
    <text class="welcome">
        <span>创建你的待办事项</span>
    </text>
    <div class="date-picker">
        <text class="pick-date" @click="showDatePicker">
            <span>点我选择日期</span>
        </text>
        <!-- 不写value,视图将不会显示 -->
        <picker
            id="picker"
            type="date"
            start="2002-2-5"
            end="2030-6-5"
            selected="{{ getCurrentDate }}"
            onchange="dateOnChange"
            show="false">
        </picker>
    </div>
</div>
样式如下:
/* index.less */
@theme_color: rgba(120, 132, 206, .8);
.container {
    background-color: @theme_color;
    flex-direction: column;
    align-items: center;
    justify-content: center;
    .welcome {
        color: #fff;
        margin-bottom: 120px;
        font-size: 24px;
        font-weight: 600;
        border-bottom: 2px solid #fff;
    }
    .date-picker {
        justify-content: center;
        .pick-date{
            color: #FFF;
            line-height: 43px;
            border: 2px solid #fff;
            border-radius: 50px;
            padding: 10px 50px;
            font-size: 20px;
        }
    }
}时间选择器使用picker组件,type设置为date,默认值为今天。选择日期时,触发onchange事件,拿到选择的日期,点击确定后,跳转至待办事项页面,并将日期作为路由参数传递。
// index.js
import router from '@system.router';
export default {
    data: {
        dateValue: '', // 时间选择器的值
    },
    // 去待办事项页面
    goDay() {
        const self = this;
        router.push({
            uri: "pages/day/day",
            params: {
                currentDate: self.dateValue,
            }
        });
    },
    showDatePicker(){
        this.$element("picker").show();
    },
    dateOnChange(e) {
        this.dateValue = e.year + "-" + (e.month+1) + "-" + e.day;
        this.goDay();
    },
    onInit() {
        // 时间选择器默认为当天
        this.dateValue = this.getCurrentDate;
    },
    computed: {
        // 获取当前日期
        getCurrentDate() {
            let now = new Date();
            return now.getFullYear() + "-" + (now.getMonth() + 1) + "-" + now.getDate();
        }
    }
}
3待办事项页面
(1)进入待办事项页面
进入待办事项页面需要根据路由参数(传递的日期)判断是否是今天,是今天则展示动态的数字时钟。
还需要根据路由参数从缓存中读取待办事项数据,并设置给list,用于页面展示。调用官网API的storage.get()方法,由于后续修改数据可能涉及多层回调,考虑到代码可读性,将从缓存中读数据操作用Promise封装。
// day.js
data: {
    keyword: "", // 输入框内容
    list: [],
    //        list: [
    //            { title: '学习鸿蒙OS', done: false },
    //            { title: '学习js开发鸿蒙应用', done: true },
    //            { title: '学习java开发鸿蒙应用', done: false },
    //            { title: '学习鸿蒙OS', done: false },
    //        ],
    currentDate: '', // 上个页面传来的选择日期
    clock: '', // 今天的时钟
    timerID: null,
    istoday: false, // 是否今天
    noTodoTips: {
        todayTxt: '请先添加今天的待办事项吧!',
        notTodayTxt: '当日还没有待办事项!'
    },
    isListEmpty: false,
    isDoneEmpty: false,
    isUnDoneEmpty: false
},
onInit() {
    // 判断是否是今天
    this.istoday = (new Date(this.currentDate).toDateString() === new Date().toDateString());
    if (this.istoday) { // 如果是今天则显示时钟
        this.timerID = setInterval(this.updateTime, 1000);
        this.updateTime();
    }
    this.setList();
},
// 从缓存中拿数据并赋值给list
async setList() {
    let res = await this.getListFromStorage(this.currentDate);
    this.list = res;

    // 用于控制总、未完成、完成的视图显示
    this.isListEmpty = (this.list.length == 0);
    this.isUnDoneEmpty = (this.list.filter(item => !item.done).length == 0);
    this.isDoneEmpty = (this.list.filter(item => item.done).length == 0);
},
getListFromStorage(key) {
    return new Promise((resolve, reject) => {
        storage.get({
            key: key,
            success: function(data) {
                resolve(JSON.parse(data));
            },
            fail: function(data, code) {
                reject(JSON.parse(data));
            },
            complete: function() {},
            default: [] // key不存在则返回的默认值
        });
    });
},
updateTime() {
    let now = new Date();
    this.clock =
        this.zeroPadding(now.getHours(), 2)
        + ':' +
        this.zeroPadding(now.getMinutes(), 2)
        + ':' +
        this.zeroPadding(now.getSeconds(), 2);
},
zeroPadding(num, digit) {
    let zero = '';
    for (let i = 0; i < digit; i++) {
        zero += '0';
    }
    return (zero + num).slice(-digit);
},
(2)分别展示全部、未完成、已完成待办事项
使用tabs组件和列表组件list渲染分别展示全部、未完成和已完成待办事项。
若无数据,全部区域展示 “请先添加今天的待办事项吧!”,已完成和未完成区域展示无数据图片。
<!-- day.hml -->
<div class="container">
    <div class="time-area">
        <text class="select-date">
            <span>{{ currentDate }} {{ getWeek }}</span>
        </text>
        <text class="today-time">
            <span if="{{ istoday }}">{{ clock }}</span>
        </text>
    </div>
    <tabs class="tabs" onchange="tabChange">
        <tab-bar class="tabBar">
            <text class="tabBarItem all">全部({{ getListSum }})</text>
            <text class="tabBarItem undo">未完成({{ getUndoSum }})</text>
            <text class="tabBarItem done">已完成({{ getDoneSum }})</text>
        </tab-bar>
        <tab-content class="tabContent">
            <div>
                <div if="{{ isListEmpty }}" class="no-data-all">
                    <text>
                        <span>{{ (getListSum == 0) && istoday ?  noTodoTips.todayTxt : noTodoTips.notTodayTxt}}</span>
                    </text>
                </div>
                <list class="todo-list" else>
                    <list-item class="todo-item" for="{{ list }}">
                        <div class="todo-item-inner">
                            <input type="checkbox" onchange="changeStatus($idx)" checked="{{ $item.done }}"></input>
                            <piece content="{{ $item.title }}" closable="true" onclose="remove($idx)" class="piece-item"></piece>
                        </div>
                    </list-item>
                </list>
            </div>
            <div>
                <div if="{{ isUnDoneEmpty }}" class="no-data-img">
                    <image class="no-data-images img-way" src="../../common/images/no_data.jpg" style="width: 200px;"></image>
                </div>
                <list class="todo-list" else>
                    <list-item class="todo-item" for="{{ list }}">
                        <div class="todo-item-inner" if="{{ !$item.done }}">
                            <input type="checkbox" onchange="changeStatus($idx)" checked="{{ $item.done }}"></input>
                            <piece content="{{ $item.title }}" closable="true" onclose="remove($idx)" class="piece-item"></piece>
                        </div>
                    </list-item>
                </list>
            </div>
            <div>
                <div if="{{ isDoneEmpty }}" class="no-data-img">
                    <image class="no-data-images img-way" src="../../common/images/no_data.jpg" style="width: 200px;"></image>
                </div>
                <list class="todo-list" else>
                    <list-item class="todo-item" for="{{ list }}">
                        <div class="todo-item-inner" if="{{ $item.done }}">
                            <input type="checkbox" onchange="changeStatus($idx)" checked="{{ $item.done }}"></input>
                            <piece content="{{ $item.title }}" closable="true" onclose="remove($idx)" class="piece-item"></piece>
                        </div>
                    </list-item>
                </list>
            </div>
        </tab-content>
    </tabs>

    <div class="header">
        <input
            id="addinp"
            class="input"
            type="text"
            value="{{ keyword }}"
            maxlength="20"
            enterkeytype="done"
            placeholder="请输入待办事项"
            onchange="change">
        </input>
        <button class="buttons" @click="add">添加</button>
    </div>
</div>
在计算属性中计算全部、未完成、已完成的个数,用于tabs展示。
// day.js
    computed: {
        // 全部个数
        getListSum() {
            return
                Object.prototype.toString.call(this.list) == '[object Array]' ? this.list.length : 0;
        },
        // 返回未完成项目的个数
        getUndoSum() {
            return this.list.filter(item => !item.done).length;
        },
        // 返回完成项目的个数
        getDoneSum() {
            return this.list.filter(item => item.done).length;
        },
        // 星期几
        getWeek() {
            let week = ['天', '一', '二', '三', '四', '五', '六'];
            let day = (new Date(this.currentDate)).getDay();
            return '星期' + week[day];
        }
    },
(3)添加待办事项
在输入框中输入内容,点击添加按钮,添加待办事项,并调用storage.set()API将list存在缓存中,成功之后更新list以更新视图。若输入框无内容,使用prompt.showToast提示输入内容。
// day.js
change(e) {
    this.keyword = e.value;
},
add() {
    if (this.keyword === "") return prompt.showToast({
        message: "请输入内容"
    })
    this.list.push({ title: this.keyword, done: false });
    this.keyword = "";
    this.setStorage();
},
// 封装函数供修改或者添加缓存中的数据
setStorage() {
    const self = this;
    storage.set({
        key: this.currentDate,
        value: JSON.stringify(this.list),
        success: function() {
            self.setList();
        },
        fail: function(data, code) {}
    });
},
(4)完成 / 取消待办事项
点击选择框,勾选或者取消勾选待办事项,并设置缓存。
// day.js
changeStatus(index) {
    this.list[index].done = !this.list[index].done;
    this.setStorage();
},
(5)删除待办事项
使用piece组件的onclose事件删除待办事项,删除前使用prompt.showDialog弹窗方法询问是否删除,点击确认后删除,并设置缓存。
// day.js
showDialog(options = {}) {
    if (JSON.stringify(options) == "{}") return;
    prompt.showDialog(options);
},
remove(index) {
    let self = this;
    let options = {
        message: "确定要删除吗?",
        buttons: [
            {
                text: '确定',
                color: '#87cbff',
            },
            {
                text: '取消',
                color: '#666666',
            },
        ],
        success: function(data) {
            if(data.index == 0){
                self.list.splice(index, 1);
                self.setStorage();
            }
        },
        cancel: function() {
            console.log('dialog cancel callback');
        },
    };
    this.showDialog(options);
},
以上就是完成带日期缓存效果的待办事项的全部过程了,算是对鸿蒙JS开发快速上手的初步认识吧, 后期还可以对其完善,比如在样式、功能方面等等,希望可以和大家共同学习鸿蒙更多的知识,一起进步。
Recommend
About Joyk
Aggregate valuable and interesting links.
Joyk means Joy of geeK
