

Flutter 实现“斑马纹”背景(需要变换颜色) - 每天进步一点点OVO
source link: https://www.cnblogs.com/wuhao-grow-uo/p/16386716.html
Go to the source link to view the article. You can view the picture content, updated content and better typesetting reading experience. If the link is broken, please click the button below to view the snapshot at that time.

Flutter 实现“斑马纹”背景
由于工作中项目需求,需要将H5转换为Flutter代码。
其中的斑马纹背景需要根据接口返回的颜色来渲染,所以不能只是图片形式,无法通过decoration属性配置图片背景板。
楼主这边想到的方法就是通过 实现一个canvas绘制斑马纹类。使用Stack布局,将斑马纹放在下方作为背景板,需要展示的内容在上方。
实现 “斑马纹”背景(需要变换颜色)
文章主要分为 效果图、实现思维、代码、计算过程解释。希望对大家有所帮助
最终效果图

斑马纹(45°角,向左倾斜)
使用CustomPaint(size: Size(width, height), painter: 画笔)
CustomPaint(
   size: Size(widget.width, widget.height),
   painter: 画笔,
)
继承 CustomPainter类,实现paint(Canvas canvas, Size size)方法,根据 宽度、高度、画笔宽度、间距 计算出各个点位。使用canvas. drawLine方法 绘制出斑马纹。
@override
void paint(Canvas canvas, Size size) {
  …
  canvas. drawLine();
}
斑马纹坐标位置计算
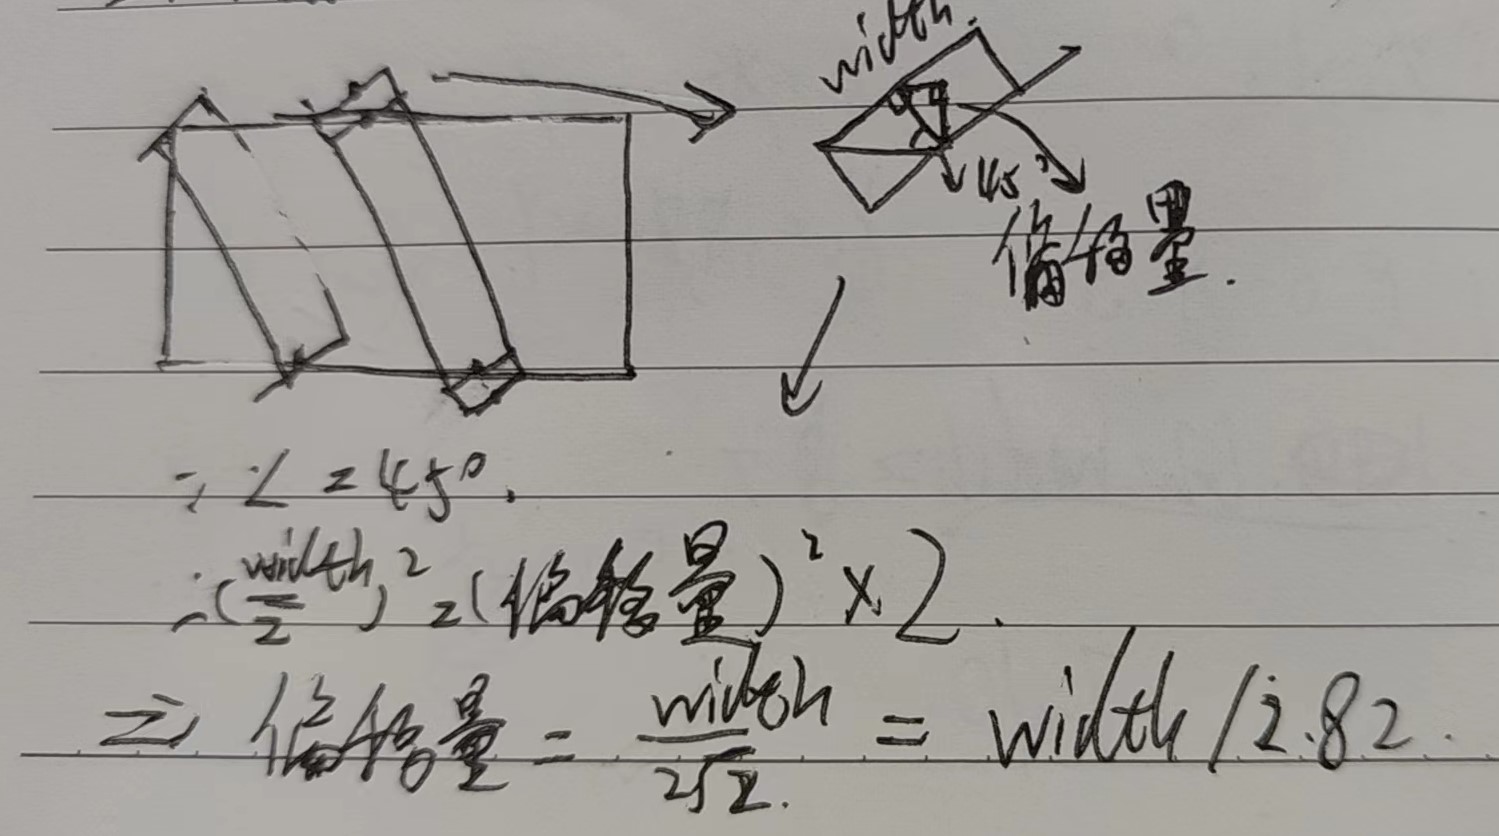
2.82 = 2倍根号2
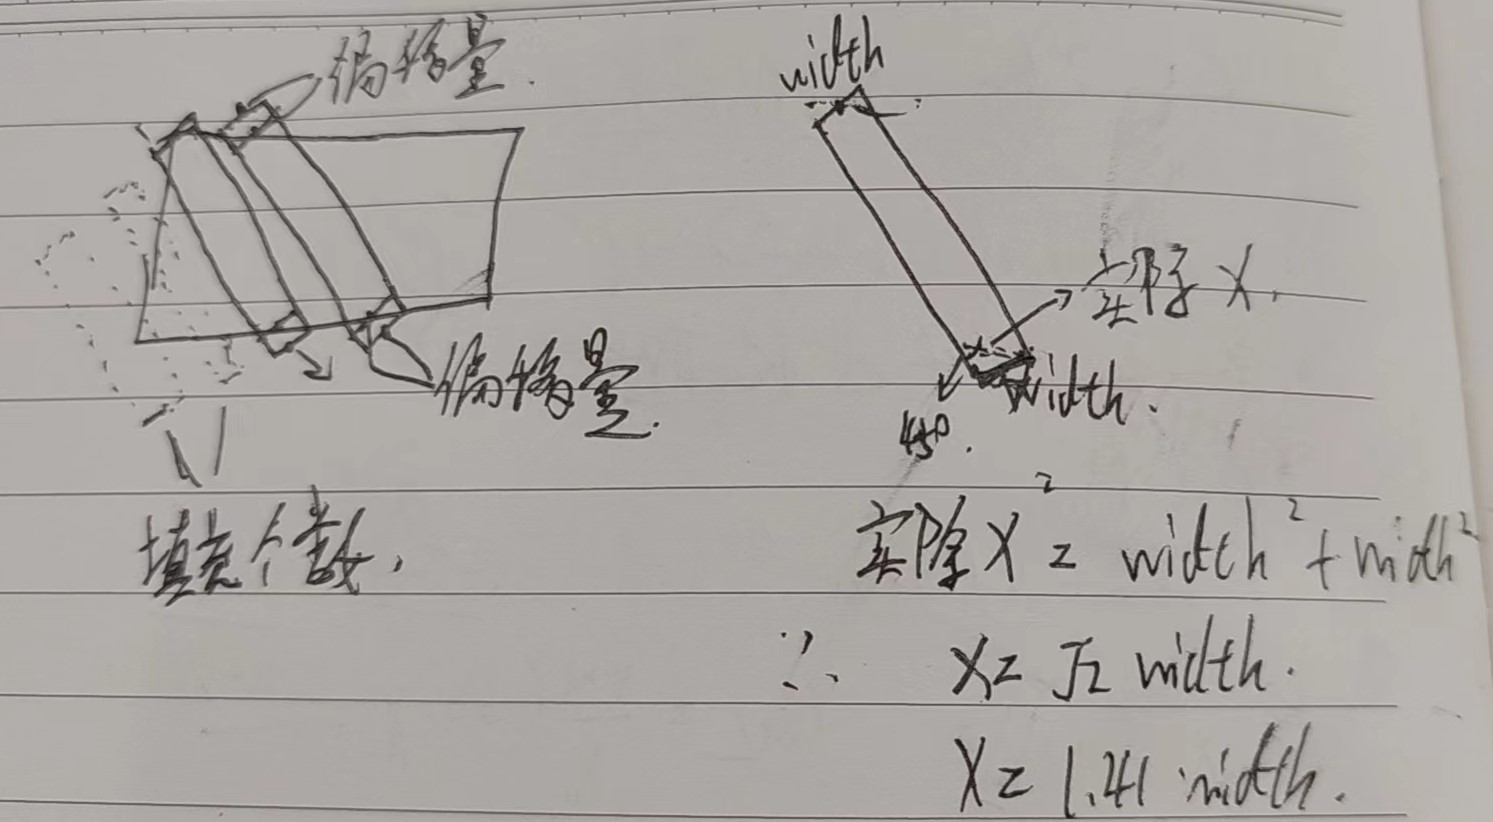
1.41 = 根号二
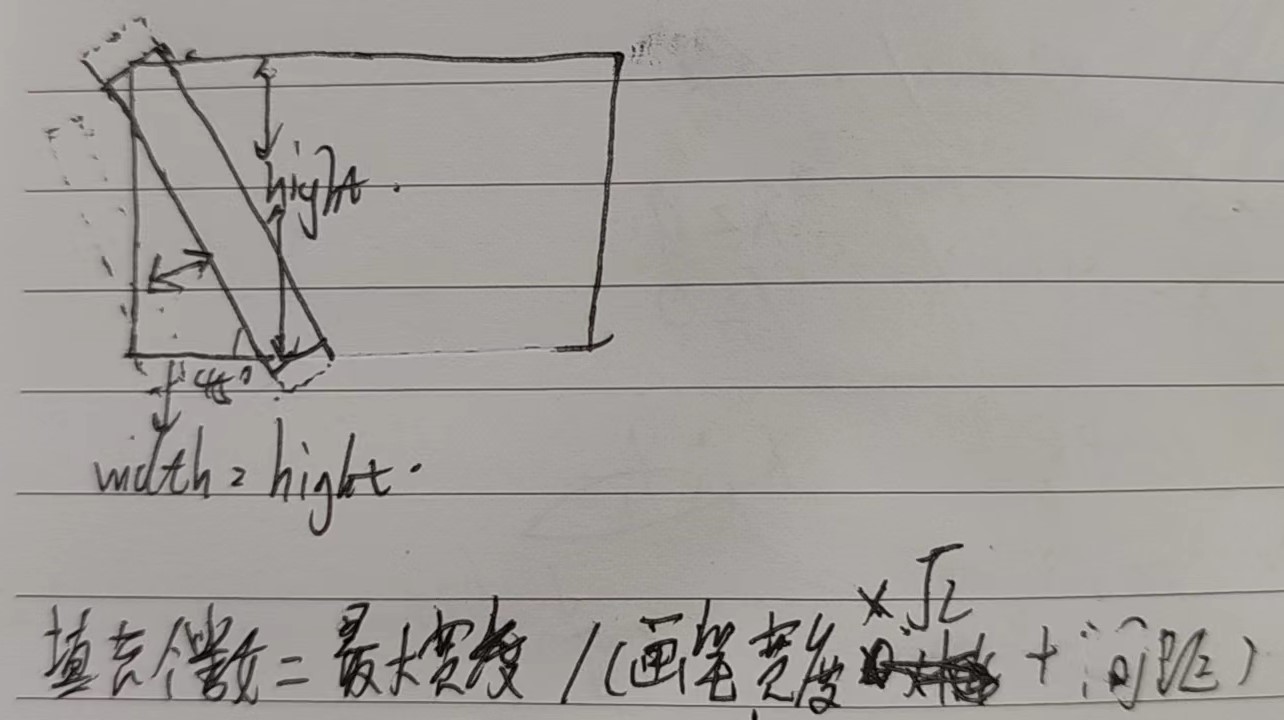
填充个数= 最大高度 / (画笔宽度1.41+间距) 向上取整。(从0, 0开始,左侧会露出空位,所以需要填充)
条纹个数 = 宽度/(画笔宽度1.41+间距) 向上取整。
(x轴y轴) 偏移量 =画笔宽度 / 2.82 (画笔起始点、结束点会露出一小节,需要计算x,y偏移量。将左上角x,y减去偏移量,右下角x,y加上偏移量,补充此部分)
起点坐标 =((画笔宽度1.41+间距) * 条纹index – 偏移量,– 偏移量)
终点坐标 =((画笔宽度1.41+间距) * 条纹index - 偏移量+高度, 高度+偏移量)
圆角裁剪(如果需要)
由于画笔绘制的是直角的,所以作为背景板会超出,需要裁剪掉四个角。使用
ClipRRect(
   borderRadius: BorderRadius.all(Radius.circular(10)),
   child: xxx
)
使用Stack布局,实现斑马纹在下方作为背景板,需要展示的内容在上方
Stack(
  children: [
  	buildZebraBack(…),
  	需要展示的内容
  ]
)
使用处 main_page.dart
Stack(
  children: [
    Positioned(
      child: ZebraStripesBack(
          width: 335,
          height: 44,
          lineWidth: 10,
          spacing: 10,
          borderRaduis: 10,
          lineColor: Colors.blue),
      top: 0,
      left: 0,
    ),
    Container(
      width: 335,
      height: 44,
      alignment: Alignment.center,
      padding: EdgeInsets.only(
          top: 10,
          left: 12,
          bottom: 10,
          right: 12),
      child: Text(
              "英语",
              style: TextStyle(
                color: Color(0xFFFFFFFF),
                fontSize: 14.sp,
                fontWeight: FontWeight.w500),
            )
      )
  ]
)
斑马纹具体实现类 zebra_stripes_back.dart
import 'dart:math';
import 'package:flutter/material.dart';

// 斑马纹具体实现类
class ZebraStripesBack extends StatefulWidget {
  ZebraStripesBack({
    this.width: 0,
    this.height: 0,
    this.spacing: 4,
    this.lineWidth: 4,
    this.lineColor: Colors.transparent,
    this.borderRaduis: 0,
  });

  final double width; // 容器宽度
  final double height; // 容器高度
  final double lineWidth; // 斑马纹宽度
  final double spacing; // 间距
  final double borderRaduis; // 容器圆角
  final Color lineColor; // 斑马纹颜色

  @override
  State<StatefulWidget> createState() => _ZebraStripesBackState();
}

class _ZebraStripesBackState extends State<ZebraStripesBack> {
  @override
  void initState() {
    super.initState();
  }

  @override
  void dispose() {
    super.dispose();
  }

  @override
  Widget build(BuildContext context) {
    return ClipRRect(
        borderRadius: BorderRadius.all(Radius.circular(widget.borderRaduis)),
        child: CustomPaint(
          size: Size(widget.width, widget.height),
          painter: _ZebraStripesBackPainter(
            maxWidth: widget.width,
            maxHeight: widget.height,
            spacing: widget.spacing,
            lineWidth: widget.lineWidth,
            lineColor: widget.lineColor,
            borderRaduis: widget.borderRaduis,
          ),
        ));
  }
}

class _ZebraStripesBackPainter extends CustomPainter {
  _ZebraStripesBackPainter({
    this.maxWidth: 0,
    this.maxHeight: 0,
    this.spacing: 4,
    this.lineWidth: 4,
    this.lineColor: Colors.black12,
    this.borderRaduis: 0,
  });

  final double maxWidth;
  final double maxHeight;
  final double spacing;
  final double lineWidth;
  final Color lineColor;
  final double borderRaduis;

  @override
  void paint(Canvas canvas, Size size) {

    var paint = Paint()
      ..isAntiAlias = true
      ..style = PaintingStyle.fill
      ..color = lineColor
      ..strokeWidth = lineWidth;

    int number = 0; // 个数
    int fillNumber = 0; // 填充个数
    double lineAndSpace = lineWidth *1.41 + spacing; // 单个条纹宽 + 间距宽
    if (lineWidth > 0) {
      number = (maxWidth / lineAndSpace).ceil();
      fillNumber = (maxHeight / lineAndSpace).ceil(); // 填充个数
    }

    double deviation = lineWidth / 2.82; // x y轴偏移量 = width / 2倍根号2
    for (int i = -fillNumber; i < number; i++) {
      var left = lineAndSpace * i - deviation;
      double dx = left;
      double dy = -deviation;
      double dx1 = left + maxHeight;
      double dy1 = maxHeight + deviation;
      canvas.drawLine(
        Offset(dx, dy),
        Offset(dx1, dy1),
        paint,
      );
    }
  }

  @override
  bool shouldRepaint(CustomPainter oldDelegate) => true;
}
计算过程解释
偏移量计算过程
填充个数计算过程
为什么画笔宽度需要乘 根号二?
缺少-填充

缺少-偏移量

__EOF__
Recommend
About Joyk
Aggregate valuable and interesting links.
Joyk means Joy of geeK