

Writing a Chat With Akka
source link: https://dzone.com/articles/writing-a-chat-with-akka
Go to the source link to view the article. You can view the picture content, updated content and better typesetting reading experience. If the link is broken, please click the button below to view the snapshot at that time.

Writing a Chat With Akka
Do you want to know more about WebSockets? Here you will find some more information about them and learn how to create a simple chat application.
Ah, writing chats. So simple yet so complex. Yes, writing chats — as in coding them, not chatting (though that might prove to be problematic too, but that’s a whole different problem). If you’re looking for a step-by-step tutorial on implementing the backend for a basic multichannel chat, read on.
So let’s dive into the technicalities. To give you some more details, the service will be implemented as a mix of a simple REST API and a Web Socket app. To make this more interesting, I decided to use Akka-related libraries and typed actors in as many numbers as possible.
Please note that all the code that’s used in this article is also available in the GitHub repository.
You may also want to read this article on building a concurrent chat app with Go and WebSockets.
Ok, let’s get to it and start with a simple question:
Why Chat?
Why not? That would be the simplest answer, but as I aspire to be a serious writer, I will add some more context.
Firstly, just next to video streaming, a chat was yet another very interesting topic for me. Secondly, writing a chat application is probably the simplest use case to get familiar with the WebSocket protocol. What is more, most of the chats out there on the web work in the same way as the one described below. Of course, scale and features are much different but the base idea remains the same.
What Is WebSocket and Why Does It Matter?
In short, it is a communication protocol that provides bi-directional communication between server and browser with the usage of a single TCP connection. Thanks to this feature, we do not have to constantly pull new data from the server; instead, the data is exchanged in “real time” in the form of messages between interested parties. Each message is either binary data or Unicode text.
The protocol was standardized in 2011 by the IETF in the form of RFC 6455. WebSocket protocol is distinct from HTTP but both are located at layer 7 of the OSI model and depend on TCP at the 4th layer. On the other hand, WebSocket by design works on HTTP ports 443 and 80 and supports HTTP concepts like proxies and intermediaries. What is more, WebSocket handshake uses HTTP upgrade header to upgrade protocol from HTTP to WebSockets.
The biggest disadvantage of WebSocket as a protocol is security. WebSockets are not restricted by same-origin policy, which may make CSRF-like attacks a lot easier.
Tools Used
Let’s start the technical part of this text with a description of tools that will be further used to implement the whole application.
- Akka — libraries from the Akka toolkit and Actor model will play a crucial role in the implementation of the whole application. Because type safety is important and compile time type checking tends to solve lots of problems before even running the code, I have decided to use as many typed actors as possible. That is why I have added akka-stream-typed and akka-actor-typed as a base instead of their classic versions.
- akka-http — nothing unexpected as I need to expose REST API with WebSocket capabilities and use Akka actors. akka-http is the easiest possible way to achieve it because I do not have to worry about integration and interoperability between different libraries. Additionally, I am using akka-http-circe. I’m going with the circe library for parsing incoming JSONs and I need interoperability between akka-http and circe.
- pureconfig — for loading config files and parsing them to Scala objects without too much boilerplate
- logback-classic — logging
And that is all I will need to implement the WebSockets chat app in Akka. Let’s start the implementation!
Implementation
I decided to use Scala 2.13.8 because not all libraries chosen to implement the app support Scala 3 at the time of writing this article (2022-05-30).
1. I’m starting by adding all necessary dependencies to the project build.sbt file.
libraryDependencies := Seq(
"com.typesafe.akka" %% "akka-actor-typed" % "2.6.19",
"com.typesafe.akka" %% "akka-stream-typed" % "2.6.19",
"com.typesafe.akka" %% "akka-http" % "10.2.9",
"de.heikoseeberger" %% "akka-http-circe" % "1.39.2",
"io.circe" %% "circe-generic" % "0.14.1",
"com.github.pureconfig" %% "pureconfig" % "0.17.1",
"ch.qos.logback" % "logback-classic" % "1.2.11",
)
2. I’m adding a config file named chatp-app.conf for application and two case classes that will later be used to represent these config values.
Example content of .conf file:
http-config {port = 8070
port = ${?PORT}host = "localhost"
host = ${?HOST}}
Such notation allows for reading an environmental variable named PORT and if it is not present, then value 8070 will be used. Basically, all the values from this file can be overridden with the use of environmental variables.
Case classes to model config:
case class AppConfig(httpConfig: HttpConfig)
case class HttpConfig(port: Int, host: String) {val toPath = s"$host:$port"
}
3. I’m implementing a runner class for the application.
object ChatAppStarter {
def main(args: Array[String]): Unit = { val appConfig = ConfigSource.resources("chat-app.conf").loadOrThrow[AppConfig] val rootBehavior = Behaviors.setup[Nothing] { context => context.setLoggerName("ChatApiLogger")Behaviors.same
}
ActorSystem[Nothing](rootBehavior, "ChatApp")
}
}
As for now, it will only read our configuration file. I will add more code here in the following steps.
4. Now, I’m implementing an actor representing each particular Chat created via the application.
object Chat {
sealed trait ChatCommand
final case class ProcessMessage(sender: String, content: String) extends ChatCommand
final case class AddNewUser(ref: ActorRef[String]) extends ChatCommand
def apply(): Behavior[ChatCommand] =
Behaviors.setup { _ =>var participants = List.empty[ActorRef[String]]
val messageQueue = mutable.Queue.empty[String]
Behaviors.receiveMessage[ChatCommand] {A chat is a simple actor that handles two types of messages: AddNewUser with actorRef argument and ProcessMessage that represents each message sent between users inside the chat.
- After receiving the AddNewUser message, the chat actor will add actorRef to the participants list and right away send all the messages already exchanged in the chat to a newly joined user.
- After receiving ProcessMessage, the actor will simply add message content to the message queue and broadcast the content to all the participants present in the chat.
5. I’m implementing a ChatsStore actor responsible for storing all the chats existing in the application.
object ChatsStore {
sealed trait StoreCommand
final case class AddNewChat(sender: User, receiver: User, replyTo: ActorRef[Int]) extends StoreCommand
final case class GetChatMeta(chatId: Int, userName: String, replyTo: ActorRef[Option[GetChatMetaResponse]]) extends StoreCommand
final case class GetChatMetaResponse(userName: String, ref: ActorRef[ChatCommand])
private var sequence = 0
private val store = mutable.Map.empty[Int, ChatMetadata]
It is yet another simple actor that supports only two types of messages: AddNewChat and GetChatMeta. After receiving the AddNewChat message, the Store will spawn a new instance of Chat actor with provided list of ids as participants and next number in sequence as id.
On the other hand, after receiving GetChatMetada, the store will try to find the Chat with the provided id and userId. If the chat for a particular combination exists, the Store will return its acrofRef along with the retrieved user name.
As its internal state actor holds the exact store represented here as a simple map from Integer to internal case class — ChatMatada alongside sequence implemented as a simple Integer that is used to assign ids for newly added chats.
Additionally, I will add this line to ChatAppStarter to effectively spawn ChatsStore actor
val store = context.spawn(ChatsStore(), "Store")
6. I’m implementing ChatService which will play the role of utils class.
def generateChatLinks(chatId: Int, senderId: String, receiverId: String): (String, String) = {class ChatService(contextPath: List[String], httpConfig: HttpConfig) {
private val apiPath = contextPath.mkString("/")
val path: PathMatcher[Unit] = toPath(contextPath, PathMatcher(""))
@tailrec
private def toPath(l: List[String], pathMatcher: PathMatcher[Unit]): PathMatcher[Unit] = { l match {case x :: Nil => toPath(Nil, pathMatcher.append(x))
case x :: tail => toPath(tail, pathMatcher.append(x / ""))
Here you can see the toPath method, which is unfolding a context path from List[String] to Akka Http compliant PathMatcher and generateChatLinks method that generates links to chats which will be later sent as a response after creating a chat for particular userIds and id combination.
Additionally, I will add this line to ChatAppStarter to instantiate the ChatService class
val service = new ChatService(List("api", "v1"), appConfig.httpConfig)
7. I’m implementing the ChatApi class responsible for exposing REST API with WebSocket capabilities along with Akka Stream Flow to handling WebSocket messages.
class ChatApi(service: ChatService, store: ActorRef[StoreCommand], logger: Logger)(implicit val system: ActorSystem[_]) {
private implicit val timeout: Timeout = Timeout(2.seconds)
private implicit val ec: ExecutionContextExecutor = system.executionContext
val routes: Route = { pathPrefix(service.path / "chats") { concat(pathEnd { post { entity(as[StartChat]) { start =>val senderId = start.sender.id.toString
Most of the code is dedicated to exposing our API in the form of two endpoints. The first one is a pure REST endpoint under path http://{url}/chats with POST responsibility for exposing the way to create chats.
The second one is a mixed endpoint under the path http::/{url}/chats/{chatId}/messages/{userId}, which starts the WebSocket channel alongside process messages for a particular chat.
All of the code from ChatApi companion object is dedicated to modeling requests and responses along some circe semi-auto derivation which I decided to use over auto derivation.
The most important piece of code in this step is the part responsible for handling WebSocket messages. In particular, the websocketFlow method. It has the classic akka-http signature for handling websockets but the implementation is not so trivial.
Firstly, I am creating an ActorRef based source responsible for receiving messages from actors representing chats users. After each source is materialized, it will send its actor ref to the chat actor for which it was requested. The second thing is Sink to which all messages from the websocket endpoint will go and which will forward all the messages to the interested chat actors. I merged them using Flow.fromSinkAndSource.
Additionally, I will add this line to ChatAppStarter to create a new instance of ChatApi.
val api = new ChatApi(service, store, context.log)(context.system)
8. In this step, I'm adding an object responsible for starting the HTTP Server
object Server {
def start(routes: Route, config: HttpConfig, logger: Logger)(implicit system: ActorSystem[_]): Unit = {import system.executionContext
val bindingFuture = Http()
.newServerAt(config.host, config.port)
.bind(routes)
bindingFuture.onComplete {case Success(binding) =>
val address = binding.localAddress
Nothing complex here, just a simple Akka Http server that starts with a message.
And one last line in ChatAppStarter to merge them all:
Server.start(api.routes, appConfig.httpConfig, context.log)(context.system)
9. I’m adding one more config file responsible for loading the Akka config. After loading, it will result in an automatic keep-alive ping being sent to our chat’s websockets connections.
The file is a simple one-liner:
akka.http.server.websocket.periodic-keep-alive-max-idle = 1 second
And I’m adding two lines to ChatAppStarter:
val akkaConfig = ConfigSource.resources("akka.conf").config().right.get - for loading the config file
ActorSystem[Nothing](rootBehavior, "ChatApp", akkaConfig)
for starting the whole actor system with the loaded config
And here we go, we have the whole chat implemented. Let's test it!
Testing
For tests, I’m using Postman and Simple Web Socket Client.
1. I’m creating a new chat for two users using Postman.
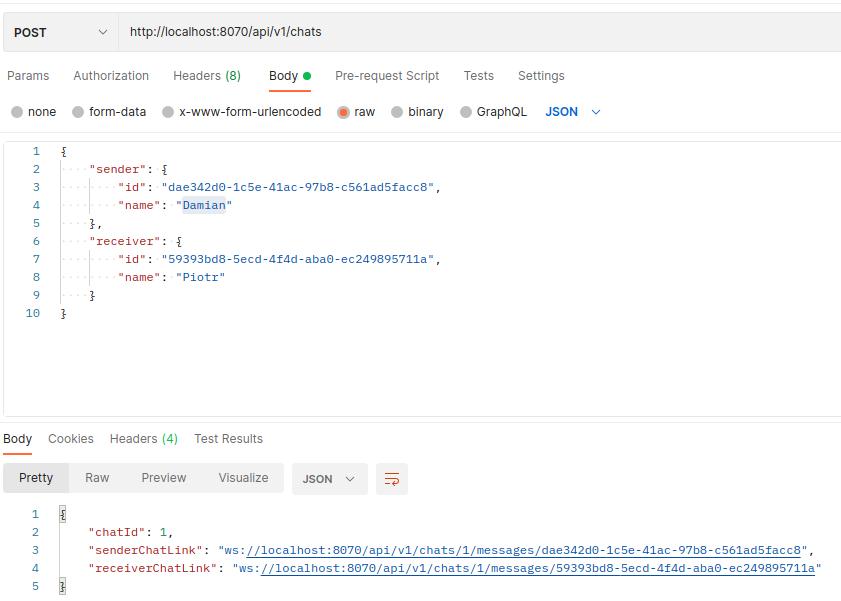
In response body, I got a chat Id and two personalized links for users to join and use a chat in quasi hyper-media style.
2. Now it’s time to use them and check if users can communicate with one another. Simple Web Socket Client comes into play here. 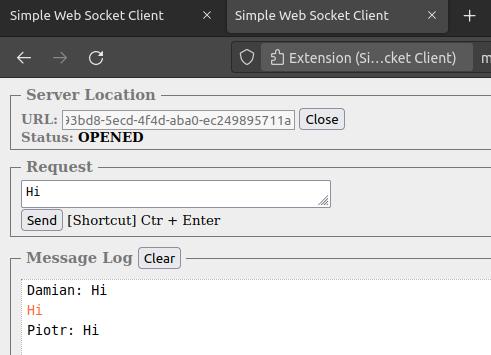
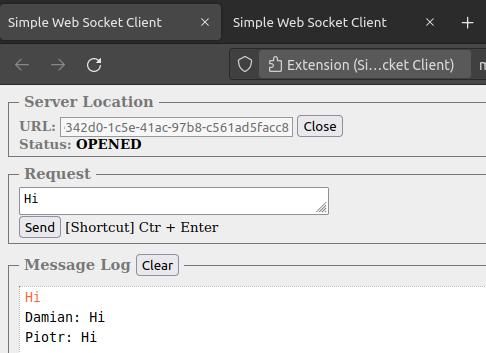
And here we are, everything is working and users are able to communicate with each other.
There is one last thing to do. Let’s spend a moment to look at things that can be done better.
What Can Be Done Better
As what I’ve just built is the most basic chat app, there are a few (or in fact quite a lot) things that may be done better. Below, I listed the things I find worthy of improving:
- Better support for users leaving and rejoining afterwards — right now, it is not implemented in the most optimal way and there is a place for significant improvements here.
- Sending attachments — for now, the chat only support simple text messages. While texting is the basic function of a chat, users enjoy exchanging images and audio files, too.
- Message model — rethink and reconsider what you exactly need in your message, maybe some changes in the API model will also be needed.
- Persistent message store — to make a messages persistent between application restarts. Also, some level of encryption will be required because of security concerns.
- Group chats support — now, the application only supports one on one chats, so group chats are the first logical next feature to add to the application.
- Tests - there are no tests for now, but why leave it like this? Tests are always a good idea
Summary
Et voilà! The chat is implemented and the main task is done. In the last paragraph, I described some ideas on the topic of what to do next to develop the app.
Please keep in mind that this chat case is very simple and it will require lots of changes and development for any type of commercial project.
Anyway, I hope that you learned something new while reading this article. Thank you for your time.
Recommend
About Joyk
Aggregate valuable and interesting links.
Joyk means Joy of geeK