

Using Document Properties to Track Your Excel Reports
source link: https://pbpython.com/excel-properties.html
Go to the source link to view the article. You can view the picture content, updated content and better typesetting reading experience. If the link is broken, please click the button below to view the snapshot at that time.

Introduction
When doing analysis with Jupyter Notebooks, you will frequently find yourself generating ad-hoc Excel reports to distribute to your end-users. After time, you might end up with dozens (or hundreds) of notebooks and it can be challenging to remember which notebook generated which Excel report. I have started using Excel document properties to track which notebooks generate specific Excel files. Now, when a user asks for a refresh of a 6 month old report, I can easily find the notebook file and re-run the analysis. This simple process can save a lot of frustration for your future self. In this brief article will walk through how to set these properties and give some shortcuts for using VS Code to simplify the process.
Background
How often has this happened to you? You get an email from a colleague and they ask you to refresh some analysis you did for them many months ago? You can tell that you created the Excel file from a notebook but can’t remember which notebook you used? Despite trying to be as organized as possible it is inevitable that you will waste time trying to find the originating notebook.
The nice aspect of the Excel document properties is that most people don’t change them. So, even if a user renames the file, the properties you set will be easily visible and should point the way to where the original code sits on your system.
Adding Properties
If you’re using pandas and xlsxwriter, adding properties is relatively simple.
Here’s a simple notebook showing how I typically structure my analysis:
import pandas as pd
from pathlib import Path
from datetime import datetime

today = datetime.now()
report_file = Path.cwd() / 'reports' / f'sales_report_{today:%b-%d-%Y}.xlsx'

url = 'https://github.com/chris1610/pbpython/blob/master/data/2018_Sales_Total_v2.xlsx?raw=True'
df = pd.read_excel(url)
The important point is that I try to always use a standard naming convention that includes the date in the name as well as a standard directory structure.
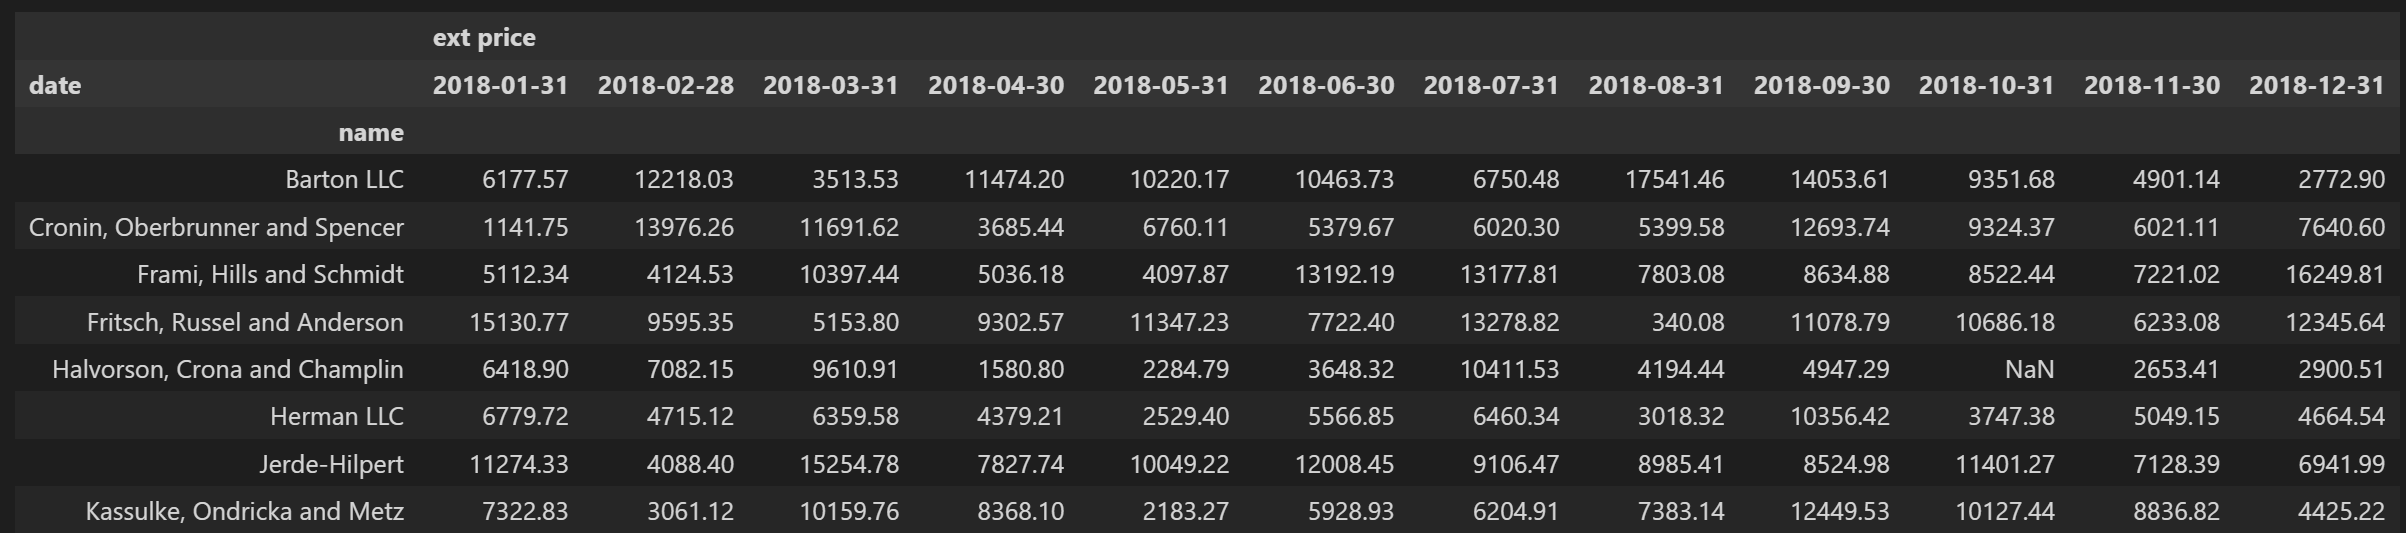
Now, I’ll do a
groupby
to show sales by month for each account:
sales_summary = df.groupby(['name', pd.Grouper(key='date', freq='M')]).agg({
    'ext price':
    'sum'
}).unstack()
Here’s what the basic DataFrame output looks like:
The final step is to save the DataFrame to Excel using the
pd.ExcelWriter
context manager
and set the document properties:
with pd.ExcelWriter(report_file,
engine='xlsxwriter',
date_format='mmm-yyyy',
datetime_format='mmm-yyyy') as writer:
sales_summary.to_excel(writer, sheet_name='2018-sales')
workbook = writer.book
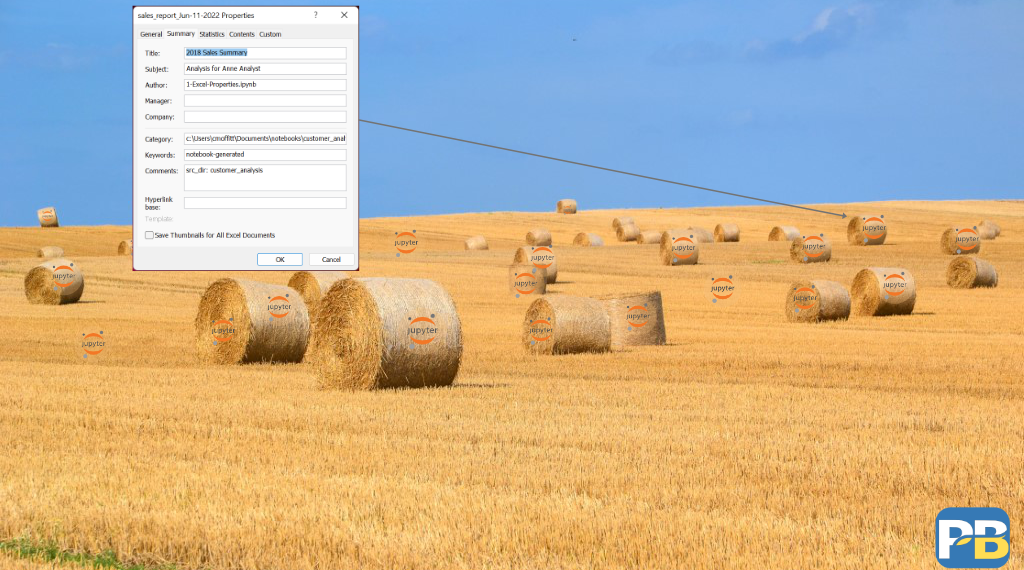
workbook.set_properties({
'category': r'c:\Users\cmoffitt\Documents\notebooks\customer_analysis',
'title' : '2018 Sales Summary',
'subject': 'Analysis for Anne Analyst',
'author': '1-Excel-Properties.ipynb',
'status': 'Initial draft',
'comments': 'src_dir: customer_analysis',
'keywords': 'notebook-generated'
})
Once this is done, you can view the properties in a couple of different ways.
First, you can hover over the filename and get a quick view:
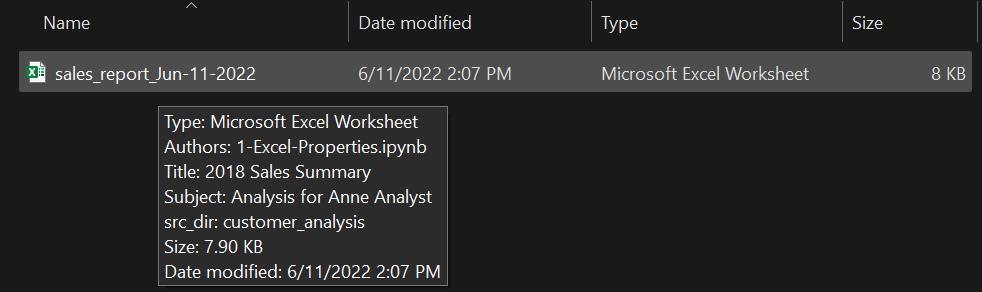
You can also view the details without opening Excel:
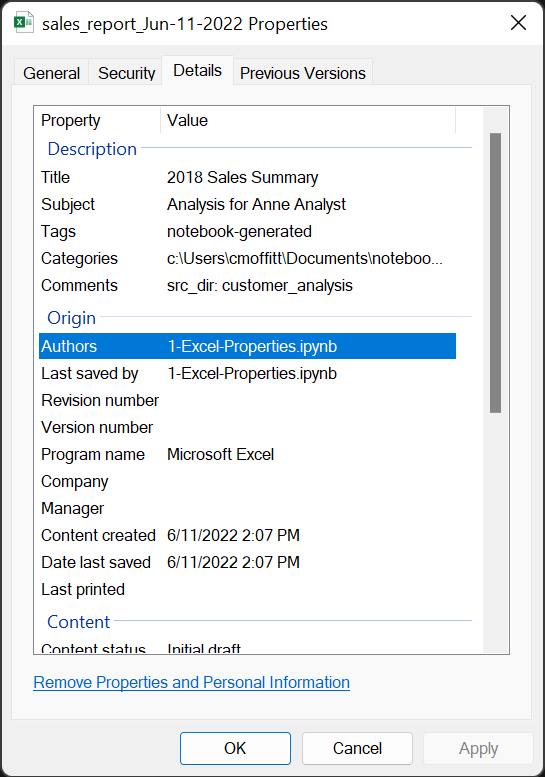
You can view the properties through Excel:
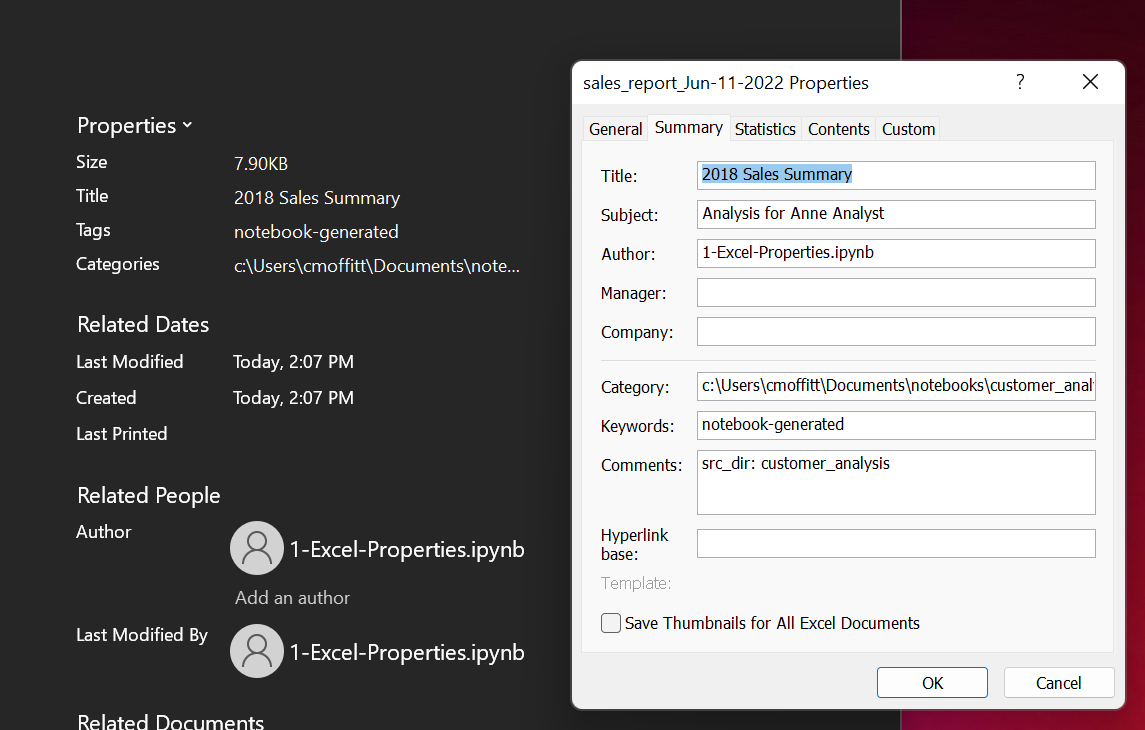
As you can see from the example, there are a handful of options for the properties.
I encourage you to adjust these based on your own needs. For example, I save all of my
work in a notebooks directory so it’s most useful to me to specify the
src_dir
in
the
Comments
section. This will quickly point me to the right directory and the
Authors
property lets me know which specific file I used.
Observant readers will notice that I used this as an example to show how to adjust the date formats of the Excel output as well. As you can see below, I have adjusted the Excel output so that only the month and year are shown in the header. I find this much easier than going in and adjusting every example by hand.
Here’s what it looks like now:

Using VS Code Snippets
If you find this helpful, you may want to set up a snippet in VS Code to make this easier. I covered how to create snippets in this article so refer back to that for a refresher.
Here is a starter snippet to save the file to Excel and populate some properties:
"Write Excel": {
"prefix": "we",
"body": [
    "# Excelwriter",
    "with pd.ExcelWriter(report_file, engine='xlsxwriter', date_format='mmm-yyyy', datetime_format='mmm-yyyy') as writer:",
    "\t$1.to_excel(writer, sheet_name='$2')",
    "\tworkbook = writer.book",
    "\tworkbook.set_properties({'category': r'$TM_DIRECTORY', 'author': '$TM_FILENAME'})",
],
"description": "Write Excel file"
}
One nice benefit of using the snippet is that you can access VS Code variables such as
$TM_DIRECTORY
and
$TM_FILENAME
to pre-populate the current path and name.
Conclusion
When working with Jupyter Notebooks it is important to have a consistent process for organizing and naming your files and directories. Otherwise the development process can get very chaotic. Even with good organization skills, it is easy to lose track of which scripts generate which outputs. Using the Excel document properties can be a quick and relatively painless way to lay out some breadcrumbs so that it is easy to recreate your analysis.
Let me know in the comments if you have any other tips you’ve learned over the years.
Recommend
-
6
How do you document and track your personal goals? It’s the new year, so I imagine many of us are thinking about what we want to do in our own lives over the coming weeks and months. What systems/tools/formats do y...
-
13
One Chinese proverb said: The faintest ink is more powerful than the strongest memory. Absolutely, sometimes I’m rush to google something and figure out one Issue without any kind of archive; then it turns out to be one fresh issue totally wh...
-
7
Mark Litwintschik I have 15 years of consulting & hands-on build experience with clients in the UK, USA, Sweden, Ireland & Germany. Past cl...
-
5
How to Use Track Changes in Microsoft Excel By David Perry Published 16 hours ago You can use Excel's Track Changes option to keep...
-
6
SmartData Collective > Big Data > Using ODBC in Excel to Create Sales Reports After Mining Sales Data...
-
2
Linoly Flores October 11, 2022 2 minute read
-
5
November 4, 2022 ...
-
4
Isaac Perez 45 minutes ago Generate Excel document in SAP CAP application 12 Views Last edit 43 minu...
-
2
Sharing Excel Reports Connected To Power BI Datasets Or The Excel Data Model/Power Pivot Using OneDrive For Business I
-
7
Analysis Services · Azure Analysis Services ·
About Joyk
Aggregate valuable and interesting links.
Joyk means Joy of geeK