

ArcaOS install on VirtualBox
source link: https://www.kevinhooke.com/2022/06/12/arcaos-install-on-virtualbox/
Go to the source link to view the article. You can view the picture content, updated content and better typesetting reading experience. If the link is broken, please click the button below to view the snapshot at that time.

ArcaOS install on VirtualBox
My first job out of college was with IBM as a contractor, working in the IBM Software Center, Basingstoke, providing technical support for OS/2 and Communications Manager/2. I ran OS/2 on my own PC at home for a few years after this, before moving to Windows 95.
In the past few years I’ve installed various versions of OS/2 in virtual machines for nostalgic reasons. I’ve also kept an eye on Arca Noae’s ArcaOS as a current day commercial offering of OS/2 complete with updated drivers and hardware support for current day hardware. For a personal install though I’ve been reluctant to pay the $120 for a personal license, but recently decided to bite the bullet and buy a copy.
I like collecting screenshots of OSes during the install process, and this post is one of those 
After the typical ‘white square’ top right and ‘OS/2’ text, we get to the first installer screen:

After accepting the license agreements, the next page is interesting, it prompts you to select a ‘personality’, a pre-configured set of features depending on how you intend to use this installation. I’ll select the default/first option for now. I don’t remember seeing options like this during a typical OS/2 install, maybe Warp 4 provided options like this (I’ll go check later):

I have a blank 2GB virtual disk on VirtualBox for this install, so I’ll select the option to format it. Later when I do a bare metal install I’ll be doing the same on a blank partition on a new SATA SSD:

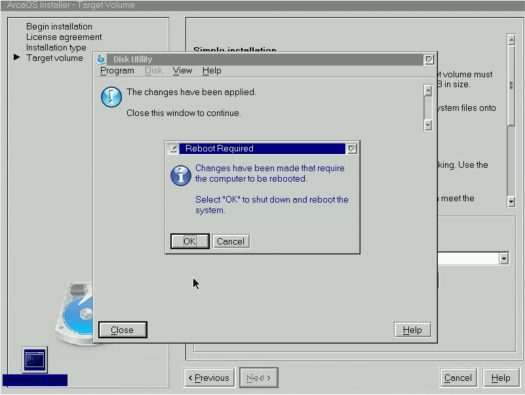
Prompted to reboot:
The familiar shutdown compete dialog!

After rebooting, you’re back at the first page of the install again. Stepping through the same options we’re now prompted to select the install volume:

There’s no volumes in the dropdown yet, so press the Manage Volumes button:

I clicked on the Volume menu option, then ‘Create new’, then the ‘Standard/bootable’ option:

I kept the default C and named the volume:

I’m using all the free space on this volume, so kept the defaults:

Volume manager now looks like this:

Closing this dialog I’m prompted to save and now the volume is selected:

Next up, location settings. Huh, remember code pages? I set my timezone, DST, and internet time sync:

This next one is interesting and allows you to configure your hardware options. This is obviously where ArcaOS shines in it’s ability to support hardware of the time as well as updated support for current hardware:

Also interesting that support for VirtualBox is selected by default as the installer recognizes we’re installing on VirtualBox:

I kept all options as default for now. When I do a bare metal install next I’ll check out what the Display options are.
Network driver install next and prompted for machine name, workgroup, and username:

Ready to install – let’s go!

Off we go. Noticeably absent and the messages telling you about the various features that you get during a Warp install:

Time to reboot:

During the install there’s a couple reboots we are automatic if you leave the checkbox selected.
Done! Up and runnning!

Related
CategoriesKev's BlogTagsos/2, retro, virtualbox
Leave a Reply Cancel reply
Your email address will not be published. Required fields are marked *
Comment *
Name *
Email *
Website
Save my name, email, and website in this browser for the next time I comment.
Notify me of follow-up comments by email.
Notify me of new posts by email.
This site uses Akismet to reduce spam. Learn how your comment data is processed.
Post navigation
Recommend
About Joyk
Aggregate valuable and interesting links.
Joyk means Joy of geeK