

两种方式!带你快速实现前端截图
source link: https://www.fly63.com/article/detial/11695
Go to the source link to view the article. You can view the picture content, updated content and better typesetting reading experience. If the link is broken, please click the button below to view the snapshot at that time.

页面截图功能在前端开发中,特别是营销场景相关的需求中, 是比较常见的。比如截屏分享,相对于普通的链接分享,截屏分享具有更丰富的展示、更多的信息承载等优势。最近在需求开发中遇到了相关的功能,所以调研了相关的实现和原理。
二、相关技术
前端要实现页面截图的功能,现在比较常见的方式是使用开源的截图npm库,一般使用比较多的npm库有以下两个:
- dom-to-image: https://github.com/tsayen/dom-to-image
- html2canvas: https://github.com/niklasvh/html2canvas
以上两种常见的npm库,对应着两种常见的实现原理。实现前端截图,一般是使用图形api重新绘制页面生成图片,基本就是SVG(dom-to-image)和Canvas(html2canvas)两种实现方案,两种方案目标相同,即把DOM转为图片,下面我们来分别看看这两类方案。
三、 dom-to-image
dom-to-image库主要使用的是SVG实现方式,简单来说就是先把DOM转换为SVG然后再把SVG转换为图片。
(一)使用方式
首先,我们先来简单了解一下dom-to-image提供的核心api,有如下一些方法:
- toSvg (dom转svg)
- toPng (dom转png)
- toJpeg (dom转jpg)
- toBlob (dom转二进制格式)
- toPixelData (dom转原始像素值)
如需要生成一张png的页面截图,实现代码如下:
import domtoimage from "domtoimage"

const node = document.getElementById('node');
domtoimage.toPng(node,options).then((dataUrl) => {
    const img = new Image();
    img.src = dataUrl;
    document.body.appendChild(img);
})
toPng方法可传入两个参数node和options。
node为要生成截图的dom节点;options为支持的属性配置,具体如下:filter,backgroundColor,width,height,style,quality,imagePlaceholder,cacheBust。
(二)原理分析
dom to image的源码代码不是很多,总共不到千行,下面就拿toPng方法做一下简单的源码解析,分析一下其实现原理,简单流程如下:
整体实现过程用到了几个函数:
- toPng(调用draw,实现canvas=>png )
- Draw(调用toSvg,实现dom=>canvas)
- toSvg(调用cloneNode和makeSvgDataUri,实现dom=>svg)
- cloneNode(克隆处理dom和css)
- makeSvgDataUri(实现dom=>svg data:url)
- toPng
toPng函数比较简单,通过调用draw方法获取转换后的canvas,利用toDataURL转化为图片并返回。
function toPng(node, options) {
  return draw(node, options || {})
    .then((canvas) => canvas.toDataURL());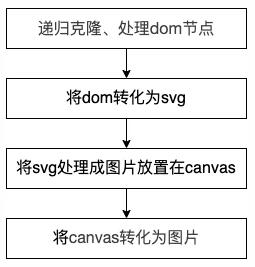
}- draw
draw函数首先调用toSvg方法获得dom转化后的svg,然后将获取的url形式的svg处理成图片,并新建canvas节点,然后借助drawImage()方法将生成的图片放在canvas画布上。
function draw(domNode, options) {
  return toSvg(domNode, options)
  // 拿到的svg是image data URL, 进一步创建svg图片
    .then(util.makeImage)
    .then(util.delay(100))
    .then((image) => {
      // 创建canvas,在画布上绘制图像并返回
      const canvas = newCanvas(domNode);
      canvas.getContext("2d").drawImage(image, 0, 0);
      return canvas;
    });
  // 新建canvas节点,设置一些样式的options参数
  function newCanvas(domNode) {
    const canvas = document.createElement("canvas");
    canvas.width = options.width || util.width(domNode);
    canvas.height = options.height || util.height(domNode);
    if (options.bgcolor) {
      const ctx = canvas.getContext("2d");
      ctx.fillStyle = options.bgcolor;
      ctx.fillRect(0, 0, canvas.width, canvas.height);
    }
    return canvas;
  }
}- toSvg
- toSvg函数实现从dom到svg的处理,大概步骤如下:
- 递归去克隆dom节点(调用cloneNode函数)
- 处理字体,获取所有样式,找到所有的@font-face和内联资源,解析并下载对应的资源,将资源转为dataUrl给src使用。把上面处理完的css rules放入<style>中,并把标签加入到clone的节点中去。
- 处理图片,将img标签的src的url和css中backbround中的url,转为dataUrl使用。
- 获取dom节点转化的dataUrl数据(调用makeSvgDataUri函数)
function toSvg(node, options) {
  options = options || {};
  // 处理imagePlaceholder、cacheBust值
  copyOptions(options);
  return Promise.resolve(node)
    .then((node) =>
      // 递归克隆dom节点
      cloneNode(node, options.filter, true))
  // 把字体相关的csstext放入style
    .then(embedFonts)
  // clone处理图片,将图片链接转换为dataUrl
    .then(inlineImages)
  // 添加options里的style放入style
    .then(applyOptions)
    .then((clone) =>
      // node节点转化成svg
      makeSvgDataUri(clone,
        options.width || util.width(node),
        options.height || util.height(node)));
  // 处理一些options的样式
  function applyOptions(clone) {
    ...
    return clone;
  }
}- cloneNode
cloneNode函数主要处理dom节点,内容比较多,简单总结实现如下:
- 递归clone原始的dom节点,其中, 其中如果有canvas将转为image对象。
- 处理节点的样式,通过getComputedStyle方法获取节点元素的所有CSS属性的值,并将这些样式属性插入新建的style标签上面, 同时要处理“:before,:after”这些伪元素的样式, 最后处理输入内容和svg。
function cloneNode(node, filter, root) {
  if (!root && filter && !filter(node)) return Promise.resolve();
  return Promise.resolve(node)
    .then(makeNodeCopy)
    .then((clone) => cloneChildren(node, clone, filter))
    .then((clone) => processClone(node, clone));
  function makeNodeCopy(node) {
  // 将canvas转为image对象
    if (node instanceof HTMLCanvasElement) return util.makeImage(node.toDataURL());
    return node.cloneNode(false);
  }
  // 递归clone子节点
  function cloneChildren(original, clone, filter) {
    const children = original.childNodes;
    if (children.length === 0) return Promise.resolve(clone);
    return cloneChildrenInOrder(clone, util.asArray(children), filter)
      .then(() => clone);
    function cloneChildrenInOrder(parent, children, filter) {
      let done = Promise.resolve();
      children.forEach((child) => {
        done = done
          .then(() => cloneNode(child, filter))
          .then((childClone) => {
            if (childClone) parent.appendChild(childClone);
          });
      });
      return done;
    }
  }
  function processClone(original, clone) {
    if (!(clone instanceof Element)) return clone;
    return Promise.resolve()
      .then(cloneStyle)
      .then(clonePseudoElements)
      .then(copyUserInput)
      .then(fixSvg)
      .then(() => clone);
    // 克隆节点上的样式。
    function cloneStyle() {
       ...
    }
    // 提取伪类样式,放到css
    function clonePseudoElements() {
       ...
    }
    // 处理Input、TextArea标签
    function copyUserInput() {
       ...
    }
    // 处理svg
    function fixSvg() {
       ...
    }
  }
}- makeSvgDataUri
首先,我们需要了解两个特性:
- SVG有一个<foreignObject>元素,这个元素的作用是可以在其中使用具有其它XML命名空间的XML元素,换句话说借助<foreignObject>标签,我们可以直接在SVG内部嵌入XHTML元素,举个例子:
<svg xmlns="http://www.w3.org/2000/svg">
<foreignObject width="120" height="50">
<body xmlns="http://www.w3.org/1999/xhtml">
<p>文字。</p>
</body>
</foreignObject>
</svg>
可以看到<foreignObject>标签里面有一个设置了xmlns=“http://www.w3.org/1999/xhtml”命名空间的<body>标签,此时<body>标签及其子标签都会按照XHTML标准渲染,实现了SVG和XHTML的混合使用。
- XMLSerializer对象能够把一个XML文档或Node对象转化或“序列化”为未解析的XML标记的一个字符串。
基于以上特性,我们再来看一下makeSvgDataUri函数,该方法实现node节点转化为svg,就用到刚刚提到的两个重要特性。
首先将dom节点通过
XMLSerializer().serializeToString() 序列化为字符串,然后在 <foreignobject>
标签 中嵌入转换好的字符串,foreignObject 能够在 svg
内部嵌入XHTML,再将svg处理为dataUrl数据返回,具体实现如下:
function makeSvgDataUri(node, width, height) {
  return Promise.resolve(node)
    .then((node) => {
      // 将dom转换为字符串
      node.setAttribute("xmlns", "http://www.w3.org/1999/xhtml");
      return new XMLSerializer().serializeToString(node);
    })
    .then(util.escapeXhtml)
    .then((xhtml) => `<foreignObject x="0" y="0" width="100%" height="100%">${xhtml}</foreignObject>`)
  // 转化为svg
    .then((foreignObject) =>
    // 不指定xmlns命名空间是不会渲染的
      `<svg xmlns="http://www.w3.org/2000/svg" width="${width}" height="${height}">${
        foreignObject}</svg>`)
  // 转化为data:url
    .then((svg) => `data:image/svg+xml;charset=utf-8,${svg}`);
}
四、 html2canvas
html2canvas库主要使用的是Canvas实现方式,主要过程是手动将dom重新绘制成canvas,因此,它只能正确渲染可以理解的属性,有许多CSS属性无法正确渲染。
支持的CSS属性的完整列表:
http://html2canvas.hertzen.com/features/
浏览器兼容性:
Firefox 3.5+ Google Chrome Opera 12+ IE9+ Edge Safari 6+
官方文档地址:
http://html2canvas.hertzen.com/documentation
(一)使用方式
// dom即是需要绘制的节点, option为一些可配置的选项
import html2canvas from 'html2canvas'
  html2canvas(dom, option).then(canvas=>{
  canvas.toDataURL()
})
常用的option配置:
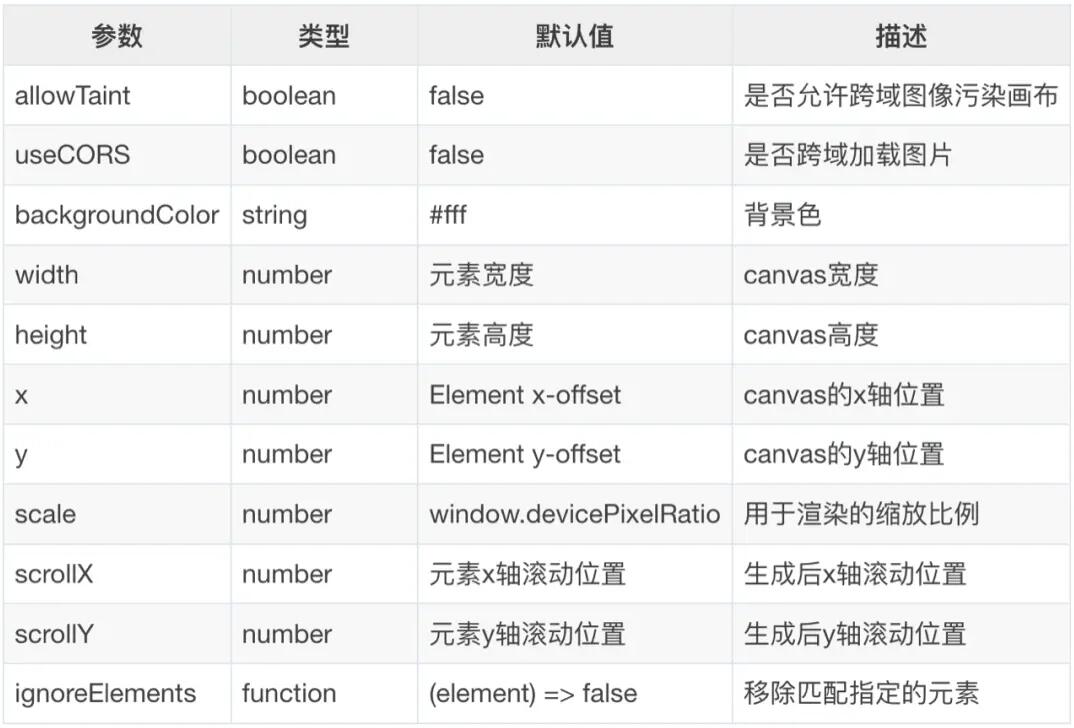
全部配置文档:
http://html2canvas.hertzen.com/configuration
(二)原理分析
html2canvas的内部实现相对dom-to-image来说要复杂一些, 基本原理是读取DOM元素的信息,基于这些信息去构建截图,并呈现在canvas画布中。
其中重点就在于将dom重新绘制成canvas的过程,该过程整体的思路是:遍历目标节点和目标节点的子节点,遍历过程中记录所有节点的结构、内容和样式,然后计算节点本身的层级关系,最后根据不同的优先级绘制到canvas画布中。
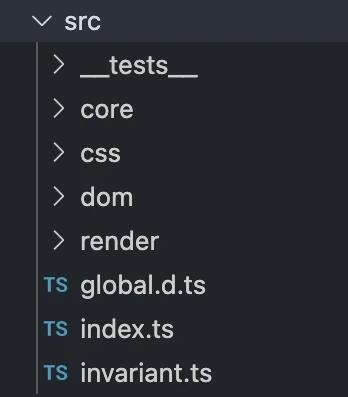
由于html2canvas的源码量比较大,可能无法像dom-to-image一样详细的分析,但还是可以大致了解一下整体的流程,首先可以看一下源码中src文件夹中的代码结构,如下图:
简单解析一下:
- index:入口文件,将dom节点渲染到一个canvas中,并返回。
- core:工具函数的封装,包括对缓存的处理函数、Context方法封装、日志模块等。
- css:对节点样式的处理,解析各种css属性和特性,进行处理。
- dom:遍历dom节点的方法,以及对各种类型dom的处理。
- render:基于clone的节点生成canvas的处理方法。
基于以上这些核心文件,我们来简单了解一下html2canvas的解析过程, 大致的流程如下:
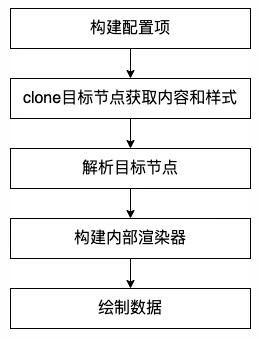
- 构建配置项
在这一步会结合传入的options和一些defaultOptions,生成用于渲染的配置数据renderOptions。在过程中会对配置项进行分类,比如resourceOptions(资源跨域相关)、contextOptions(缓存、日志相关)、windowOptions(窗口宽高、滚动配置)、cloneOptions(对指定dom的配置)、renderOptions(render结果的相关配置,包括生成图片的各种属性)等,然后分别将各类配置项传到下接下来的步骤中。
- clone目标节点并获取样式和内容
在这一步中,会将目标节点到指定的dom解析方法中,这个过程会clone目标节点和其子节点,获取到节点的内容信息和样式信息,其中clone
dom的解析方法也是比较复杂的,这里不做详细展开。获取到目标节点后,需要把克隆出来的目标节点的dom装载到一个iframe里,进行一次渲染,然后就可以获取到经过浏览器视图真实呈现的节点样式。
- 解析目标节点
目标节点的样式和内容都获取到了之后,就需要把它所承载的数据信息转化为Canvas可以使用的数据类型。在对目标节点的解析方法中,递归整个DOM树,并取得每一层节点的数据,对于每一个节点而言需要绘制的部分包括边框、背景、阴影、内容,而对于内容就包含图片、文字、视频等。在整个解析过程中,对目标节点的所有属性进行解析构造,转化成为指定的数据格式,基础数据格式可见以下代码:
class ElementContainer {
  // 所有节点上的样式经过转换计算之后的信息
  readonly styles: CSSParsedDeclaration;
  // 节点的文本节点信息, 包括文本内容和其他属性
  readonly textNodes: TextContainer[] = [];
  // 当前节点的子节点
  readonly elements: ElementContainer[] = [];
  // 当前节点的位置信息(宽/高、横/纵坐标)
  bounds: Bounds;
  flags = 0;
  ...
}
具体到不同类型的元素如图片、IFrame、SVG、input等还会extends ElementContainer拥有自己的特定数据结构,在此不详细贴出。
- 构建内部渲染器
把目标节点处理成特定的数据结构之后,就需要结合Canvas调用渲染方法了,Canvas绘图需要根据样式计算哪些元素应该绘制在上层,哪些在下层,那么这个规则是什么样的呢?这里就涉及到CSS布局相关的一些知识。
默认情况下,CSS是流式布局的,元素与元素之间不会重叠。不过有些情况下,这种流式布局会被打破,比如使用了浮动(float)和定位(position)。因此需要需要识别出哪些脱离了正常文档流的元素,并记住它们的层叠信息,以便正确地渲染它们。
那些脱离正常文档流的元素会形成一个层叠上下文。元素在浏览器中渲染时,根据W3C的标准,所有的节点层级布局,需要遵循层叠上下文和层叠顺序的规则,具体规则如下:

在了解了元素的渲染需要遵循这个标准后,Canvas绘制节点的时候,需要生成指定的层叠数据,就需要先计算出整个目标节点里子节点渲染时所展现的不同层级,构造出所有节点对应的层叠上下文在内部所表现出来的数据结构,具体数据结构如下:
// 当前元素
element: ElementPaint;
// z-index为负, 形成层叠上下文
negativeZIndex: StackingContext[];
// z-index为0、auto、transform或opacity, 形成层叠上下文
zeroOrAutoZIndexOrTransformedOrOpacity: StackingContext[];
// 定位和z-index形成的层叠上下文
positiveZIndex: StackingContext[];
// 没有定位和float形成的层叠上下文
nonPositionedFloats: StackingContext[];
// 没有定位和内联形成的层叠上下文
nonPositionedInlineLevel: StackingContext[];
// 内联节点
inlineLevel: ElementPaint[];
// 不是内联的节点
nonInlineLevel: ElementPaint[];
基于以上数据结构,将元素子节点分类,添加到指定的数组中,解析层叠信息的方式和解析节点信息的方式类似,都是递归整棵树,收集树的每一层的信息,形成一颗包含层叠信息的层叠树。
- 绘制数据
基于上面两步构造出的数据,就可以开始调用内部的绘制方法,进行数据处理和绘制了。使用节点的层叠数据,依据浏览器渲染层叠数据的规则,将DOM元素一层一层渲染到canvas中,其中核心具体源码如下:
async renderStackContent(stack: StackingContext): Promise<void> {
  if (contains(stack.element.container.flags, FLAGS.DEBUG_RENDER)) {
  debugger;
  }
  // 1. the background and borders of the element forming the stacking context.
  await this.renderNodeBackgroundAndBorders(stack.element);
  // 2. the child stacking contexts with negative stack levels (most negative first).
  for (const child of stack.negativeZIndex) {
  await this.renderStack(child);
  }
  // 3. For all its in-flow, non-positioned, block-level descendants in tree order:
  await this.renderNodeContent(stack.element);
  for (const child of stack.nonInlineLevel) {
  await this.renderNode(child);
  }
  // 4. All non-positioned floating descendants, in tree order. For each one of these,
  // treat the element as if it created a new stacking context, but any positioned descendants and descendants
  // which actually create a new stacking context should be considered part of the parent stacking context,
  // not this new one.
  for (const child of stack.nonPositionedFloats) {
  await this.renderStack(child);
  }
  // 5. the in-flow, inline-level, non-positioned descendants, including inline tables and inline blocks.
  for (const child of stack.nonPositionedInlineLevel) {
  await this.renderStack(child);
  }
  for (const child of stack.inlineLevel) {
  await this.renderNode(child);
  }
  // 6. All positioned, opacity or transform descendants, in tree order that fall into the following categories:
  // All positioned descendants with 'z-index: auto' or 'z-index: 0', in tree order.
  // For those with 'z-index: auto', treat the element as if it created a new stacking context,
  // but any positioned descendants and descendants which actually create a new stacking context should be
  // considered part of the parent stacking context, not this new one. For those with 'z-index: 0',
  // treat the stacking context generated atomically.
  //
  // All opacity descendants with opacity less than 1
  //
  // All transform descendants with transform other than none
  for (const child of stack.zeroOrAutoZIndexOrTransformedOrOpacity) {
  await this.renderStack(child);
  }
  // 7. Stacking contexts formed by positioned descendants with z-indices greater than or equal to 1 in z-index
  // order (smallest first) then tree order.
  for (const child of stack.positiveZIndex) {
  await this.renderStack(child);
  }
}
在renderStackContent方法中,首先对元素本身调用renderNodeContent和renderNodeBackgroundAndBorders进行渲染处理。
然后处理各个分类的子元素,如果子元素形成了层叠上下文,就调用renderStack方法,这个方法内部继续调用了renderStackContent,这就形成了对于层叠上下文整个树的递归。
如果子元素是正常元素没有形成层叠上下文,就直接调用renderNode,renderNode包括两部分内容,渲染节点内容和渲染节点边框背景色。
async renderNode(paint: ElementPaint): Promise<void> {
  if (paint.container.styles.isVisible()) {
    // 渲染节点的边框和背景色
    await this.renderNodeBackgroundAndBorders(paint);
    // 渲染节点内容
    await this.renderNodeContent(paint);
  }
}
其中renderNodeContent方法是渲染一个元素节点里面的内容,其可能是正常元素、文字、图片、SVG、Canvas、input、iframe,对于不同的内容也会有不同的处理。
以上过程,就是html2canvas的整体内部流程,在了解了大致原理之后,我们再来看一个更为详细的源码流程图,对上述流程进行一个简单的总结。
五、 常见问题总结
在使用html2canvas的过程中,会有一些常见的问题和坑,总结如下:
(一)截图不全
要解决这个问题,只需要在截图之前将页面滚动到顶部即可:
document.documentElement.scrollTop = 0;
document.body.scrollTop = 0;
(二)图片跨域
插件在请求图片的时候会有图片跨域的情况,这是因为,如果使用跨域的资源画到canvas中,并且资源没有使用CORS去请求,canvas会被认为是被污染了,canvas可以正常展示,但是没办法使用toDataURL()或者toBlob()导出数据,详情可参考:https://developer.mozilla.org/en-US/docs/Web/HTML/CORS_enabled_image
解决方案:在img标签上设置crossorigin,属性值为anonymous,可以开启CROS请求。当然,这种方式的前提还是服务端的响应头Access-Control-Allow-Origin已经被设置过允许跨域。如果图片本身服务端不支持跨域,可以使用canvas统一转成base64格式,方法如下。
function getUrlBase64_pro( len,url ) {
  //图片转成base64
  var canvas = document.createElement("canvas"); //创建canvas DOM元素
  var ctx = canvas.getContext("2d");
  return new Promise((reslove, reject) => {
  var img = new Image();
  img.crossOrigin = "Anonymous";
  img.onload = function() {
  canvas.height = len;
  canvas.width = len;
  ctx.drawImage(img, 0, 0, len, len);
  var dataURL = canvas.toDataURL("image/");
  canvas = null;
  reslove(dataURL);
  };
  img.onerror = function(err){
  reject(err)
  }
  img.src = url;
  });
}
(三)截图与当前页面有区别
方式一:如果要从渲染中排除某些elements,可以向这些元素添加>html2canvas(ele,{ useCORS: true, ignoreElements: (element: any) => { if (element.tagName.toLowerCase() === 'iframe') { return element; } return false; }, })
方式二:可以将需要转化成图片的部分放在一个节点内,再把整个节点,透明度设置为0, 其他部分层级设置高一些,即可实现截图指定区域。
本文针对前端截图实现的方式,对两个开源库dom-to-image和html2canvas的使用和原理进行了简单的使用方式、实现原理方面,进行介绍和分析。
来源: 前端大全
Recommend
About Joyk
Aggregate valuable and interesting links.
Joyk means Joy of geeK