

如何实现一个卷积函数
source link: https://seanwangjs.github.io/2022/06/09/conv2d.html
Go to the source link to view the article. You can view the picture content, updated content and better typesetting reading experience. If the link is broken, please click the button below to view the snapshot at that time.

如何实现一个卷积函数
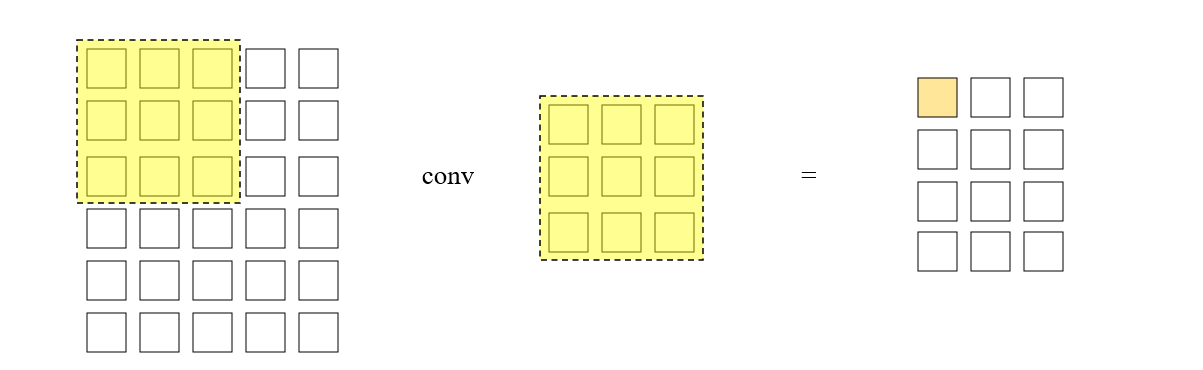
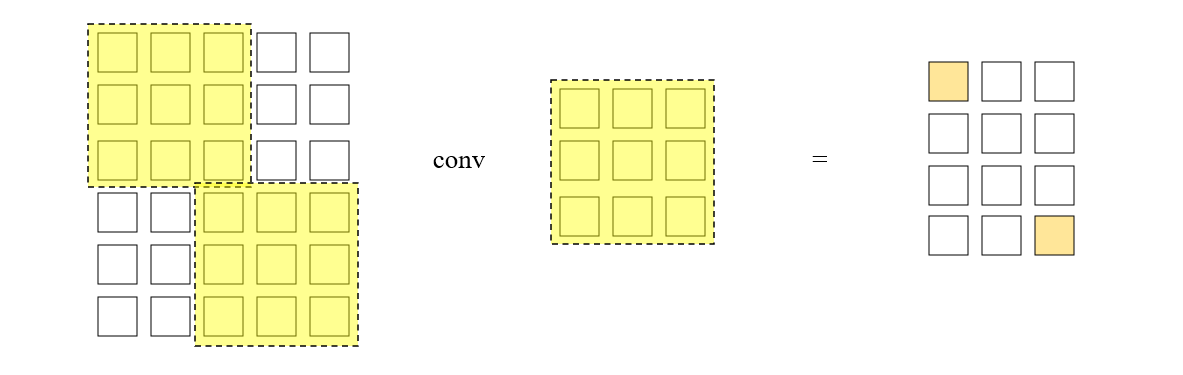
本文,我们使用 C++ 来实现一个简单的卷积运算函数。卷积运算我们都不陌生了,它的过程其实就是卷积核在矩阵上面滑动,每停留一次就将卷积核及其所覆盖的区域进行 element-wise 相乘并求和,所有这样的求和结果就构成了输出矩阵的元素。
为了提高卷积运算的性能,采用并行计算的思想,我们可以令不同位置的卷积核同时开算,在足够理想的情况下,任意尺寸的矩阵卷积时间复杂度都将是 (\mathcal{O}(1))。
另一方面来看,单个卷积核的运算过程本质上可以看作是一维向量的点积。于是我们可以把卷积核及其所覆盖的矩阵块都展开成一维向量,然后使用向量点积来代替前述的 element-wise 相乘并求和。而这个矩阵展开的过程就叫做 im2col,通过 im2col,我们可以把卷积运算问题转化为矩阵乘法问题,在之前这篇文章和这篇文章中有详细叙述。现在,假设我们实现 im2col 方法和矩阵乘法 matmul,接下来的问题就是如何利用这两个方法实现一个我们自己的卷积层,为了方便说明,我们把 im2col 和 matmul 的方法签名定义在这里
/**
 * @param data_im The image tensor.
 * @param im_c The number of channels in the image.
 * @param im_h The height of the image.
 * @param im_w The width of the image.
 * @param kh The height of the kernel.
 * @param kw The width of the kernel.
 * @param ph The padding size of vertical direction.
 * @param pw The padding size of horizontal direction.
 * @param sh The kernel stride of vertical direction.
 * @param sw The kernel stride of horizontal direction.
 * @param data_col The output tensor.
 * @param col_w The width of the output tensor.
 * @param col_h The height of the output tensor.
 * **/
void im2col(const float* data_im,
    const int im_c,
    const int im_w,
    const int im_h,
    const int kw,
    const int kh,
    const int ph,
    const int pw,
    const int sh,
    const int sw,
    float* data_col,
    const int col_w,
    const int col_h);

void matmul(float* A, float* B, float* C, int M, int N, int K);
卷积运算的方法签名也很直接
/**
 * @param input The input tensor.
 * @param channels The number of channels in the input tensor.
 * @param width The width of the input tensor.
 * @param height The height of the input tensor.
 * @param weights The kernel tensor.
 * @param kernel_size The size of the kernel, with width equals to height.
 * @param kernel_num The number of kernels, also the output channel of convolution.
 * @param stride The stride of the kernel.
 * @param padding The padding size of the input tensor.
 * @param output The output tensor.
 * @param output_width The width of the output tensor.
 * @param output_height The height of the output tensor.
*/
void conv2d(const float* input,
    const int channels,
    const int width,
    const int height,
    const float* weights,
    const int kernel_size,
    const int kernel_num,
    const int stride,
    const int padding,
    float* output,
    const int output_width,
    const int output_height);
根据前文所述,卷积运算变换后的矩阵乘法如下图所示
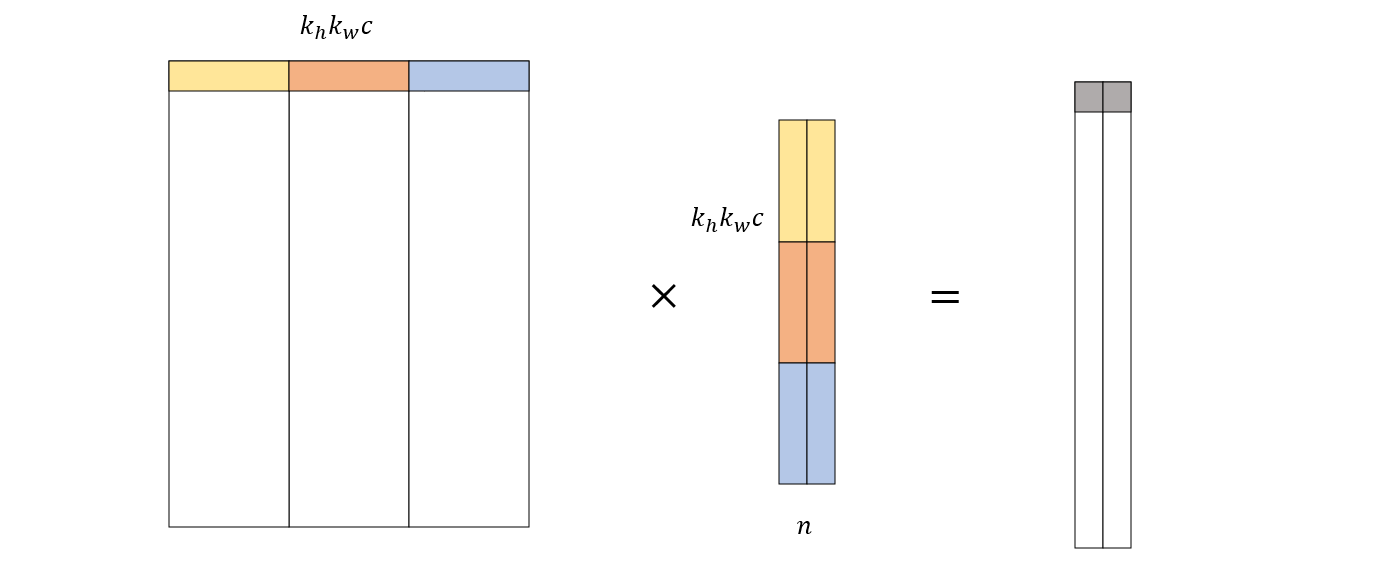
其中左边的矩阵就是 data_col。中间的矩阵是由所有卷积核变换而来的,其中变换过程如下
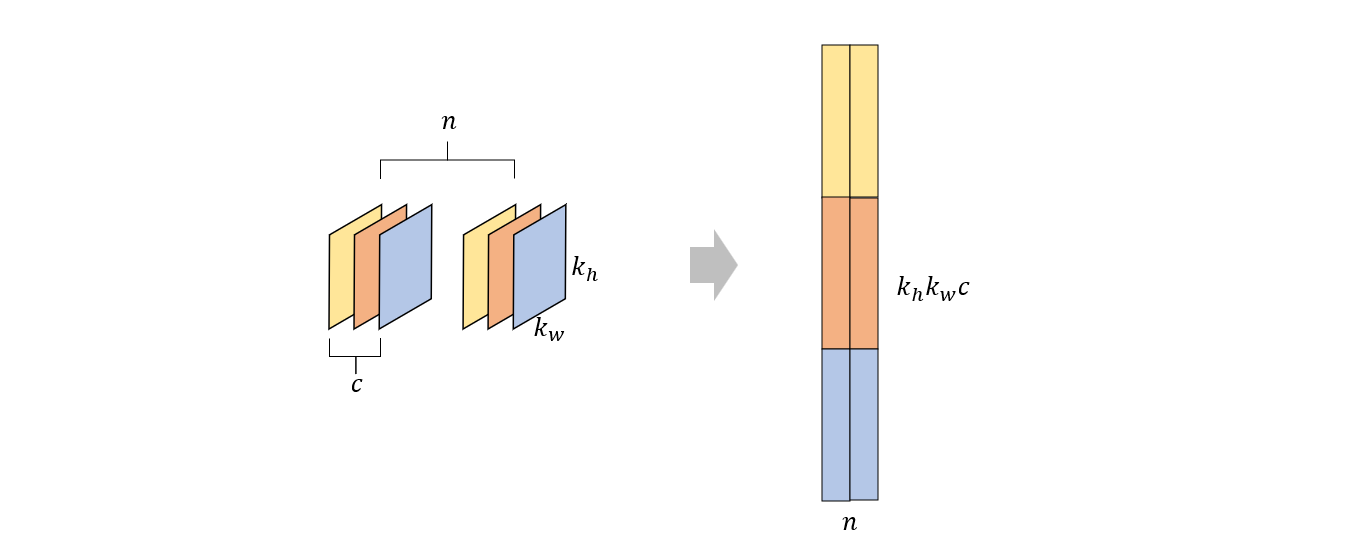
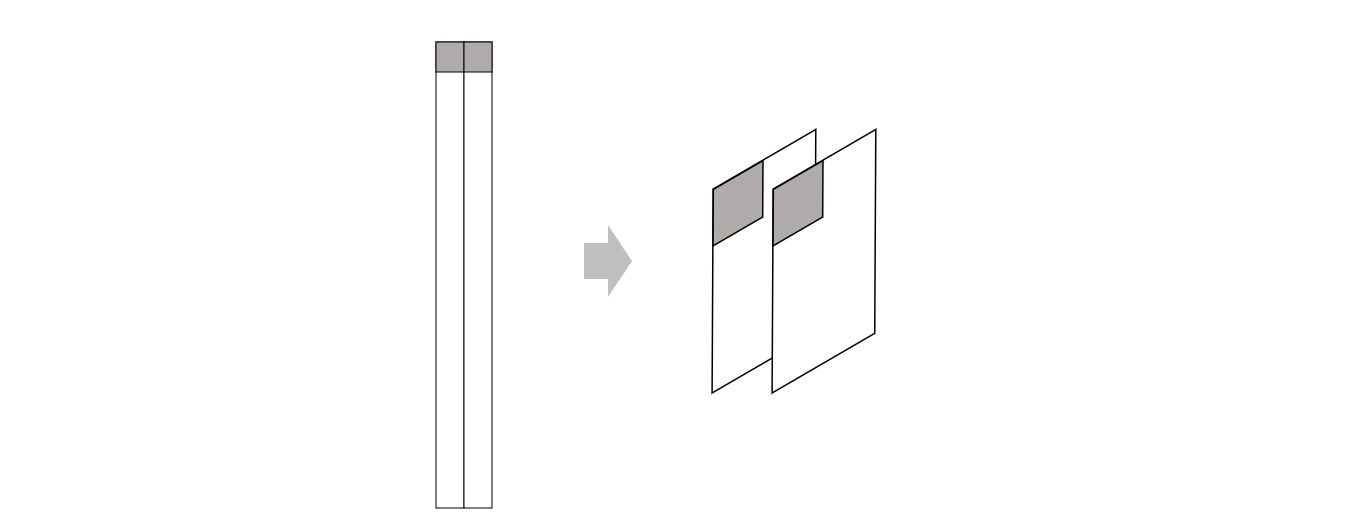
由于任意维度的张量在我们的程序中都是一维存储的,所以变换之前的卷积核阵列的存储形式是下面这样的

若将其看作是二维数组 (n \times k_h k_w c),那么它的逻辑结构又如下

显然,为了将其变换到目标形式,我们只需要对它进行转置即可。另一方面,完成矩阵乘法之后,我们还需要把结果矩阵变换到正常的张量形式
上图左边的矩阵在内存中的存储形式仍然是一维连续的

为了将其变换到目标输出形式,我们同样要对它进行转置。所以我们可以实现一个简单的转置函数
void transpose(const float* matrix, int row, int col, float* matrix_t) {
    for(int i = 0; i < row; i++) {
        for(int j = 0; j < col; j++) {
            matrix_t[j * row + i] = matrix[i * col + j];
        }
    }
}
然后根据上面的分析,我们给出卷积方法的实现
void conv2d(const float* input,
    const int channels,
    const int width,
    const int height,
    const float* weights,
    const int kernel_size,
    const int kernel_num,
    const int stride,
    const int padding,
    float* output,
    const int output_width,
    const int output_height) {

        int col_h = ((height - kernel_size + padding * 2 + 1) / stride) * ((width - kernel_size + padding * 2 + 1) / stride);
        int col_w = channels * kernel_size * kernel_size;
        float* data_col = (float*)malloc(sizeof(float) * col_h * col_w);

        im2col(input, channels, width, height, kernel_size, kernel_size, padding, padding, stride, stride, data_col, col_w, col_h);

        float* weights_t = (float*)malloc(sizeof(float) * kernel_num * col_w);
        transpose(weights, kernel_num, col_w, weights_t);

        // data_col: col_h x col_w
        // weights_t: col_w x kernel_num
        matmul(data_col, weights_t, output, col_h, kernel_num, col_w);

        float* output_t = (float*)malloc(sizeof(float) * col_h * kernel_num);
        transpose(output, col_h, kernel_num, output_t);

    }
最后,我们使用 pytorch 简单对比验证一下:
channels = 2
width = 4
height = 5
kernel_size=3
kernel_num = 2
stride=1
padding=1

weights = torch.FloatTensor(np.arange(0, channels * kernel_num* kernel_size**2).reshape(kernel_num, channels, kernel_size, kernel_size))
conv2d=torch.nn.Conv2d(channels, kernel_num, kernel_size, (stride, stride), padding)
conv2d.weight = torch.nn.parameter.Parameter(weights)
inputs = torch.FloatTensor(np.arange(channels * width * height).reshape(channels, height, width))
inputs = inputs.unsqueeze(0)
print(conv2d(inputs))

## output
## tensor([[[[ 1435.8663,  2143.8662,  2263.8662,  1487.8663],
##          [ 2204.8662,  3260.8662,  3413.8662,  2222.8662],
##          [ 2636.8662,  3872.8662,  4025.8662,  2606.8662],
##          [ 3068.8662,  4484.8662,  4637.8662,  2990.8662],
##          [ 1855.8663,  2683.8662,  2767.8662,  1763.8663]],
##
##         [[ 3236.0149,  4952.0146,  5288.0146,  3576.0149],
##          [ 5337.0146,  8121.0146,  8598.0146,  5787.0146],
##          [ 6633.0146, 10029.0146, 10506.0146,  7035.0146],
##          [ 7929.0146, 11937.0146, 12414.0146,  8283.0146],
##          [ 5384.0146,  8084.0146,  8384.0146,  5580.0146]]]],
##       grad_fn=<ThnnConv2DBackward0>)
void test_conv2d() {

    int im_c = 1;
    int im_h = 5;
    int im_w = 5;
    int kernel_size=3;
    int padding = 1;
    int stride=1;
    int kernel_num = 2;

    float* input = (float*)malloc(sizeof(float) * im_c * im_h * im_w);
    for(int i = 0; i < im_c * im_h * im_w; i++) {
        input[i] = i;
    }

    float* weights = (float*)malloc(sizeof(float) * kernel_size * kernel_size * kernel_num * im_c);

    for(int i = 0; i < kernel_size * kernel_size * kernel_num * im_c; i++) {
        weights[i] = i;
    }

    int output_w = (im_w - kernel_size + 2 * padding) / stride + 1;
    int output_h = (im_h - kernel_size + 2 * padding) / stride + 1;
    float* output = (float*)malloc(sizeof(float) * output_h * output_w * kernel_num);

    for(int i = 0; i < output_h * output_w * kernel_num; i++) {
        output[i] = 0;
    }

    conv2d(input, im_c, im_w, im_h, weights, kernel_size, kernel_num, stride, padding, output, output_w, output_h);
}

// output
// 1436.0 2144.0 2264.0 1488.0
// 2205.0 3261.0 3414.0 2223.0
// 2637.0 3873.0 4026.0 2607.0
// 3069.0 4485.0 4638.0 2991.0
// 1856.0 2684.0 2768.0 1764.0

// 3236.0 4952.0 5288.0 3576.0
// 5337.0 8121.0 8598.0 5787.0
// 6633.0 10029.0 10506.0 7035.0
// 7929.0 11937.0 12414.0 8283.0
// 5384.0 8084.0 8384.0 5580.0
可以看到,除了 pytorch 的精度问题,两者的输出几乎是一样的。
Recommend
About Joyk
Aggregate valuable and interesting links.
Joyk means Joy of geeK