

Insights Salesforce Record Pages | Slalom Technology
source link: https://medium.com/slalom-technology/baking-marketing-insights-into-salesforce-record-pages-30e75f73837f
Go to the source link to view the article. You can view the picture content, updated content and better typesetting reading experience. If the link is broken, please click the button below to view the snapshot at that time.

Baking Marketing Insights into Salesforce Record Pages
A recipe for success from Slalom’s Pardot kitchen

Photo by EKATERINA BOLOVTSOVA from Pexels
The more Pardot integrates with Salesforce, the more marketing information there is to surface within the platform. From read-only Pardot fields to dashboards, organization is crucial for keeping your Salesforce record pages from looking like a kitchen junk drawer.
Below is a quick recipe to organize your lead record page in Salesforce, offering one-stop shopping for your Pardot lead record data.
Serves: Marketing and sales teams
Prep time: 30 minutes
Ingredients:
- 1 record page
- 1 action on the lead record
- Pardot fields
- 1–2 lightning web components (built by Pardot)
- Related lists
Double the recipe: Repeat steps for the contact object. For other objects that have Pardot data to display (like the account, opportunity, and campaign record pages), just rinse and repeat!
Instructions:
Step 1: Create an action
Why do we need an action? When you installed your Pardot package in Salesforce, it provided you with a whole slew of Pardot fields you can display on a lead or contact record page in Salesforce. They should all be read-only so if someone were to change one and save the record, it will simply revert to its previous value, which will inevitably frustrate your sales users if they try to update one of these fields.
We are going to take whichever Pardot or marketing fields you want to display and add them to an action, which we’ll use later. On that action, the fields will automatically be read-only, meaning no salesperson frustration.
To do this, you’ll need to:
- Head to your lead object in Salesforce Setup > Object manager > Lead.
- Select “Buttons, Links, and Actions.”
- Click the “New Action” button in the top right corner of your screen.
- Complete your action information (as pictured below) and save.

After you create an action, edit your layout by adding Pardot fields and other read-only marketing fields by dragging them from the lead fields tray to the page and clicking save. You’ll get a warning that you’re missing fields like “Company,” “Lead Status,” and “Name,” but click “yes” to continue — you don’t need those fields for the purpose of this action.

Step 2: Update your lead record page
Prep work: Ensure you’re updating the correct lead record page(s).
You might have several lead record pages for different Salesforce user profiles. For example, an accounts receivable user might not need all the marketing engagement magnificence that Pardot provides, so be sure to check with your Pardot admin. Note that record pages come out of the box in Salesforce on most default objects, but your admin will need to create one for the campaign object.
After you’ve saved your action, select “Lightning Record Page” in your left sidebar from the lead object in the object manager. Select the page you want to update and click the edit button. If you haven’t seen the record page editor, no worries — everything is drag and drop.
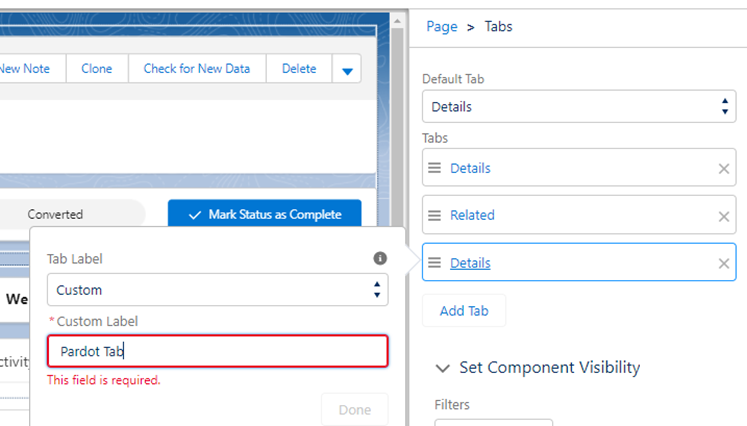
To add a Pardot tab, start by clicking the empty space to the right of your tabs. This will change what you see in the right sidebar. At the top, it should now show “Page > Tabs”. Under that, you’ll see “Details” and “Related.” Click “Add Tab.”

The new tab will show up at the bottom of that list as well as next to your tabs. To change the name, click “Details” in the right sidebar and a pop-up window will appear. Select “Custom” to add a name. For this example, we’ll call mine “Pardot Tab” and click “Done.”
If you click the new tab we just created, you’ll see the tab is blank. However, we need to add a dash of awesome sauce. To have your “Pardot Fields” at the top, grab the “Related Record” component from the left sidebar and drag it onto your canvas. It will show you the fields we added to the “Pardot Fields” action in step one.
Give the component a click and look at the right sidebar. If your component doesn’t display the “Pardot Fields” action created in step one, you can look halfway down the right sidebar and examine the “*Update Action” to change the displayed action. This is a picklist, so select “Pardot Fields” if that’s not the default value.
I also like to update the action title displayed in the component by changing the header label in the right sidebar.

Drag the “Engagement History Lightning Web Component (LWC)” onto the canvas under the key “Pardot Fields.”

Drag the “Engagement History Dashboard” standard component onto the canvas under the “Engagement History LWC.”
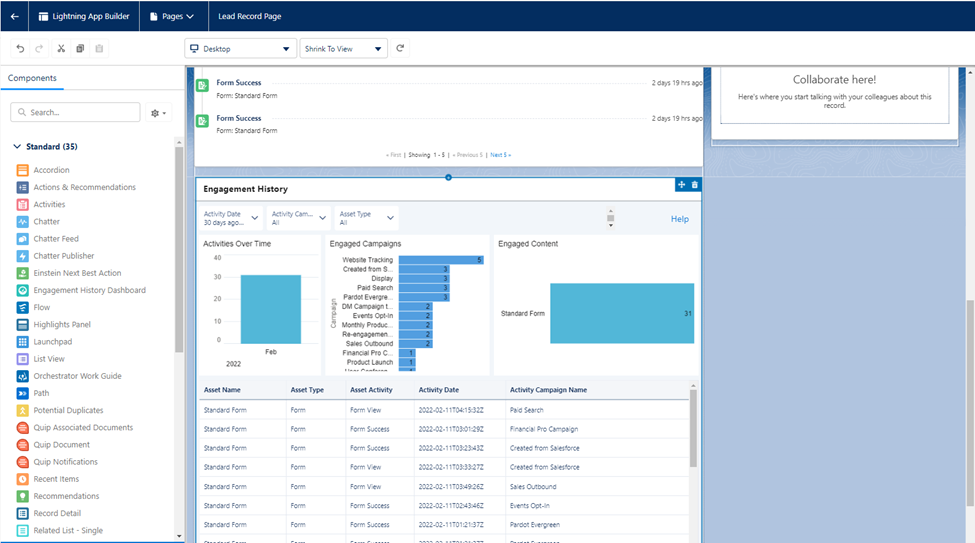
On the Pardot tab, you can add related lists, such as “Engagement History” and “Engagement Metrics.” If you have a Salesforce report with an awesome report chart you’d like to share, you can add that here as well.
Step 3: Garnish
Voila! Your Salesforce record page now has a shiny new Pardot tab, housing important marketing information in one, easy-to-find place. As a “garnish,” work with your Salesforce Admin to customize component visibility behind the scenes in the right sidebar of the record page layouts.
Recommend
About Joyk
Aggregate valuable and interesting links.
Joyk means Joy of geeK