

Smol Dungeon
source link: https://smoldungeon.com/pixel-art
Go to the source link to view the article. You can view the picture content, updated content and better typesetting reading experience. If the link is broken, please click the button below to view the snapshot at that time.

Smol Dungeon
How to Make Pixel Art
A step-by-step guide
In the design article I described the high level overview of how I approached the sprite design in Smol Dungeon. This article is a step-by-step guide executing that idea.
Preparation
- We'll need an application to make our art. I use Pixaki on an iPad with an Apple Pencil. If you've never made pixel art before, try Aseprite.
- Choose a color palette, making art is far easier with strict constraints. Smol Dungeon uses DB32.
- Choose a sprite size. Keep it small! Smol Dungeon uses 16x16 sprites. Constraints are good, especially for learning!
As you practice making art you'll naturally find when you want to break out of these constraints, try different apps, bigger sprites, etc.
Monster laboratory
Here are the steps we will take. The steps are a listed in order but we'll probably need to work on each step a few times, that's normal. Art is a muscle, you gotta get the reps in.
- Choose a shape.
- Choose a feature.
- Shadows and details.
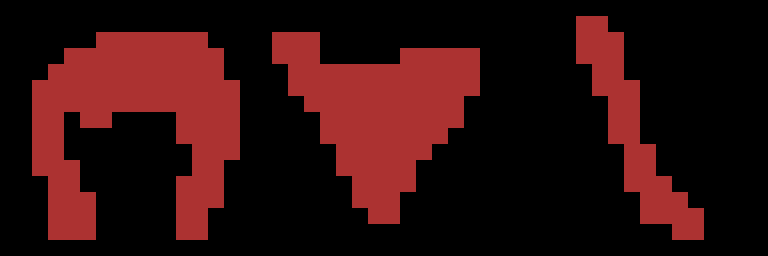
Some shapes we could use to build our monster.
Ok we have some shapes, I think there is a monster in each one of those! Now we just need to make a decision. I like all three, but I think we can quickly eliminate the second shape. It's a triangle shape and we already have a triangle shaped monster in our game. If we add another it might confuse the player. Ok it's down to the first arch shape or the skinny shape - let's go with the arch shape.
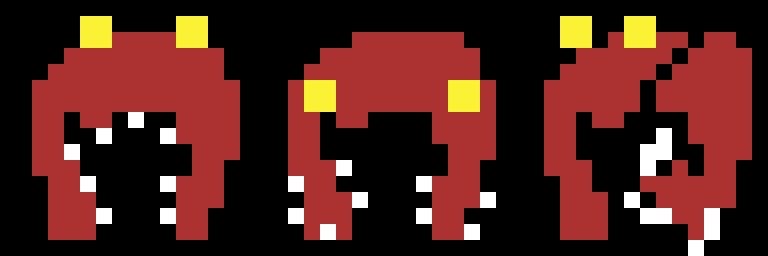
Some features we could use to define our monster.
Now we're thinking about features. It's a monster, it should be monstrous. Claws and teeth and stingers and spikes and horns, try them all! Here I've doodled up a quick few that were inspired by the arch shape.
The first has a huge mouth, maybe this monster is arch shaped because it has a huge mouth. Maybe it doesn't have a stomach at all, maybe it chews on its prey and then vomits digestive acid onto the body and slurps up its meal. Gross. I love it.
The second has spikey club hands. This monster beats its prey with spiked clubs before devouring their meal. In my head the spiked clubs look awesome, but limited to 16x16 I'm not sure they look like spikey clubs to me.
The third is arch shaped because it walks around like a gorilla, with huge fore limbs with massive claws it uses to grab prey and tear apart piece by piece, limb from limb! Sounds bloody.
Ok we have some interesting directions we can go with our monster. Let's elimate the second option. I like the spiked club idea but I'm worried that it won't read well, they'll just end up looking like claws. And if they look like claws, the third design is cooler. I like option 1 and option 3 equally. I flipped a coin: option 3!
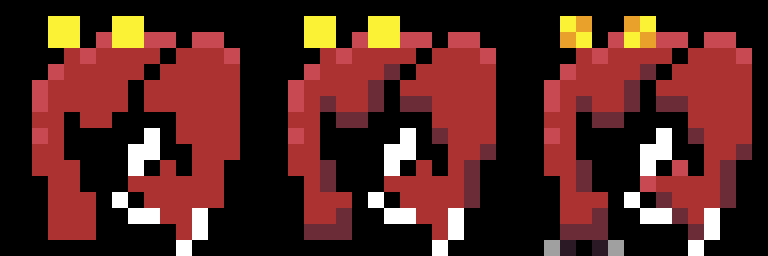
Highlights, then shadows, then details.
Choose a lighting direction. If this your first time making pixel art, choose top-down like I've done here. If you already have sprites drawn for your game, choose the same lighting direction. Here I first added a highlight, there was a light red / pinkish color in my color palette. The lighting is coming from directly above so the highlights go on the top pixels of the shape. As you practice you'll see how much lights and shadows define the shape.
Second, I added shadow. For the shadow color I went with a nice dark purple. If you're unsure of what colors to choose for highlights and shadows: choose white and black and use 20-40% opacity. If you want colored highlights and shadows like I've done here, be consistent with how the color shifts. If the highlight shifts warm (more red) then the shadow should shift the opposite, cool (more blue).
Third, I added a little extra detail. Some orange in the eyes to make them look more interesting. A little extra white on the other limb to hint at another claw curled away. Try it many ways, digital drawing apps have layers and undo - they are very forgiving.
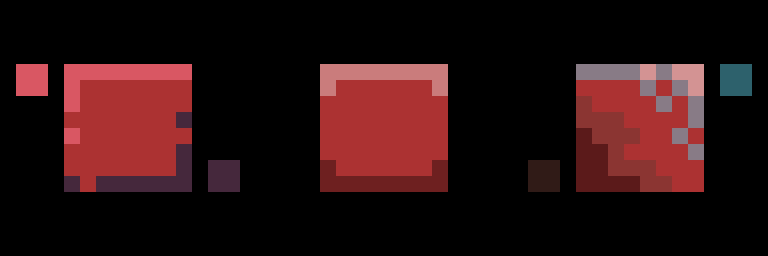
Top-left warm lighting, overhead lighting, and top-right cool lighting.
The first square it lit with warm light from the top-left. The highlight color is a warm pink and the shadow is a cool purple. The middle square is lit from overhead, the highlight is white and the shadow is black. The third square is lit with cool blue light from the top-right. The highlight is a light blue color and the shadow is a brown color. Lights and shadows are how you can make something smooth and flat look textured and/or three dimensional.
Monster factory
If this new monster was going into the game, the next step would be to give it an idle animation. For the beginner pixel artist I would advise to not yet wade into the murky depths of animation. Instead, start cranking out monsters. As an exercise you should try to get through at least a dozen monsters. See how many you can make in 90 minutes. You might not like all of your creations but I bet you'll make some gems. If you do, please show me! @krisshamloo
More things
There are a ton of pixel art tutorials online. These are my two favorite:
Copyright © 2022 Kris Shamloo. All rights reserved.
@krisshamloo -
privacy
Recommend
About Joyk
Aggregate valuable and interesting links.
Joyk means Joy of geeK