

How & Why To Prevent Bots From Crawling Your Site
source link: https://www.searchenginejournal.com/prevent-bot-crawling/450430/
Go to the source link to view the article. You can view the picture content, updated content and better typesetting reading experience. If the link is broken, please click the button below to view the snapshot at that time.


How To Automate Ecommerce Category Page Creation With Python
Learn how to use Python + Streamlit to automatically create ecommerce category pages by clustering product inventory (includes script).
-
SHARES

Clustering product inventory and automatically aligning SKUs to search demand is a great way to find opportunities to create new ecommerce categories.
Niche category pages are a proven way for ecommerce sites to align with organic search demand while simultaneously assisting users in purchasing.
If a site stocks a range of products and there is search demand, creating a dedicated landing page is an easy way to align with the demand.
But how can SEO professionals find this opportunity?
Sure, you can eyeball it, but you’ll usually leave a lot of opportunity on the table.
This problem motivated me to script something in Python, which I’m sharing today in a simple to use Streamlit application. (No coding experience required!)
The app linked above created the following output automatically using nothing more than two crawl exports!
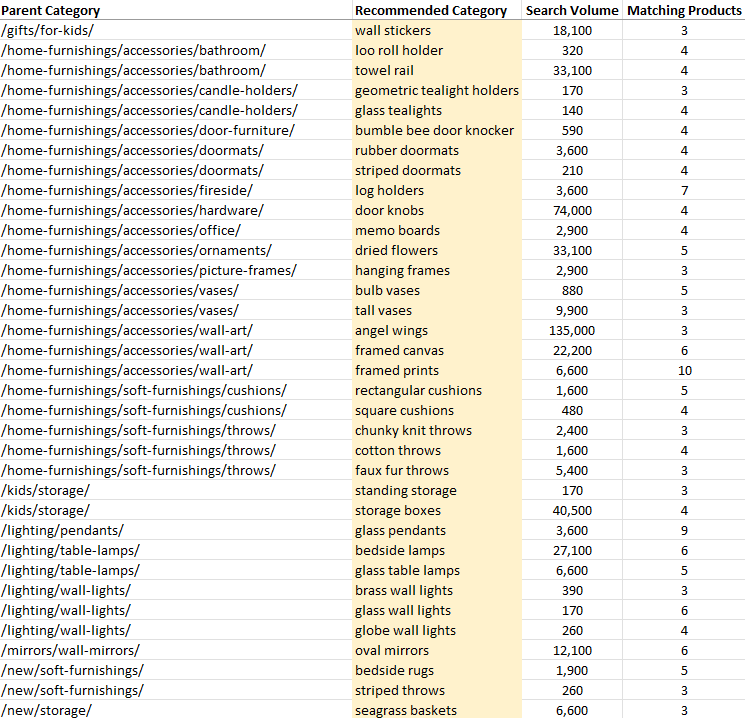
Notice how the suggested categories are automatically tied back to the existing parent category?

The app even shows how many products are available to populate the category.

Benefits And Uses
- Improve relevancy to high-demand, competitive queries by creating new landing pages.
- Increase the chance of relevant site links displaying underneath the parent category.
- Reduce CPCs to the landing page through increased relevancy.
- Potential to inform merchandising decisions. (If there is high search demand vs. low product count – there is a potential to widen the range.0
Mock-up Screenshot from Google Chrome, May 2022
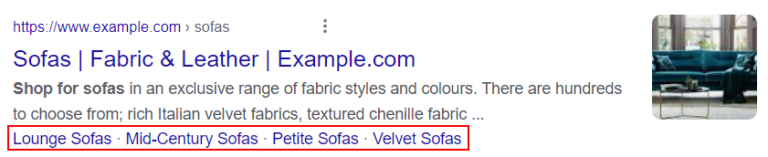
Creating the suggested subcategories for the parent sofa category would align the site to an additional 3,500 searches per month with relatively little effort.
Features
- Create subcategory suggestions automatically.
- Tie subcategories back to the parent category (cuts out a lot of guesswork!).
- Match to a minimum of X products before recommending a category.
- Check similarity to an existing category (X % fuzzy match) before recommending a new category.
- Set minimum search volume/CPC cut-off for category suggestions.
- Supports search volume and CPC data from multiple countries.
Getting Started/Prepping The Files
To use this app you need two things.
- The Streamlit app.
- A copy of Screaming Frog.
- A way to check keyword search volume. The Streamlit app natively supports the Keywords Everywhere API key, but it’s possible to check search volume manually after the script has completed.
At a high level, the goal is to crawl the target website with two custom extractions.
The internal_html.csv report is exported, along with an inlinks.csv export.
These exports are then uploaded to the Streamlit app, where the opportunities are processed.
Crawl And Extraction Setup
When crawling the site, you’ll need to set two extractions in Screaming Frog – one to uniquely identify product pages and another to uniquely identify category pages.
The Streamlit app understands the difference between the two types of pages when making recommendations for new pages.
The trick is to find a unique element for each page type.
(For a product page, this is usually the price or the returns policy, and for a category page, it’s usually a filter sort element.)
Extracting The Unique Page Elements
Screaming Frog allows for custom extractions of content or code from a web page when crawled.
This section may be daunting if you are unfamiliar with custom extractions, but it’s essential for getting the correct data into the Streamlit app.
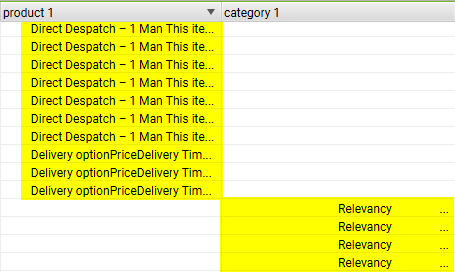
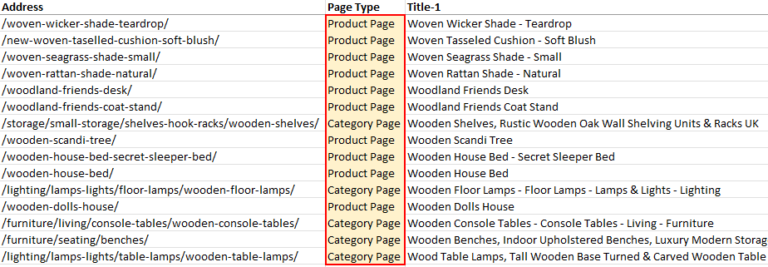
The goal is to end up with something looking like the below image.
(A unique extraction for product and category pages with no overlap.)
The steps below walk you through manually extracting the price element for a product page.
Grow Your Business With Vetted Freelancers Today
Fiverr Business gives your team the tools to collaborate and delegate with the world's largest selection of talented freelancers for any need.
Then, repeat for a category page afterward.
If you’re stuck or would like to read more about the web scraper tool in Screaming Frog, the official documentation is worth your time.
Manually Extracting Page Elements
Let’s start by extracting a unique element only found on a product page (usually the price).
Highlight the price element on the page with the mouse, right-click and choose Inspect.
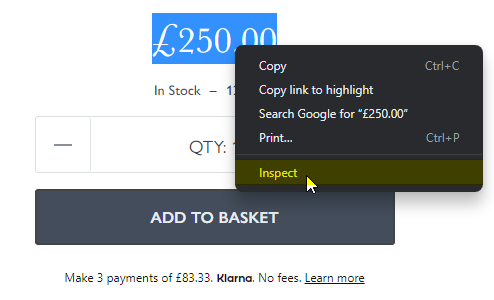
This will open up the elements window with the correct HTML line already selected.
Right-click the pre-selected line and choose Copy > Copy selector. That’s it!

Open Screaming Frog and paste the copied selector into the custom extraction section. (Configuration > Custom > Extraction).
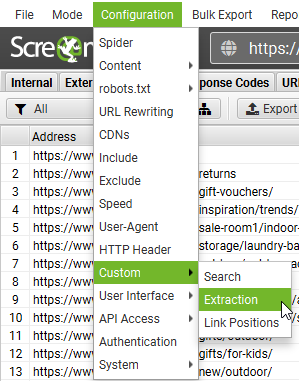
Name the extractor as “product,” select the CSSPath drop down and choose Extract Text.
Repeat the process to extract a unique element from a category page. It should look like this once completed for both product and category pages.

Finally, start the crawl.
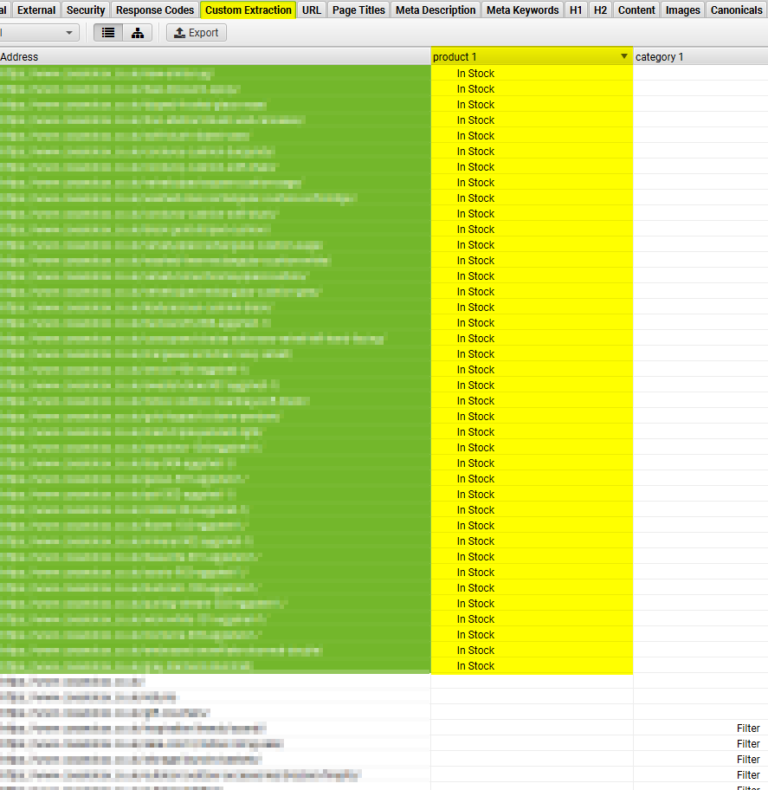
The crawl should look like this when viewing the Custom Extraction tab.
Notice how the extractions are unique to each page type? Perfect.
The script uses the extractor to identify the page type.
Internally the app will convert the extractor to tags.
(I mention this to stress that the extractors can be anything as long as they uniquely identify both page types.)
Exporting The Files
Once the crawl has been completed, the last step is to export two types of CSV files.
- internal_html.csv.
- inlinks to product pages.
Go to the Custom Extraction tab in Screaming Frog and highlight all URLs that have an extraction for products.
(You will need to sort the column to group it.)
Lastly, right-click the product URLs, select Export, and then Inlinks.
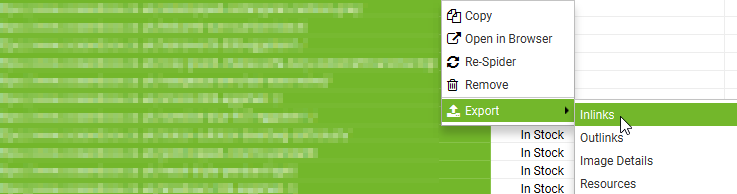
You should now have a file called inlinks.csv.
Finally, we just need to export the internal_html.csv file.
Click the Internal tab, select HTML from the dropdown menu below and click on the adjacent Export button.
Finally, choose the option to save the file as a .csv
 Screenshot from Screaming Frog SEO Spider, May 2022
Congratulations! You are now ready to use the Streamlit app!
Using The Streamlit App
Using the Streamlit app is relatively simple.
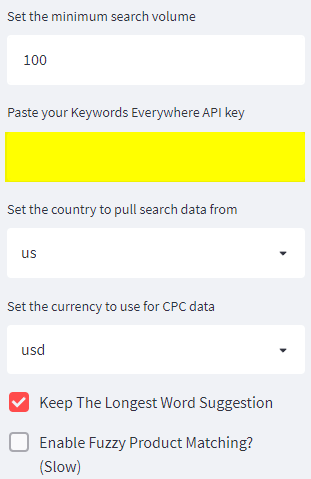
The various options are set to reasonable defaults, but feel free to adjust the cut-offs to better suit your needs.
I would highly recommend using a Keywords Everywhere API key (although it is not strictly necessary as this can be looked up manually later with an existing tool if preferred.
(The script pre-qualifies opportunity by checking for search volume. If the key is missing, the final output will contain more irrelevant words.)
If you want to use a key, this is the section on the left to pay attention to.
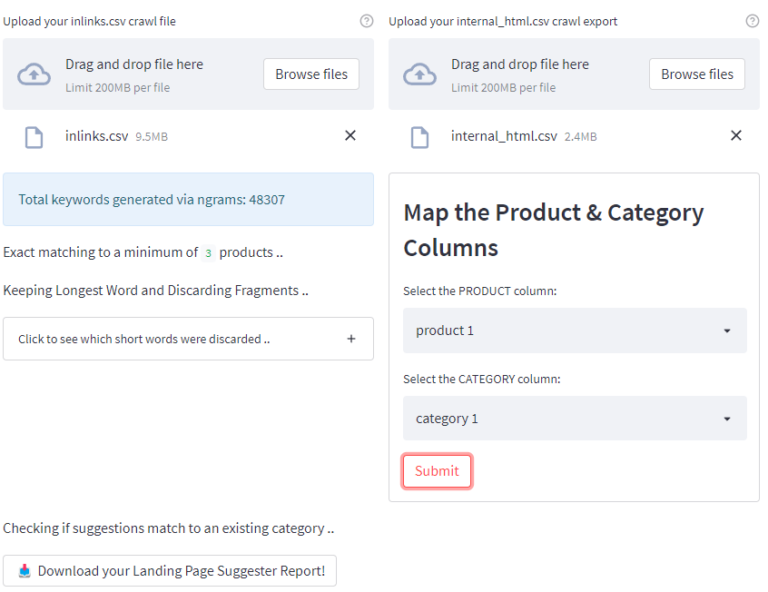
Once you have entered the API key and adjusted the cut-offs to your links, upload the inlinks.csv crawl.
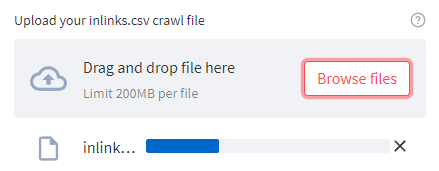
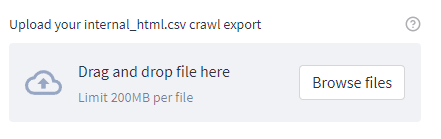
Once complete, a new prompt will appear adjacent to it, prompting you to upload the internal_html.csv crawl file.
Finally, a new box will appear asking you to select the product and column names from the uploaded crawl file to be mapped correctly.
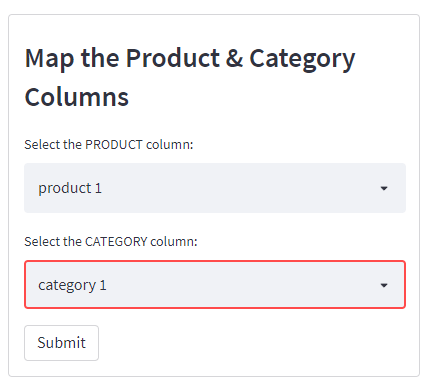
Click submit and the script will run. Once complete, you will see the following screen and can download a handy .csv export.
How The Script Works
Before we dive into the script’s output, it will help to explain what’s going on under the hood at a high level.
At a glance:
- Generate thousands of keywords by generating n-grams from product page H1 headings.
- Qualify keywords by checking whether the word is in an exact or fuzzy match in a product heading.
- Further qualify keywords by checking for search volume using the Keywords Everywhere API (optional but recommended).
- Check whether an existing category already exists using a fuzzy match (can find words out of order, different tenses, etc.).
- Uses the inlinks report to assign suggestions to a parent category automatically.
N-gram Generation
The script creates hundreds of thousands of n-grams from the product page H1s, most of which are completely nonsensical.
In my example for this article, n-grams generated 48,307 words – so this will need to be filtered!

The first step in the filtering process is to check whether the keywords generated via n-grams are found at least X times within the product name column.
(This can be in an exact or fuzzy match.)
Anything not found is immediately discarded, which usually removes around 90% of the generated keywords.
The second filtering stage is to check whether the remaining keywords have search demand.
Any keywords without search demand are then discarded too.
(This is why I recommend using the Keywords Everywhere API when running the script, which results in a more refined output.)
It’s worth noting you can do this manually afterward by searching Semrush/Ahrefs etc., discarding any keywords without search volume, and running a VLOOKUP in Microsoft Excel.
Cheaper if you have an existing subscription.
Recommendations Tied To Specific Landing Pages
Once the keyword list has been filtered the script uses the inlinks report to tie the suggested subcategory back to the landing page.
Earlier versions did not do this, but I realized that leveraging the inlinks.csv report meant it was possible.
It really helps understand the context of the suggestion at a glance during QA.
This is the reason the script requires two exports to work correctly.
Limitations
- Not checking search volumes will result in more results for QA. (Even if you don’t use the Keywords Everywhere API, I recommend shortlisting by filtering out 0 search volume afterward.)
- Some irrelevant keywords will have search volume and appear in the final report, even if keyword volume has been checked.
- Words will typically appear in the singular sense for the final output (because products are singular and categories are pluralized if they sell more than a single product). It’s easy enough to add an “s” to the end of the suggestion though.
User Configurable Variables
I’ve selected what I consider to be sensible default options.
But here is a run down if you’d like to tweak and experiment.
- Minimum products to match to (exact match) – The minimum number of products that must exist before suggesting the new category in an exact match.
- Minimum products to match to (fuzzy match) – The minimum number of products that must exist before suggesting the new category in a fuzzy match, (words can be found in any order).
- Minimum similarity to an existing category – This checks whether a category already exists in a fuzzy match before making the recommendation. The closer to 100 = stricter matching.
- Minimum CPC in $ – The minimum dollar amount of the suggested category keyword. (Requires the Keywords Everywhere API.)
- Minimum search volume – The minimum search volume of the suggested category keyword. (Requires Keywords Everywhere API.)
- Keywords Everywhere API key – Optional, but recommended. Used to pull in CPC/search volume data. (Useful for shortlisting categories.)
- Set the country to pull search data from – Country-specific search data is available. (Default is the USA.)
- Set the currency for CPC data – Country-specific CPC data is available. (Default USD.)
- Keep the longest word suggestion – With similar word suggestions, this option will keep the longest match.
- Enable fuzzy product matching – This will search for product names in a fuzzy match. (Words can be found out of order, recommended – but slow and CPU intensive.)
Conclusion
With a small amount of preparation, it is possible to tap into a large amount of organic opportunity while improving the user experience.
Although this script was created with an ecommerce focus, according to feedback, it works well for other site types such as job listing sites.
So even if your site isn’t an ecommerce site, it’s still worth a try.
Python enthusiast?
I released the source code for a non-Streamlit version here.
More resources:
Featured Image: patpitchaya/Shutterstock
Subscribe to SEJ
Get our daily newsletter from SEJ's Founder Loren Baker about the latest news in the industry!
Lee Foot
Lee Foot is the founder and director of Search Solved, an SEO agency specialising in enterprise and eCommerce SEO. He ... [Read full bio]
- Suggested Articles
-
SHARES
-
READS

For the most part, bots and spiders are relatively harmless.
You want Google’s bot, for example, to crawl and index your website.
However, bots and spiders can sometimes be a problem and provide unwanted traffic.
This kind of unwanted traffic can result in:
- Obfuscation of where the traffic is coming from.
- Confusing and hard to understand reports.
- Misattribution in Google Analytics.
- Increased bandwidth costs that you pay for.
- Other nuisances.
There are good bots and bad bots.
Good bots run in the background, seldom attacking another user or website.
Bad bots break the security behind a website or are used as a wide, large-scale botnet to deliver DDOS attacks against a large organization (something that a single machine cannot take down).
Here’s what you should know about bots and how to prevent the bad ones from crawling your site.
What Is A Bot?
Looking at exactly what a bot is can help identify why we need to block it and keep it from crawling our site.
A bot, short for “robot,” is a software application designed to repeat a specific task repeatedly.
For many SEO professionals, utilizing bots goes along with scaling an SEO campaign.
“Scaling” means you automate as much work as possible to get better results faster.
Common Misconceptions About Bots
You may have run into the misconception that all bots are evil and must be banned unequivocally from your site.
But this could not be further from the truth.
Google is a bot.
If you block Google, can you guess what will happen to your search engine rankings?
Some bots can be malicious, designed to create fake content or posing as legit websites to steal your data.
However, bots are not always malicious scripts run by bad actors.
Some can be great tools that help make work easier for SEO professionals, such as automating common repetitive tasks or scraping useful information from search engines.
Some common bots SEO professionals use are Semrush and Ahrefs.
These bots scrape useful data from the search engines, help SEO pros automate and complete tasks, and can help make your job easier when it comes to SEO tasks.
Why Would You Need to Block Bots From Crawling Your Site?
While there are many good bots, there are also bad bots.
Bad bots can help steal your private data or take down an otherwise operating website.
We want to block any bad bots we can uncover.
It’s not easy to discover every bot that may crawl your site but with a little bit of digging, you can find malicious ones that you don’t want to visit your site anymore.
So why would you need to block bots from crawling your website?
Some common reasons why you may want to block bots from crawling your site could include:
Protecting Your Valuable Data
Perhaps you found that a plugin is attracting a number of malicious bots who want to steal your valuable consumer data.
Or, you found that a bot took advantage of a security vulnerability to add bad links all over your site.
Or, someone keeps trying to spam your contact form with a bot.
This is where you need to take certain steps to protect your valuable data from getting compromised by a bot.
Bandwidth Overages
If you get an influx of bot traffic, chances are your bandwidth will skyrocket as well, leading to unforeseen overages and charges you would rather not have.
You absolutely want to block the offending bots from crawling your site in these cases.
You don’t want a situation where you’re paying thousands of dollars for bandwidth you don’t deserve to be charged for.
What’s bandwidth?
Bandwidth is the transfer of data from your server to the client-side (web browser).
Every time data is sent over a connection attempt you use bandwidth.
When bots access your site and you waste bandwidth, you could incur overage charges from exceeding your monthly allotted bandwidth.
You should have been given at least some detailed information from your host when you signed up for your hosting package.
Limiting Bad Behavior
If a malicious bot somehow started targeting your site, it would be appropriate to take steps to control this.
For example, you would want to ensure that this bot would not be able to access your contact forms. You want to make sure the bot can’t access your site.
Do this before the bot can compromise your most critical files.
By ensuring your site is properly locked down and secure, it is possible to block these bots so they don’t cause too much damage.
How To Block Bots From Your Site Effectively
You can use two methods to block bots from your site effectively.
The first is through robots.txt.
This is a file that sits at the root of your web server. Usually, you may not have one by default, and you would have to create one.
These are a few highly useful robots.txt codes that you can use to block most spiders and bots from your site:
Disallow Googlebot From Your Server
If, for some reason, you want to stop Googlebot from crawling your server at all, the following code is the code you would use:
User-agent: Googlebot
Disallow: /
You only want to use this code to keep your site from being indexed at all.
Don’t use this on a whim!
Have a specific reason for making sure you don’t want bots crawling your site at all.
For example, a common issue is wanting to keep your staging site out of the index.
You don’t want Google crawling the staging site and your real site because you are doubling up on your content and creating duplicate content issues as a result.
Disallowing All Bots From Your Server
If you want to keep all bots from crawling your site at all, the following code is the one you will want to use:
User-agent: *
Disallow: /
This is the code to disallow all bots. Remember our staging site example from above?
Perhaps you want to exclude the staging site from all bots before fully deploying your site to all of them.
Or perhaps you want to keep your site private for a time before launching it to the world.
Either way, this will keep your site hidden from prying eyes.
Keeping Bots From Crawling a Specific Folder
If for some reason, you want to keep bots from crawling a specific folder that you want to designate, you can do that too.
The following is the code you would use:
User-agent: *
Disallow: /folder-name/
There are many reasons someone would want to exclude bots from a folder. Perhaps you want to ensure that certain content on your site isn’t indexed.
Or maybe that particular folder will cause certain types of duplicate content issues, and you want to exclude it from crawling entirely.
Either way, this will help you do that.
Common Mistakes With Robots.txt
There are several mistakes that SEO professionals make with robots.txt. The top common mistakes include:
- Using both disallow in robots.txt and noindex.
- Using the forward slash / (all folders down from root), when you really mean a specific URL.
- Not including the correct path.
- Not testing your robots.txt file.
- Not knowing the correct name of the user-agent you want to block.
Using Both Disallow In Robots.txt And Noindex On The Page
Google’s John Mueller has stated you should not be using both disallow in robots.txt and noindex on the page itself.
If you do both, Google cannot crawl the page to see the noindex, so it could potentially still index the page anyway.
This is why you should only use one or the other, and not both.
Using The Forward Slash When You Really Mean A Specific URL
The forward slash after Disallow means “from this root folder on down, completely and entirely for eternity.”
Every page on your site will be blocked forever until you change it.
One of the most common issues I find in website audits is that someone accidentally added a forward slash to “Disallow:” and blocked Google from crawling their entire site.
Not Including The Correct Path
We understand. Sometimes coding robots.txt can be a tough job.
You couldn’t remember the exact correct path initially, so you went through the file and winging it.
The problem is that these similar paths all result in 404s because they are one character off.
This is why it’s important always to double-check the paths you use on specific URLs.
You don’t want to run the risk of adding a URL to robots.txt that isn’t going to work in robots.txt.
Not Knowing The Correct Name Of The User-Agent
If you want to block a particular user-agent but you don’t know the name of that user-agent, that’s a problem.
Rather than using the name you think you remember, do some research and figure out the exact name of the user-agent that you need.
If you are trying to block specific bots, then that name becomes extremely important in your efforts.
Why Else Would You Block Bots And Spiders?
There are other reasons SEO pros would want to block bots from crawling their site.
Perhaps they are deep into gray hat (or black hat) PBNs, and they want to hide their private blog network from prying eyes (especially their competitors).
They can do this by utilizing robots.txt to block common bots that SEO professionals use to assess their competition.
For example Semrush and Ahrefs.
If you wanted to block Ahrefs, this is the code to do so:
User-agent: AhrefsBot
Disallow: /
This will block AhrefsBot from crawling your entire site.
If you want to block Semrush, this is the code to do so.
There are also other instructions here.
There are a lot of lines of code to add, so be careful when adding these:
To block SemrushBot from crawling your site for different SEO and technical issues:
User-agent: SiteAuditBot
Disallow: /To block SemrushBot from crawling your site for Backlink Audit tool:
User-agent: SemrushBot-BA
Disallow: /To block SemrushBot from crawling your site for On Page SEO Checker tool and similar tools:
User-agent: SemrushBot-SI
Disallow: /To block SemrushBot from checking URLs on your site for SWA tool:
User-agent: SemrushBot-SWA
Disallow: /To block SemrushBot from crawling your site for Content Analyzer and Post Tracking tools:
User-agent: SemrushBot-CT
Disallow: /To block SemrushBot from crawling your site for Brand Monitoring:
User-agent: SemrushBot-BM
Disallow: /To block SplitSignalBot from crawling your site for SplitSignal tool:
User-agent: SplitSignalBot
Disallow: /To block SemrushBot-COUB from crawling your site for Content Outline Builder tool:
User-agent: SemrushBot-COUB
Disallow: /
Using Your HTACCESS File To Block Bots
If you are on an APACHE web server, you can utilize your site’s htaccess file to block specific bots.
For example, here is how you would use code in htaccess to block ahrefsbot.
Please note: be careful with this code.
If you don’t know what you are doing, you could bring down your server.
We only provide this code here for example purposes.
Make sure you do your research and practice on your own before adding it to a production server.
Order Allow,Deny
Deny from 51.222.152.133
Deny from 54.36.148.1
Deny from 195.154.122
Allow from all
For this to work properly, make sure you block all the IP ranges listed in this article on the Ahrefs blog.
If you want a comprehensive introduction to .htaccess, look no further than this tutorial on Apache.org.
If you need help using your htaccess file to block specific types of bots, you can follow the tutorial here.
Blocking Bots and Spiders Can Require Some Work
But it’s well worth it in the end.
By making sure you block bots and spiders from crawling your site, you don’t fall into the same trap as others.
You can rest easy knowing your site is immune to certain automated processes.
When you can control these particular bots, it makes things that much better for you, the SEO professional.
If you have to, always make sure that block the required bots and spiders from crawling your site.
This will result in enhanced security, a better overall online reputation, and a much better site that will be there in the years to come.
More resources:
Featured Image: Roman Samborskyi/Shutterstock
Recommend
About Joyk
Aggregate valuable and interesting links.
Joyk means Joy of geeK