

Easy to learn .NET 6.0 and Angular - Getting Started Angular Template - Part1
source link: https://www.codeproject.com/Articles/5333497/Easy-to-learn-NET-6-0-and-Angular-Getting-Started
Go to the source link to view the article. You can view the picture content, updated content and better typesetting reading experience. If the link is broken, please click the button below to view the snapshot at that time.

Introduction
Good day all this time I have planned to publish .NET 6.0 and Angular series of articles. In this series I have planned to publish articles like
Easy to learn .NET 6.0 and Angular - Getting Started Angular Template – Part 1
Easy to learn .NET 6.0 and Angular - Getting Started Angular Standalone Template – Part 2
Easy to learn .NET 6.0 and Angular - Getting Started Admin LTE Design – Part 3
Easy to learn .NET 6.0 and Angular - Getting Started Multi Language – Part 4
Easy to learn .NET 6.0 and Angular - Getting Started Publish to IIS – Part 5
Easy to learn .NET 6.0 and Angular - Getting Started WEB API – Part 6
Easy to learn .NET 6.0 and Angular - Getting Started WEB API CRUD SQL SERVER – Part 7
In this article we will see in detail on how to getting started with the .NET 6.0 and Angular using the Angular Template which is available in Visual Studio 2022.
.NET 6.0 has more improvement on the performance which includes on major advantage as it has the intelligent code editing and also it is called as the fastest full stack web framework. The .NET 6.0 also provide better performance in the File Stream.
When you create a new Angular Template project using Visual Studio 2022 you can notice as the Asp.NET Core 6.0 and Angular 13 version has been used as both .NET6.0 and Angular 13 is new versions and surely it will be quite interesting and fun to learning and working with new things.
Background
Prerequisites
- Visual Studio 2022
- Node.js – If you don’t have Node.js install Node.js (Download link).
Using the code
Create ASP.NET Core with Angular Template
After installing all the prerequisites listed above and click Start >> Programs >> Visual Studio 2022 >> Visual Studio 2022 on your desktop. Click New >> Project.

Search for Angular Template and Select ASP.NET Core with Angular and click Next.

Enter your project name and click Next.

Now we can see as the Framework is .NET 6.0(Long term support). Click on he Create button .

When we create the project, we can see the Solution structure like below.

Here we can see few interesting and new files has been added and we can also see as here in Visual Studio there is no Startup.cs file which was the main class for the Asp.NET Core projects in 2019 versions.
Visual Studio 2019 with Startup.cs
If you had worked with the ASP.NET MVC and ASP.NET Core you might be aware about the Startup.cs class. As this class is very main class for all the .NET and .NET Core applications. This Startup.cs class contains configure and configureService methods.As this class is used to register all our services which our application is needed in ConfigureService and the configure methods used as the middleware pipeline for controlling the application.

Visual Studio 2022 does not need the Startup.cs
When we create ASP.NET Core 6.0 and Angular Application the Startup.cs class file will be missing. Yes, now all the Configure and ConfigureService related all the service will be added in the Program.cs file.
For example if we need to add the connection string and need to add the DBContext means then we can add it in the Program.cs file with builder.Service.AddDbContext() . To add all the services we can use the builder object as we can see for adding the DBContext service we use the builder.Service.AddDbContext().
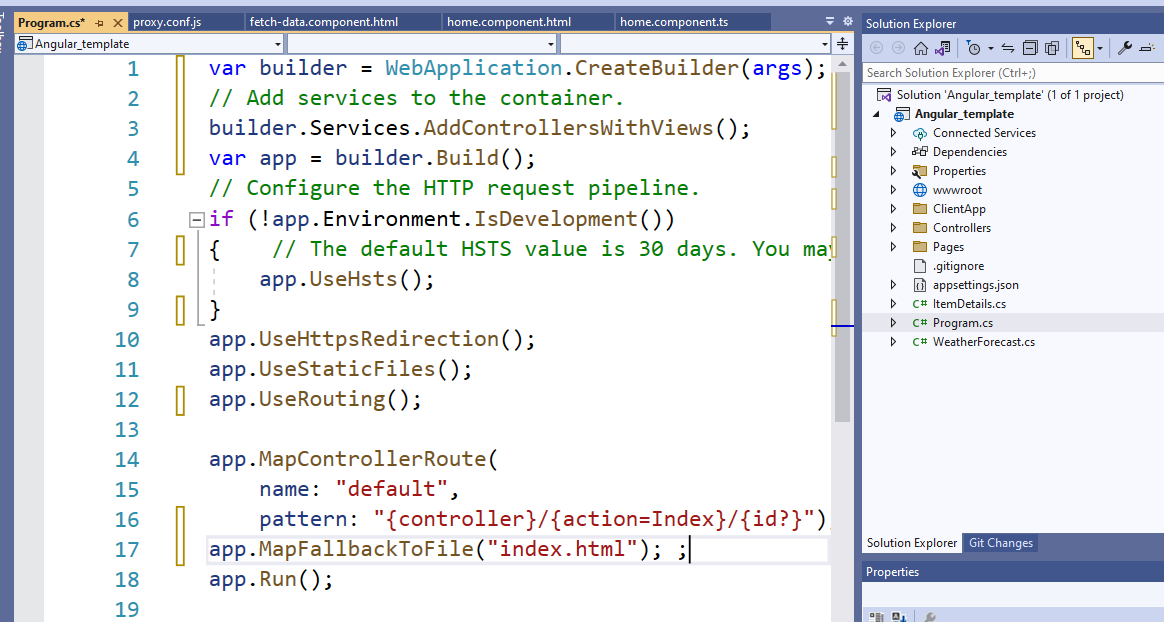
We can see that as the there is no main method, class and using headers in the program.cs file, don’t be panic, yes now in the .NET 6.0 the codes are made simpler and the intelligent code supports seems to be more advanced and now it’s easier and reduce the time on working our codes and projects.
Top-Level statements
This is called as the Top-Level statements as the main method is not needed from the C# 9. The main aim of the Top-Level statement is to reduce the code and improve the performance, The main method and the class will be created by the compiler as we no need to write separate code for it.
New Angular Files Part
aspnetcore-https.js
This JavaScript file set up the HTTPS for the application which are targeted to sue the ASP.NET Core HTTPS certificates.

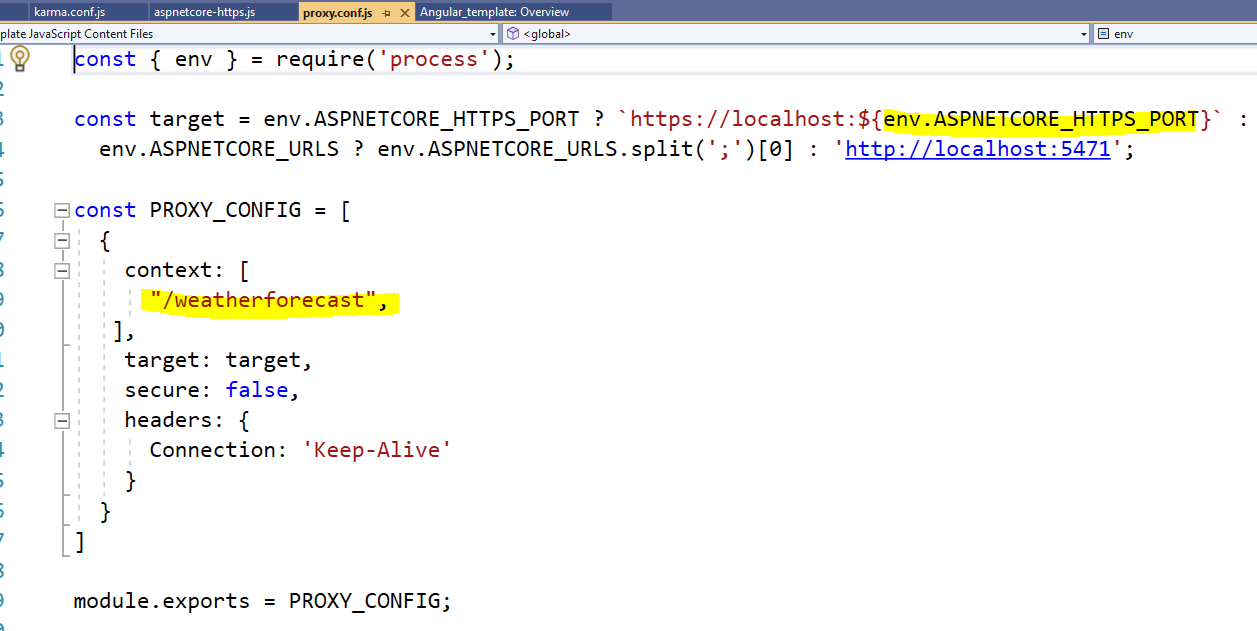
proxy.conf.js
This JavaScript file is used to add our HTTPs ports, WEB API URL as target and in the context, we will be adding all our controller and methods to get access in the angular application.
Build and Run the Application
When we run the application, we can see by default the home. Counter and Fetch data components has been added in menu and we can navigate to each menu and see the component results.

Current Month Item Wise Sales Details Making
Now let’s make a simple WEB API controller to get the Item Sales details.
Creating Model Class:
For this first we need to add the class file to create our Model Class. Right click the project and click > Add > New Item. Select Class and name it as ItemDetails.cs and click add.

In the class add property variables like below code.
public class ItemDetails
    {
        public String ItemCode { get; set; }
        public int SaleCount { get; set; }
    }
Creating API Controller Class:
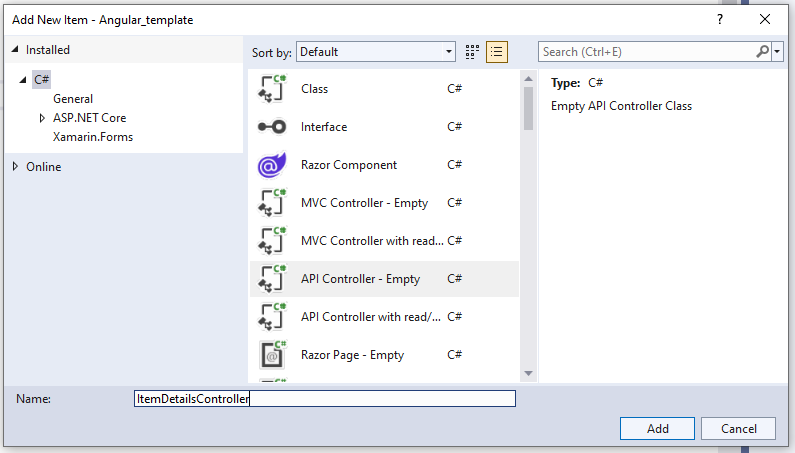
Right click Controllers folder and click > Add > Controller. Select API > Select API Controller – Empty and click Add

Give the empty API Controller name as ItemDetailsController.cs and click Add.
In the controller we add Get Method which will create random 10 item code along with random Sale count value range from 20 to 100.
This is first article in this series later when we use the SQL Server for CRUD then we can see more in detail as how actually the real world examples work.
[ApiController]
    [Route("[controller]")]
    public class ItemDetailsController : ControllerBase
    {
        private readonly ILogger<ItemDetailsController> _logger;
        public ItemDetailsController(ILogger<ItemDetailsController> logger)
        {
            _logger = logger;
        }

        [HttpGet(Name = "GetItemDetails")]
        public IEnumerable<ItemDetails> Get()
        {
            var rng = new Random();
            int ivale = 0;
            return Enumerable.Range(1, 10).Select(index => new ItemDetails
            {
                ItemCode = "ITM_" + rng.Next(1, 100),
                SaleCount = rng.Next(20, 100),
            }).ToArray(); ;
        }
    }
Angular Part:
Here I use the default home Angular components to update for showing the Item details with sale count.
home Component:
In the home component I have updated the code by adding the HTTPClient import part also Inject import part.
Then I create the interface with ItemDetails as same we created in Model class.
In the Constructor method using the http.get method we get the API JSON results and bind it to the itemsdetails to display the results in the html page.
import { Component, Inject } from '@angular/core';
import { HttpClient } from '@angular/common/http';
@Component({
  selector: 'app-home',
  templateUrl: './home.component.html',
})
export class HomeComponent {
  public itemsdetails: ItemDetails[] = [];
  constructor(http: HttpClient, @Inject('BASE_URL') baseUrl: string) {
    http.get<ItemDetails[]>(baseUrl + 'ItemDetails').subscribe(result => {
      this.itemsdetails = result;
    }, error => console.error(error));
  }
}
interface ItemDetails {
  itemCode: string;
  saleCount: number;
}
home.component.html:
In the html add the below code to display the results of ItemCode and salescount from API.
<h1>Current Month Item wise Sales Details</h1>
<table class='table table-striped' aria-labelledby="tableLabel" *ngIf="itemsdetails">
  <thead>
    <tr>
      <th>Item Code</th>
      <th>Sales Count</th>
    </tr>
  </thead>
  <tbody>
    <tr *ngFor="let itemdetail of itemsdetails">
      <td>{{ itemdetail.itemCode }}</td>
      <td>{{ itemdetail.saleCount }}</td>
    </tr>
  </tbody>
</table>
Build and Run
Build and run the application. In the Home page we can see the result like below and you can notice as we are not able to see the Item Details and sale count values. This is because we didn’t add yet the controller class and method in the proxy.config.js file. In order to use the WEB API in Angular App we need to add the WEB API Controller and methods in Proxy.config.js context array.

You can see as from the below image now we have added our controller named as ItemDetails in the proxy.config.js file context array.

Run the application to see the result. Now we can see as our WEB API results has been binded in our home page with Item Code and Sales Count.

Points of Interest
Hope this article helps to understand on getting started with ASP.NET Core and Angular using Visual Studio 2022.In next part we will see more in detail on how to using the ASP.NET Core for creating the Standalone Angular application.
History
Angular_template.zip - 2022-05-26
Recommend
About Joyk
Aggregate valuable and interesting links.
Joyk means Joy of geeK