

Cloud infrastructure for continuous integration tests
source link: https://community.arm.com/arm-community-blogs/b/tools-software-ides-blog/posts/infrastructure-for-continuous-integration-tests
Go to the source link to view the article. You can view the picture content, updated content and better typesetting reading experience. If the link is broken, please click the button below to view the snapshot at that time.
Cloud infrastructure for continuous integration tests

Today, most embedded applications are still created on desktop computers. This has many reasons. For example, the validation process relies heavily on target hardware. For other applications, cloud computing is well established. This blog introduces a cloud-based continuous integration (CI) workflow for embedded projects that uses model-based simulation.
Arm has released Arm Virtual Hardware which is an evolution of Arm's modeling technology for application developers to build and test software. It runs in the cloud, removing the complexity of building and configuring board farms. It helps using modern agile software development practices such as continuous integration and continuous development CI/CD (DevOps) and MLOps workflows. This blog takes this infrastructure to a cloud service such as GitHub. It uses:
- An AWS AMI instance that contains a tool environment to build and run a project.
- GitHub actions that kick off the test workflow when new code is pushed to a repository.
Cloud-based continuous testing
Embedded software development traditionally uses local IT infrastructure and desktop computers that connect to test hardware. Cloud technologies have the potential to improve the development flows with continuous testing where a cloud server provides a virtual machine that includes tool environment with simulation models. For example, safety standards require for a staged test process that is composed of:
- Unit testing where code is tested primarily at function level using a test framework.
- Integration testing where multiple components are combined, and interfaces are verified.
- System testing where the complete system is tested against the requirements.
For embedded applications, these types of testing are frequently ignored even though the benefits (that apply also for non-safety-related applications) are well understood. There are some fundamental reasons as system testing of an embedded application typically requires access to target hardware.
Arm Virtual Hardware (AVH) provides simulation models, software tooling, and infrastructure that can be integrated into CI/CD flows. AVH supports the software development cycle of embedded, IoT, and ML applications and provides essential components for effective test and validation environments. It is flexible and can run any RTOS that is designed for Cortex-M or bare-metal code that interacts with the processor. AVH offers a comprehensive tool integration along with resources for software developers and can therefore run complex applications and software integration tests.
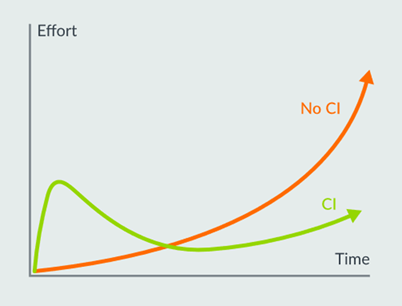
However, there is reluctance by development teams to spend initial effort setting up continuous integration (CI) workflow even though the long-term benefits are undisputed in the following:
Examples and tool environment
We published an example repository on GitHub that shows how cloud-native DevOps for embedded software works: https://github.com/ARM-software/AVH-GetStarted.
The tools required to run these demos are provided in an AWS AMI. This image contains CMSIS-Build for managing the compilation with Arm Compiler 6, and the AVH models for simulation.
GitHub Actions
As the examples are available on GitHub, they use GitHub actions to automate tasks; similar technology is also available on GitLab. Events in your repository (for example a git push command) trigger GitHub actions, which then run command jobs that are specified in a YAML-based workflow file.
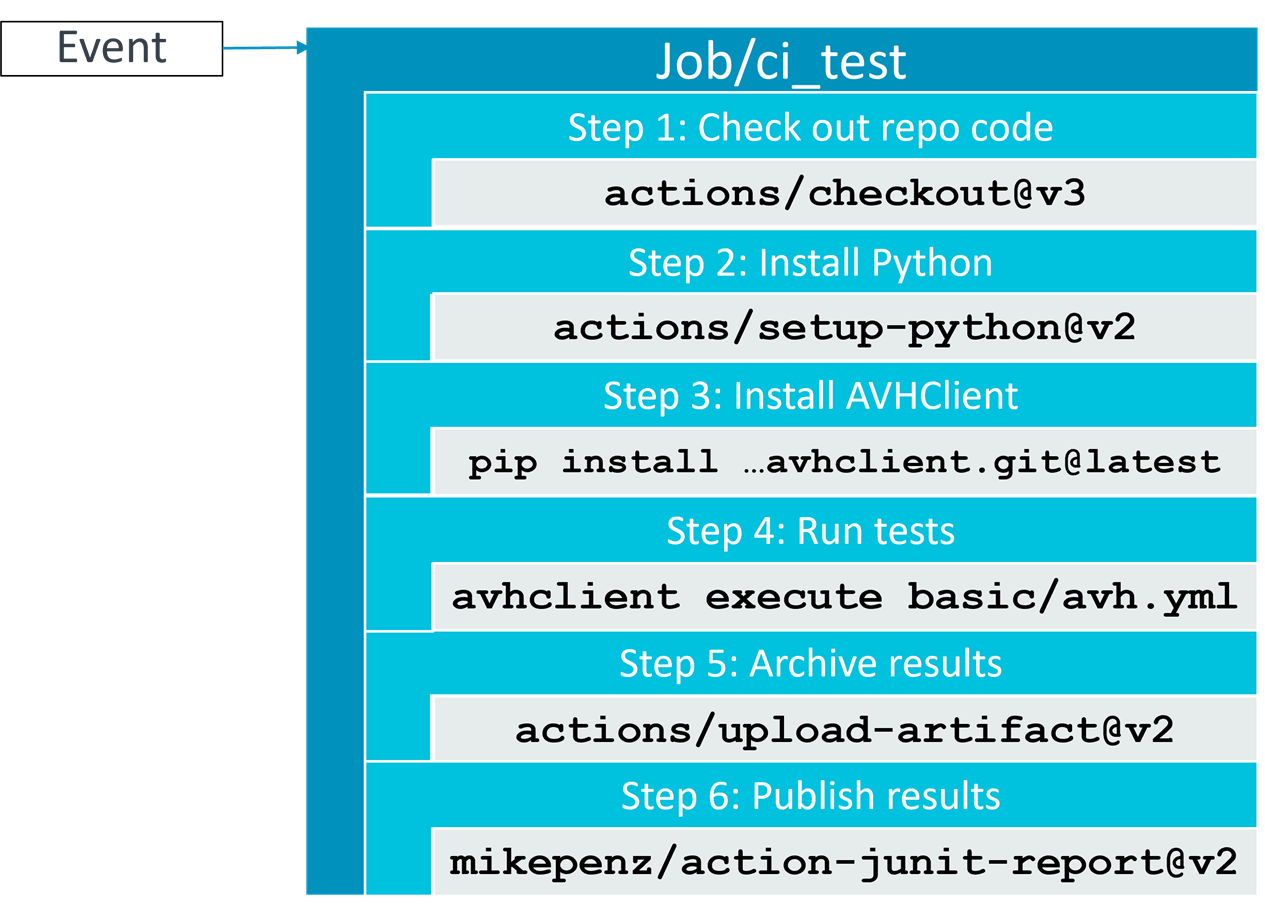
The following diagram shows how GitHub actions run the .github/workflows/basic.yml file in your repository. An event triggers a workflow which contains one or more jobs. A job defines several steps with actions that are executed. These actions are the actual commands that automate your software testing.
Let us look at the basic.yml in the ./github/workflows directory:
name: Arm Virtual Hardware basic example - github hosted - remote AWS via GH plugin
on:
  push:
    branches: [ main ]
  pull_request:
    paths:
      - .github/workflows/basic.yml
      - basic/**/*
First, you give the action a name that is later shown when your workflow runs on GitHub. Next, you specify the events (a push or pull request to the repository) and branches (for examplemain) that trigger the workflow to run.
For working in the cloud with AWS, you need a couple of credentials. These credentials are added on the Settings tab of the repo in the Secrets – Actions area. These secrets are then used in the YAML file:
env:
  AWS_ACCESS_KEY_ID: ${{ secrets.AWS_ACCESS_KEY_ID }}
  AWS_SECRET_ACCESS_KEY: ${{ secrets.AWS_SECRET_ACCESS_KEY }}
  AWS_DEFAULT_REGION: ${{ secrets.AWS_DEFAULT_REGION }}
  AWS_S3_BUCKET_NAME: ${{ secrets.AWS_S3_BUCKET_NAME }}
  AWS_IAM_PROFILE: ${{ secrets.AWS_IAM_PROFILE }}
  AWS_SECURITY_GROUP_ID: ${{ secrets.AWS_SECURITY_GROUP_ID }}
  AWS_SUBNET_ID: ${{ secrets.AWS_SUBNET_ID }}
Next, you specify the actual jobs that you need to run:
jobs:
  ci_test:
    runs-on: ubuntu-latest
    outputs:
      avhresult: ${{ steps.avh.conclusion }}
      testbadge: ${{ steps.avh.outputs.badge }}
    steps:
    - name: Check out repository code
      uses: actions/checkout@v3

    - name: Set up Python 3.10
      uses: actions/setup-python@v2
      with:
        python-version: '3.10'

    - name: Install AVH Client for Python
      run: |
        pip install git+https://github.com/ARM-software/avhclient.git@latest
    - uses: ammaraskar/gcc-problem-matcher@master

    - name: Run tests
      id: avh
      run: |
        avhclient -b aws execute --specfile basic/avh.yml
- A jobcalled ci_test is specified that runs on a virtual machine (provided by the GitHub hosting server) using the ubuntu-latest image. It generates some outputs, the actual results (avhresult) and a badge (testbadge) that shows the status in a simple way.
- Next, a sequence of tasks called stepsare defined that do the actual work on the virtual machine. The steps of this job are:
- The repository is checked-out into the workspace of the virtual machine.
- Python 3.10 is installed.
- Required Python packages are installed, such as the AVHClient.
Running the model
The avh.yml file present in the ./basic directory contains the commands that are run on the model:
name: "AVH GetStarted Example"
workdir: ./
backend:
  aws:
    ami-version: ~=1.2
    instance-type: t2.micro
upload:
  - RTE/**/*
  - -:RTE/**/RTE_Components.h
  - basic.debug.cprj
  - build.py
  - main.c
  - requirements.txt
  - retarget_stdio.c
  - vht_config.txt
  - README.md
steps:
  - run: |
      pip install -r requirements.txt
      python build.py --verbose build run
download:
  - RTE/**/RTE_Components.h
  - Objects/basic.axf
  - Objects/basic.axf.map
  - basic-*.xunit
- basic-*.zip- First, you define the test suite’s name ("AVH GetStarted Example") and the working directory (./). The backend sets up the AMI version to use and the AWS instance type (you can choose between various VMs).
- Afterwards, the project is uploaded to the instance.
- Then, in the run step, required Python modules are installed and the build.py script is executed using its steps “build” and afterwards “run”.
- Finally, the results are downloaded into the repository.
Taking a closer look at build.py
The Python script ./basic/build.py is the place were the project it built and run. The script is using the matrix runner for Python to generate a top-level command-line interface. In this case, we have two commands available: build and run. The script also uses the JUnit XML module to create test result documents that can be read by external tools, such as the mikepenz/action-junit-report@v2 GitHub action in the final step (see next section).
The build step executes cbuild.sh, a build invocation tool from the CMSIS toolbox. The run step executes the AVH model with the previously built binary file from the build step.
Final steps
After the simulation has finished and the artifacts are downloaded, the next steps in the basic.yml file are executed:
    - name: Archive results
      uses: actions/upload-artifact@v2
      with:
        name: results
        path: |
          basic/basic-*.zip
          basic/basic-*.xunit
        retention-days: 1
        if-no-files-found: error
      if: always()

    - name: Publish test results
      uses: mikepenz/action-junit-report@v2
      with:
        check_name: "Test results"
        report_paths: basic/basic-*.xunit
if: always()- The results are archived using an action that can upload artifacts.
- The results are published using an action that processes JUnit XML test reports and shows the results with summary and annotations.
Example project: basic.debug.cprj
This repository contains a project with unit tests showing the CI workflow:
/*----------------------------------------------------------------------------
 * Name:    main.c
 *----------------------------------------------------------------------------*/

#include "unity.h"
#include <stdio.h>

extern void stdio_init (void);

/* Application function to test */
static int my_sum(int a, int b) {
  return a + b;
}

/*============= UNIT TESTS ============== */

/* Called in RUN_TEST before executing test function */
void setUp(void) {
  // set stuff up here
}

/* Called in RUN_TEST after executing test function */
void tearDown(void) {
  // clean stuff up here
}

/* Testing summation of positive integers */
static void test_my_sum_pos(void) {
  const int sum = my_sum(1, 1);
  TEST_ASSERT_EQUAL_INT(2, sum);
}

/* Testing summation of negative integers */
static void test_my_sum_neg(void) {
  const int sum = my_sum(-1, -1);
  TEST_ASSERT_EQUAL_INT(-2, sum);
}

/* Testing summation of zeros */
static void test_my_sum_zero(void) {
  const int sum = my_sum(0, 0);
  TEST_ASSERT_EQUAL_INT(0, sum);
}

/* Failing test with incorrect summation value */
static void test_my_sum_fail(void) {
  const int sum = my_sum(1, -1);
  TEST_ASSERT_EQUAL_INT(2, sum);
}

/*  Main: Run tests */
int main(void) {
  stdio_init();

  printf("---[ UNITY BEGIN ]---\n");
  UNITY_BEGIN();
  RUN_TEST(test_my_sum_pos);
  RUN_TEST(test_my_sum_neg);
  RUN_TEST(test_my_sum_fail);
  RUN_TEST(test_my_sum_zero);
  const int result = UNITY_END();
  printf("---[ UNITY END ]---\n");
  return result;
}
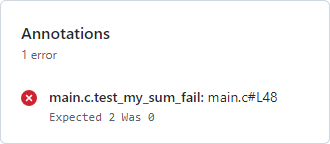
The embedded program implements a set of simple unit tests. The test_my_sum_fail function will fail as the expected result does not match the calculation. On the Actions tab of the GitHub repo this is clearly shown:
Debug failing test cases
Due to the nature of the service, everything is deleted once the action has finished. In case of a failure, a software developer needs to rebuild the environment and do some testing on his machine. Luckily, you can use AVH also on your local machine. Keil MDK-Professional comes with the same set of virtual hardware targets as the AMI. In the ./basic directory, double-click the CPRJ file. This opens µVision with the project and you can run the test on AVH locally.
This produces the exact same results as the cloud run before. But here it is easier to review log files and output of the different steps to find the error.
Summary
Cloud-native DevOps has entered the deeply embedded market. All required components are already available and help developers to achieve their goals with better tested software. If you want to try it out for yourself, fork the AVH-GetStarted template repository.
Recommend
About Joyk
Aggregate valuable and interesting links.
Joyk means Joy of geeK