

聊一聊ResNet系列(ResNet、ResNeXt)
source link: https://imlogm.github.io/%E6%B7%B1%E5%BA%A6%E5%AD%A6%E4%B9%A0/resnet/
Go to the source link to view the article. You can view the picture content, updated content and better typesetting reading experience. If the link is broken, please click the button below to view the snapshot at that time.

聊一聊ResNet系列(ResNet、ResNeXt) | LogM's Blog
聊一聊ResNet系列(ResNet、ResNeXt)
本文原载于https://imlogm.github.io,转载请注明出处~
摘要:终于到了介绍ResNet系列的时候了。ResNet真的很好用,特别时shortcut的想法真的厉害。最近,又推出了改进版本ResNeXt,新版本结合了Inception多支路的思想。
关键字:深度学习, ResNet, ResNeXt
说到残差网络ResNet,大家应该都不默认。近几年,深度学习领域的论文井喷,注重benchmark的文章不断强调自己把精度提高了多少多少点,注重算法思想的文章则宣称自己的算法多么多么有效。
但是这些文章中,鱼龙混杂,或者夸大的成分太多,我们该如何判断?工业界给了我们答案。如果一篇文章提到的思想能在工业被广泛使用的话,那一定是篇好文章。ResNet就是其中之一。
ResNet由微软亚研院MSRA的几位大佬所写,一发表,就引起巨大关注。就我个人的看法,ResNet真的是神作,在当时大家对一层一层堆叠的网络形成思维惯性的时候,shortcut的思想真的是跨越性的。
你能想到100+层的网络,运算量却和16层的VGG差不多,精度提高一个档次。而且模块性、可移植性很强。默默膜拜下大神。
1. ResNet
网络上介绍ResNet的文章很多,比如:你必须要知道CNN模型:ResNet-小白将的文章
就我个人的看法,ResNet的核心就是shortcut的出现。图1是ResNet的基本模块。
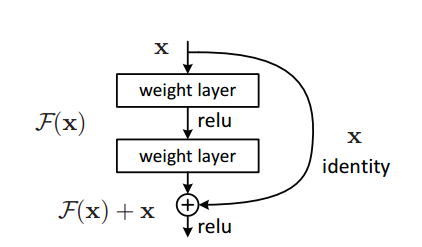
图1如果去掉旁路,那就是经典的堆叠式的网络。ResNet的贡献就是引入了旁路(shortcut)。旁路(shortcut)的引入一方面使得梯度的后向传播更加容易,使更深的网络得以有效训练;另一方面,也使得每个基本模块的学习任务从学习一个绝对量变为学习相对上一个基本模块的偏移量。
ResNet的网络结构很简单,就是把这些基本模块堆起来,形成不同层数的网络。基本模块的简单堆叠也使得ResNet可以很轻松地移植到其他网络中。图2是论文里提到的几种结构,它们都是不同数量的基本模块叠加得到的。
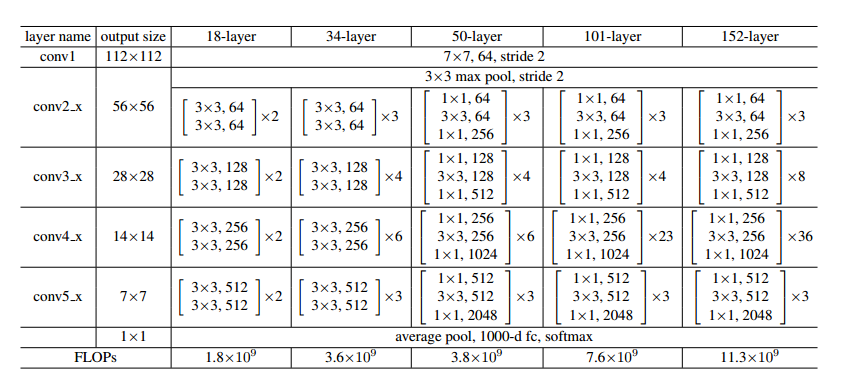
还有一点令人惊讶的是,ResNet100+层的网络,运算量却和16层的VGG差不多,关于这点,可以看我之前的文章:以VGG为例,分析深度网络的计算量和参数量
默默放上一段用Keras写的ResNet,如果熟悉Keras的话,相信通过代码能很快理解ResNet的结构。当然,现在ResNet已经被Keras内置,只需要一句代码就能写出ResNet。
代码里说的conv_block和identity_block其实就是ResNet的基本模块,它们的区别是conv_block的旁路是直接一条线,identity_block的旁路有一个卷积层。之所以有的基本模块旁路一条线,有的基础模块旁路会有卷积层,是为了保证旁路出来的featuremap和主路的featuremap尺寸一致,这样它们才能相加。
############################################################
#  Resnet Graph
############################################################

# Code adopted from:
# https://github.com/fchollet/deep-learning-models/blob/master/resnet50.py
def resnet_graph(input_image, architecture, stage5=False):
    assert architecture in ["resnet50", "resnet101"]
    # Stage 1
    x = KL.ZeroPadding2D((3, 3))(input_image)
    x = KL.Conv2D(64, (7, 7), strides=(2, 2), name='conv1', use_bias=True)(x)
    x = BatchNorm(axis=3, name='bn_conv1')(x)
    x = KL.Activation('relu')(x)
    C1 = x = KL.MaxPooling2D((3, 3), strides=(2, 2), padding="same")(x)
    # Stage 2
    x = conv_block(x, 3, [64, 64, 256], stage=2, block='a', strides=(1, 1))
    x = identity_block(x, 3, [64, 64, 256], stage=2, block='b')
    C2 = x = identity_block(x, 3, [64, 64, 256], stage=2, block='c')
    # Stage 3
    x = conv_block(x, 3, [128, 128, 512], stage=3, block='a')
    x = identity_block(x, 3, [128, 128, 512], stage=3, block='b')
    x = identity_block(x, 3, [128, 128, 512], stage=3, block='c')
    C3 = x = identity_block(x, 3, [128, 128, 512], stage=3, block='d')
    # Stage 4
    x = conv_block(x, 3, [256, 256, 1024], stage=4, block='a')
    block_count = {"resnet50": 5, "resnet101": 22}[architecture]
    for i in range(block_count):
        x = identity_block(x, 3, [256, 256, 1024], stage=4, block=chr(98 + i))
    C4 = x
    # Stage 5
    if stage5:
        x = conv_block(x, 3, [512, 512, 2048], stage=5, block='a')
        x = identity_block(x, 3, [512, 512, 2048], stage=5, block='b')
        C5 = x = identity_block(x, 3, [512, 512, 2048], stage=5, block='c')
    else:
        C5 = None
    return [C1, C2, C3, C4, C5]

def identity_block(input_tensor, kernel_size, filters, stage, block,
                   use_bias=True):
    """The identity_block is the block that has no conv layer at shortcut
    # Arguments
        input_tensor: input tensor
        kernel_size: defualt 3, the kernel size of middle conv layer at main path
        filters: list of integers, the nb_filters of 3 conv layer at main path
        stage: integer, current stage label, used for generating layer names
        block: 'a','b'..., current block label, used for generating layer names
    """
    nb_filter1, nb_filter2, nb_filter3 = filters
    conv_name_base = 'res' + str(stage) + block + '_branch'
    bn_name_base = 'bn' + str(stage) + block + '_branch'

x = KL.Conv2D(nb_filter1, (1, 1), name=conv_name_base + '2a',
                  use_bias=use_bias)(input_tensor)
    x = BatchNorm(axis=3, name=bn_name_base + '2a')(x)
    x = KL.Activation('relu')(x)

x = KL.Conv2D(nb_filter2, (kernel_size, kernel_size), padding='same',
                  name=conv_name_base + '2b', use_bias=use_bias)(x)
    x = BatchNorm(axis=3, name=bn_name_base + '2b')(x)
    x = KL.Activation('relu')(x)

x = KL.Conv2D(nb_filter3, (1, 1), name=conv_name_base + '2c',
                  use_bias=use_bias)(x)
    x = BatchNorm(axis=3, name=bn_name_base + '2c')(x)

x = KL.Add()([x, input_tensor])
    x = KL.Activation('relu', name='res' + str(stage) + block + '_out')(x)
    return x


def conv_block(input_tensor, kernel_size, filters, stage, block,
               strides=(2, 2), use_bias=True):
    """conv_block is the block that has a conv layer at shortcut
    # Arguments
        input_tensor: input tensor
        kernel_size: defualt 3, the kernel size of middle conv layer at main path
        filters: list of integers, the nb_filters of 3 conv layer at main path
        stage: integer, current stage label, used for generating layer names
        block: 'a','b'..., current block label, used for generating layer names
    Note that from stage 3, the first conv layer at main path is with subsample=(2,2)
    And the shortcut should have subsample=(2,2) as well
    """
    nb_filter1, nb_filter2, nb_filter3 = filters
    conv_name_base = 'res' + str(stage) + block + '_branch'
    bn_name_base = 'bn' + str(stage) + block + '_branch'

x = KL.Conv2D(nb_filter1, (1, 1), strides=strides,
                  name=conv_name_base + '2a', use_bias=use_bias)(input_tensor)
    x = BatchNorm(axis=3, name=bn_name_base + '2a')(x)
    x = KL.Activation('relu')(x)

x = KL.Conv2D(nb_filter2, (kernel_size, kernel_size), padding='same',
                  name=conv_name_base + '2b', use_bias=use_bias)(x)
    x = BatchNorm(axis=3, name=bn_name_base + '2b')(x)
    x = KL.Activation('relu')(x)

x = KL.Conv2D(nb_filter3, (1, 1), name=conv_name_base + '2c', use_bias=use_bias)(x)
    x = BatchNorm(axis=3, name=bn_name_base + '2c')(x)

shortcut = KL.Conv2D(nb_filter3, (1, 1), strides=strides,
                         name=conv_name_base + '1', use_bias=use_bias)(input_tensor)
    shortcut = BatchNorm(axis=3, name=bn_name_base + '1')(shortcut)

x = KL.Add()([x, shortcut])
    x = KL.Activation('relu', name='res' + str(stage) + block + '_out')(x)
    return x
2. ResNeXt
ResNeXt是这个系列的新文章,是ResNet的升级版,升级内容为引入Inception的多支路的思想。
同样,网络上也有非常好的解读的文章:深度学习——分类之ResNeXt-范星.xfanplus的文章
如果你对ResNet和Inception都比较熟悉的话,那么其实只要看图3就能明白ResNeXt在做什么了。
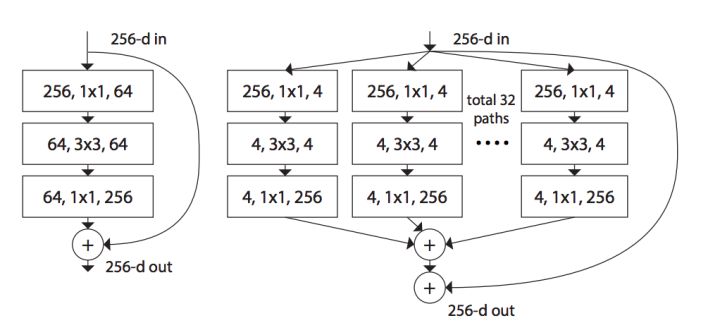
图3中左图是ResNet的基本模块,右图是ResNeXt的基本模块。容易发现,ResNeXt就是把ResNet的单个卷积改成了多支路的卷积。
作者说ResNeXt的目的是为了保持ResNet的高可移植性优点,同时继续提高精度。文章中还顺便吐槽了Inception的缺点。也就是我在上一篇介绍Inception的文章(聊一聊Inception系列)中说的:Inception系列的前两篇文章很惊艳,但是后两篇文章炼丹痕迹越来越重。直到Xception出现后,可移植性增强不少。
Recommend
About Joyk
Aggregate valuable and interesting links.
Joyk means Joy of geeK