

安卓集成发布详解(二)
source link: http://frank-zhu.github.io/android/2015/06/15/android-release_app_build_gradle/
Go to the source link to view the article. You can view the picture content, updated content and better typesetting reading experience. If the link is broken, please click the button below to view the snapshot at that time.

上一篇主要讲了安卓版本编译版本发布的过程,本篇主要写版本编译脚本的实现,包括签名文件处理及多渠道版本编译。安卓集成发布详解(一)
一、签名部分编写
gradle本身支持直接签名,只需要在releas部分添加如下代码即可
	signingConfigs {
        debug {

}
        release {
            storeFile file("../yourapp.keystore")
    		storePassword "your password"
    		keyAlias "your alias"
    		keyPassword "your password"
        }
    }

buildTypes {
        debug {
            minifyEnabled false
            zipAlignEnabled false
            shrinkResources false
            signingConfig signingConfigs.debug
        }

release {
            minifyEnabled true//混淆编译
            zipAlignEnabled true
            //移除无用的资源文件
            shrinkResources true
            signingConfig signingConfigs.release
            proguardFiles getDefaultProguardFile('proguard-android.txt'), 'proguard-rules.pro'
        }
    }
一般填上上面的代码即可执行签名,但是一般这种方式不太安全,一般建议不要在build.gradle文件中写上签名文件的密码,这是由于build.gradle文件一般都会集成到代码的版本控制中,这样所有人都会有签名文件的密码,会有后续的麻烦。所以呢,我们接下来要做的就是把签名文件的密码隔离起来,写到一个配置文件中,此配置文件不包含在代码版本控制中,这样其他开发者就不会知道签名文件的密码。
gradle的配置文件一般以.properties结束,我们先新建一个signing.properties文件,内容如下:
STORE_FILE=yourapp.keystore
STORE_PASSWORD=your password
KEY_ALIAS=your alias
KEY_PASSWORD=your password
注意没有字符串双引号”“
注意没有字符串双引号”“
注意没有字符串双引号”“
重要的事情说三遍
我们上面新建了一个配置文件,用来保存签名文件的信息,并且此文件不会加入到代码版本控制中,达到保护签名文件的目的。接下来我们就应该在guild.gradle文件中读取我们的配置文件,读取的代码如下:
File propFile = file('signing.properties');
if (propFile.exists()) {
    def Properties props = new Properties()
    props.load(new FileInputStream(propFile))
    if (props.containsKey('STORE_FILE') && props.containsKey('STORE_PASSWORD') &&
            props.containsKey('KEY_ALIAS') && props.containsKey('KEY_PASSWORD')) {
        android.signingConfigs.release.storeFile = file(props['STORE_FILE'])
        android.signingConfigs.release.storePassword = props['STORE_PASSWORD']
        android.signingConfigs.release.keyAlias = props['KEY_ALIAS']
        android.signingConfigs.release.keyPassword = props['KEY_PASSWORD']
    } else {
        android.buildTypes.release.signingConfig = null
    }
} else {
    android.buildTypes.release.signingConfig = null
}
代码很简单,就是读取文件,然后拿到签名需要的四个变量值分别赋值即可。
以上就是签名部分代码,是不是很简单😊
二、多渠道打包
gradle的多渠道打包很简单,因为gradle已经帮我们做好了很多基础功能。下面以友盟统计为例说明(貌似只要是讲多渠道打包都离不开友盟这货😊)
一般友盟统计在AndroidManifest.xml里面会有这么一段声明
<meta-data
    android:name="UMENG_CHANNEL"
    android:value="CHANNEL_ID" />
其中CHANNEL_ID就是友盟的渠道标示,多渠道的实现一般就是通过修改这货的值来实现的,接下来将一步一步来实现多渠道版本打包。
1)在AndroidManifest.xml里配置PlaceHolder,用与在build.gradle文件中来替换成自己想要设置的值
<meta-data
    android:name="UMENG_CHANNEL"
    android:value="${UMENG_CHANNEL_VALUE}" />
2)在build.gradle设置productFlavors,修改PlaceHolder的值
productFlavors {
        playStore {
            manifestPlaceholders = [UMENG_CHANNEL_VALUE: "playStore"]
        }
        miui {
            manifestPlaceholders = [UMENG_CHANNEL_VALUE: "miui"]
        }
        wandoujia {
            manifestPlaceholders = [UMENG_CHANNEL_VALUE: "wandoujia"]
        }
}按照上面两步即可编译打多渠道包了,命令是gradle assembleRelease,可以打包所有的多渠道包,通过下面这张图可以看到gradle可以执行的task。
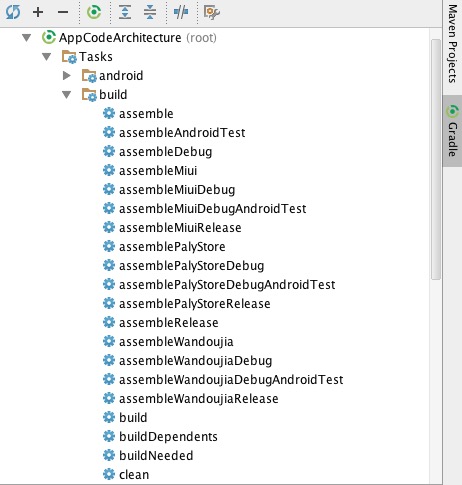
如果只是想打单渠道包,则执行相应的task即可,如gradle assemblePalyStoreRelease就是打PlayStore渠道的Release版本。
3)一般打出来的包我们希望可以带上打包时间,也就是希望可以对最终的文件名做修改,而修改文件名也很简单,参考以下代码即可实现
def packageTime() {
    return new Date().format("yyyy-MM-dd", TimeZone.getTimeZone("UTC"))
}

android{

applicationVariants.all { variant ->
        variant.outputs.each { output ->
            def outputFile = output.outputFile
            if (outputFile != null && outputFile.name.endsWith('.apk')) {
                File outputDirectory = new File(outputFile.parent);
                def fileName
                if (variant.buildType.name == "release") {
                    fileName = "app_v${defaultConfig.versionName}_${packageTime()}_${variant.productFlavors[0].name}.apk"
                } else {
                    fileName = "app_v${defaultConfig.versionName}_${packageTime()}_beta.apk"
                }
                output.outputFile = new File(outputDirectory, fileName)
            }
        }
    }

}PS:此方法有一定局限性,就是渠道包多了之后编译花费的时间会很长,这里推荐美团打包的第三种方法。
三、buildConfigField自定义配置
大家可能会遇到下面这种情况,就是Beta版本服务器和Release版本服务器通常不在一台服务器上,而测试希望可以同时发布两个服务器的版本用于测试,这个时候我们就需要修改代码,然后一个一个老老实实的发包,次数少还可以,但是间隔时间短而且服务器还多的情况下就不那么爽了(坑爹了这是),所以下面主要介绍buildConfigField配合多渠道打不同服务器版本的方法。
其实用法很简单,首先在相应的节点加上定义,比如
buildTypes {
        debug {
buildConfigField "boolean", "LOG_DEBUG", "true"//是否输出LOG信息
            buildConfigField "String", "API_HOST", "\"http://api.test.com\""//API Host
			}
}然后在代码中通过BuildConfig.LOG_DEBUG或者BuildConfig.API_HOST调用即可,是不是很简单,不过虽然简单,但是功能很强大,可以扩展很多不同的应用场景,比如可以定义测试和正式版本的微信分享APPID等等,就不一一列举了,自己去尝试扩展成自己的场景吧。
四、dex突破65535的限制
大家都知道随着项目的一天天变大,慢慢的都会遇到单个dex最多65535个方法数的瓶颈,如果是ANT构建的项目就会比较麻烦,但是Gradle已经帮我们处理好了,而添加的方法也很简单,总共就分三步 1)首先是在defaultConfig节点使能多DEX功能
android {
		defaultConfig {
			// dex突破65535的限制
        	multiDexEnabled true
		}
	}
2)然后就是引入multidex库文件
dependencies {
		 compile 'com.android.support:multidex:1.0.0'
	}
3)最后就是你的AppApplication继承一下MultiDexApplication即可
怎么样,是不是很简单的就解决了之前的大难题,这还是得感谢谷歌的辛勤劳作啊
最后给出最终的build.gradle文件
apply plugin: 'com.android.application'

//定义打包时间函数
def packageTime() {
    return new Date().format("yyyy-MM-dd", TimeZone.getTimeZone("UTC"))
}

android {
    compileSdkVersion Integer.parseInt(ANDROID_BUILD_COMPILE_SDK_VERSION)
    buildToolsVersion ANDROID_BUILD_TOOLS_VERSION

signingConfigs {
        debug {

}
        release {
            //storeFile file("../yourapp.keystore")
            //storePassword "your password"
            //keyAlias "your alias"
            //keyPassword "your password"

//setting your signing.properties
            //first, add signing.properties to ./app/
            //second, add property STORE_FILE, STORE_PASSWORD, KEY_ALIAS, KEY_PASSWORD
        }
    }

defaultConfig {
        applicationId "com.ecloud.android.xreap"
        minSdkVersion Integer.parseInt(MIN_SDK_VERSION)
        targetSdkVersion Integer.parseInt(ANDROID_BUILD_TARGET_SDK_VERSION)
        versionCode Integer.parseInt(VERSION_CODE)
        versionName VERSION_NAME

// dex突破65535的限制
        multiDexEnabled true
    }
    buildTypes {
        debug {
            buildConfigField "boolean", "LOG_DEBUG", "true"//是否输出LOG信息
            buildConfigField "String", "API_HOST", "\"http://api.test.com\""//API Host
            minifyEnabled false
            zipAlignEnabled true
            shrinkResources true
            signingConfig signingConfigs.debug
        }

release {
            buildConfigField "boolean", "LOG_DEBUG", "false"//是否输出LOG信息
            buildConfigField "String", "API_HOST", "\"http://api.release.com\""//API Host
            minifyEnabled false//混淆编译
            zipAlignEnabled true
            //移除无用的资源文件
            shrinkResources true
            signingConfig signingConfigs.release
            proguardFiles getDefaultProguardFile('proguard-android.txt'), 'proguard-rules.pro'
        }
    }

compileOptions {
        sourceCompatibility JavaVersion.VERSION_1_7
        targetCompatibility JavaVersion.VERSION_1_7
    }

lintOptions {
        disable 'InvalidPackage'
        abortOnError false
    }

//修改生成的最终文件名
    applicationVariants.all { variant ->
        variant.outputs.each { output ->
            def outputFile = output.outputFile
            if (outputFile != null && outputFile.name.endsWith('.apk')) {
                File outputDirectory = new File(outputFile.parent);
                def fileName
                if (variant.buildType.name == "release") {
                    // 输出apk名称为app_v1.0.0_2015-06-15_playStore.apk
                    fileName = "app_v${defaultConfig.versionName}_${packageTime()}_${variant.productFlavors[0].name}.apk"
                } else {
                    fileName = "app_v${defaultConfig.versionName}_${packageTime()}_beta.apk"
                }
                output.outputFile = new File(outputDirectory, fileName)
            }
        }
    }

productFlavors {
        playStore {
            manifestPlaceholders = [UMENG_CHANNEL_VALUE: "playStore"]
        }
        miui {
            manifestPlaceholders = [UMENG_CHANNEL_VALUE: "miui"]
        }
        wandoujia {
            manifestPlaceholders = [UMENG_CHANNEL_VALUE: "wandoujia"]
        }
    }

//批量替换
//    productFlavors {
//        palyStore {}
//        miui {}
//        wandoujia {}
//    }
//
//    productFlavors.all {
//        flavor -> flavor.manifestPlaceholders = [UMENG_CHANNEL_VALUE: name]
//    }
}

File propFile = file('signing.properties');
if (propFile.exists()) {
    def Properties props = new Properties()
    props.load(new FileInputStream(propFile))
    if (props.containsKey('STORE_FILE') && props.containsKey('STORE_PASSWORD') &&
            props.containsKey('KEY_ALIAS') && props.containsKey('KEY_PASSWORD')) {
        android.signingConfigs.release.storeFile = file(props['STORE_FILE'])
        android.signingConfigs.release.storePassword = props['STORE_PASSWORD']
        android.signingConfigs.release.keyAlias = props['KEY_ALIAS']
        android.signingConfigs.release.keyPassword = props['KEY_PASSWORD']
    } else {
        android.buildTypes.release.signingConfig = null
    }
} else {
    android.buildTypes.release.signingConfig = null
}

dependencies {
    compile fileTree(dir: 'libs', include: ['*.jar'])
    compile 'com.android.support:appcompat-v7:22.2.0'
    compile 'com.android.support:cardview-v7:21.0.3'
    compile 'com.android.support:recyclerview-v7:21.0.3'
//    compile 'com.android.support:support-v4:22.0.0'
    compile 'com.android.support:multidex:1.0.0'
}最后可以参考参考我的这个项目,所有的代码都在这里哦AppCodeArchitecture
Recommend
About Joyk
Aggregate valuable and interesting links.
Joyk means Joy of geeK