

GitHub Action + Hugo 自动构建发布个人博客
source link: https://lianpf.github.io/posts/%E5%BC%80%E5%8F%91%E6%97%A5%E8%AE%B0/01.%E8%87%AA%E5%8A%A8%E5%8C%96%E6%9E%84%E5%BB%BA%E5%8D%9A%E5%AE%A2/
Go to the source link to view the article. You can view the picture content, updated content and better typesetting reading experience. If the link is broken, please click the button below to view the snapshot at that time.

一、整个流程及原理
- xxx.github.io public 仓库 A
- 存放个人源码(博客文稿) 的 private 仓库 B
- 熟悉 Hugo
- 熟悉 github actions
注意:国内站点可以参考Gitee
2.流程及原理
- 本地添加文章,提交到 Github 仓库 B
- push 操作自动触发 Github 仓库 B 预先配置的Actions
- 执行对应的action,构建打包,且发布打包后的源码到仓库 A 托管
- 通过 Github 给 Pages 生成的 URL 访问即可
二、详细步骤
1.创建仓库且配置SSH Key
- 创建 xxx.github.io 仓库
- 创建存放源码仓库 Blogs(根据个人需求可设置为private)
- 生成一对SSH Key,为两个仓库绑定 SSH Key
为什么需要SSH Key?
当我们在通过Git提交源码之后,Github Actions会编译生成静态文件并通过Git Push到 xxx.github.io,因此这一步需要 Git 账户认证。
如何配置?
- 生成的 Public Key 添加到 xxx.github.io 仓库,settings -> Deploy keys,变量名无所谓。
- Private Key 添加到 源码仓库 Blogs,settings -> Secrets。这里 Secrets 变量名要一定是: ACTIONS_DEPLOY_KEY, 会在源码仓库hugo action .yml文件自动化构建部署用到。
2.启用 Hugo
2.1 将 xxx.github.io.source 仓库克隆到本地,初始化 Hugo 系统
# 选取一个目录
# 克隆 source 仓库
git clone xxx

# 进入仓库
cd xxx.github.io
生成 Hugo 源码并进行配置
# 在当前目录生成 Hugo 源码
hugo new site .

# 为当前博客选取一个主题,你可以不执行这一命令使用默认的主题
git submodule add https://github.com/halogenica/beautifulhugo.git themes/beautifulhugo

# 编辑 config.toml 配置文件,使 beautifulhugo 主题生效
echo 'theme = "beautifulhugo"' >> config.tomlecho 'theme = "beautifulhugo"' >> config.tom

# 此时你就可以运行预览效果
hugo serve -D
此时,控制台构建成功,输出可访问地址:
http://localhost:1313/
满意没问题之后,即可推送到 Github
git add .
git commit -m "first commit"
git push -u origin master
3.配置 Github 自动构建发布 Actions
源码仓库Blogs为 xxx.github.io 仓库配置action。可直接拷贝如下代码:
name: GitHubPages

on:
  push:
    branches:
      - master  # Set a branch to deploy

jobs:
  deploy:
    runs-on: ubuntu-18.04
    steps:
      - uses: actions/checkout@v2
        with:
          submodules: recursive  # Fetch Hugo themes (true OR recursive)
          fetch-depth: 0    # Fetch all history for .GitInfo and .Lastmod

      - name: Setup Hugo
        uses: peaceiris/actions-hugo@v2
        with:
          # hugo-version: '${{ steps.hugo-version.outputs.HUGO_VERSION }}'
          hugo-version: '0.74.2'
          # extended: true

      - name: Build
        run: hugo --minify

      - name: Deploy
        uses: peaceiris/actions-gh-pages@v3
        with:
          deploy_key: ${{ secrets.ACTIONS_DEPLOY_KEY }}
          external_repository: xxx/xxx.github.io
          publish_branch: master
          publish_dir: ./public
修改远程仓库即可,其他的基本上不用更新。
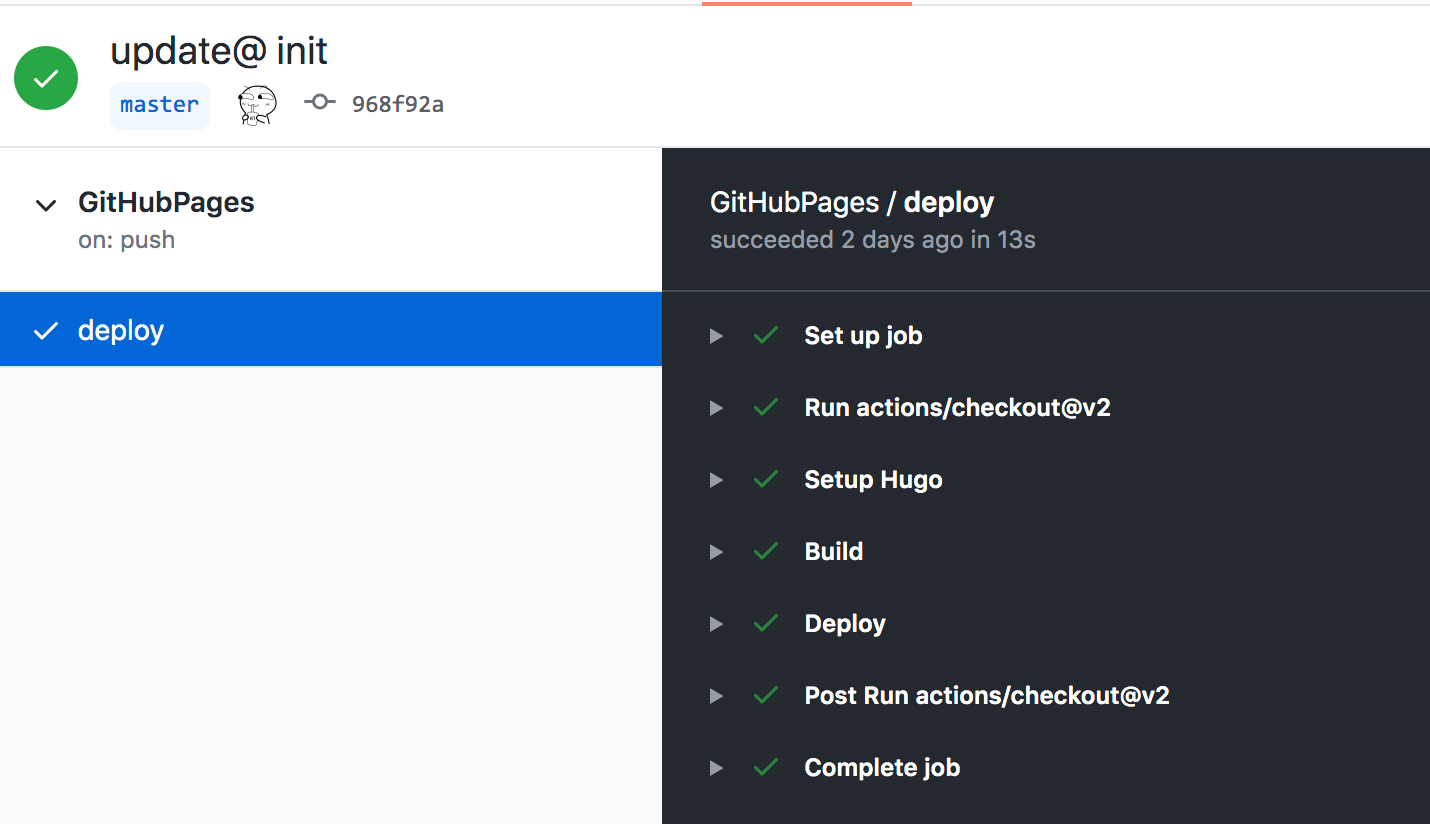
本地修改源码, commit、push,检查流水线是被正常触发,可以查看流水线日志确认。
整个搭建就结束了,我们可以访问Github为 xxx/xxx.github.io 仓库生成的域名:https://xxx.github.io/ 查看效果
三、功能拓展
四、遇到的坑
- brew 安装 hugo,一直 update
- Supported Tokens 三种方案
- SSH Key 和 deploy_key 的问题
- Github Pages访问较慢
1.brew install hugo,一直 update
国内的网络环境下使用 Homebrew 安装软件的过程中可能会长时间卡在 Updating Homebrew 这个步骤 例:执行 brew install composer 命令
➜  ~ brew install composer
Updating Homebrew... # 如果碰到长时间卡在这里,参考以下 2 种处理方法
1.1 方法 1:按住 control + c 取消本次更新操作
➜  ~ brew install composer
Updating Homebrew...
^C
按住 control + c 之后命令行会显示 ^C,就代表已经取消了 Updating Homebrew 操作
大概不到 1 秒钟之后就会去执行我们真正需要的安装操作了
➜  ~ brew install composer
Updating Homebrew...
^C==> Satisfying dependencies
==> Downloading https://getcomposer.org/download/1.7.2/composer.phar
...
这个方法是临时的、一次性的
1.2 方法 2:使用 Alibaba 的 Homebrew 镜像源进行加速
执行 brew 命令安装软件的时候,跟以下 3 个仓库地址有关
- brew.git
- homebrew-core.git
- homebrew-bottles
所以, 将这 3 个仓库地址全部替换为 Alibaba 提供的地址
# 替换成阿里巴巴的 brew.git 仓库地址:
cd "$(brew --repo)"
git remote set-url origin https://mirrors.aliyun.com/homebrew/brew.git

# 替换成阿里巴巴的 homebrew-core.git 仓库地址:
cd "$(brew --repo)/Library/Taps/homebrew/homebrew-core"
git remote set-url origin https://mirrors.aliyun.com/homebrew/homebrew-core.git

# 替换 / 还原 homebrew-bottles 访问地址, 这个步骤跟你的 macOS 系统使用的 shell 版本有关系
# 如果你的输出结果是 /bin/zsh,参考下方的 zsh 终端操作方式
# 如果你的输出结果是 /bin/bash,参考下方的 bash 终端操作方式
echo $SHELL

# zsh 终端操作方式,替换成阿里巴巴的 homebrew-bottles 访问地址:
echo 'export HOMEBREW_BOTTLE_DOMAIN=https://mirrors.aliyun.com/homebrew/homebrew-bottles' >> ~/.zshrc
source ~/.zshrc

# bash 终端操作方式,替换 homebrew-bottles 访问 URL:
echo 'export HOMEBREW_BOTTLE_DOMAIN=https://mirrors.aliyun.com/homebrew/homebrew-bottles' >> ~/.bash_profile
source ~/.bash_profile

# =======================================================

# 还原为官方提供的 brew.git 仓库地址
cd "$(brew --repo)"
git remote set-url origin https://github.com/Homebrew/brew.git

# 还原为官方提供的 homebrew-core.git 仓库地址
cd "$(brew --repo)/Library/Taps/homebrew/homebrew-core"
git remote set-url origin https://github.com/Homebrew/homebrew-core.git

# zsh 终端操作方式,还原为官方提供的 homebrew-bottles 访问地址
vi ~/.zshrc
# 然后,删除 HOMEBREW_BOTTLE_DOMAIN 这一行配置
source ~/.zshrc

# bash 终端操作方式,还原为官方提供的 homebrew-bottles 访问地址
vi ~/.bash_profile
# 然后,删除 HOMEBREW_BOTTLE_DOMAIN 这一行配置
source ~/.bash_profile
2.Github Actions 实现的三种方案
- github_token
- deploy_key
- personal_token
简单来说,github_token 更适合 源码和 public/ 存放在同一个仓库下,源码放在 master 分支,public/ 内容放在另一个分支(如 gh-pages),并指定部署 gh-pages 分支的内容。deploy_key 则更适合,源码存储于一个单独的仓库,而 public/ 存放在主仓库 xxx.github.io 的模式。
详细使用和差异,建议参考 官方文档
3.SSH Key 和 deploy_key 的问题
问题:常规本地已经存在公共的 ssk key, 这个key 我们常用于 gitHub 或 gitLab 整个 depository 下的公共设置,用于 ssh仓库 pull / push 代码。但是,我们这里也需要一对 具体仓库下(即 源码仓库blogs 和 xxx.github.io)的deploy_key。官方完档里没有提及这点,最开始,我是直接把已有的push key放到xxx.github.io仓库内,很明显。会爆出 key 已被用的错误提示。所以,后边我们重新生成一对key, 用于 deploy_key
ssh-keygen -t rsa -C "[email protected]" -f ~/.ssh/id_rsa_hugo_deploy
4. Github Pages访问较慢
可通过自定义域名+CDN加快访问速度
博主站点仓库地址:https://github.com/lianpf/lianpf.github.io 如果觉得这篇文章有助于你,麻烦gitHub点个star,给本文点赞。
如若遇到问题,可到该仓库下提issue。
最后, 希望大家早日实现:成为前端高手的伟大梦想!
欢迎交流~

Recommend
About Joyk
Aggregate valuable and interesting links.
Joyk means Joy of geeK