

mysql学习之路
source link: https://haojunsheng.github.io/2022/01/mysql-learning/
Go to the source link to view the article. You can view the picture content, updated content and better typesetting reading experience. If the link is broken, please click the button below to view the snapshot at that time.

Mysql作为软件开发工程师的必备技能,本人在学习Mysql的过程中遇到了非常多的坑,现在将学习的过程进行记录。
1. 初学Mysql
这里推荐极客时间的《SQL 必知必会》课程。
我基于这个专栏,做了学习笔记,有忘记的语法的话,我会回到这里看下。
2. Java & Mysql
Socket
最早是基于Socket编程来实现的。但是Java和Mysql,Oracle等的规范都不相同。
Java Data Base Connectivity,它是可以执行SQL语句的Java API。
为了简化编程和统一各个数据库,进行了抽象。
- 定义了连接(Connection):用来代表和数据库的连接。
- 执行sql语句,用Stagement表示
- 返回的结果用ResultSet表示
public class JDBCTest {

    public static void main(String[] args) {
        try {
          // 注册驱动
            Class.forName("com.mysql.jdbc.driver");
        } catch (ClassNotFoundException e) {
            e.printStackTrace();
        }
        String url = "jdbc:mysql://127.0.0.1:3306/stu_db/";
        // 获取数据库连接
        Connection connection = null;
        // 获取语句
        Statement statement = null;
        //  执行结果
        ResultSet resultSet = null;
        try {
            connection = DriverManager.getConnection(url, "username", "password");
            statement = connection.createStatement();
            resultSet = statement.executeQuery("select * from users");
            while (resultSet.next()) {
                resultSet.getInt("id");
                resultSet.getString("name");
            }
        } catch (SQLException e) {
            e.printStackTrace();
        } finally {
            try {
                if (resultSet != null) {
                    resultSet.close();
                }
                if (statement != null) {
                    statement.close();
                }
                if (connection != null) {
                    connection.close();
                }
            } catch (SQLException e) {

            }
        }
    }

}
上面的个Statement对象是SQL拼接完成的,存在SQL注入的风险,了解下PreparedStatement对象:
- 预编译,提高效率
- 防止SQL注入
PreparedStatement ps = conn.prepareStatement("SELECT * FROM student WHERE id=?");
ps.setInt(1, 10);
JDBCTemplate
上面的那坨代码写着太恶心人了。本质上,数据库访问的操作为:
- 指定数据库连接参数
- 打开数据库连接
- 声明SQL语句
- 预编译并执行SQL语句
- 遍历查询结果
- 处理每一次遍历操作
- 处理抛出的任何异常
- 关闭数据库连接
DataSource dataSource = new MysqlDataSource();
        JdbcTemplate jdbcTemplate = new JdbcTemplate(dataSource);
        List<User> users = jdbcTemplate.query("select * from users", new RowMapper<User>() {
            @Override
            public User mapRow(ResultSet rs, int rowNum) throws SQLException {
                User user = new User();
                user.setName(rs.getString("name"));
                user.setAge(rs.getInt("age"));
                return user;
            }
        });
并且可以结合Spring进行使用。
O/R Mapping
O/R Mapping :Object Relational Mapping。
Java对象和Mysql的表数据映射需要我们手动操作,希望把这个过程自动化完成。
Java Persistence API。
基本的原则:
- 数据库的表和Java的类进行映射
- 表中的行记录和Java对象进行映射
- 表中的列和Java的属性进行映射
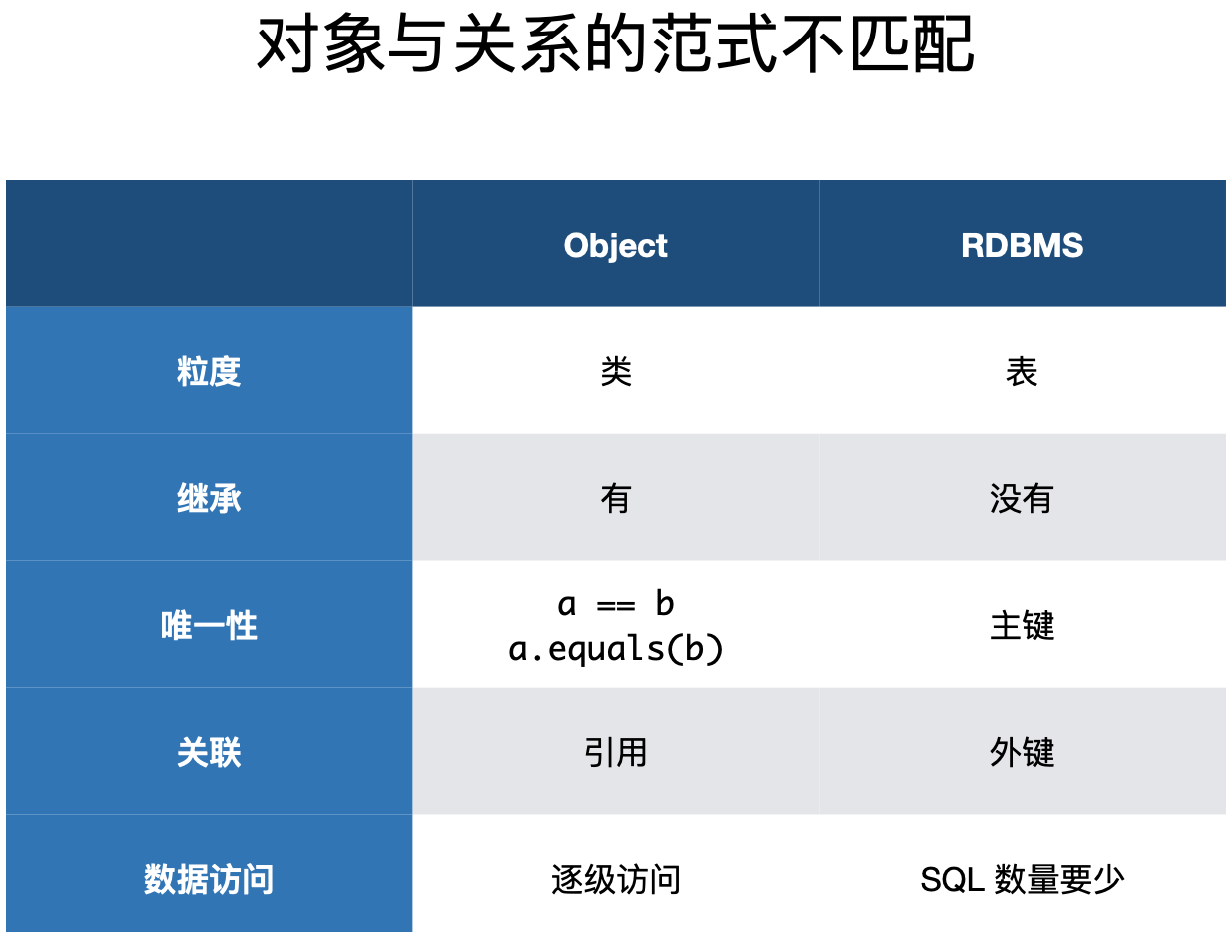
涉及到细节
-
很多情况下,多个类合到一起才可以和一张表进行映射,如
public class User { private Name name; private int id; } public class Name { private String firstName; private String middleName; private String lastName; } create table User ( id int not null , firstName VARCHAR , middleName VARCHAR , lastName VARCHAR ) -
Java的类之间有继承关系,Mysql没有
-
对象的标识问题
- Java用a.equals(b)来判断对象是否相等,数据库使用外键
-
对象的关联问题
-
- City c = user.getAddress().getCity(); 数据库只能通过表的连接来实现
-
对象的状态
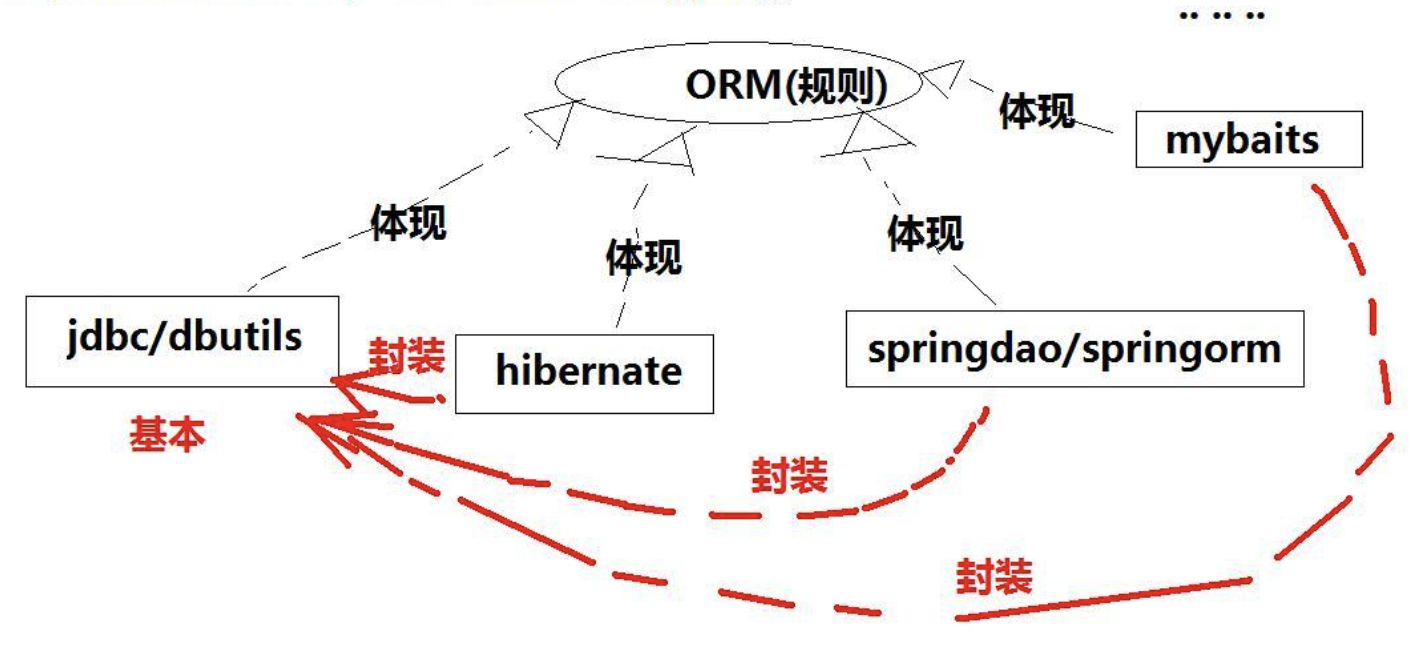
JPA针对这些问题,定义了一系列的规范,Hibernate和Spring Data JPA实现了JPA规范。
| 方式 | 优点 | 缺点 | 应用场景 |
|---|---|---|---|
| Hibernate | 不再需要编写SQL就可以通过映射关系来操作数据库 | 当多表关联超过3个时Hibermate的级联会损失很多性能;学习成本高 | 适合性能要求不太苛刻的系统,不适合需要大量复杂查询的系统 |
| SpringJDBC | 内嵌Spring框架中、支持AOP;提供了统一的异常处理,框架处理了异常;事务管理 | 只是对原生JDBC进行一层非常薄的封装,没有缓存 | 需要在代码中嵌入SQL语句,适用中小型项目 |
| MyBatis | 满足灵活定制SQL和性能优化的需求 | 编写SQL和映射规则,工作量相对大些 | 性能要求高、响应快、灵活的系统;sql修改、优化比较方便 |
Hibernate
事实上,现有的Hibernate,后有的JPA规范。
Spring Data JPA
使用现有的JPA的实现,进行了简单的封装。
使用demo,可以看到,无需关注SQL编写。
-
配置文件,application.properties
spring.jpa.hibernate.ddl-auto=create-drop spring.jpa.properties.hibernate.show_sql=true spring.jpa.properties.hibernate.format_sql=true -
Coffee.java
@Entity @Table(name = "T_MENU") @Builder @Data @NoArgsConstructor @AllArgsConstructor public class Coffee implements Serializable { @Id @GeneratedValue private Long id; private String name; @Column @Type(type = "org.jadira.usertype.moneyandcurrency.joda.PersistentMoneyAmount", parameters = {@org.hibernate.annotations.Parameter(name = "currencyCode", value = "CNY")}) private Money price; @Column(updatable = false) @CreationTimestamp private Date createTime; @UpdateTimestamp private Date updateTime; } -
CoffeeOrder.java
@Entity @Table(name = "T_ORDER") @Data @NoArgsConstructor @AllArgsConstructor @Builder public class CoffeeOrder implements Serializable { @Id @GeneratedValue private Long id; private String customer; @ManyToMany @JoinTable(name = "T_ORDER_COFFEE") private List<Coffee> items; @Column(nullable = false) private Integer state; @Column(updatable = false) @CreationTimestamp private Date createTime; @UpdateTimestamp private Date updateTime; } -
CoffeeOrderRepository.java
import org.springframework.data.repository.CrudRepository; public interface CoffeeOrderRepository extends CrudRepository<CoffeeOrder, Long> { } -
CoffeeRepository.java
import org.springframework.data.repository.CrudRepository; public interface CoffeeOrderRepository extends CrudRepository<CoffeeOrder, Long> { } -
JpaDemoApplication.java
@SpringBootApplication
@EnableJpaRepositories
@Slf4j
public class JpaDemoApplication implements ApplicationRunner {
	@Autowired
	private CoffeeRepository coffeeRepository;
	@Autowired
	private CoffeeOrderRepository orderRepository;

	public static void main(String[] args) {
		SpringApplication.run(JpaDemoApplication.class, args);
	}

	@Override
	public void run(ApplicationArguments args) throws Exception {
		initOrders();
	}

	private void initOrders() {
		Coffee espresso = Coffee.builder().name("espresso")
				.price(Money.of(CurrencyUnit.of("CNY"), 20.0))
				.build();
		coffeeRepository.save(espresso);
		log.info("Coffee: {}", espresso);

		Coffee latte = Coffee.builder().name("latte")
				.price(Money.of(CurrencyUnit.of("CNY"), 30.0))
				.build();
		coffeeRepository.save(latte);
		log.info("Coffee: {}", latte);

		CoffeeOrder order = CoffeeOrder.builder()
				.customer("Li Lei")
				.items(Collections.singletonList(espresso))
				.state(0)
				.build();
		orderRepository.save(order);
		log.info("Order: {}", order);

		order = CoffeeOrder.builder()
				.customer("Li Lei")
				.items(Arrays.asList(espresso, latte))
				.state(0)
				.build();
		orderRepository.save(order);
		log.info("Order: {}", order);
	}
}
Mybatis
Mybatis使用
需要关注SQL的编写。
使用Demo:
-
application.properties,配置文件
mybatis.type-handlers-package=geektime.spring.data.mybatisdemo.handler mybatis.configuration.map-underscore-to-camel-case=true mybatis.mapper-locations = classpath*:mapper/**/*.xml mybatis.type-aliases-package = 类型别名的包名 -
MybatisDemoApplication,MapperScan配置扫描位置
@SpringBootApplication @Slf4j @MapperScan("geektime.spring.data.mybatisdemo.mapper") public class MybatisDemoApplication implements ApplicationRunner { @Autowired private CoffeeMapper coffeeMapper; public static void main(String[] args) { SpringApplication.run(MybatisDemoApplication.class, args); } @Override public void run(ApplicationArguments args) throws Exception { Coffee c = Coffee.builder().name("espresso") .price(Money.of(CurrencyUnit.of("CNY"), 20.0)).build(); int count = coffeeMapper.save(c); log.info("Save {} Coffee: {}", count, c); c = Coffee.builder().name("latte") .price(Money.of(CurrencyUnit.of("CNY"), 25.0)).build(); count = coffeeMapper.save(c); log.info("Save {} Coffee: {}", count, c); c = coffeeMapper.findById(c.getId()); log.info("Find Coffee: {}", c); } } -
Mapper定义接口
@Mapper public interface CoffeeMapper { @Insert("insert into t_coffee (name, price, create_time, update_time)" + "values (#{name}, #{price}, now(), now())") @Options(useGeneratedKeys = true) int save(Coffee coffee); @Select("select * from t_coffee where id = #{id}") @Results({ @Result(id = true, column = "id", property = "id"), @Result(column = "create_time", property = "createTime"), // map-underscore-to-camel-case = true 可以实现一样的效果 // @Result(column = "update_time", property = "updateTime"), }) Coffee findById(@Param("id") Long id); } -
Coffee.java
@Data
@AllArgsConstructor
@NoArgsConstructor
@Builder
public class Coffee {
    private Long id;
    private String name;
    private Money price;
    private Date createTime;
    private Date updateTime;
}
Mybatis原理
MyBatis Generator
可以看到,MyBatis需要我们关注SQL的编写。MyBatis Generator可以根据表帮助我们生成:
- Mapper 接⼝
- SQL Map XML
- 命令行:java -jar mybatis-generator-core-x.x.x.jar -configfile generatorConfig.xml
- mybatis-generator-maven-plugin插件
- mvn mybatis-generator:generate
- ${basedir}/src/main/resources/generatorConfig.xml
MyBatis PageHelper
数据库连接池
HikariCP,Druid。
手动实现一个数据库连接池。
Spring事务管理
在Spring中,事务是我们必须要掌握的。
3. Mysql进阶
Mysql结构
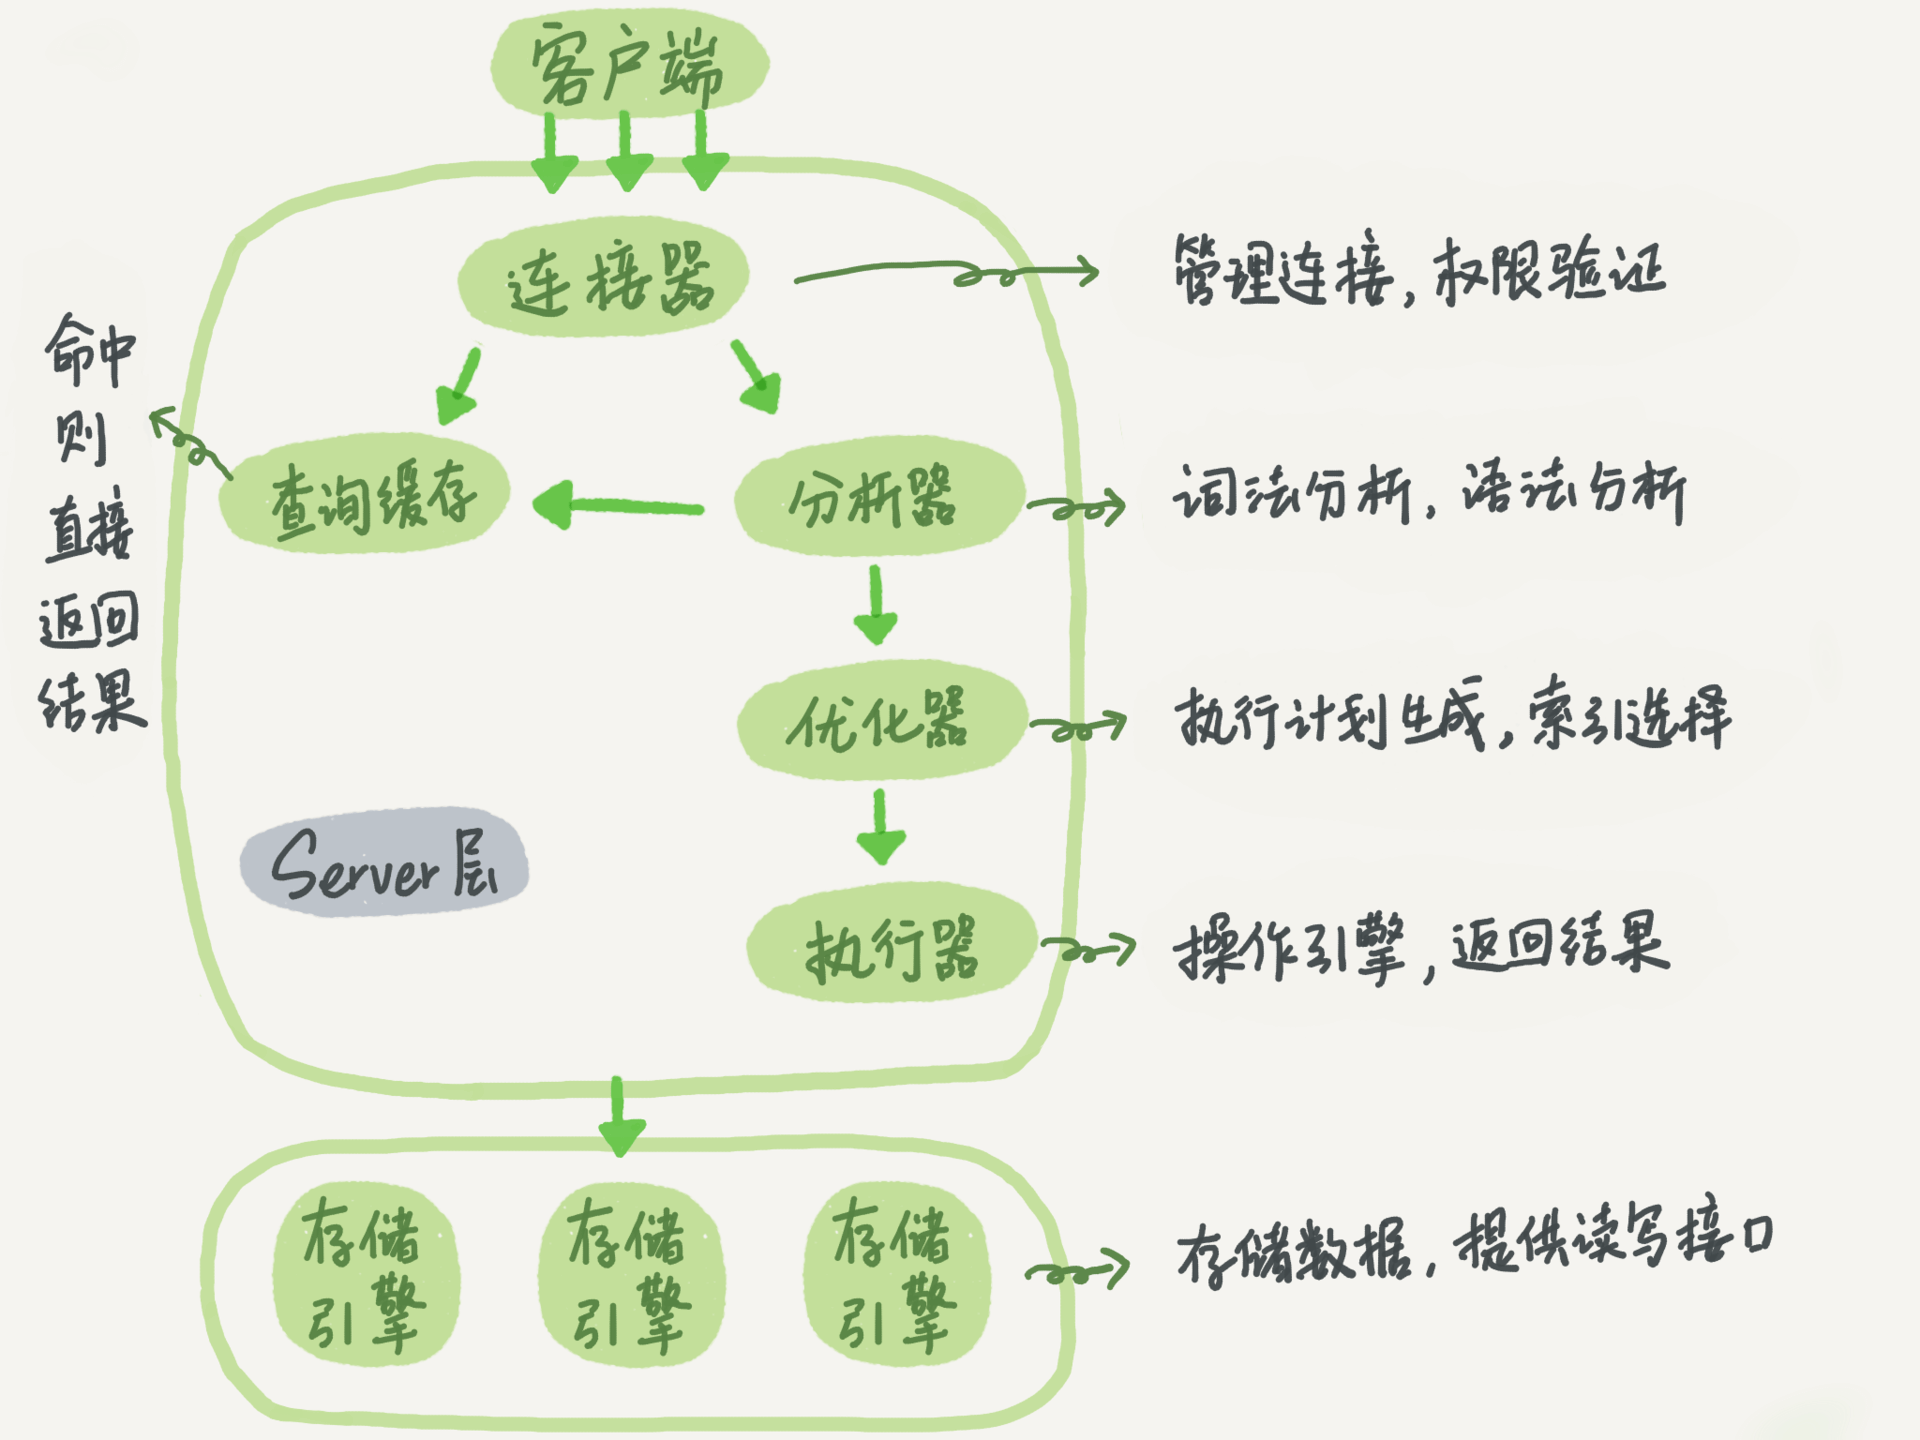
其中,需要关注各个存储引擎的区别。
| 特性 | InnoDB | MyISAM | Memory | Archive |
|---|---|---|---|---|
| 存储限制 | 64TB | 256TB | RAM | None |
| 事务支持 | ✔️ | ✖️ | ✖️ | ✖️ |
| 锁粒度 | 行级锁 | 表级锁 | 表级锁 | 行级锁 |
| 支持MVCC | ✔️ | ✖️ | ✖️ | ✔️ |
| 支持B+树索引 | ✔️ | ✔️ | ✔️ | ✖️ |
| 支持哈希索引 | ✔️ | ✖️ | ✔️ | ✖️ |
| 支持全文索引 | ✔️ | ✔️ | ✖️ | ✖️ |
| 支持聚簇索引 | ✔️ | ✖️ | ✖️ | ✖️ |
| 支持外键 | ✔️ | ✖️ | ✖️ | ✖️ |
| 存储成本 | 高 | 低 | N/A(内存) | 非常低 |
| 内存成本 | 高 | 低 | 中等 | 低 |
| 批量插入速度 | 低 | 高 | 高 | 非常高 |
- 如果对事务安全(ACID)要求较高,需要并发控制,或者表上数据更新、删除很频繁,就要选择InnoDB引擎,InnoDB能确保事务完整提交和回滚,并且能有效降低更新、删除操作导致的锁定
- 如果应用主要以插入和查询操作为主,对事务和并发控制没有要求,可以选择MyISAM引擎,MyISAM提供了较高的处理效率
- 如果只是临时存放数据,数据量不大,并且不需要较高的数据安全性,可以选择将数据保存在内存中的Memory引擎,Memory引擎可以提供极快的访问速度。MySQL就使用Memory引擎作为临时表,存放查询的中间结果
- 如果只有插入和查询操作,不要求事务安全,但是对存储成本要求较高,可以选择Archive引擎,Archive支持高并发的插入操作,而且对数据的压缩比很高,适合存储归档数据,例如日志信息
InnoDB核心概念
需要掌握Redo Log,Binlog,(WAL)Write-Ahead Logging和两阶段提交的概念。
这些概念本质上是为了解决:
- 数据更新/插入过程中:高效。
-
系统异常崩溃:数据可恢复
- redolog vs binlog vs undolog
- redolog:重做日志,存储引擎层。记录这一页做了什么改动。
- binlog:归档日志,Server层。2种模式,statement格式是sql语句,row格式是更新前后的数据。
- Undolog:回滚日志,用于多版本并发控制,MVCC
- 两阶段提交(跨系统维持数据逻辑一致性时常用的一个方案)
- redolog用来恢复原库(Mysql异常重启),binlog用来恢复临时库(数据误删除,表扩容)
- WAL
- Write-Ahead Logging,先写日志,在写磁盘。
- Crash-safe
- redo log vs change buffer
- redo log节省的是随机写磁盘的IO消耗,转成了顺序写
- change buffer节省的是随机读磁盘的IO消耗
索引那些事
索引本质上是解决数据快速查找的问题。
需要掌握数据存储的模型,索引的工作原理,常见的索引分类,常见的索引优化技巧。
事务,隔离,MVCC,锁,这些概念之间有什么关系呢?
锁&MVCC
Explain
Recommend
About Joyk
Aggregate valuable and interesting links.
Joyk means Joy of geeK