

Integrate Third-Party Login Systems in Web Apps - DZone Integration
source link: https://dzone.com/articles/How-To-Integrate-Third-Party-Login-Sytems-in-Your-Web-App-Using-OAuth-2
Go to the source link to view the article. You can view the picture content, updated content and better typesetting reading experience. If the link is broken, please click the button below to view the snapshot at that time.

How To Integrate Third-Party Login Systems in Your Web App Using OAuth 2.0
In this article, learn the fundamentals of OAuth 2.0 Authorization Code Flow and also how to implement them into an example Node.js/HTML5 web app.
Join the DZone community and get the full member experience.
Join For FreeHave you ever wondered how third-party login systems like "Login with RingCentral," "Login with Google," or "Login with GitHub" work in modern web apps?All of these login flows work by integrating third-party OAuth 2.0 logins, generally with the host app's own login system.
In this article, let's learn the fundamentals of OAuth 2.0 Authorization Code Flow and then implement the same in an example Node.js/HTML5 web app (available on GitHub) that provides "Login with RingCentral" functionality for users to login using their RingCentral account.
OAuth 2.0 Auth Code Flow 101
OAuth 2.0 is the latest version of the popular open-source framework, as defined by the Internet Engineering Task Force (IETF). This framework is also referred to as the "3-legged authorization flow," as it involves 3 parties talking to each other as shown in the diagram below.
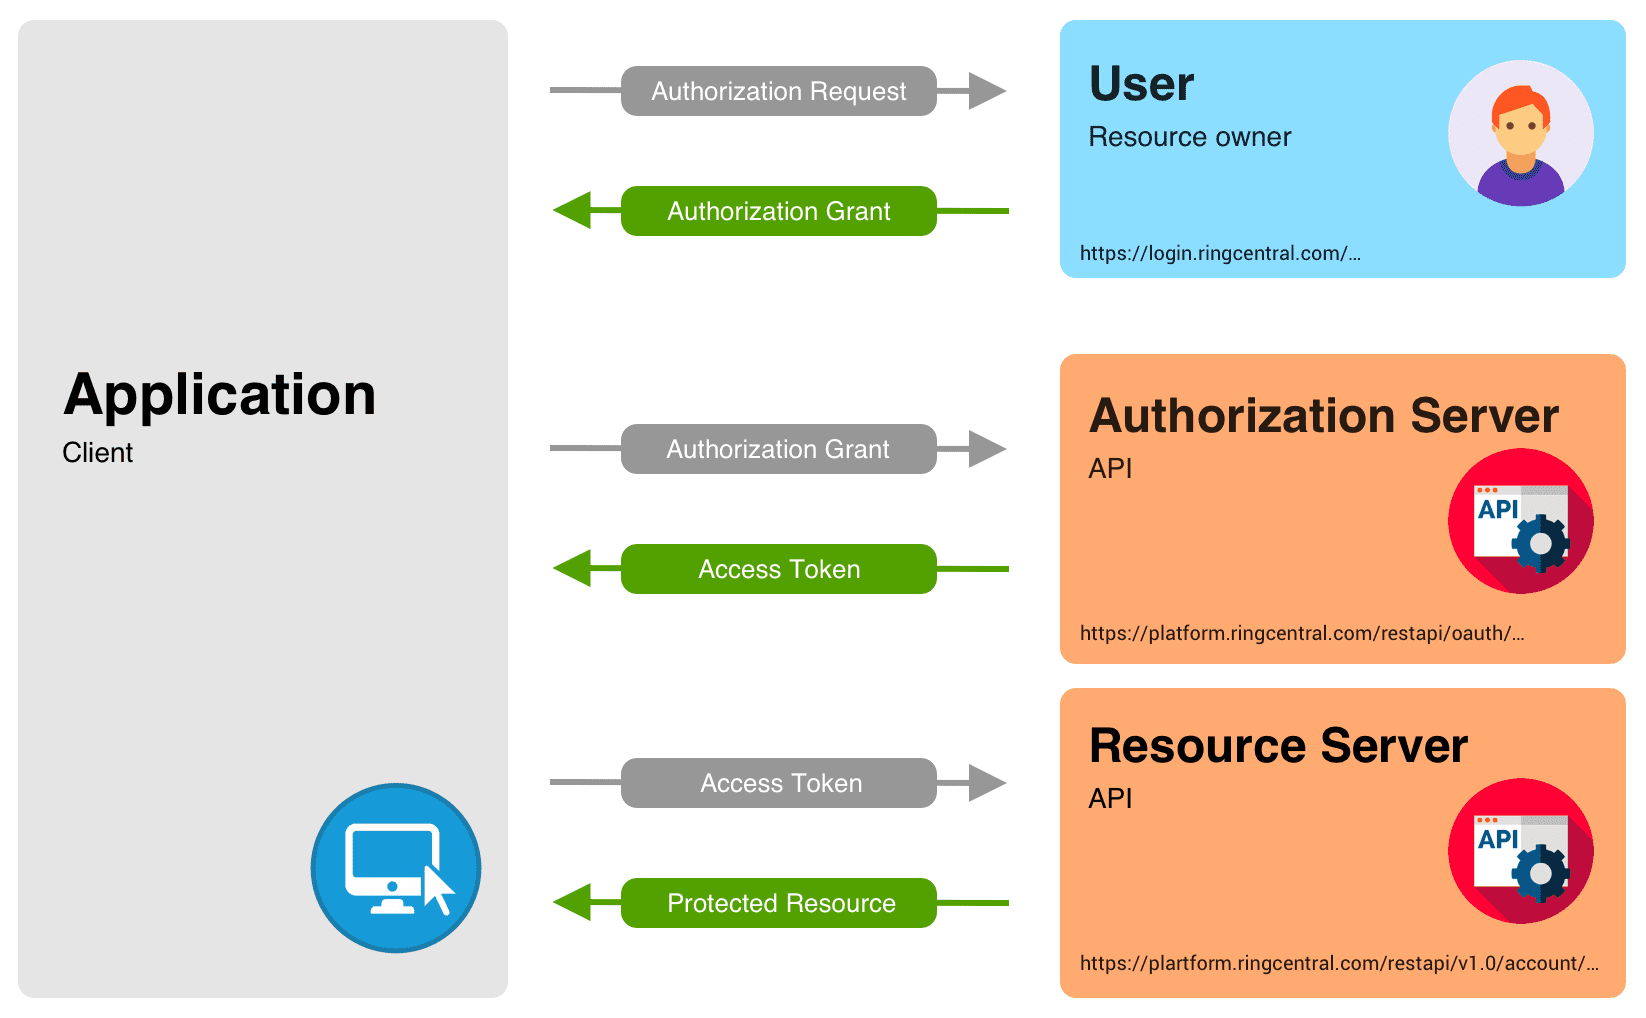
- Leg 1: The Application (Nodejs/HTML5 Web app): The application starts by opening a "login form" from the login URL as seen below. In our example, that will be the "Login with RingCentral" button that the user will click. It is important to note that when the application is first created, make sure to check the 3-legged OAuth Code Flow as the authentication scheme and provide your Redirect URL. This is the URL that the RingCentral platform will direct to upon successful authentication.
- Leg 2: User (RingCentral User): The user fills out their credentials, authorizes the application, and the application transmits the same to the RingCentral platform.
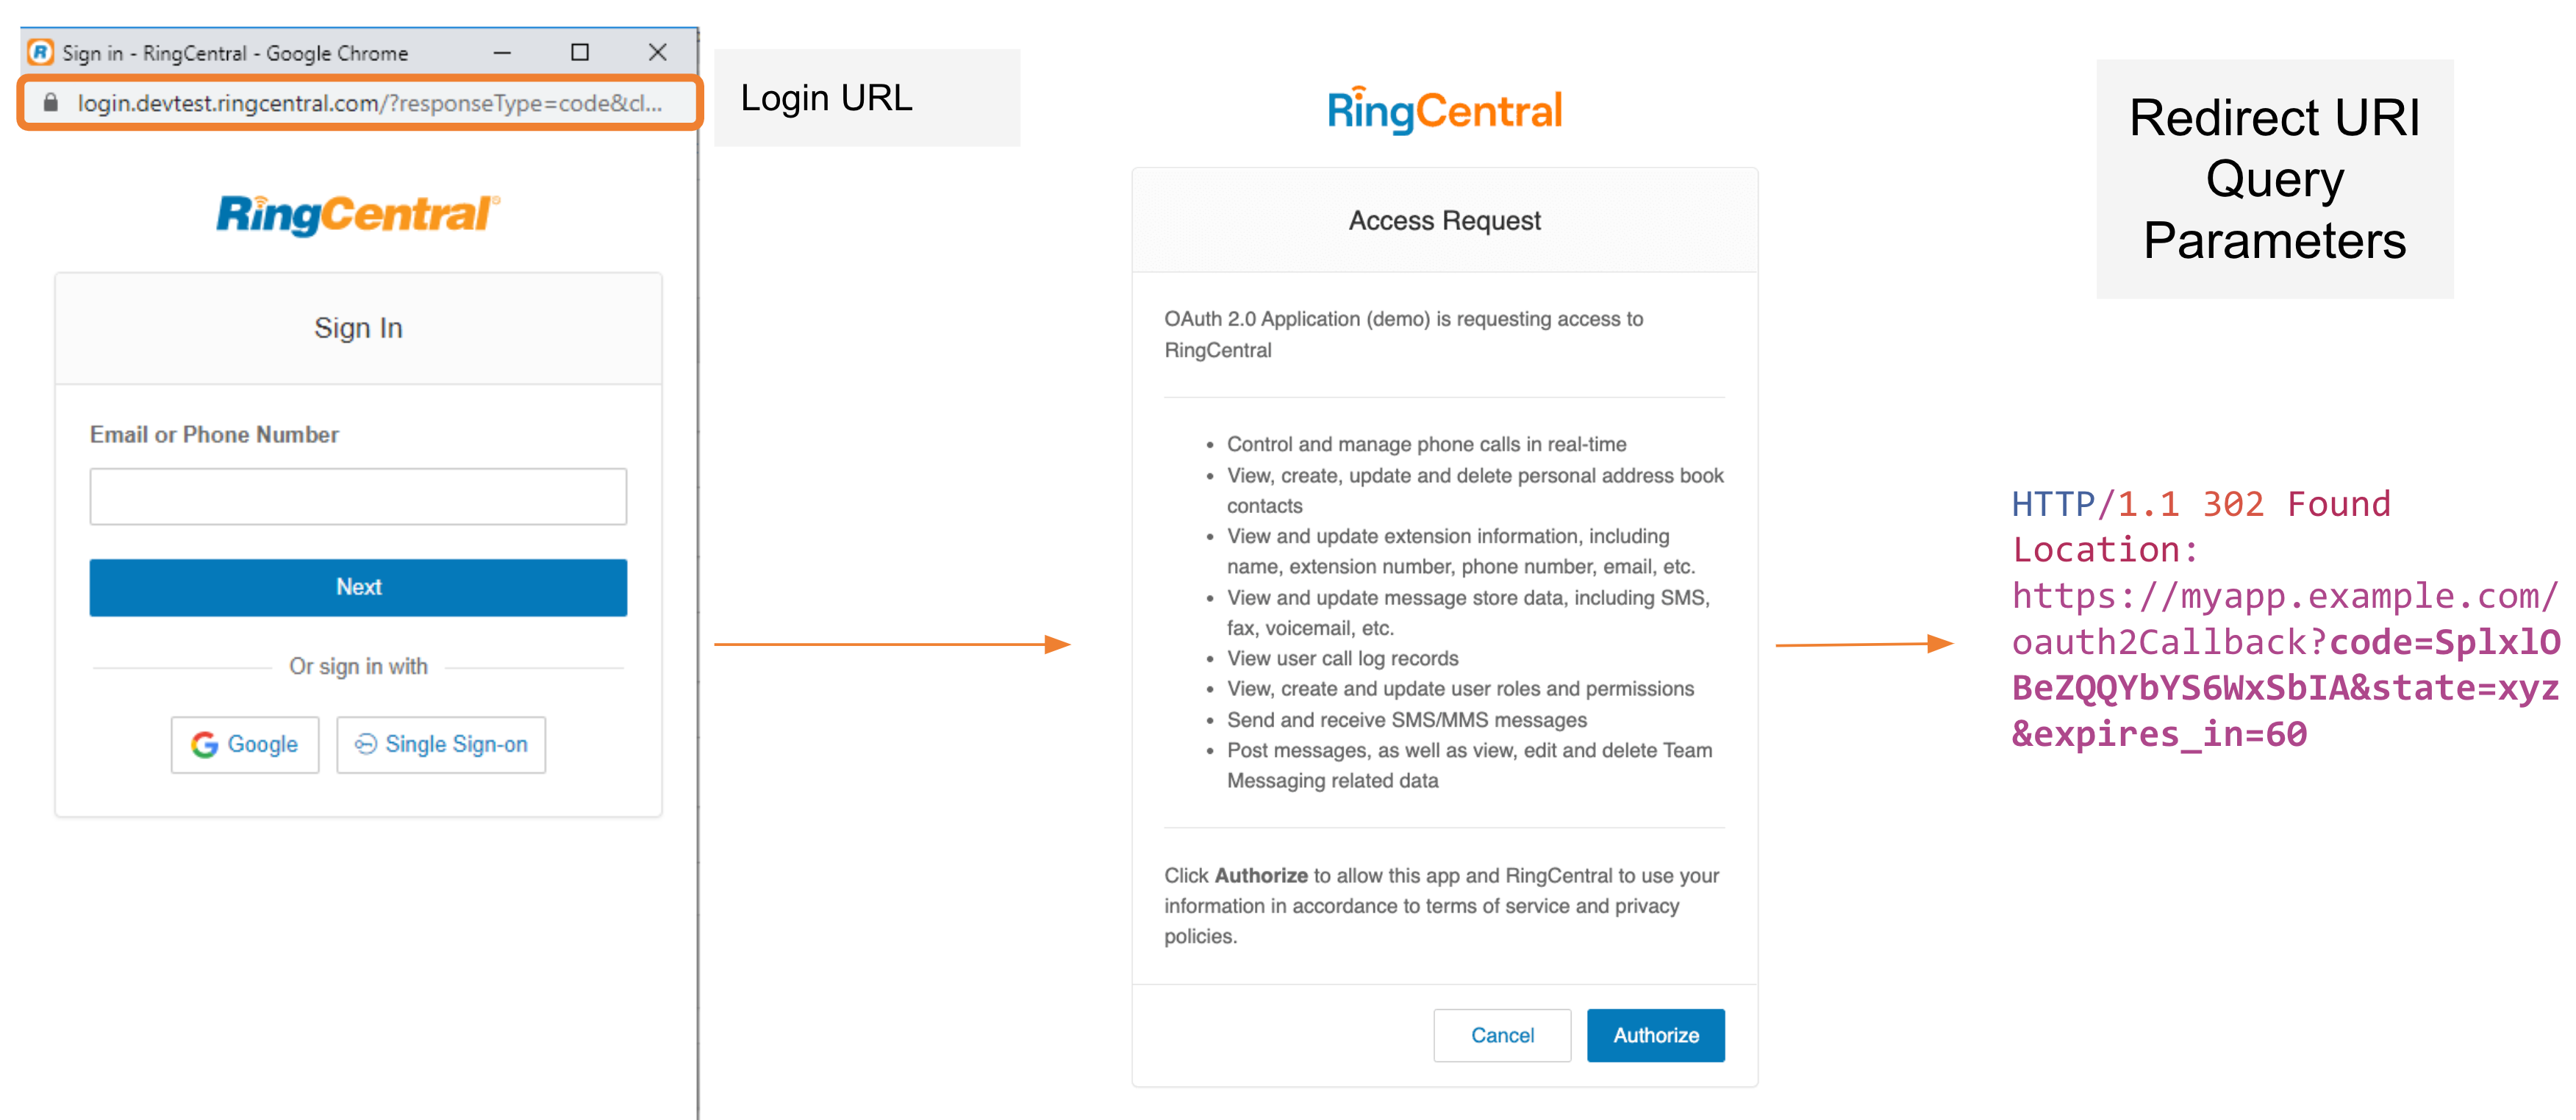
- Leg 3: API / Platform (RingCentral Platform): The platform reverts back with the "Authorization Grant Code" (highlighted in purple above) that is appended to the Redirect URI back to the application.
Acquiring Access Token
The Application then calls the RingCentral platform by providing it the "Authorization Grant Code" and receives "Access Token" and "Refresh Token," both of which expire at a certain time. It is vital that this information is securely stored.
Sample Request - HTTP Header:
POST /restapi/oauth/token HTTP/1.1
Accept: application/json
Content-Type: application/x-www-form-urlencoded
Authorization: Basic cmVsLWFsbC1wZXJtaXNzaWXFjMmpRZmlQcnlkSUkweE92QQ==

code=U0pDMTFQMDFQQVMwMXxBQUJfTVpHWk5lM29zNVFmWnNHQ01MSmJuMHJmNGlRcnRaeEptTWlPS0MzUTdYRDdSTURiaH
  BuWHZINGM2WTdqaWlBOEVhRHNxRWdJVUNYQjd4dmJsWHJoVVlWQVN2SFo2YWJPanJsRkFWZk9SMm5lek0tWnF5d3h8C3A
  nYOPxO0flEwO6Ffoq9Tlqs1s&grant_type=authorization_code
  &redirect_uri=https%3A%2F%2Fmyapp.acme.com%2Foauth2redirect
Sample Response:
HTTP/1.1 200 OK
Content-Type: application/json

{
   "access_token" : "U1BCMDFUMDRKV1MwMXxzLFSvXdw5PHMsVLEn_MrtcyxUsw",
   "token_type" : "bearer",
   "expires_in" : 7199,
   "refresh_token" : "U1BCMDFUMDRKV1MwMXxzLFL4ec6A0XMsUv9wLriecyxS_w",
   "refresh_token_expires_in" : 604799,
   "scope" : "AccountInfo CallLog ExtensionInfo Messages SMS",
   "owner_id" : "256440016"
}
Accessing Protected Data
The application then transmits the "Access Token" to make any subsequent API calls such as to access protected data from RingCentral, i.e., getting contacts from the user's address book. This can be done in any of the following ways:
Option 1: Using Bearer Scheme (Recommended)
Sample HTTP Request (HEADER):
GET /restapi/v1.0/account/~/extension/~/address-book/contact/29874662828 Authorization: BearerU1BCMDFUMDRKV1MwMXxzLFSvXdw5PHMsVLEn_MrtcyxUswHost: platform.ringcentral.com Accept: application/json Connection: keep-alive
Option 2. Using Query Parameter in the API Endpoint (Less Secure)
Sample HTTP Request (HEADER):
GET /restapi/v1.0/account/1110475004/extension/1110475004/address-book/contact/29874662828
   ?access_token=2YotnFZFEjr1zCsicMWpAA
Host: platform.ringcentral.com
Accept: application/json
Connection: keep-alive
OAuth 2.0 Auth Code Flow Implementation
In the explanation above, we covered the fundamentals of OAuth 2.0 Authorization Code Flow. Now, let's see how all of this can be easily performed using RingCentral's Node.js SDK in a Web App.
Setup
1. Create an application in RingCentral of type "REST API App" with "3-legged OAuth flow authorization code" for authentication.
2. Under "Security," add the following permissions "ReadAccounts" and "ReadCallLog".
3. Under "Authentication," make sure to specify the following as Redirect URI "http://localhost:5000/oauth2callback."
4. Download/Clone the Node.js app from GitHub.
$ git clone https://github.com/suyashjoshi/ringcentral-node-auth-client.git
$ npm install
$ nano .env
5. Inside .env file, update the following variables with your sandbox/production credentials: RC_CLIENT_ID, RC_CLIENT_SECRET, and RC_REDIRECT_URL values. Make sure not to publicly expose your application credentials by adding this .env file in your .gitignore file.
6. Run the Demo App
node index.js7. Go to http://localhost:5000 in your web browser.
8. Click "Login using RingCentral Account" and follow the wizard to authenticate.
9. Once authenticated, you will see another web app that shows "protected API endpoints." Here, click to perform any actions such as "Read Extension Info," "Read Extension Call Log," or "Read Account Call Log."
Congratulations! You now not only have a good theoretical understanding of the working of OAuth 2.0 Auth Code Flow but also have been able to build and run a web app locally that integrates with a 3rd party login: RingCentral.
Feel free to fork the app, play with it and build on it. If you have any questions, drop them in the comments.
Recommend
About Joyk
Aggregate valuable and interesting links.
Joyk means Joy of geeK